
You are using an out of date browser. It may not display this or other websites correctly.
You should upgrade or use an alternative browser.
You should upgrade or use an alternative browser.
2 Sluggo's Garage
- Thread starter rmalkow2
- Start date

Looking good so far. I like the paint highlights you added to the fenders and such. Giving it a weathered look I think?
The model is finished
")

Vieux, Great work on your finished car model. Very real looking and good details in the finish.
I am done with painting as of last night. The fuselage, wings and all the small parts are painted in the specified colors. Had to do a lot of the small stuff with just a tiny drop of paint on the small end of a wood tooth pick. But it should be ready for final assembly and a little touch up today.

I am done with painting as of last night. The fuselage, wings and all the small parts are painted in the specified colors. Had to do a lot of the small stuff with just a tiny drop of paint on the small end of a wood tooth pick. But it should be ready for final assembly and a little touch up today.
Attachments

Vieux, Great work on your finished car model. Very real looking and good details in the finish.
I am done with painting as of last night. The fuselage, wings and all the small parts are painted in the specified colors. Had to do a lot of the small stuff with just a tiny drop of paint on the small end of a wood tooth pick. But it should be ready for final assembly and a little touch up today.
I also when painting I use a toothpick
. What kind of paint do you paint the model, acrylic or nitro? Who makes this paint?I for painting models using Japanese paints and varnishes Tamiya. Here's what happened from my model of truck.

Vieux,
Jus WOW! That truck turned out great. Very realistic looking. Your painting skills are excellent right down to the wheel nuts and center caps.
I believe my paints are acrylic but as I'm away from home now I'll have to double check that. Most of the ones I bought are Testor brand model paints. I'm not sure where they are making this paint now. It is a traditional brand for many years here for model kit paints.
Spitfire Progress…..
Made a little progress this week on the current model kit but slow due to work, travel and parts of the kit that don't want to fit as well as I would like. The airplane wings had a little warp to them so I'm having to coax things into proper position.
I did get the cockpit assembled finally. It seems my fingers are much bigger than when I used to assemble these kits as a kid. The tiny parts are very hard to hold and glue in place but after multiple tries it finally came together. Cockpit seat belts were a very tiny decal that had to be coaxed into position with a tooth pick.


Here's a couple pics of the plane body top and bottom in final base paint. The top side still need the second color to break it up and give a camouflaged look. That will be a challenge.
I'm out of town for a few days on a trip to see some family members so the completion of this will wait for my return home.


Made a little progress this week on the current model kit but slow due to work, travel and parts of the kit that don't want to fit as well as I would like. The airplane wings had a little warp to them so I'm having to coax things into proper position.
I did get the cockpit assembled finally. It seems my fingers are much bigger than when I used to assemble these kits as a kid.
The tiny parts are very hard to hold and glue in place but after multiple tries it finally came together. Cockpit seat belts were a very tiny decal that had to be coaxed into position with a tooth pick.Here's a couple pics of the plane body top and bottom in final base paint. The top side still need the second color to break it up and give a camouflaged look. That will be a challenge.
I'm out of town for a few days on a trip to see some family members so the completion of this will wait for my return home.
Attachments


1/2 Cup
Member Emeritus
rmalkow, nice work and detail..
dadsEH
Well-known member
And tweezers
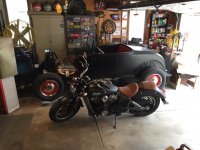
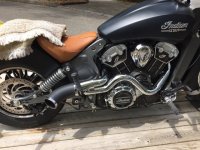
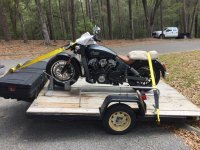
Here's what I dragged home last week while on vacation to visit family in Texas. In 5 days I drove through Ohio, Kentucky, Tennessee, Mississippi, Arkansas, Louisiana, Alabama and back up to Michigan. 2800 miles total and the final stop in Alabama was to pick up this 2016 Indian Scout for my son. This was an almost new bike with very low miles and a lot of fun to ride. Very smooth, fast and easy to shift and ride.


After riding it and then parking in my garage for the week I realized how nice the matte black paint matched my hot rod. I was almost tempted to keep it but can't do that to my my son. And I definitely don't need it just because it was fun.

By Sunday it was strapped to the back of a larger trailer for shipment to Utah where my son now lives. Got word that it arrived safely today and he is all smiles after the first of many rides.

So ends my motorcycle adventures for this week. My Harley is coming out of winter storage soon and after it gets a few maintenance items taken care of.
After riding it and then parking in my garage for the week I realized how nice the matte black paint matched my hot rod. I was almost tempted to keep it but can't do that to my my son. And I definitely don't need it just because it was fun.
By Sunday it was strapped to the back of a larger trailer for shipment to Utah where my son now lives. Got word that it arrived safely today and he is all smiles after the first of many rides.
So ends my motorcycle adventures for this week. My Harley is coming out of winter storage soon and after it gets a few maintenance items taken care of.
Attachments

A small weekend project last Saturday was to fix up one of my shop roll around seats. It was in sad shape and being a cheap HF item made in China I could have tossed it but decided to take a lesson from Vieux and add new life into one more cheaply made Chinese product.
The castors were getting loose and wobbly and the bottom tool pan (plastic) had split and warped for no real reason. I had not really abused it there but once it started cracking then any little pressure was making it worse.

Luckily the castors were just loose and could be re-tightened, lubricated and ready for continued use. A scrap piece of thin plywood was cut to form a new flat tray surface, a couple pieces of scrap wood underneath to screw into with wood screws and pull the warped plastic back into place finished that repair. Then some black spray paint helps make it look better and we are ready for this years use around the garage.


The castors were getting loose and wobbly and the bottom tool pan (plastic) had split and warped for no real reason. I had not really abused it there but once it started cracking then any little pressure was making it worse.
Luckily the castors were just loose and could be re-tightened, lubricated and ready for continued use. A scrap piece of thin plywood was cut to form a new flat tray surface, a couple pieces of scrap wood underneath to screw into with wood screws and pull the warped plastic back into place finished that repair. Then some black spray paint helps make it look better and we are ready for this years use around the garage.
Attachments


Grumblebum
Well-known member
Vieux and yourself are really romping through the model building.
I'm not a bike guy but that is one nice Indian. When is the hot rod due for a cruise ?
Cheers GB
I'm not a bike guy but that is one nice Indian. When is the hot rod due for a cruise ?
Cheers GB
1/2 Cup
Member Emeritus
The bike looks great!
I'm glad you followed my example and fixed it. As I always say - throw always have time.
Never a truer word has been spoken..
Vieux and yourself are really romping through the model building.
I'm not a bike guy but that is one nice Indian. When is the hot rod due for a cruise ?
Cheers GB
Hot Rod is due to hit the road sometime this summer. It's about 90% complete as I purchased it and due to some travel time this spring I won't get quality work time on it before May. The major tasks are to get all lights wired, fit proper door and trunk latches and swap the radiator. Unfortunately the very nice aluminum radiator in it now was selected wrong and has the outlet on the wrong side for this engine. The builder used some questionable extension hose that sort of works but I don't really like. I have another radiator that has the proper outlet and should fit the grille shell. Hopefully by July I'll be able to start enjoying it.
Strut Sunday!
This past Sunday afternoon and evening turned into a marathon event to replace all four strut assemblies on my buddy's Toyota Matrix. Sluggo #1 shares my garage space with me any time he needs a place to work and we generally have a good time on projects like this.
We ran into about every dirty, rusty, stuck bolt, hard to reach fastener, you can imagine. Had to use the saws-all, two different cut off disc tools and almost every wrench I own but about 8 hours later we finished just before 10pm.
I didn't think to take pics during the process but the garage looked like a tool bomb went off the next day. I was so tired Sunday night we just pulled everything into the garage and left some on the floor and some piled high on the bench. I put it all away again Monday after work.


Even managed to break my vintage Milwaukee electric impact wrench. Amazingly the housing just plain broke in two pieces.
But the job got done and his car rides like new again.
This past Sunday afternoon and evening turned into a marathon event to replace all four strut assemblies on my buddy's Toyota Matrix. Sluggo #1 shares my garage space with me any time he needs a place to work and we generally have a good time on projects like this.
We ran into about every dirty, rusty, stuck bolt, hard to reach fastener, you can imagine. Had to use the saws-all, two different cut off disc tools and almost every wrench I own but about 8 hours later we finished just before 10pm.
I didn't think to take pics during the process but the garage looked like a tool bomb went off the next day. I was so tired Sunday night we just pulled everything into the garage and left some on the floor and some piled high on the bench. I put it all away again Monday after work.
Even managed to break my vintage Milwaukee electric impact wrench. Amazingly the housing just plain broke in two pieces.
But the job got done and his car rides like new again.
Attachments

metalhead140
Well-known member
Great work on the model plane, and I like the Indian a lot! Reckon that roll around seat is probably better than new now, well done.
HSpencer
ALLIANCE MEMBER
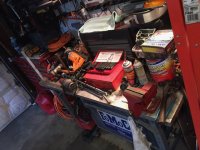
The garage is looking great with the pictures showing a huge organization of your tools and equipment. Sometimes (we all face this) there is just not enough room. That is when we do as you have, and decide if an items has the "points" with us to remain in our shop. I am getting crowded these days, and my 8X16 shed is also crowded. I like to purge out things now, and enjoy the space where I did not have any.
Your doing very well on your reorganization, and that ceiling rack is GREAT!!
Just keep up the excellent work!!
Best Regards
Herb
Your doing very well on your reorganization, and that ceiling rack is GREAT!!
Just keep up the excellent work!!
Best Regards
Herb
Duckfarmer27
Active member
Happened to notice the name of your garage - and in being led to this thread see you also build models.
You might be interested in this picture of my Uncle's P-51 back in WWII. He spent 3 years flying out of England. Named his plane Slugger, not Sluggo - family name Sluga. But I figured close enough.
Dale
You might be interested in this picture of my Uncle's P-51 back in WWII. He spent 3 years flying out of England. Named his plane Slugger, not Sluggo - family name Sluga. But I figured close enough.
Dale
Attachments

The garage is looking great with the pictures showing a huge organization of your tools and equipment. Sometimes (we all face this) there is just not enough room. That is when we do as you have, and decide if an items has the "points" with us to remain in our shop. I am getting crowded these days, and my 8X16 shed is also crowded. I like to purge out things now, and enjoy the space where I did not have any.
Your doing very well on your reorganization, and that ceiling rack is GREAT!!
Just keep up the excellent work!!
Best Regards
Herb
Thanks for the kind words Herb and for your visit here. The garage constantly goes from full and messy to then I get fed up and have to clean up and put things away. I guess that's part of life doing what we like to do on our garages.
Happened to notice the name of your garage - and in being led to this thread see you also build models.
You might be interested in this picture of my Uncle's P-51 back in WWII. He spent 3 years flying out of England. Named his plane Slugger, not Sluggo - family name Sluga. But I figured close enough.
Dale
Hey Dale,
Thanks for stopping in to my thread. I think I sort of told the story behind that name in the beginning but it definitely does not command as much respect as that of your uncle. I have total admiration for the pilots that flew in the big war and strapped into those hot rod airplanes to do battle. He is a hero for sure.
I've always loved building models since being a kid but just recently started back into it following the lead of our GJ friend over in Russia. I still have to finish the Spitfire model. Progressed stopped for awhile as I have been traveling a bunch and had some sick time in the mix as well.
Again, thanks for taking a look here at my pretty average garage.
Bob
It's been a really busy April and May so far so I'm behind here not just in posting progress but also just getting things done. There has been lots of April and May travel involved and one whole lost week sick with a really bad tooth infection that is now cleared up with some additional dental visits in my future to fix things more permanently.
My son runs the Boston Marathon almost every year now and this year we were celebrating his 10th running of the event so I went big on the accommodations for the family that attended. Rather than the usual basic motel room, I rented a 47 foot houseboat/converted trawler docked right in Boston Harbor. It was a beautiful location near the North End and Little Italy. Close to the T and easy walking distance to many downtown sights. Just an awesome family time where we could all stay on the ship, cook and eat our meals together and had perfect weather for staying on the water. That was Easter weekend as well this year and of course Patriots Day in Boston.


Glad to say the Hooptie Van ran great for this trip. Before leaving I had replaced both outer tie rod ends which tightened up the steering like new and it ran smooth all the way there and back home. It was also useful to have there for local sightseeing with 7 people in attendance.
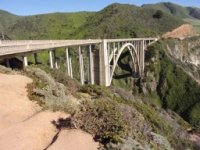
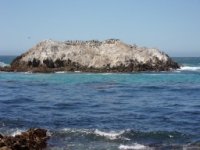
Barely 2 weeks later it was off to California for the running of the Big Sur Marathon. This is my son's second year doing both back to back as a special challenge. He's crazy I think but hey, he loves to run and see if he can do things like this.

Just beautiful scenery along the coast line as we drove Highway 1 from Monterey down to Big Sir and back. Did the 17 Mile Drive and checked out Pebble Beach, The Bird Rock and that famous tree used for the Pebble Beach logo. The coastline views are just amazing.


He ran good times in both races just a little over 3 hours and I am very proud of him for these accomplishments. So glad I'm able to go and cheer for him and watch these races. But, the travel has worn me out and am also glad to be home for awhile to get things sorted here a bit as summer approaches.
My son runs the Boston Marathon almost every year now and this year we were celebrating his 10th running of the event so I went big on the accommodations for the family that attended. Rather than the usual basic motel room, I rented a 47 foot houseboat/converted trawler docked right in Boston Harbor. It was a beautiful location near the North End and Little Italy. Close to the T and easy walking distance to many downtown sights. Just an awesome family time where we could all stay on the ship, cook and eat our meals together and had perfect weather for staying on the water. That was Easter weekend as well this year and of course Patriots Day in Boston.
Glad to say the Hooptie Van ran great for this trip. Before leaving I had replaced both outer tie rod ends which tightened up the steering like new and it ran smooth all the way there and back home. It was also useful to have there for local sightseeing with 7 people in attendance.
Barely 2 weeks later it was off to California for the running of the Big Sur Marathon. This is my son's second year doing both back to back as a special challenge. He's crazy I think but hey, he loves to run and see if he can do things like this.
Just beautiful scenery along the coast line as we drove Highway 1 from Monterey down to Big Sir and back. Did the 17 Mile Drive and checked out Pebble Beach, The Bird Rock and that famous tree used for the Pebble Beach logo. The coastline views are just amazing.
He ran good times in both races just a little over 3 hours and I am very proud of him for these accomplishments. So glad I'm able to go and cheer for him and watch these races. But, the travel has worn me out and am also glad to be home for awhile to get things sorted here a bit as summer approaches.
Attachments


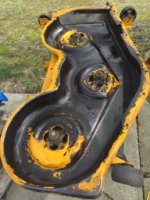
First job on the list after coming home from Cali was to get the lawn cut which meant getting the mower deck cleaned up and ready to use. It has needed a good thorough cleaning and paint job underneath for a long time.

First step was hand scraping all the big chunks of caked on grass and dirt, then using the cup wire brush on an angle grinder to get it down to clean bare metal. Cleaned with some brake cleaner and then coated with some Permatex rust preventer on all the bare metal.

Followed by a couple coats of gloss black paint which is what I had handy. Sharpened blades and cleaned and painted them also.

I also replaced the worn guide wheels with new ones so the deck should run true again. The old ones were many years in service indefinitely worn flat on one edge.

Put the deck back on the lawn tractor and proceeded to my first cutting of the year which went great and gave the scruffy looking grass a nice even haircut.
Before:

After:

First step was hand scraping all the big chunks of caked on grass and dirt, then using the cup wire brush on an angle grinder to get it down to clean bare metal. Cleaned with some brake cleaner and then coated with some Permatex rust preventer on all the bare metal.
Followed by a couple coats of gloss black paint which is what I had handy. Sharpened blades and cleaned and painted them also.
I also replaced the worn guide wheels with new ones so the deck should run true again. The old ones were many years in service indefinitely worn flat on one edge.
Put the deck back on the lawn tractor and proceeded to my first cutting of the year which went great and gave the scruffy looking grass a nice even haircut.
Before:
After:
Attachments


The next project to tackle was some long awaited service to my car hauler trailer. I purchased this last fall and used to once to help a friend and then winter cam and it was put away for a long cold sleep.
Well it needed to come back out recently to help a friend move his tractor from home to a community garden plot that he plows so out it came and given a quick once over and checked all tire pressures we moved the tractor. But it needed lights and other improvements and until now I was using a set of cheap HF magnetic mount lights. Well on my way home and less than 1/2 mile from home I het some bumps and they fell off and I dragged then a ways before noticing. Not very strong magnets.
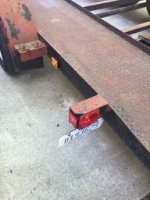
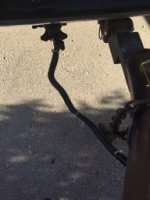
So task 1 was to install all new lighting on the trailer permanently. I bought a light kit and proceeded to remove the old wiring and lights with cracked lenses and way too many splices in the wiring, some with those dreaded little squeeze splices that I hate.
Off with the old:

Ran all new wiring with the minimum number of splices and those were soldered and securely taped. Now I have good working tail lights and a couple extra amber side markers as well.


And….. I did not use any of these things supplied with the light kit.

Ready for the next job this summer whenever that happens.
Well it needed to come back out recently to help a friend move his tractor from home to a community garden plot that he plows so out it came and given a quick once over and checked all tire pressures we moved the tractor. But it needed lights and other improvements and until now I was using a set of cheap HF magnetic mount lights. Well on my way home and less than 1/2 mile from home I het some bumps and they fell off and I dragged then a ways before noticing. Not very strong magnets.
So task 1 was to install all new lighting on the trailer permanently. I bought a light kit and proceeded to remove the old wiring and lights with cracked lenses and way too many splices in the wiring, some with those dreaded little squeeze splices that I hate.
Off with the old:
Ran all new wiring with the minimum number of splices and those were soldered and securely taped. Now I have good working tail lights and a couple extra amber side markers as well.
And….. I did not use any of these things supplied with the light kit.
Ready for the next job this summer whenever that happens.
Attachments


1/2 Cup
Member Emeritus
rmalkow give your son a big high five for his efforts...
Thank you for sharing some awesome pictures as well.
Busy, busy by the looks of things..
Top job on the lawns as well
Regards
Thank you for sharing some awesome pictures as well.
Busy, busy by the looks of things..
Top job on the lawns as well
Regards
ajohno
Well-known member
Great job rmalkow. It's always nice to get those jobs out of the way.
Thanks guys!
The next tasks on the car hauler was to start freshening up the look a bit with a new paint job and the addition of a tongue tool box. Geez, it's bad when you almost forget you bought the aluminum tool box back during winter and start looking for another one to buy. Had a senior memory issue for a couple days until I discovered where I had stashed this box. Glad I didn't buy an extra.
So far the front tongue section got wire brushed good and painted with some Rustoleum Matte Black I had on the shelf. Old school time with a paint brush but will give the old beast a new look when I get all the way around.


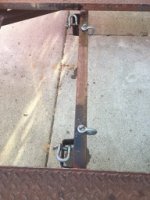
I also have added some shackles to the frame that will make it much easier to hook ratchet straps when carrying a load. So far I've added 4 connection points to the front and also to the back. I'll probably add a few more at strategic spots to allow for strapping down any size load.

More improvements coming with the future addition of a new winch.
The next tasks on the car hauler was to start freshening up the look a bit with a new paint job and the addition of a tongue tool box. Geez, it's bad when you almost forget you bought the aluminum tool box back during winter and start looking for another one to buy. Had a senior memory issue for a couple days until I discovered where I had stashed this box. Glad I didn't buy an extra.
So far the front tongue section got wire brushed good and painted with some Rustoleum Matte Black I had on the shelf. Old school time with a paint brush but will give the old beast a new look when I get all the way around.
I also have added some shackles to the frame that will make it much easier to hook ratchet straps when carrying a load. So far I've added 4 connection points to the front and also to the back. I'll probably add a few more at strategic spots to allow for strapping down any size load.
More improvements coming with the future addition of a new winch.
Attachments
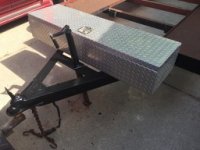


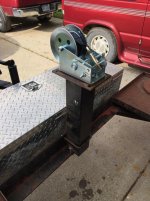
Latest addition to my car hauler trailer is a 3000lb two speed hand winch. It will never pull that much weight but I like to have extra capacity for safety and wanted the woven strap style rather than wire rope. I fabbed up a mount for it yesterday and we'll see how it works later today. I'll be bringing home a new project for the garage but more on that later………….

Attachments
1/2 Cup
Member Emeritus
rmalkow, your winch looks the goods.
I prefer a woven strap as well, you may consider a canvas cover if you are leaving it out side as they do deteriorate over the years.
A new project, interesting..
Regards
I prefer a woven strap as well, you may consider a canvas cover if you are leaving it out side as they do deteriorate over the years.
A new project, interesting..
Regards
Grumblebum
Well-known member
Looking good RM. How long do we have to wait to see what you are bringing home ?
GB
GB
rmalkow, your winch looks the goods.
I prefer a woven strap as well, you may consider a canvas cover if you are leaving it out side as they do deteriorate over the years.
A new project, interesting..
Regards
Looking good RM. How long do we have to wait to see what you are bringing home ?
GB
I do need to make some sort of cover for the winch. For long term storage it will unbolt and can be stored out of the weather but, there will be those times that it spends some time out on the trailer.
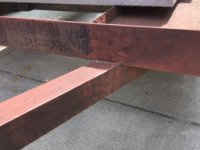
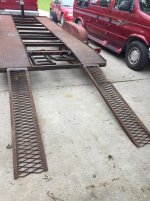
The new project vehicle is coming but, first I had to make one more improvement. The original ramps on this trailer were pretty beat up by the prior owner and one has a good curve bent into it by some piece of heave equipment.
I've had some longer ramps from a prior GS purchase and they needed a little attention. The top end needed some angle iron caps and a second piece of angle to form the lip that will hook onto the trailer. A spare length of angle and my trusty portable band saw made short work of cutting the required pieces.
Then some much needed practice at welding and the top of the ramps were ready. At the bottom a simple trim of the side rails at the proper angle to meet with the ground and they are ready to go. The expanded metal center sections is in pretty good shape and very heavy gauge. Some day I'll add a little more support for the heavier loads and then get these sand planted and painted for a better look. The immediate need was to make them functional.
Attachments

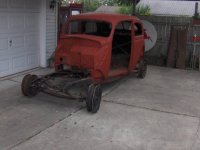
Time to unveil the latest project I've brought home. It's a 1937 Ford Tudor Slant Back Sedan. I now have most of the sheet metal plus various other parts that have come from two different sources locally. All that remains is the rear fenders which I have a source for and hopefully will get this coming week. Very hard to find vehicle especially in my area. Usually I have to drive a 1000 miles or more to get such vehicles so this was a huge bonus to find local to the Detroit area and only need to drive a short distance to haul it home.
The front clip came from one source that had a "complete" vehicle but the rest of the body was very rusted and trashed. They wanted too much money for the condition so I made a deal on the front clip.
The body came from a very nice and talented gentleman and retired hot rod builder. He was going to build this sedan but then bought a '37 coupe and decided to go that direction for his personal vehicle. He made me a super deal and then found extra parts he had and tossed them into the deal.
And the trailer made the job super easy as well.
After looking it all over and making a deal on Friday I had to then finish getting all those trailer modifications done to pick up the body on Saturday. It is basically a rolling vehicle on the original wheels and my new hand winch made easy and short work of pulling that up onto the railer via my rebuilt ramps.
Got it home and today had to loosely set the front clip in place to get that overall look in mind. So here are a few pics.


This is no immediate project for me but rather the beginning of a much desired vehicle build that I will save for the future. I did not plan to buy all this stuff right now but cars like this are very hard to find especially at bargain pricing and so you have to buy when you see them or they are gone. So maybe in a year or two I can get started on one of my all time favorite Ford vehicles. I've always loved the styling of a '37. The grille is one of their best ever and the Tudor Sedan to me is a beautiful shape. It's one of the few vehicles I actually like with fenders.
The front clip came from one source that had a "complete" vehicle but the rest of the body was very rusted and trashed. They wanted too much money for the condition so I made a deal on the front clip.
The body came from a very nice and talented gentleman and retired hot rod builder. He was going to build this sedan but then bought a '37 coupe and decided to go that direction for his personal vehicle. He made me a super deal and then found extra parts he had and tossed them into the deal.
And the trailer made the job super easy as well.
After looking it all over and making a deal on Friday I had to then finish getting all those trailer modifications done to pick up the body on Saturday. It is basically a rolling vehicle on the original wheels and my new hand winch made easy and short work of pulling that up onto the railer via my rebuilt ramps.
Got it home and today had to loosely set the front clip in place to get that overall look in mind. So here are a few pics.
This is no immediate project for me but rather the beginning of a much desired vehicle build that I will save for the future. I did not plan to buy all this stuff right now but cars like this are very hard to find especially at bargain pricing and so you have to buy when you see them or they are gone. So maybe in a year or two I can get started on one of my all time favorite Ford vehicles. I've always loved the styling of a '37. The grille is one of their best ever and the Tudor Sedan to me is a beautiful shape. It's one of the few vehicles I actually like with fenders.
Attachments


taumac
Well-known member
Yep, all you need is alittle buffing and some air in the tires and you'll be all set. LOL. Wow, a lot going on and what a cool project. I'm so so jealous of your vintage cars. One of these days I'll have a cool project like that.
1/2 Cup
Member Emeritus
rmalkow, absolutely fantastic...
Grumblebum
Well-known member
That's way cool RM. 
Assuming one of the flathead motors you recently acquired will be destined for it ?
GB
Assuming one of the flathead motors you recently acquired will be destined for it ?
GB
That's way cool RM.
Assuming one of the flathead motors you recently acquired will be destined for it ?
GB
Well time will tell that story. One would certainly fit as that was the original motor used in a '37. The flathead motors I have now are first and foremost learning tools until I can assess whether any of them can really be revived to run again. But to have a hopped up flathead back in that '37 someday would certainly be cool.
Thanks guys for the comments and stopping in here.
Bob Heine
ALLIANCE MEMBER
I was about 6 years old (1950) when our next door neighbor (car-nut) pulled up in a 1937 Ford 4-door convertible sedan. I instantly fell in love with the car and it was my go-to "draw a picture of a car" for many years. It had faded red paint that was close to the color of rust that went with the nasty-looking top but it just spoke cool to me (before I knew what cool was).
Nice memory Bob and I can understand why you wanted t draw that car with it's very fluid lines. That would have been the Phaeton model. Here's a picture of one very nice example.
Another very rare vehicle. Wouldn't this be the best fun ever to take the family out on a sunny day with the top down.

Another very rare vehicle. Wouldn't this be the best fun ever to take the family out on a sunny day with the top down.
Attachments

Well, just when I think I should stop dragging old things home then I look in Craig's List and find a deal.
I was outside working all day yesterday and just came in for a short water break and to cool off a bit and of course I can't sit still without checking CL. My local area Free Section first and up pops this ad only 43 minutes old for a smaller old tire changer. I've wanted one for years but usually you see the really large heavy commercial ones and they are just too big for me and, usually too expensive for my wallet.
Well this one had the right price of free and I was the first caller to get through to the owner. Got his address and 25 minutes later was at his barn and loading this into the truck. It remains to be seen if it can live again and what it will cost to repair it. It's all air powered and he stopped using it because it leaked. So hopefully some new seals in various places will solve the problem. Time will tell and at least its complete with all the hand tools.

