To avoid these ads, REGISTER NOW!

20' workbench and tool storage

NakeDiesel

Well-known member
Joined
Sep 6, 2007
Messages
2,727
Location
oklahoma
I've finally gotten around to building a real workbench for the 20' section of wall where I have my whiteboards. The bench is 20' long by 29" wide and 40" tall, will have 3 harbor freight 44" tool boxes, clamp storage, drill storage, air tool storage, air outlets on top and a hose reel and additional shelves for other storage and some pull out drawers.

This is the design I put together in Google Sketchup to figure out how I wanted to lay out the workbench

15511439687_9c3aa94973_b.jpg


Cutting out the pieces for the "A" frames

15696344905_68057e66ce_b.jpg


Getting the "A" frames put together, built 8 of them total

15697944692_6ab00dbcbb_b.jpg


I used 1 1/2" x 1 1/2" angle for the upper rail to tie the "A" frames together

15076394954_c290d1f182_b.jpg


15696337515_422d8078cf_b.jpg


All of the "A" frames welded in place

15510956268_793d13400f_b.jpg


Laying out the tool box support/braces for the first toolbox section

15510461159_37d8b8159f_b.jpg


15511146937_4b90c2a7bc_b.jpg


The first between section lower drawer sliders

15694423861_d5089a0cff_b.jpg


Where the drawer goes, I wanted a place to store all my drills and like devices in holsters. So I took some 4" pvc pipe and notched them out and mounted them with self tapping screws

15132702644_fa44d72ed3_b.jpg


Drill holsters done, mounted and painted

15567480727_b8c76bdccf_b.jpg


15567825760_9123eb27d6_b.jpg


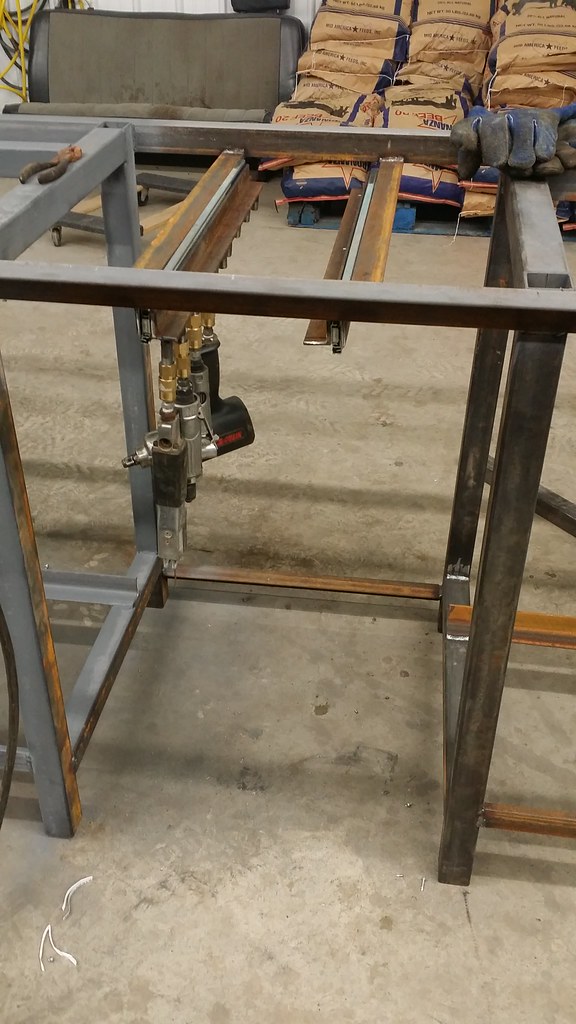
The second cubby hole, I wanted for air tools, so I used another set of slides and some angle iron and some 3" x 1/4 ******* and cut the ******* in half and welded them onto the angle

15591975768_0543fe39e4_b.jpg


15775531691_6686660ff2_b.jpg


15777400805_dc303677ed_b.jpg


Painting some more parts of the work bench

15598593869_051bba2109_b.jpg


In the air tool section I also wanted to add a 50' retractable air hose that will plumb into my main air lines

15179104453_2faf987e2e_b.jpg


15613385357_acba735bae_b.jpg


15800127982_f58dbdda7f_b.jpg


The two end sections, I wanted just open storage with shelves. I have some left over diamond plate that I will cut to make the two shelves and attach via self tapping screws

15179131613_91be37ee3c_b.jpg


Painting it all

15798576155_f46a147c02_b.jpg


15800139152_699ceea0fe_b.jpg


Notice the bars on this end, those are for storing all my c clamps and welding clamps and whatever else I can hang off of it.

15613731190_89e1430eb1_b.jpg


15798570735_9387d4ab62_b.jpg


15613728030_3baea07430_b.jpg


This brings us to today in the build. Today I set one end up on a moving dolly and the other end up on a floor jack and rolled it to it's new home area

15187591663_1dd658ea22_b.jpg


Then my son and I spent a few hours disassembling and inserting all three tool boxes into the frame from the top with my cherry picker

15808614092_e5889b150c_b.jpg


15621853297_61cce2815a_b.jpg


15622191160_59738926d6_b.jpg


15621849397_da7657a2b2_b.jpg


The top is going to be made out of 2 layers of 3/4 inch plywood glued then screwed in from underneath on the angle iron pieces

15783372296_ae9264c815_b.jpg


15622185870_84d08abbc7_b.jpg


15621631308_ec9ddcea50_b.jpg


15808601692_f4fa60f535_b.jpg


15187573023_610719d3af_b.jpg


I'm hoping to get it finished up tomorrow, I need to pick up some 1 1/2" wood screws and some 1/4" t's to plumb the air lines for the hose reel and the two coiled air lines I want on the top side of the work bench.

I still need to make one more drawer out of angle iron for the air tool section so i can store my jack stands there.
 
To avoid these ads, REGISTER NOW!
OP
N

NakeDiesel

Well-known member
Joined
Sep 6, 2007
Messages
2,727
Location
oklahoma
Thanks, the Camaro is a long term project and has been sitting like that since 2008 when I sand blasted and coated it in epoxy before I moved back to Oklahoma. I've owned it since I was 14, so that's 28 years now. It will eventually be turned into a pro touring type of car with all the modern niceties in it. I have a mud race truck to build this winter for my Daughter still to do, including a full paint job of neon green. And I have to change the gears out on my race truck, rebuild the th400 again and fix some other stuff that needs attention on it.

I'm planning to eventually put a stainless steel top on the bench when I get the time and extra money.
 

sberry

Banned
Joined
Jun 18, 2005
Messages
35,747
Location
Brethren, Michigan
I was trying to critique it and in the end not sure if I would do it this way and things look different early on, change a bit as the shop matures but this whole scheme is pretty good and even would lend itself to remodel down the road with very little effort. Could always pretty much be sawed in 2 or 3 pieces and not hard to add or remove features.
The location looks like its probably going to make it super convenient.
 

-Brent-

Well-known member
Joined
Dec 23, 2009
Messages
4,709
Location
Utah
Awesome bench! Nice work.

If you can keep a 20' bench from accumulating a mess of items you'll deserve an award. I have what seems to be a 20th of this space and it still accumulates "stuff." I wouldn't allow myself to have such an awesome bench. :D
 
OP
N

NakeDiesel

Well-known member
Joined
Sep 6, 2007
Messages
2,727
Location
oklahoma
I looked at a lot of threads, Steve0's included and searched for ideas on the intertube as well when designing it. For the last 2 years, I've been using these shelves for a piled up workbench in that same area.

15469016528_1555c4b351_b.jpg


I have a welding table (when it's cleaned off) with a 3/8" plate top to beat the **** out of stuff on and have a vice and drill press mounted on it.

This workbench spans the first two bays in the shop with lighting already installed over it with 4 double sets of outlets on 2 - 20amp breakers as well as whiteboard above it for notes and random drawings.

I've had the structure for the shop up for almost 2 years now and already rebodied my 96 dodge to a 46 power wagon body in it and did a body swap on a 91 dodge w250 with a body from a 91 d150 including complete paint inside and out. We are working on a 68 chevy shop truck getting it to a drivable state from being sitting for almost 10 years and turning an 82 chevy short wide bed into a mud racing truck for my daughter.

Here's a pano of the shop I took last year

11988305095_3e35961e2a_b.jpg


And the shop floor plan:

10210668374_6b0ffc22c4_b.jpg
 
Last edited:

CNGsaves

Well-known member
Joined
Sep 26, 2012
Messages
13,233
Location
KS and OK
Great work and unique solutions.

Big plus is all your tools are secured in one area. With the tough steel frame, you could even fab some locking bars across the front, if necessary.

Gotta call your creation . . . . . Steevo II :thumbup:
 
To avoid these ads, REGISTER NOW!
OP
N

NakeDiesel

Well-known member
Joined
Sep 6, 2007
Messages
2,727
Location
oklahoma
Awesome bench! Nice work.

If you can keep a 20' bench from accumulating a mess of items you'll deserve an award. I have what seems to be a 20th of this space and it still accumulates "stuff." I wouldn't allow myself to have such an awesome bench. :D

This is the reason I built the bench with 3 tool boxes and added 4 metal shelves (2 in the compressor room and 2 out in the shop) and 2 14' tall x 20' long pallet racks and a 6' tall 10' pallet rack to get things organized and actually have enough storage for all my tools that were piled up. The pallet rack storage is pretty organized now, with tubs for house electrical, car electrical, parts by vehicle, hose pieces, plumbing fittings, etc...
 

RogueFab

Well-known member
Joined
Jun 27, 2013
Messages
430
Location
Oregon
Very nicely done. I would use some 2" flatbar or hardwood to trim the sides on that plywood top, and it will look ****. Slick bench man.
 
OP
N

NakeDiesel

Well-known member
Joined
Sep 6, 2007
Messages
2,727
Location
oklahoma
Very nicely done. I would use some 2" flatbar or hardwood to trim the sides on that plywood top, and it will look ****. Slick bench man.

I plan on eventually covering it with stainless steel, I'll bend it down over the lip on 3 sides when I do that and it will be ultimately finished then.
 

bcbsox

Active member
Joined
Oct 22, 2008
Messages
30
Location
Waynesville, MO... until I get back to AK
Looks great! Excellent use of space and neat ideas.

One note; why not use ABS pipe for the elec hand tool storage? It's already black. No issues with paint chipping.

I would love to build something like this. Even half the size. Moving every three years kinda prohibits that... Someday!
 

ishiboo

Well-known member
Joined
Oct 27, 2010
Messages
9,481
Location
Oshkosh, WI
Looks great! I would remove the US General badges since they are half-covered. There are no holes behind them.
 
OP
N

NakeDiesel

Well-known member
Joined
Sep 6, 2007
Messages
2,727
Location
oklahoma
Yeah, I thought of removing the badges, but after I had them put in their frames so I'm not going to worry about it now.

Didn't get a whole lot done tonight due to late getting home from work and feeding animals before dark, but I did get started on plumbing the air lines in the bench while my son was putting the screws into the top that we have done so far.

15814845101_0857388765_b.jpg


15196766784_14cd4b8683_b.jpg
 

White 99

Well-known member
Joined
Jul 5, 2009
Messages
285
Location
Northern CA
I plan on eventually covering it with stainless steel, I'll bend it down over the lip on 3 sides when I do that and it will be ultimately finished then.

Are you going to put a back splash on? Could the metal top be bent to include a back splash?

Very nice bench and shop.
 

2nrguy

Well-known member
Joined
Sep 24, 2014
Messages
158
UM going to 'borrow' the air tool on rails idea. AW hell, might just borrow the WHOLE idea!!
 

BSAschields

Well-known member
Joined
Jan 27, 2011
Messages
450
Location
East Coast
UM going to 'borrow' the air tool on rails idea. AW hell, might just borrow the WHOLE idea!!

I agree - REALLY NICE !!!

(as soon as the boss releases me for the Deck and Kitchen remodels) Then its back to the garage !! Could be a 20 foot bench in my (distant) future :dunno:
 
OP
N

NakeDiesel

Well-known member
Joined
Sep 6, 2007
Messages
2,727
Location
oklahoma
Just a quick update from the little bit of time I got to spend out there last night as I had to haul a bull to be butchered after work. I have the two top air lines plumbed and tied in together with the 50' hose reel. I need to pick up another 5' of 3/8" hose to finish up the run to where I'm tying it into my 3/4" black pipe and the air lines will be tested. Should be able to pick up the hose tomorrow. The top is all attached now as well. Will start sanding it tonight and picked up some black stain/sealer yesterday to coat it with. Once that's done, the bench will be moved into place and I can start stuffing it with tools.
 
OP
N

NakeDiesel

Well-known member
Joined
Sep 6, 2007
Messages
2,727
Location
oklahoma
Got the air lines plumbed into my main line and fighting with leaks for the two coil lines at the valves. Had them tefloned, leaked real bad so I pulled them back apart and applied rector seal (what I used on all my other pipe lines) and fixed most of the leaks but still have a small one I need to deal with.

Finished sanding the plywood and applied the first coat of black stain / sealer to it. I will let it dry today and apply a second coat either tonight or in the morning, then it's ready to move into it's home and be filled up with tools.

15843934941_d9a607749e_b.jpg


15845929505_46636be1f1_b.jpg
 
To avoid these ads, REGISTER NOW!
Top Bottom