To avoid these ads, REGISTER NOW!

20x23 2-Car

OP
C

calereeves

Well-known member
Joined
Dec 31, 2012
Messages
87
Location
Eagle River, Alaska
I just moved here from Georgia in July, probably passed you along the Alcan. it's been strangely warm today, ice is getting pretty bad from the rain... I'd much rather be in Reno until spring, though!
 
To avoid these ads, REGISTER NOW!

adam728

Well-known member
Joined
Aug 9, 2009
Messages
2,900
Location
Michigan
As far as the torsion springs, you can do it yourself as long as you have two good arms, and a couple of pieces of Rebar or steel bar that fits in the hole of the hub. You need two pieces of rod. Insert, turn, hold while you insert the other bar, lather, rinse, repeat.

I've always used two 3/8" extensions, works great for me.
 
OP
C

calereeves

Well-known member
Joined
Dec 31, 2012
Messages
87
Location
Eagle River, Alaska
Really?!? I finally got the light hung, ran the final wire for the last light on the line, then cut the hole for the final light wiring to be pulled down through. Only to find that there was insulation above the ceiling on this one...uhoh. Lifted the insulation and found out that I was on the outside of another beam, and the joists had changed directions in this section AGAIN! You friggin serious?! I had to cut another LARGER hole to get the drill into the ceiling again, and punch a hole for the wire.... found out while doing that I was drilling through a 6" thick beam.... and my drillbit was only about 4.5." Gahhhhh!!!!!

I managed to dig through some stuff and find a 3/4" butterfly bit, punched the hole, and then realized that there was NO WAY to mount the light along the same line as the others because I wanted to run it parallel with the joists in this section, dead center between them. I guess I could have gone and gotten the drywall anchors...that would have been the smart solution, but I didn't think of that until just now. Figures. So I moved the light about 8" to the right of where I wanted it mounted and screwed it to the joist.

At least now the main lighting is finished, but I've found that lighting is strangely addictive. Once I finish my built-in cabinets overhead, I think I'm going to run three flush-mount fixtures in the bottom of the cabinets to brighten up the center section of the garage. Once the cabinets are built in I can already tell I'm going to have some pretty bad shadows between the two rows. Good thing I know where every dadgum joist in the garage runs now for connection to the cabinets!

Edit: I'll be patching the holes this week after I pick up some drywall supplies. I'm going to drywall the built-ins so I'll be picking up supplies for them anyway.
 

Attachments

  • insulation.jpg
    insulation.jpg
    161.6 KB · Views: 36
  • both on.jpg
    both on.jpg
    148.6 KB · Views: 44
OP
C

calereeves

Well-known member
Joined
Dec 31, 2012
Messages
87
Location
Eagle River, Alaska
After a trip to Lowe's I'm equipped with the lumber and brackets to frame out my cabinets. My wife was with me, so I didn't want to get the plywood and drywall and give her a hint of sticker shock :) I'll frame it out this weekend and hopefully be ready to go buy the plywood and drywall next week after work one day.
 

Attachments

  • 34564376.jpg
    34564376.jpg
    113.7 KB · Views: 31
OP
C

calereeves

Well-known member
Joined
Dec 31, 2012
Messages
87
Location
Eagle River, Alaska
I had a Daddy-Daughter dance last night and another family function tonight, so no progress today. Other than the new recreational addition :) I had the black mini fridge--the ubiquitous "beer fridge" is now sitting on a beer mug freezer. I found a Caravell "Ice Cream Freezer" on craigslist for $50. Makes a perfect base to raise the beer fridge to a more ergonomic entry angle, and provides immediately adjacent and plentiful storage for my frosty beer mugs.

I'm happy as hell, AND on top of the tangible and immediately apparent benefits already discussed, I've got a night light in the garage now!


Tomorrow, there WILL be progress on the shelves.... I have the material to get the entire base and vertical supports in, so we'll see what gets done.
 

Attachments

  • IMG_20130119_150845.jpg
    IMG_20130119_150845.jpg
    156 KB · Views: 49
  • IMG_20130119_151655.jpg
    IMG_20130119_151655.jpg
    135 KB · Views: 61
  • IMG_20130119_150855.jpg
    IMG_20130119_150855.jpg
    144.8 KB · Views: 68
OP
C

calereeves

Well-known member
Joined
Dec 31, 2012
Messages
87
Location
Eagle River, Alaska
I managed to get the old shelves out and most of the blocking needed for the shelf supports up screw to put in. I had to rethink the way I was going about the construction since I didn't have any help to hold the pieces overhead, so it took longer than expected but I'm rolling with it now. I'll post pics tomorrow once the decking is laid down.

Utilizing the new mug cooler was probably the highlight of the evening :)
 
OP
C

calereeves

Well-known member
Joined
Dec 31, 2012
Messages
87
Location
Eagle River, Alaska
I finished the floor of the cabinet framing tonight. Going to have to get plywood sometime this week so I can deck and face them. You can see the PO used some cheap MDF for the base of the shelf, with 2x6s flat on a roughly 30" center... I say roughly because they were eyeballed, obviously not measured out, as none of them were spaced the same. The holey-rolled-strap material providing the support to the joists was the big finisher for these things...UGLY! The two vertical supports are just temporary until I can get the plywood facing on. I figure 1/2" plywood along the full face should provide plenty of support... any naysayers on the plywood versus 2x4 verticals?

Here's a before/during/after. The two 10-footers with the cross piece were what I had to use to hold the joists for the cabinet floor since I was going at it solo...
 

Attachments

  • IMG_20130120_191720.jpg
    IMG_20130120_191720.jpg
    133.5 KB · Views: 146
  • IMG_20130121_010418.jpg
    IMG_20130121_010418.jpg
    130.9 KB · Views: 129
  • IMG_20130122_203806.jpg
    IMG_20130122_203806.jpg
    130.8 KB · Views: 136
OP
C

calereeves

Well-known member
Joined
Dec 31, 2012
Messages
87
Location
Eagle River, Alaska
I put up the 2x3 face on the ceiling cleat and got the 3/4 plywood decking on the shelves tonight. Tomorrow I'll cut the plywood for the face and get it hung so I can start working on the lighting underneath.

Anybody know of a good source for gas struts? I'll have three 20" x 60" plywood doors that open vertically and I'd like two gas struts on each door to hold them open and closed.
 

Attachments

  • IMG_20130123_214806.jpg
    IMG_20130123_214806.jpg
    128 KB · Views: 104
  • IMG_20130123_214801.jpg
    IMG_20130123_214801.jpg
    131.5 KB · Views: 99
OP
C

calereeves

Well-known member
Joined
Dec 31, 2012
Messages
87
Location
Eagle River, Alaska
Got the decking screwed down and one of the three fascia panels hung. Number two is laid out and ready to cut, but the kids are in bed and one's room is right above the garage, so no more loudness for the night. Hopefully get the other two hung tomorrow so I can hang the lights underneath over the weekend and skin the under side.
 

Attachments

  • IMG_20130124_212457.jpg
    IMG_20130124_212457.jpg
    142.7 KB · Views: 80
OP
C

calereeves

Well-known member
Joined
Dec 31, 2012
Messages
87
Location
Eagle River, Alaska
Finally got the fascia boards finished. I crawled up inside them to finish screwing down the decking, and they were very sturdy. I guess I'll run to Lowe's tomorrow and grab the two "residential" troffers I need for the underlighting. Once I hang and wire the troffers I'm going to stuff the shelves full and leave them alone for a bit before I get around to painting them. I need to figure out what door struts I'm going to use and order them, so in the meantime I'm going to FINALLY get around to setting up my Gladiator stuff the way I want it and actually organizing the garage.

I keep putting off organizing for the sake of doing other projects that will allow me to better organize...seems I need to take a step back and actually do some organizing before I do another project!

One question: I've got a Bosch miter saw on a gravity rise rolling stand...any good storage ideas for one of those? It's bulky as hell, but there's really no good way I can think of to store it except standing it on end in the corner like it has been. Just curious what innovative ways some of you fellow GJers have found to store really bulky, seldom-used tools.

Edit: I added a pic of the saw/stand. It eats up a 28" x 28" footprint, 50" high when folded and stored.
 

Attachments

  • IMG_20130125_224914.jpg
    IMG_20130125_224914.jpg
    145.6 KB · Views: 78
  • IMG_20130125_231126.jpg
    IMG_20130125_231126.jpg
    143.2 KB · Views: 73
Last edited:

Sludge Puppy

Well-known member
Joined
Jan 16, 2012
Messages
92
Cal, looks like we have the same idea for the doors. Mine are 24x50 so just smaller then your lifting up and I as well am adding struts to each side. I have been searching for small affordable ones but most are not cheap(for what they are). Ill let you know if I find some.
 
OP
C

calereeves

Well-known member
Joined
Dec 31, 2012
Messages
87
Location
Eagle River, Alaska
Thanks, I found some sets on Amazon that looked to be good quality for about $60/pr. I'm hoping to find some a little cheaper but I guess you probably get what you pay for just like anything else. I'll post up when I decide what to order.
 
To avoid these ads, REGISTER NOW!
OP
C

calereeves

Well-known member
Joined
Dec 31, 2012
Messages
87
Location
Eagle River, Alaska
I got 4 pieces of GearWall hung and set one cabinet on it to gauge the height. I'll definitely need to add another row above, possibly two. I didn't tonight since I'll have to cut clearance for the cabinets, but I need to get drywall on them first. I have some 2gal cans of paint to return to HD tomorrow, so I'll exchange them for the lights and the drywall.

So much for holding off on more projects until I get organized.
 

Attachments

  • gladiator rd1.jpg
    gladiator rd1.jpg
    131.7 KB · Views: 75
OP
C

calereeves

Well-known member
Joined
Dec 31, 2012
Messages
87
Location
Eagle River, Alaska
Added part of the third row. I'll do the short section under the cabinets after the drywall, and I'll trim out the edge adjacent to the front of the cabinets. One thing for sure about this GearWall--it shows you any imperfections in your wall behind it! I can't believe how wavy the wall is. I knew it bowed a little, but this stuff REALLY highlights it. Very happy with the results so far, hopefully much more to come over the weekend now that I have cabinets and gearboxes to put stuff in while I'm organizing.

Who knows--maybe if I get really ambitious I'll get the garage cleared out enough to pull my Rambler in and change the wheel bearings.
 

Attachments

  • IMG_20130130_205820.jpg
    IMG_20130130_205820.jpg
    137.2 KB · Views: 42
OP
C

calereeves

Well-known member
Joined
Dec 31, 2012
Messages
87
Location
Eagle River, Alaska
I finally got the center of the garage mostly cleared out and moved around some shelving. Tomorrow I'll be able to get the rest of the center cleared and move along with the GearWall hanging. I'm planning on pulling the Rambler into the garage and changing the wheel bearings once I get the floor cleared...hopefully have some pics of it IN the garage tomorrow.
 

Attachments

  • IMG_20130209_170052.jpg
    IMG_20130209_170052.jpg
    142.8 KB · Views: 82
  • PANO_20130209_170104.jpg
    PANO_20130209_170104.jpg
    94.1 KB · Views: 83
OP
C

calereeves

Well-known member
Joined
Dec 31, 2012
Messages
87
Location
Eagle River, Alaska
Not much to update...got the Rambler pulled in, that's about it. Once I get the wheel bearings changed out this week, I'll be back full force finishing the cabinets and finishing the organization and cleanup.
 

Attachments

  • IMG_20130210_201017.jpg
    IMG_20130210_201017.jpg
    146 KB · Views: 63
OP
C

calereeves

Well-known member
Joined
Dec 31, 2012
Messages
87
Location
Eagle River, Alaska
I finally got some more work done on the garage...work and life has been busy lately! Once I got the decking on the shelves, it was way too dark in the middle of the garage. I settled on some troffer lights for the underside of the shelves. I'm going to drywall the underside, but I couldn't handle the darkness any longer, and I'm just not quite ready to get around to drywalling...so the lighting is a temporary install for now. My dad is coming to visit in April, so I'll get him to help do the drywall while he's in town.

I also got the door cut and installed for my new storage space. The hole in the wall was killing me! I cut the top piece of trim a hair too long so it's not sitting straight, but I'm replacing the trim with a different style wider trim next weekend (the piece I cut up was a used piece we'd pulled from a room in the house.) Once I get the trim I want on there, I'm going to paint the trim dark grey and the door orange to match the main door.

My plan for tomorrow is to finally get around to the rest of the GearWall panels. I've got two whole walls worth of the stuff to hang up. Hopefully I can get an early start and get finished with all of it tomorrow.
 

Attachments

  • IMG_20130302_223611.jpg
    IMG_20130302_223611.jpg
    132.5 KB · Views: 56
  • IMG_20130302_182720.jpg
    IMG_20130302_182720.jpg
    133.2 KB · Views: 45
Last edited:
OP
C

calereeves

Well-known member
Joined
Dec 31, 2012
Messages
87
Location
Eagle River, Alaska
I knew it would create a dim spot in the center, so I'd planned on running those lower troffers, but I didn't think it would be as bad as it was! It irritated me every time I worked on something out there.
 
OP
C

calereeves

Well-known member
Joined
Dec 31, 2012
Messages
87
Location
Eagle River, Alaska
Embarrassingly, it's been over a year since I've updated this. So much for accountability, huh? I'm currently overseas, should be home in mid-late summer, in time to do some motorcycle riding and finish up a few more tasks in the garage before winter sets in with a vengeance.

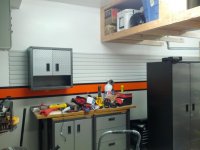
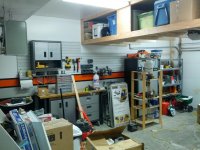
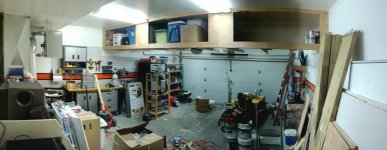
Things I've added since the last photo update (but unfortunately I don't have a current picture to prove it...) are another wall of GearWall panels from the orange stripe to the ceiling, on the opposite wall from the work bench. I've procured 2 more 30" cabinets, a Craftsman rolling workbench/cart, and my wife just yesterday found me a Premier series 5-drawer GearBox with the maple top, for $250 on a local Facebook for sale page. She's a keeper :)

I've got enough GearWall panels to finish off the front of the garage, thus covering all three walls from the orange stripe to the ceiling in GearWall, all found for significantly less than retail price.

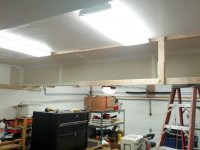
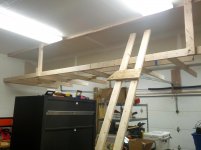
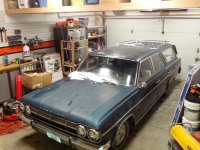
When I get back home, I'm planning to put down some RaceDeck or Gladiator flooring on the work/motorcycle side of the floor, and I'll finally get around to finishing up the doors/drywall on the overhead cabinets and build in the enclosure for the HVAC/Water heater. I'll have a solid month or so off work when I get back, so in addition to a few outdoor projects and some work on my old Tahiti jet boat, the garage will have plenty of attention.
 
OP
C

calereeves

Well-known member
Joined
Dec 31, 2012
Messages
87
Location
Eagle River, Alaska
Re: 20x23 2-Car organization/facelift in Alaska

cc2f9d1386bc29bc719b27572bdca40f.jpg
8b465b152f64e445fda1f97ebb6e6443.jpg
34b6648c99ebbce64a302662a310eb19.jpg
 
OP
C

calereeves

Well-known member
Joined
Dec 31, 2012
Messages
87
Location
Eagle River, Alaska
Since my last update, I finally got home and decided to build a shed. I went with an 8x12 framed shed to keep costs down. I only wanted something big enough to get big items out of the garage to make room for working on my newest habit--chainsaws. I put the large space-hog, seldom-used items out in the shed, and now I've got plenty of work space.

So much so, that I picked up another Gladiator workbench (an 8 footer this time) and 2 more of the premier modular 5-drawer cabinets for $500 off CL a couple of weeks ago. Had to move stuff around to make room for it.

I've got the Rambler back in the garage right now thawing out so I can figure out what's going on with the transmission--some sort of intermittent fluid control problem. Has me scratching my head right now. When I pulled it in earlier, I found that my oil drain pan is a solid block of ice, so it AND the car are thawing over night in the garage so I can pull the ****** pan and see what's going on inside her.

I REALLY need to get the boat engine (454 in the foreground on the 3rd pic above) out of the garage and into the boat before spring breakup this year... we'll see if that happens. The floor space that thing eats up is really annoying. I've got it on casters so I can move it as necessary, but it's still a PITA.

I never got around to enclosing the mech systems, so I'll probably just finish up the paint right around it and call it good. My wife has put a moratorium on major garage upgrades since we're only here for another 6 months or so.

Thanks for all the input from you guys! I can't wait to get to my next place (not sure where it'll be yet) with a bigger garage. My wife has agreed that the next place will have either a 3-car, or a 2-car with a detached shop.
 
Last edited:
OP
C

calereeves

Well-known member
Joined
Dec 31, 2012
Messages
87
Location
Eagle River, Alaska
Re: 20x23 2-Car organization/facelift in Alaska

Thanks guys. I still haven't done anything with the steps. My wife OK'd using some of the long, narrow ceramic tiles that look like hardwood flooring. I just haven't done it yet. Once I get the rambler back out this week, I'll get a couple of better pics. I'm off this week, so maybe I'll get some more done out there.

Seems like I enjoy working on the garage as much as I enjoy working in it.
 
To avoid these ads, REGISTER NOW!
Top Bottom