To avoid these ads, REGISTER NOW!

Between 265 & 485 SQ/FT 20'x24' Pole Barn Workshop

Workspaces sized between 265 and 485 squarefeet.

devvar

Member
Joined
Sep 19, 2023
Messages
24
Location
Connecticut
First time poster, long time reader. About 3 years ago my wife & I bought an old dairy farm property in CT that consists of the house we live in (circa 1785), a smaller rental house (circa 1940), a few old foundations from long-removed farm buildings, and a TON of overgrown brush. Unfortunately all of the old barns and outbuildings had been removed due to neglect. When we moved in I purchased a couple of tent garages to temporarily store the many large items that won't fit inside (tractor, lawn mower, table saw, miter saw, welding bench, generator, etc). When a large tree branch destroyed one of the tents this winter, we decided it was finally time to build a permanent storage building. We have big plans over the long term to erect a few more outbuildings; this one will turn into a dedicated woodworking shop in the longer term. But for now, we need covered storage space.

In anticipation of this build, I actually took down a neighbor's garage in the summer of 2023 so I could use the materials in my building. I put together a YouTube video if anybody is interested in that process (We Bought A Garage On The Internet!). I spent the last two years planning and designing a 3 car garage that would accommodate a lift, my full size pickup, and plenty of space for repairs and fabrication. An ACL injury and a surprise extra year paying for daycare halted all progress on those plans, so the garage I took down has been neatly stacked in the back of the property, patiently waiting. The destruction of my temporary storage put the planning gears back in motion and I drew up plans for a smaller, simpler structure utilizing the building materials I already own. The result is the 20'x24' pole-barn style building seen below.

Render1.jpg
Plans1.jpg
Plans2.jpg

It will just be a gravel floor for now, but I plan to pour a slab in the next couple years as funding allows. Similarly, it will have minimal power at this time and not be heated or cooled. Maybe insulation and heating will come some day. Phase 1 to be completed this summer is a closed structure to keep my things dry. I'm looking forward to any feedback/questions/concerns you all might have.
 
To avoid these ads, REGISTER NOW!
OP
D

devvar

Member
Joined
Sep 19, 2023
Messages
24
Location
Connecticut
Materials are beginning to show up for the foundation! I'm using Perma-Columns and plastic Footing Pad footings for speed of install. It was about the same cost as forming piers with sonotubes and mixing concrete from bags but will be significantly less work.

20250513_135028.jpg

Unfortunately there is no access to the building site from my driveway right now so I have to get all deliveries in the driveway and move it myself to the building site. I will say, I thought 20 tons of 3/4 process would be a larger pile... I will end up needing another load I think to get the site fully leveled and up to the grade I want

20250513_080428.jpg
 

wandrur

ALLIANCE MEMBER
Joined
Dec 13, 2021
Messages
1,222
Location
Fredericksburg, VA
Oh, I am VERY interested in this!

But I should say--congratulations on what sounds like an amazing place!

I will be following every step of the way.
 
OP
D

devvar

Member
Joined
Sep 19, 2023
Messages
24
Location
Connecticut
I took this past week off from work and rented some equipment to make some serious progress on this project. Monday was spent scraping topsoil off the building site and creating a driveway access ramp using my tractor and box scraper. It's pretty impressive how much work can be done with some basic machinery.

Photo May 26 2025, 3 17 50 PM.jpg

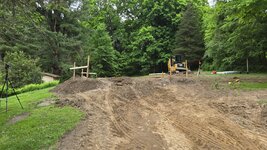
Tuesday brought the arrival of a 5 ton excavator and a 16' dump trailer. The original plan was to haul a large mountain of brush to a local recycling facility but we quickly realized that the dump trailer didn't raise to a steep enough angle to effectively dump anything. So we decided to just move the brush and some topsoil to the rear of my property. By the end of the day we had the building site looking more level.

Photo May 27 2025, 8 07 27 PM.jpg

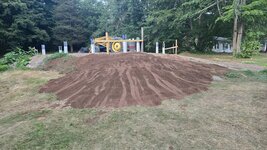
I ended up getting another 20 tons of stone delivered, I used a total of about 25 tons to get the pad level and the driveway access passable. The remainder will be used to bring the pad up another 6 inches after the posts are backfilled.

20250529_175519.jpg

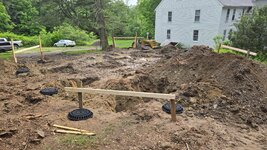
I managed to get all 12 post holes dug before the rain started Friday and Saturday, and now I'm waiting for my footing inspection on Monday morning. I have never had an inspection for anything I have done personally so I don't fully know what to expect but I'm keeping my fingers crossed everything will be good!

20250531_163416.jpg
 

Attachments

  • 20250528_164429.jpg
    20250528_164429.jpg
    1.3 MB · Views: 9
  • 20250511_133253.jpg
    20250511_133253.jpg
    1.3 MB · Views: 13
Last edited:
OP
D

devvar

Member
Joined
Sep 19, 2023
Messages
24
Location
Connecticut
This summer has gotten away from me and I haven't made as much progress as I wanted on the workshop build, but I'm still pecking away at things after work here and there...

The building inspector showed up Monday morning pretty skeptical that I knew what I was doing. He asked a bunch of questions about where my grade would end up, was I pouring a concrete slab, was I putting in electrical, etc. After a few minutes of questioning he was satisfied, waived most of the other inspections (except for framing obviously) and signed off on my footing inspection. Immediate stress relief! As soon as he left I hopped back in the excavator to get all the concrete posts set before the machine got picked up Tuesday morning. This went pretty smoothly, it took me about 30 minutes per post to get it set and backfilled, seemed like the majority of the time was spent hopping in and out of the cab. Would have probably gone much quicker with an assistant to hold the level and shovel some dirt.

20250602_093428.jpg

20250602_171913.jpg

Fast forward about a month, my parents bought me a Father's Day gift few would appreciate, 40 yards of fill dirt!! I spent a couple days shuttling dirt to the building site to get the pad closer to grade now that all the posts were in the ground. I still have a few inches to go, but will be putting compacted stone as the top layer.

20250713_162340.jpg

I also got the driveway entrance more consistently sloped, and started to slope the pad into the existing lawn. The goal is to be able to mow this and not need a retaining wall - its taking a lot more fill material than I originally planned on. Probably 20 more yards should be enough...

20250713_162403.jpg

20250807_194022.jpg
 

runit

Well-known member
Joined
Aug 22, 2022
Messages
195
Location
Raleigh NC
cool! we don't see many detailed builds using this type of foundation.

keep it coming!
 
OP
D

devvar

Member
Joined
Sep 19, 2023
Messages
24
Location
Connecticut
I took a day on this long Labor Day weekend to finish the building pad so I can actually start framing. I rented a plate compactor from the orange store, which started out in typical fashion with no oil in the engine. A quart of oil later and it ran like a champ all day! I compacted the fill dirt, then put a few inches of clean crushed stone over the top. This got compacted and leveled, as this will be my temporary finished floor until I have funds to get a concrete slab poured. Finally done and ready to start building up! I do need to do something about the access driveway, it's hard to see in pictures but it is rather steep and my tractor tears it up pretty good. I like the look of the crushed stone but I'm worried it will be too loose. Does anybody have experience with asphalt millings? Would they pack firm enough to not be like loose marbles on the slope? Maybe millings over crushed stone, both layers compacted well?

20250901_161751.jpg

20250901_161734.jpg
 
To avoid these ads, REGISTER NOW!
OP
D

devvar

Member
Joined
Sep 19, 2023
Messages
24
Location
Connecticut
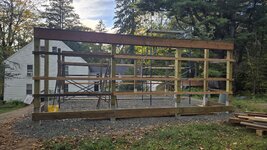
Framing is finally underway! I worked in the evenings to install the grade boards to the concrete permacolumns. Each board got 3 split drive anchors per end (basically large nails with a bent tip). I then spent a day getting all the 6x6 posts cut to length and upright.

20250913_171558.jpg
20250919_171128.jpg

I took advantage of a pre-planned visit by my parents to get some help lifting the main 24' 2x12 beams into place. From there the rest of the wall framing went quickly and it actually looks like a building now!

20250921_174744.jpg

I spent this weekend cutting roof rafters, laying out the ridge board and top plates, installing diagonal bracing, and moving pipe staging around. Everything is prepped to have the roof going up in a couple weeks, once I get home from some work travel.
 
OP
D

devvar

Member
Joined
Sep 19, 2023
Messages
24
Location
Connecticut
Much progress has been made! I realized installing the roof rafters would be much easier with a platform to stand on. I installed all the rafter ties and laid some planks down. From that platform, I was able to build a support structure to hold up the ridge board.

20251011_164736.jpg

20251019_101431.jpg

It took me most of a day to install the rafters, including a bunch of remeasuring and adjusting the height of the ridge board to get the first two sets of rafters to sit properly. Once those were in place it went pretty smoothly. It's finally looking like a real building!

20251019_171607.jpg
 
OP
D

devvar

Member
Joined
Sep 19, 2023
Messages
24
Location
Connecticut
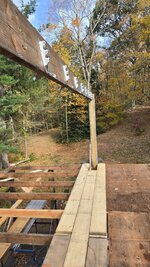
I am in progress with roofing right now. My dad helped me get started on the roof sheathing, I have it almost done except for a couple sheets that need to be nailed down.

20251026_150407.jpg

I installed fascia, drip edge, and Ice & Water on both sides. I was worried the Ice & Water would be challenging to install by myself but thankfully it went better than expected.

20251102_151258.jpg

I also had to do a quick test fit to make sure my lawnmower would be able to squeeze by the tractor when they are both parked inside. Plenty of room!

20251026_173430.jpg
 
OP
D

devvar

Member
Joined
Sep 19, 2023
Messages
24
Location
Connecticut
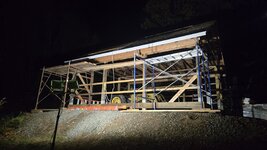
I had an evening work session tonight, getting hurricane ties installed before some 60mph winds come in tomorrow. I don't think anything would happen but I definitely would rather get this done than chase roof parts around the yard...

20251104_183121.jpg

20251104_183107.jpg
 
OP
D

devvar

Member
Joined
Sep 19, 2023
Messages
24
Location
Connecticut
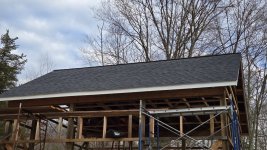
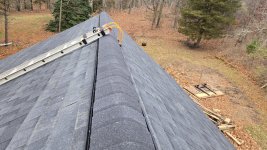
The roof is dried in! I finished just before Thanksgiving, definitely pushing the weather a bit. Between waiting for frost to melt and dodging rain showers for a few weekends in a row, it took much longer than I expected to get the shingles done. But I have to say it came out looking pretty good!

20251123_132316.jpg

20251123_131202.jpg

I ended up renting a lift for a weekend to help shuttle bundles of shingles up and act as my mobile work platform while on the roof. This was well worth the cost and allowed me to work alone and not be tripping over roof brackets constantly.

20251116_164200.jpg

I plan to take a break for at least December and January while I catch up on other projects. I need to finish up some window and door framing so I can get my framing inspection completed, then in the spring it will be on to soffits, siding, trim, windows, & doors.
 
To avoid these ads, REGISTER NOW!
Top Bottom