To avoid these ads, REGISTER NOW!

Between 705 & 1200 SQ/FT 24x30 build in progress

Workspaces between 705 and 1200 squarefeet.

Rich H.

Well-known member
Joined
Nov 30, 2010
Messages
285
Location
SE Michigan
Hey there,

Been lurking around here for a few years, always dreamed of having my own shop and really enjoy checking out all the nice ones on here.

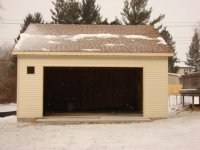
In '07 that dream began to take shape. I bought a house with enough land for a detached shop....something larger than a normal two car garage, but nothing so giant I would be tempted to hoard until it's stuffed, or that I couldn't afford to heat or cool.

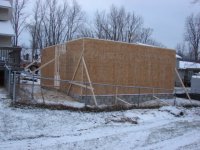
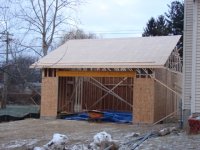
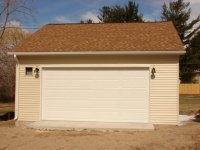
Going in, I thought 30x40 would be about right for me....but I knew there was no reasonable way to fit that on the property/make it look the way I wanted and I would have to come up with something else. Township said they would approve 24x30 without any variance, and that size of building seemed to complement the house rather than overpower it, but I was still not sure, it seemed too small. I did some rough sketches on paper and in microsoft paint, and dreamed some more.

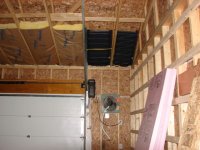
Then I started looking closer at some of the work areas I've used in the past and present. I took a tape measure to a shop I was working in, mostly doing engine swaps and builds, and I found if I was careful with the layout and storage, it would work.

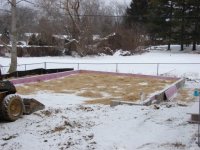
The former owners had an above ground pool in the fenced area there....township made them tear it down because it was too close to power lines, and there the fenced area sat ever since. It was just a fenced weed garden when I got the place. Work started december/january this past winter.
 

Attachments

  • 07.jpg
    07.jpg
    77.8 KB · Views: 655
To avoid these ads, REGISTER NOW!
OP
R

Rich H.

Well-known member
Joined
Nov 30, 2010
Messages
285
Location
SE Michigan
The lot was sloped down to the west which required some fill to be brought in and a few courses of block to get the elevation where we wanted it. The general contractor kept the ground warm at all times by covering it with straw. I was amazed how well it worked.

I have pictures of the footings and some site prep on another computer, unfortunately, but maybe if I start with the building itself...you guys won't get bored and fall asleep on me :bounce: Maybe I'll dig 'em out later.

Here's a closer look, right before the GC requested approval to pour the slab, which did not happen when we wanted (read on). You can see I went with 2" foam insulation.

Unfortunately you can't see the 5 loops of pex that were laid down, for radiant heat because, as with site prep pics....they are on another computer. Oops. Maybe post 'em up later if anyone wants to see that.
 

Attachments

  • 02.jpg
    02.jpg
    84.9 KB · Views: 531
OP
R

Rich H.

Well-known member
Joined
Nov 30, 2010
Messages
285
Location
SE Michigan
At this point there was a little disagreement with the GC and the township.

The township felt the ground was too cold to pour the slab, that the slab might fail after it warmed up. The GC invited them to come and check it out...he had it covered with straw for weeks, and a person could stick their bare hand in it and feel it was not frozen.

Myself, I could see the point in both arguements. The ground was indeed fairly warm under the straw like the GC said. But like the township said, who knows if it was frozen below that .....All I wanted is for it to be to my specs, and to hold up, regardless of the methods used.

Right about that time I was glad I paid the GC a little extra to pull the permit instead of pulling it myself. No way would I want to be in the middle of that. Anything goes wrong, he has to fix it...not me.

In the end, the township prevailed.....the twp made the GC enclose the building before the slab was poured. This would not be a big deal, except I was freaked out my PEX in the floor might be damaged in the process. The GC assured me they would be extra careful, and that the pressure test at the end would tell the tale. He was right.

So, they had to enclose it.
 
OP
R

Rich H.

Well-known member
Joined
Nov 30, 2010
Messages
285
Location
SE Michigan
View from the deck, looking west.

A couple glass patio tables were smashed to bits, because of the way the wind used to whip across the deck.

Also, the deck was kind of hard to use in the summer evenings, because the sun bakes you out there until like 9:00 pm.

One of my ideas with the garage dimensions and siting (besides meeting local setbacks to a "T"), was to block some wind and sun on the deck. It's helped a huge amount with both, so I got a more useable deck in the bargain :)

I explained all that to my Dad, for like a half hour, before ground was broken on the new shop. He gave me that look, like "Son, you're out of your mind":lol_hitti Then, after he saw it done he understood.....
 

Attachments

  • 06.jpg
    06.jpg
    60.1 KB · Views: 581
OP
R

Rich H.

Well-known member
Joined
Nov 30, 2010
Messages
285
Location
SE Michigan
At this point, is when it really hit me, and what was happening sunk in :)
 

Attachments

  • 05.jpg
    05.jpg
    75.6 KB · Views: 930
OP
R

Rich H.

Well-known member
Joined
Nov 30, 2010
Messages
285
Location
SE Michigan
Looks like fall yard work happened a little late in this shot, but this was the method used to enclose it and hold in the heat because...similar to the radiant heat (which I would not have tried if it was not for GJ) I also wanted a high lift door like I had seen on GJ, and wanted 8' tall instead of a normal 7 footer.....like I had seen on GJ :bounce:

The door supplier could get everything but didn't have it at the time, so the GC made do with the tarp, and straw. The twp made them enclose it and heat it for 24 hours...I went in there to check it out, and there were two big space heaters running full blast all night long, and it was almost 80 degrees inside, in the dead of winter...when it was like 30 outside. There were open flames, bare studs, maybe a little sawdust, and straw all within a couple feet of each other...personally I found it scary. Deep down I knew the GC was fully insured and knew what he was doing, so I didn't say a word...

The pour was then approved, and was done before I got home from work the next day.
 

Attachments

  • 07.5.jpg
    07.5.jpg
    65.5 KB · Views: 551
OP
R

Rich H.

Well-known member
Joined
Nov 30, 2010
Messages
285
Location
SE Michigan
With the pour done but still no front door, the gc started on the exterior stuff. It looks just like I imagined it, and matches the house really well.

I had a 6" slab poured in hopes of getting a hoist, which was also the reason for the high lift door, the 10 foot walls, and the scissor truss you'll see in later pics. The ceiling is around 14' at the peak, forgot the exact height but I think it'll work for a hoist and most vehicles.

My buddy has offered to sell me his 7000lb Rotary for a good price, and I will probably just buy that when I'm ready. Going to be awhile before everything's situated though.
 

Attachments

  • 09.jpg
    09.jpg
    56.8 KB · Views: 507
OP
R

Rich H.

Well-known member
Joined
Nov 30, 2010
Messages
285
Location
SE Michigan
Then, the door! It took quite some time to show up...Prior to this, the door was a gray tarp that flapped in the wind. I got so tired of the tarp flapping, I weighed it down with an old 3/4 ton Dodge truck driveshaft. The electricians worked in there when the door was a tarp. They had to have been cold.

And look! Gutters, downspouts, and aluminum too!

Not to mention exterior lighting and a funny little square hole in the front....

Still awake out there? Bored to death yet?

:lol_hitti
 

Attachments

  • 10.jpg
    10.jpg
    54.6 KB · Views: 627
OP
R

Rich H.

Well-known member
Joined
Nov 30, 2010
Messages
285
Location
SE Michigan
With electric done and approved, 200a upgrade to the house + 100a service to the shop, the GCs job was done. He got paid and that was that, the rest was (and still is) up to me.

Do I just move in? 25 years worth of Mopar stuff...a bunch of tools, parts...engines..etc etc..just cram it all in there and get to work, and finish it later? Had a couple heart to heart discussions with friends who had been in the same position.....After that I was convinced....no way...If I didn't finish it now, then I'd be regretting it years later, and sure wouldn't be enjoying working in there in the meantime. So I went ahead and began finishing it....then when ready, load up the hoard.....and then begin the de-hoarding + delayed project process in a sensible manner rather than rushing.

After alot of thought I decided to try the Mooney Wall system to insulate the walls (dense packed cellulose behind a layer of fabric, so the density can be easily confirmed/seen/felt...google "Mooney Wall" for a better explanation), but for the ceiling I went with more conventional blown in cellulose over fiberglass.

When I began insulating the ceiling, the first mistake I noticed was that I didn't specify a raised heel scissor truss, which I didn't know existed until AFTER the whole thing was built.... It probably would have only cost a little extra, and I could have fit more insulation in there. But, it was too late at that point...work with it...The eaves are R19 for the first 5 feet, then R38 for the remainder, then 15 bags of cellulose blown on top of that. The eaves have all the insulation I could fit in them, without collapsing the rafter baffles.

In this pic you can see the high lift track, the liftmaster 3800 opener, rafter baffles, my first row of insulation....and it explains what the little square hole is in the front. It's an industrial exhaust fan with a louver, a used/re purposed piece from a cell phone tower site. I'll put it on a switch at some point, but for now when you plug it in the fan spools up and the louver opens at the same time. It really worked great keeping me somewhat cool in there this summer when I was working on the place....open a window at the other end... cross flow ventilation. Or better yet, pull up a chair by the open window and you've always got a breeze when the fan is on, and take a break.
 

Attachments

  • DSC00507.jpg
    DSC00507.jpg
    61.7 KB · Views: 1,161
Last edited:

Kevin54

MEMBER EMERITUS
Joined
Jan 12, 2005
Messages
29,341
Location
Urbana, Ohio
View from the deck, looking west.

A couple glass patio tables were smashed to bits, because of the way the wind used to whip across the deck.

Also, the deck was kind of hard to use in the summer evenings, because the sun bakes you out there until like 9:00 pm.

One of my ideas with the garage dimensions and siting (besides meeting local setbacks to a "T"), was to block some wind and sun on the deck. It's helped a huge amount with both, so I got a more useable deck in the bargain :)

I explained all that to my Dad, for like a half hour, before ground was broken on the new shop. He gave me that look, like "Son, you're out of your mind":lol_hitti Then, after he saw it done he understood.....

No matter what though, when you open your garage doors the wind will blow the leaves right in there :lol_hitti That's a given no matter where a garage sits.

In your last pic where you are insulating, why do you have 2x strapping on the walls, or did I miss something?
 
OP
R

Rich H.

Well-known member
Joined
Nov 30, 2010
Messages
285
Location
SE Michigan
Oh yeah, leaves and grass clippings are an ongoing battle for sure.

Went after the ceiling with R38 fiberglass and drywall. I had never done a ceiling before so it was quite an adventure. Even with the drywall lift I bought, it was alot of work. I started mudding it for a little more strength before the blown-in. Left the center open for the blown in and closed it up as I went.

To the left you can see the big shelf/mezzanine or whatever you want to call it...I built out of engineered I joists, and my old reliable metal Dominion fan on top. The shelf was, for me, a huge project in itself.... straightforward, but quite physically demanding when you're too dumb and stubborn to call a friend to come help. Like a dummy I built the whole thing myself, and it's a wonder there weren't any nasty accidents/I joists crashing down etc....somehow I got it done working alone, and there weren't any problems (other than my arms locking up and not being able to move a couple times!).

The 2x strapping is for the "mooney wall", wall insulation....will post pics of it in a bit.
 

Attachments

  • 11.jpg
    11.jpg
    52.4 KB · Views: 1,267
Last edited:
OP
R

Rich H.

Well-known member
Joined
Nov 30, 2010
Messages
285
Location
SE Michigan
You'll notice the rented HD scaffold, the ebay drywall hoist with extension, the first row of insulweb stapled for the mooney wall because I wanted to sneak it under the gable framing, and drywall hung on the other gable which is insulated with OC pink panther. btw I hated working with the owens corning pink stuff....I used Certainteed for the rest of the fiberglass work and preferred it greatly, I found it much more robust than the pink stuff....it didn't rip so easily and fall apart when manhandled. Both were the nasty itchy type. I'm throwing two shirts away as a result, the fibers just won't wash out.

And there's a great big open hole in the middle ready for cellulose....
 

Attachments

  • garage4.jpg
    garage4.jpg
    52.4 KB · Views: 620
OP
R

Rich H.

Well-known member
Joined
Nov 30, 2010
Messages
285
Location
SE Michigan
15 bags of cellulose, the blower in the truck bed, and had nothing but problems. It only took a little while to blow the material, but many things went wrong...
 

Attachments

  • garage3.jpg
    garage3.jpg
    59.8 KB · Views: 394
OP
R

Rich H.

Well-known member
Joined
Nov 30, 2010
Messages
285
Location
SE Michigan
First, the "free with X number of bags purchased" HD blower machine was junk. It only worked for about a half hour and then the drive belt broke, the blower ran but there was no material flow.

I took it apart and noticed it had a cheesy leather belt, the adjustable link kind like many table saws have. OK for some table saws but totally inadequate for this job. So another hour and a half was blown round trip, to and from o'reilly auto parts for an actual 3/8 automotive drive belt, and another half hour blown repairing the pile-0-krap machine. Not happy about all the wasted time I soldiered on.
 

Attachments

  • garage5.jpg
    garage5.jpg
    32 KB · Views: 493
OP
R

Rich H.

Well-known member
Joined
Nov 30, 2010
Messages
285
Location
SE Michigan
Notice how it's getting darker and darker in the previous shot lol....

Alex and Sam, my helpers/machine feeders, did their best.

Alex is the one with outstretched arms, he is 9, and considers himself the brains of the outfit. He definitely is acting like a big shot in this picture. He's smart as a whip, with quite an imagination and highly developed creative skills especially in basic visual arts.

Sam is 7, and seems to be a follower at this point in his life...he's the younger brother after all.....however, Sam is hell for strong, is more active, taller, and outweighs his brother too. If Sam ever develops a temper, his brother is going to be in big trouble. Just have to teach him to use his powers for good instead of evil, and all will be well with the world.

When you're 7, you think it's fun to make a game out of not feeding the machine properly and instead throw little tufts in one handful at a time. Whee!

When you're 9, you can see the pointy, prickly, dangerous looking thing spinning at the bottom of the machine, and you know better than to get to close to it, so you really WANT to feed the machine properly but you're afraid of it.

See where I'm going with this? Yep, another hour or so was spent just waiting for material to come out the other end of the hose. Highly frustrating. During a pure act of God, my Dad just decided to stop by unannounced which he NEVER EVER does....he showed the boys how to feed the machine, and we got quite efficient after that.

Even then, with the machine failure and repair and so on, the boys went to bed at 12:30am that night and everyone was wore out. I paid them by the hour though, so they were happy about it. Gotta teach them the simple stuff as young as possible.....work, get paid, make money. Don't work, don't get paid, and you do not have any money. This is only the beginning...
 

Attachments

  • garage6.jpg
    garage6.jpg
    80.1 KB · Views: 834
OP
R

Rich H.

Well-known member
Joined
Nov 30, 2010
Messages
285
Location
SE Michigan
Thank you for saying so.

I laugh when I see the boys' idea of "work clothes". For me it was jeans, t shirt and boots.. But it was very hot and humid that day, so the boys did something slightly different :)

I'll break the chronological order for a second....I had begun hanging sheetrock on the ceiling, and stopped into a HD store I don't usually frequent for a bucket of drywall compound. Lo and behold, they had a couple industrial ceiling fans on sale...discontinued, and deeply discounted as well. Very interesting... I read the reviews on garage journal and it seemed like a good one for me, so I grabbed it and set everything up for it.

Luckily I already had an unused circuit and a dedicated breaker for it, that I wanted to utilize....breaker is labeled "garage door opener". I had specified the opener should be installed on the left side of the door, but the door company installed it on the right side instead. I was upset they didn't follow my directions, but once I added the ceiling fan....it all worked out for the best. It was a lucky break.
 

Attachments

  • 00526.jpg
    00526.jpg
    36.2 KB · Views: 445
OP
R

Rich H.

Well-known member
Joined
Nov 30, 2010
Messages
285
Location
SE Michigan
Viewers will also notice I mudded and taped as I went, instead of hanging the entire ceiling and then taping the entire ceiling. It is, most likely, considered bad form...

Several reasons for it....one, I am not a pro and can't work on stilts, I'd probably kill myself. It's very slow and tedious doing it on a scaffold, because of the up/down/up down needed to move the scaffold around.....and because I was learning as I went. Tough lessons, and I've got much respect for folks who do this stuff for a living.

I had done tons of sheetrock/drywall/gypsum repair on my house, there were many holes in walls I repaired, and I removed one wall in the house and relocated it....so I had some practice doing walls....but found the ceiling to be a whole different animal.

There are a few mistakes I decided to live with instead of agonize over. It will be a workshop and hangout, not so much a showplace....to get it done I had to cut myself some slack....decided to do "garage quality" work. Some areas look like they may have been a sad attempt at level 4 finish but they really are not...after studying pro drywall forums I learned a couple places to effectively cheat, tried them and they worked well.

I blew cellulose and stapled R38 a little at a time, and closed up the hole.
 

Attachments

  • 00527.jpg
    00527.jpg
    45.2 KB · Views: 374
OP
R

Rich H.

Well-known member
Joined
Nov 30, 2010
Messages
285
Location
SE Michigan
It's very short, sweet and simple posting pics and a few sentences on a bulletin board....but when I think about how much work these pics represent?

Oh boy...gallons of sweat, or at least it felt that way.

I guess the feeling was...Who needs health clubs and excercise machines when you've got a garage to finish?

I got cardio from the heart racing, because of the fear of falling off the ladder. Happened quite often. I got a leg and back workout from standing and bending constantly. I got core, shoulder, and arm workout from the constant overhead work. Maybe this explained why I usually felt I had gone 10 rounds with Mike Tyson and lost. Especially first thing in the morning....

it was often 90 degrees in there, and I had to remember to keep drinking water and made sure I put lots of salt on my food as well.

I consider myself average strength, but I'm a desk jockey and part time mechanic for my day gig and am not used to this level of activity.

I lost about 10 lbs or so.
 

Attachments

  • 00528.jpg
    00528.jpg
    21.6 KB · Views: 352
To avoid these ads, REGISTER NOW!
OP
R

Rich H.

Well-known member
Joined
Nov 30, 2010
Messages
285
Location
SE Michigan
It would have been better to hang the ceiling fan after paint, but the scaffold had to be returned...and I felt like I was playing Russian roulette every time I went too near the top of 10 foot stepladder.

So I went ahead with the fan, and will just have to paint around it best as I can.

Garage quality: Form follows function. And several other excuses :lol_hitti
 

Attachments

  • 00529.jpg
    00529.jpg
    20.4 KB · Views: 334
OP
R

Rich H.

Well-known member
Joined
Nov 30, 2010
Messages
285
Location
SE Michigan
Mooney time.

As the legend goes, a man named John Mooney developed a unique method for insulating walls and had documented it on the fine homebuilding breaktime forums. Over the course of time, his method became known as a "Mooney Wall". Feel free to ask any questions and/or google it, there is alot of information out there on it.

In a nutshell it entails horizontal strapping over the studs, then an inexpensive synthetic fabric known as insulmesh or insulweb is stretched and staped over the strapping. Glue is applied over the stapled areas. Then holes are poked in the insulmesh, and finally cellulose is blown in to a very high density. When done correctly, the insulated areas feel like a firm mattress.

There is a common misunderstanding that all insulation requires loft to function correctly. I've found this is not true of cellulose...cellulose performs best overall when densely packed.

Overall performance--including least air intrusion and least sound transfer (neither of which is addressed by R value) is improved using this method.

In certain areas of the building, Mooney was not practical and would have required too much extra effort.....but the all important west wall, and the east wall that faces the house both have it. Best sound deadening facing east, least air intrusion facing west. It isn't perfect but alot of thought went into it.
 

Attachments

  • DSC00563.jpg
    DSC00563.jpg
    39 KB · Views: 740
OP
R

Rich H.

Well-known member
Joined
Nov 30, 2010
Messages
285
Location
SE Michigan
It makes one hella mess. It's dusty. It's this, it's that, and so on.

All the insulation calculators are wrong for dense packed.

The calculators said I needed 34 bags.

I used 52 :lol_hitti

Again Sam and Alex helped, again I paid them by the hour...and again we worked until late at night....this time until 1:30am. Though they think it's fun to stay up late, I worked them very hard and everyone was even more worn out than when we did the ceiling.

The HD Greenfiber junk machine can not do this job, it isn't capable of producing enough air pressure for dense pack. Same with the stuff Lowes had.

On top of that, HD's price on cellulose was $9 per bag vs. Menards $6 per bag retail/$1 per bag rebate for exactly the same thing, and Menards had a fantastic Krendl branded machine with some horsepower. The menards machine worked flawlessly and was actually difficult to hold on to at times, it is much more powerful.
 

Attachments

  • DSC00564.jpg
    DSC00564.jpg
    20.3 KB · Views: 367
OP
R

Rich H.

Well-known member
Joined
Nov 30, 2010
Messages
285
Location
SE Michigan
horizontal strapping gives more opportunities for vertical paneling.

Which, after I did the math, is saving me a whole bunch of mud work. I'm thankful it worked out that way. Being an ameteur I didn't consider it at all when I started.

I didn't entirely "go Mooney"....too inconvienient for the way the subpanel and exhaust fan is installed, would have created too much work on the wall above the shelf. But I did use the insulweb technique everywhere else I could.

One other thing about the Mooney technique....a rank amateur like me can easily see and feel exactly how densely the cellulose is packed, and any missed areas are easily found and corrected. With my lack of skills and experience I would not want to blow blind into a pre-finished wall, and I would only trust a pro to do that. Not everyone would agree, many are more adventurous, etc.

There are probably 100 mistakes in these two pics, but it will all work out to garage quality in the end.
 

Attachments

  • DSC00564.jpg
    DSC00564.jpg
    134.2 KB · Views: 480
  • DSC00568.jpg
    DSC00568.jpg
    132.2 KB · Views: 521
Last edited:
OP
R

Rich H.

Well-known member
Joined
Nov 30, 2010
Messages
285
Location
SE Michigan
Mistakes! What to do?

I have researched and read on other boards where professional tapers have to deal with other people's mistakes all the time. Was very interested in learning the techniques they use to get around common problems, like gaps between panels caused by drywall hung slightly crooked or slightly out of alignment with each other.

I did these myself with no help, and of course had gaps between panels to deal with as a result. 10 footers are heavy and clumsy, I did the best I could.

A couple of the pros posted that they
"pre fill with (insert number here, usually 90)".

After awhile I figured it out. Fill the gaps with a setting type (not an air dry all purpose!) compound. Then after it sets, scrape it with the knife blade flexed into the joint to slightly undercut the pre fill. Then "knockdown" (scrape all the burrs and lines off, remove sharp edges, and then tape as usual.

If it cracks, it will crack UNDER the tape and won't be visible. And if you use a setting type compound (20 minute is my favorite), it's much less likely to crack at all, ever.

This stuff is common knowledge to alot of folks, but sure wasn't to me when I started.

So here are some nasty gaps I had on the same wall as the previous couple shots, that I pre filled. I'm going to knock it down and tape it tomorrow.
 

Attachments

  • DSC00574.JPG
    DSC00574.JPG
    143.7 KB · Views: 329
OP
R

Rich H.

Well-known member
Joined
Nov 30, 2010
Messages
285
Location
SE Michigan
More benefit from studying the pro drywall forums....

Most books a homeowner will read will say embed the tape, maybe apply a thin coat over the top of it, then let dry completely. After that the books say you're supposed to apply a filler coat, then a topcoat.

That never worked consistently for me, because the second step (fill coat) needs to be such a huge amount of mud I always had trouble judging it. I'd create too much extra work for myself because of that.

As it turns out, my problem was common. The drywall forums set me straight. The solution is called "tape coat". I had never heard of it before.

To do tape coat, you embed the tape, and then apply at least half of your fill coat immediately, then allow that to set up. This allows the second coat to typically be much thinner, easier to apply, easier to judge....and the kicker is...it's actually less likely to crack than doing it the way the homeowner books tell you to.

Why is it less likely to crack? Because the compound is designed to lock into the paper. The drying characteristics of mud on paper are much better and far more desirable than mud on mud.

Not sure if it's a trade secret but it sure works...maybe some won't agree and that's ok with me.

I taped and tape coated the inside corners and **** joints, on top of the shelf today. Here is a shot of the first pass...I don't expect to need very much mud for my second coat and I really like it that way.
 

Attachments

  • DSC00572.JPG
    DSC00572.JPG
    121.1 KB · Views: 366
Last edited:
OP
R

Rich H.

Well-known member
Joined
Nov 30, 2010
Messages
285
Location
SE Michigan
Here's where I'm at on the west wall as of today. I might put one more coat on the screw heads, but other than that it just needs sanding and then it's ready for primer.

The primer I chose is Sheetrock branded, called "first coat". It has gypsum in it and it's supposed to help hide your mistakes..and mask irregularities. We will find out, won't we? At this point I'll take all the help I can get:rolleyes:
 

Attachments

  • DSC00569.JPG
    DSC00569.JPG
    105 KB · Views: 193
OP
R

Rich H.

Well-known member
Joined
Nov 30, 2010
Messages
285
Location
SE Michigan
Here's the back/north wall underneath the shelf. Only needs sanding before primer, no more mud going on it unless I find any big issues.

There's a definite art to mud and tape...again, much respect to the guys who do this every day...it ain't easy.
 

Attachments

  • DSC00571.jpg
    DSC00571.jpg
    18.1 KB · Views: 140
OP
R

Rich H.

Well-known member
Joined
Nov 30, 2010
Messages
285
Location
SE Michigan
Here's the view sitting on the shelf, looking south-southwest.

Still need to mud and tape above the door, the top of the east wall, and the southeast corner. I've put off doing the southeast corner until last because that's where the radiant boiler and integrator panel are supposed to go, and I want to make sure I get everything right before it's closed up.

Those with a sharp eye will notice the panels' paper on the ceiling is a slightly different color than the walls.....I mixed brands and used USG 'Ultralight' for the entire ceiling and gables, but used 99% LaFarge for the walls. I also used a small amount of Georgia Pacific "Tough Rock" on this project; one sheet in a small area. Three different brands...it'll finish just fine being all the same dimensions.

If anyone cares for a comparison between the different brands of drywall, I'll post it up....I've definitely developed opinions after working with all three.
 

Attachments

  • DSC00573.JPG
    DSC00573.JPG
    104 KB · Views: 284
OP
R

Rich H.

Well-known member
Joined
Nov 30, 2010
Messages
285
Location
SE Michigan
Took some time off work, spent most of the day yesterday sanding the north wall and ceiling above the shelf, and taping the south wall.

I got the wall above the shelf about halfway sanded, when the phone rang. Alex had puked in the hall at school and I had to go bring him home:willy_nil
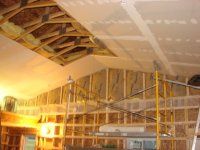
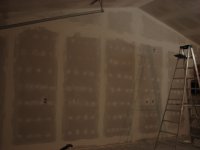
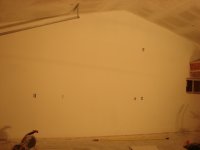
.... there I was, looking like I just jumped into a vat of flour, covered from head to toe in drywall dust.....so, shower/cleaned up/changed clothes, went and got him and came back. Changed clothes, went right back to work and got that wall all sanded out. I'm not going to do a second coat, it doesn't need it! Very happy about that.

Then dinner time...got cleaned up and changed clothes yet again. Had dinner, chilled out for awhile, and got to thinking (uh oh).

"What if my mudwork isn't as....decent....for lack of a better word....as I think it is? What if it really ***** and is going to look krappy?"

Thought about it....thought about it....and after a little while I couldn't stand it anymore, and had to check my mud work out so I primed the north wall under the shelf last night before bed.

Came out for a look this morning...and I am VERY pleased with it. I didn't think I could do that kind of work especially with only two coats of mud. Very relieved and glad:beer:

Seeing this is giving me a kick in the pants to keep going, which at this point...as beat up as i feel, really helps.

That's the end of an old used Lista industrial workbench, with a used Equipto industrial cabinet underneath it, that I picked up for cheap. My sincere apologies they are neither color coordinated, nor are they beautiful and shiny at this juncture :p :lol: Someday, just not today.

Happy birthday to me :beer:
 

Attachments

  • DSC00576.jpg
    DSC00576.jpg
    145.5 KB · Views: 267

Omphaloskeptic

Well-known member
Joined
Oct 11, 2008
Messages
2,346
Location
Ultima Ratio, Wa.
:beer:Rich H.,:beer:HAPPY BIRTHDAY TO YOU!:beer:

Thanks for your thorough documentation of the build, and kudos to you for your one-man (and two :argue: boys) finish effort.

A couple of questions:
- What are some of your favorite 'rock & mudding' sites for tips and tricks? My shop has had the initial taping done, and it is up to me to finish it. :(
- For future reference, what brand of rock did you prefer, and why?
- What sheen of paint did you choose? Semi-gloss seems to me to be the best trade-off between light reflectivity, ease of cleaning, dust resistance, and the ability not to highlight too many occurrences of our amateur mud jobs. lol
- Are you going to spray the finish coat(s) on and dry-roll the paint in, or are you going to roll/cut the entire job?

It seems to me that since the GC finished, you have been working your **** off (10#!), pretty much single handed, AND getting one hell of a lot of it knocked out; I applaud your efforts.:thumbup:
 
OP
R

Rich H.

Well-known member
Joined
Nov 30, 2010
Messages
285
Location
SE Michigan
Thanks fellas, appreciate the comments!

It's been a pretty uneventful birthday, which considering how things have been going, is nothing I'm going to complain about :)

Just knocked out some errands today and took it easy, got license plates and stuff like that....and really didn't do much in the shop other than open it up and air out the fumes. The primer and mud combination is a smelly one. I can handle one or the other, but not both at the same time.

While I was out running errands, I remembered a light fixture HD had on clearance that I saw when picking up the last box-o-mud....thought about for a minute, but didn't get. I went back and got it today, so that's my 10 dollar birthday present to myself :) It's sort of a rustic look I guess? I'm going to try to keep things fairly modern looking in there but don't mind mixing in a few other influences too. This is the "one bulb by the door" light, so I won't have to turn on every light in the shop to just run in there for a second and grab a screwdriver or whatever...

Skeptic, those are great questions! I made a lot of mistakes, my work is not perfect...so take what I say with a grain of salt...but will try to answer best as I can.

- What are some of your favorite 'rock & mudding' sites for tips and tricks? My shop has had the initial taping done, and it is up to me to finish it. :(

With your tape done, you're 1/3 of the way home! Just fill, sand, topcoat, voila. Sounds easy doesn't it??? It isn't!!! :lol_hitti The best drywall forum I have found is http://www.drywalltalk.com/

- For future reference, what brand of rock did you prefer, and why?

USG Sheetrock UltraLight FTW. It is very strong and it has a "bouncy/springy" quality to it...almost like a thin piece of plywood..really amazing....it cuts/snaps the cleanest, but it is also the lightest weight. Not surprisingly, it is also the most expensive compared to the other brands I tried. I used it exclusively on my ceiling, which is also glued and screwed. Didn't want it coming down on my head. It was $7 a sheet for 4x8, which I thought was a lousy value until I compared it to other brands and understood what I was getting.

LaFarge LiftLite was second place, GP tough rock a very, very distant third.

- What sheen of paint did you choose? Semi-gloss seems to me to be the best trade-off between light reflectivity, ease of cleaning, dust resistance, and the ability not to highlight too many occurrences of our amateur mud jobs. lol

It's just primer right now, but I'm with you on semi gloss for the walls. I will be using a flat for the ceiling though, to try to hide my mistakes a little better. Am also expermenting with roller nap.....I used 1/2" nap on the wall, and seems close....I might go 3/4" on the ceiling for more texture and better concealment of mistakes though.

- Are you going to spray the finish coat(s) on and dry-roll the paint in, or are you going to roll/cut the entire job?

Will probably roll and cut it....I painted my house that way in '07 and am used to doing it that way.

Thanks again for the nice remarks :beer:
 

Attachments

  • DSC00578.JPG
    DSC00578.JPG
    124.2 KB · Views: 119

Motofixxer

Well-known member
Joined
Oct 10, 2009
Messages
681
Wow looks similar to my build. I have to say, the drywall has been the worst aspect so far.
 
OP
R

Rich H.

Well-known member
Joined
Nov 30, 2010
Messages
285
Location
SE Michigan
Wow, I see what you mean :)

I'm also probably going to put AC in mine like you have...will be going with a window unit and picked out of the windows based on that.

Back to the daily grind....

I think I'll primer the wall above the shelf tonight possibly...maybe some of the ceiling too.

Or maybe I'll make a giganic mess and sand the west wall down/mud the east wall some more?

It probably doesn't matter as long as something gets done...
 
OP
R

Rich H.

Well-known member
Joined
Nov 30, 2010
Messages
285
Location
SE Michigan
You bet Shaun and thx for the birthday wishes!

Sanded and primed the west wall last night...it was another late one...

I'm glad I did that now instead of waiting, as I found a couple missed spots I don't want to live with, that I can take care of without much effort. Nothing big.

Even with that, when I walked in there this morning before work...I was stoked big time :rocker::rocker:
 

Attachments

  • DSC00579.JPG
    DSC00579.JPG
    143.6 KB · Views: 286
To avoid these ads, REGISTER NOW!
Top Bottom