To avoid these ads, REGISTER NOW!

24X40X12 Pole Frame Build

dwouscg

Member
Joined
Oct 20, 2019
Messages
22
Location
Southern IL
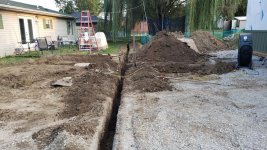
Broke ground on my new shop build. I have used this forum to generate ideas through most of the planning process so I will try to keep up with progress reports and pictures in case they may help someone in the future.

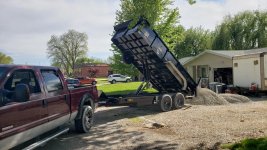
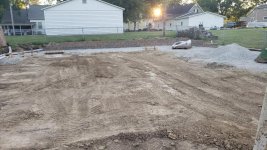
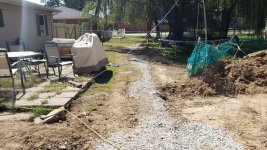
The first step is to cut back into the grade. I will end up with around a 2' cut in the back and I am going to fill in about the first 10' of the shop with 6" or fill to create a level grade for the build and concrete slab. I will be installing a stone retaining wall along both fence lines and sloping the grade on the side and front of the shop. Going to place a driveway on the front so it will be sloped anyway.

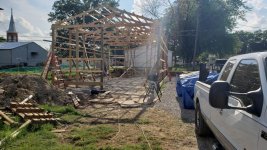
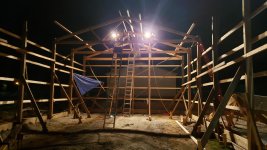
Going with a 24X40X12 pole frame kit for construction with one 12' sliding door on the gable end. I was hoping to go with a metal frame but by the time I got the village engineer to sign off on my drawings the great deal I found on used steel was already taken so back to the wood frame.
 

Attachments

  • 20200419_185618.jpg
    20200419_185618.jpg
    148.1 KB · Views: 166
  • 20200419_185609.jpg
    20200419_185609.jpg
    148.2 KB · Views: 161
  • 20200419_185555.jpg
    20200419_185555.jpg
    146.6 KB · Views: 156
To avoid these ads, REGISTER NOW!
OP
D

dwouscg

Member
Joined
Oct 20, 2019
Messages
22
Location
Southern IL
It has been a while since an update but progress has been slow so far. A lot of rain and a four-month-old baby girl has slowed things down. Lost an injector on the haul truck as well so I had to swap it out.

I have the initial grade work done. Due to a lot of clay I mixed in some quicklime to help dry up and harden the soil. If I can get my hands on a padfoot compactor I will hit it with that as well. I will be adding fill at the front after the structure is up. I have placed and compacted stone along the back so I can get the retaining wall started. I am going to wait to place the remainder of the stone until after the holes are drilled so I don't make a mess with the spoils.

I am placing an order for the building materials this week so I plan on getting the wall and holes drilled in the next two weeks to be ready for the material.

At the moment I am debating with myself on if I am going to bury the poles or place concrete piers with brackets. I am leaning towards piers at the moment due to wet soil conditions.

I have shamelessly added a picture of the new toy as well.....
 

Attachments

  • 20200601_201353.jpg
    20200601_201353.jpg
    147.8 KB · Views: 157
  • 20200602_195939.jpg
    20200602_195939.jpg
    147.7 KB · Views: 153
  • 20200603_165021.jpg
    20200603_165021.jpg
    142.4 KB · Views: 157
  • 20200501_155813.jpg
    20200501_155813.jpg
    150.7 KB · Views: 186

hot_rod4

New member
Joined
Oct 7, 2019
Messages
3
Location
Dorsey, IL
How do you like that dump trailer? I have been eyeing those as well. What are the dimensions on yours? Feel free to PM if you rather.
 

mike93lx

ALLIANCE MEMBER
Joined
Dec 9, 2013
Messages
37,456
Location
Richmond, VA
100% do concrete piers. Never bury wood for a structure.

I know some people get away with it, but it still isn't a good idea
 

Spulen81

Well-known member
Joined
Jan 26, 2010
Messages
57
Location
Warners, NY
Looking good, I have a similar situation with my grade and was considering a retaining wall also. Looking forward to seeing how everything goes.
 

captain14

Well-known member
Joined
Dec 19, 2012
Messages
7,030
Location
Near College Park Maryland 20740
It’s not a new toy. Every new project you are allowed to buy at least one new tool. That’s a rule here on GJ along with I shoulda made it bigger.

Sometimes even two Or three If it’s cheaper than hiring someone else to
Do it.
 
OP
D

dwouscg

Member
Joined
Oct 20, 2019
Messages
22
Location
Southern IL
The dump trailer is great. They are proud of them when it comes to cost but if you can keep it halfway busy it is justified in my opinion. Since I am doing everything myself I think I would have ended up being in at least $1K in rental fees(with all the downtime for rain I had really I could have spent way more) and with it, I can get my stone for about $9 a ton depending on fuel costs. I went with a 16' length so that I can haul 20' steel and still be legal. So the inside is 6'11" X 16'. The bed is on the high side but with the included ramps I can still load my compact tractor comfortably. The one option I wish I had was a gravity down instead of powered. I don't use it enough at one time for it to really make a difference as of yet though.

Plus I have talked to a few of my friends more than ever now that they know I have. It has added to my list of help requests for sure...
 

mike93lx

ALLIANCE MEMBER
Joined
Dec 9, 2013
Messages
37,456
Location
Richmond, VA
Why would you want gravity down instead of powered? I always thought the preference was the other way around
 
OP
D

dwouscg

Member
Joined
Oct 20, 2019
Messages
22
Location
Southern IL
I have not seen a gravity down in action but unless it is considerably slower I would rather save battery power for lifting. I don't use it enough between charges for it to matter though. I have done six cycles so far without any problems.

For my grade, I considered just using treated boards up to the top of grade against the side of the shop but of course, I had concerns about how long they would hold and keeping water out. For another $600 in material and some labor, I went with the wall. Plus I get more storage space for trailers on the side of the shop.
 
OP
D

dwouscg

Member
Joined
Oct 20, 2019
Messages
22
Location
Southern IL
Making progress slowly on the build. Work picked up so just evenings mostly in the yard. Did get my holes augered and picked up the posts. The plan is to have them installed in time to take a day off for Father's Day.

Found out we are going to Tennesse for a week starting 7/24 so my goal is to have the shop up before then.
 

Attachments

  • 20200615_195337.jpg
    20200615_195337.jpg
    144.7 KB · Views: 92
  • 20200615_195401.jpg
    20200615_195401.jpg
    145.5 KB · Views: 80
OP
D

dwouscg

Member
Joined
Oct 20, 2019
Messages
22
Location
Southern IL
Posts are going up. 2 out of the 16 had to much warp to install. I reordered those and they should be ready for pickup tomorrow. I had to laugh because I took the posts back and stuck around to load up my boards. While I was loading the trailer I watched them put them in the rack looking like bananas with the AC2 treated lumber. Whoever gets them will get a great treatment for the price just won't be straight.

I am hoping to get the trusses up one day next week.
 

Attachments

  • 20200620_201213.jpg
    20200620_201213.jpg
    152.1 KB · Views: 98

matt_i

Well-known member
Joined
Mar 14, 2008
Messages
10,725
Location
SE Michigan
Just make sure you have the UC4B severe rating on your posts...that's a critical piece of information. All "treated" are not created equal and the posts is one location you don't want to come up with a low grade
 
OP
D

dwouscg

Member
Joined
Oct 20, 2019
Messages
22
Location
Southern IL
My posts are CCA .6 which is listed as a UC4B per the AWPA if I am reading the charts right so I should be good to go.

Never can understand why there has to be so many different abbreviations and callouts in specs....they must do it on purpose.
 
To avoid these ads, REGISTER NOW!

karoc

Well-known member
Joined
Dec 19, 2017
Messages
1,996
Location
Hemphill Tx
I have read that states also uses UC4B rated poles since they last forever.From what I was told,keep pics coming following along
 
OP
D

dwouscg

Member
Joined
Oct 20, 2019
Messages
22
Location
Southern IL
Progress has been slow and steady. Still looking to have all the tin on by 7/24.

I do have a question for those that have been thru the building process. This is my first go at a large framing project with wood. I am used to steel with bolts and welding. Throughout the process, I have been checking for plumb and square on just about everything I put in with the goal of keeping everything within 1/8". This has been quite the process. I wonder if I can have a wider gap and will still be able to square everything up just prior to placing the steel siding and holding everything in place. Mind you I understand it cant be way off but in my mind as long as the steel on the sides and the roof are square to each other a little variation on the framing won't affect anything and won't be that noticeable. This would increase productivity and prevent me from pulling my hair out.

Also, what is the preferred order for siding? Install roof then sides or vice versa? I would like to do the roof first but I am not sure on how to get the closers installed on the eves this way. I do not have any overhangs on the building if that makes a difference.
 

Attachments

  • 20200629_223544.jpg
    20200629_223544.jpg
    148.7 KB · Views: 84
  • 20200709_172513.jpg
    20200709_172513.jpg
    152.9 KB · Views: 75

mike93lx

ALLIANCE MEMBER
Joined
Dec 9, 2013
Messages
37,456
Location
Richmond, VA
You definitely should check and adjust before hanging steel. Use tools like ratchet straps to help.

Before you hang steel is your last chance to correct and you only have one chance to get it right. Take your time, it will be worth it
 

gagecalman

Well-known member
Joined
Feb 5, 2020
Messages
194
Location
MD
I watch this guy named Kyle on youtube.
He has a lot of videos and explains the process. He always does the roof first. He also shows how he used straps and chains to adjust the framing.
As Mike stated align everything before you install the steel.
 

MagKarl

Well-known member
Joined
Oct 15, 2012
Messages
684
Location
Olympia, WA
Roof first, then walls in my case. I bought a few Harbor Freight boat trailer cable winches for about $20 each that worked great to square each roof and wall section before they were sheeted with tin. Use string lines to get straight and use winches diagonal to get square/plumb.
 

mike93lx

ALLIANCE MEMBER
Joined
Dec 9, 2013
Messages
37,456
Location
Richmond, VA
You need to be careful with sheathing the roof before the walls. If you have high winds come through, the roof will act like a parachute and can do some damage.
 
OP
D

dwouscg

Member
Joined
Oct 20, 2019
Messages
22
Location
Southern IL
I have watched those videos. There is some good info in there. I have used some 2" ratcheting straps that worked well. My issue with the roof first is I do not have overhangs so to install the roof I would need to put on the eve trim and closure strips. My concern is it will be hard to get the side panels in under the trim after the fact. I can't think of any other way to do it at the moment.

My intention is to get all of the tin on over the weekend and I will be keeping an eye on wind conditions.
 
OP
D

dwouscg

Member
Joined
Oct 20, 2019
Messages
22
Location
Southern IL
Made a mistake on my measurments that is going to cost me some time. When I marked the bottom of truss on my outer posts it is 1-1/2" lower than the notch on my center posts. I could tell something was off when I put in the edge purlins and once I put up a string line it only got worse. Still not sure how I made the error. I even had the sight level out and did a final elevation check on my notches prior to install. I must have left the corner posts out of that verification.

My plan is to take the weight off of each end of the center trusses with jacks and cut the nothces lower to level the roof. I have enough extra in my grade board and stone to account for the change and keep a 12' ceiling.
 
OP
D

dwouscg

Member
Joined
Oct 20, 2019
Messages
22
Location
Southern IL
I have not been keeping up on progress pics very well. Mostly due to the fact I was working evenings and it was to dark for pictures. I have been moving along slow but steady.

I took a step back and installed my new drainage thru the yard and put in my conduit for electrical. I did have some issues with the trencher I rented. never used on before and did not realize there was a scraper attachement that was missing. After working a 24" deep trench I would have about 6" of spoils I had to muck out. I think the scraper would have prevented that. I ran 4" triple wall thru the yard and out to the street. I am looking forward to the next big rain and not having a pond in my back yard I have to pump out.

As far as the shop, I still need to finish the front and get the sliding door installed. Hopefully that will be done this weekend. I am also going to push to get some concrete in before I put even more stuff in that I will just have to move.
 

Attachments

  • 20200629_223544.jpg
    20200629_223544.jpg
    148.7 KB · Views: 41
  • 20200830_193350.jpg
    20200830_193350.jpg
    154 KB · Views: 49
  • 20200906_183405.jpg
    20200906_183405.jpg
    146.7 KB · Views: 41
  • 20200906_184226.jpg
    20200906_184226.jpg
    144 KB · Views: 42
  • 20200919_113429.jpg
    20200919_113429.jpg
    146.2 KB · Views: 41
OP
D

dwouscg

Member
Joined
Oct 20, 2019
Messages
22
Location
Southern IL
I swapped my 100 amp panel in the house with a new 200amp panel. Installed the old 100amp panel in the shop. When I went to loosen the netrual bonding screw it was already out so guess I should have checked on that when I moved in to the house years ago. Pulled the 2-2-2-4 MHF out to the panel and tied everything together. I am running a few plugs and lights for now and will come back and install more later. I got tired of having to take batteries back to the house for charging.

I also installed some upper shelving for general storage. This may be full before I even get the concrete in at the rate I am going. I think they turned out very well for using all salvage material. The wood is from shipping crates that I recieved on a jobsite. I have officially exported my wood needs due to the high prices. I now have a part of Italy in the shop. Had the unistrut and threaded rod sitting at the house as well.

Hope fully over the weekend I will get final grading done inside to prepare for concrete.
 

Attachments

  • 20200930_174856.jpg
    20200930_174856.jpg
    152.5 KB · Views: 17
  • 20200930_174912.jpg
    20200930_174912.jpg
    87.3 KB · Views: 17
To avoid these ads, REGISTER NOW!
Top Bottom