I like it, few questions.
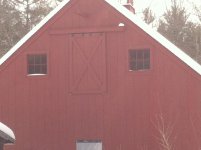
I see the wall with the garage doors don't seem to be braced or the sides having 1x4's let into the framing. Inspector didn't have any issues with that?
With the 2x10 rafters, what is the depth of the eave, 12"? and height of the fascia, 8"?
I am going to start a similar structure this month and just want to make sure my aesthetics look right.
Is there only one rafter tie on each rafter or is there one on each side?
Let in braces to the left and right of the respected garage door openings to prevent sideways sheer? Above the three doors there is almost solid framing across the entire wall, I though about putting horizontal blocking to extend the stability of the headers across whole wall. I have not done that but I did use a 4 inch oc nailing schedule on the edges and the field of the osb across whole front wall of the building. That is what code calls for in wind prone areas that require sheer walls. Our inspector is very lax, he hasn't been out to look at the project yet. So far it has survived the winter with over a 1 1/2 feet of snow on it at times, quite the wind(50+ mph bursts) and a
Cement truck that drove into( straight into the front wall, no shear forces put on it) with no issues that I could find yet.
So as far as the rafters go, since I obviously have no cielings joists that I can utilize as rafters ties I went with the tie back method you see. I found this method on a framing site as well as
So a garage done almost identical to mine locally where they only used hurricane ties, not the heavy gauge straps like I did and that buildin has been up for 10 years so far without issue. So what I did. I used a 2x8 plate which I glued down to he deck as well as nailed down as well as used timber locks to pull down into each I joist below. Then I landed each rafter on top of the plate toe nailing it from each side 3 times. I then used the tie back twist straps to mechanically tie back the rafter to the plate. I also hurricane tied them down which I know doesn't provide any tie back strength but I used them incase of any uplift shear. I made sure to inspect the system periodically through the winter as haven't seen anything concerning.
As you can see by the pics I framed out the Facia front with a 2x4 since if I cut my rafters off vertically the eaves would have been very shallow. I'll have to measure it all tomorrow and let you know.