To avoid these ads, REGISTER NOW!

36x36 Barn Plus 60x40 Shop

To avoid these ads, REGISTER NOW!
OP
M

mtechgunman

Well-known member
Joined
Dec 4, 2013
Messages
142
Location
Wyoming
I received some 304 today. 1.5" diameter. Using this to practice turning down and cutting threads that would be the same for barrels.


Sent from my iPhone using Tapatalk
 
OP
M

mtechgunman

Well-known member
Joined
Dec 4, 2013
Messages
142
Location
Wyoming
The barrels are considered blanks, but the rifling is complete. In this case, the contouring is complete as well. I will cut the blanks to length, chamber, thread etc
 
OP
M

mtechgunman

Well-known member
Joined
Dec 4, 2013
Messages
142
Location
Wyoming
Today I practiced removing bluing. This Winchester model 70 was pretty nasty. Needed to do this prior to blueprinting. I'll be finishing it in cerakote or durakote.

Vinegar is the ticket for removing bluing. It only took a few minutes for the bluing to start falling off. About 20 min of soaking followed by rub down with a scotch Brite pad and another 20 min of soaking this is the end result.


Sent from my iPhone using Tapatalk
 
OP
M

mtechgunman

Well-known member
Joined
Dec 4, 2013
Messages
142
Location
Wyoming
Just agreed to purchase this K&T 2D rotary head mill. 5500 lbs of American goodness!


Sent from my iPhone using Tapatalk
 

longlivepunk

Well-known member
Joined
Feb 22, 2013
Messages
377
Location
Edmonton, AB, Canada
That mill is some kinda ****! That photo is the first thing I've seen of this thread. Now I have to go to the start and read up to this point!

Sent from my B15 using Tapatalk
 

longlivepunk

Well-known member
Joined
Feb 22, 2013
Messages
377
Location
Edmonton, AB, Canada
Alright, all caught up! (Slow at work) sorry to hear about your dad, mtech. But congratulations, on the new broom-operator!

I wish my lathe had the ability to take collets. Looking forward to seeing more of your machining and fab work, the benches and bolt-handle look great!

Sent from my B15 using Tapatalk
 
OP
M

mtechgunman

Well-known member
Joined
Dec 4, 2013
Messages
142
Location
Wyoming
Thanks for the compliments! The collet adapter on the lathe is a really nice feature. It's been a pleasure learning to run the lathe. Can't wait to get my hands on the mill. Going to order a bunch of end mills and other tooling tonight


Sent from my iPhone using Tapatalk
 
OP
M

mtechgunman

Well-known member
Joined
Dec 4, 2013
Messages
142
Location
Wyoming
Did some serious shop cleaning and reorganization last couple days in preparation for the mill arrival. Hoping it will be here next weekend.


This is where the mill will go.


Sent from my iPhone using Tapatalk
 
To avoid these ads, REGISTER NOW!
OP
M

mtechgunman

Well-known member
Joined
Dec 4, 2013
Messages
142
Location
Wyoming
Also, ran more RapidAir Maxline to the lathe. Been needing to do this.


Sent from my iPhone using Tapatalk
 
OP
M

mtechgunman

Well-known member
Joined
Dec 4, 2013
Messages
142
Location
Wyoming
Yesterday I started working on an actual barrel. Got the threads and shoulder for bolt cut, everything went a little too well if you ask me. Started on the chamber, I've got about .050" to go. Defiance action, lilja barrel. This rifle will be chambered in 260 remington.


OP
M

mtechgunman

Well-known member
Joined
Dec 4, 2013
Messages
142
Location
Wyoming
So, I decided to do a little upgrading on the lathe. I have been running it under a VFD, but honestly, it's not been up to snuff because it's been working strictly as a phase converter.

The Leblond Regal servo shift machines are a little trickier to run the spindle motor alone on a VFD because you have to figure a way to be able to switch gears since the servo shift runs off of a separate 1/2 hp three phase motor.

The options are:
Buy a new single phase 1/2 horse motor and wire connections separate from original wiring
Buy new VFD for running servo shift motor
Convert machine to manual shift.

I called Leblond up, who by the way are incredibly helpful, and they told me they sell parts to convert the machines to manual shift for about $500.

I didn't purchase the parts, instead I wanted to see if I could make the parts myself.

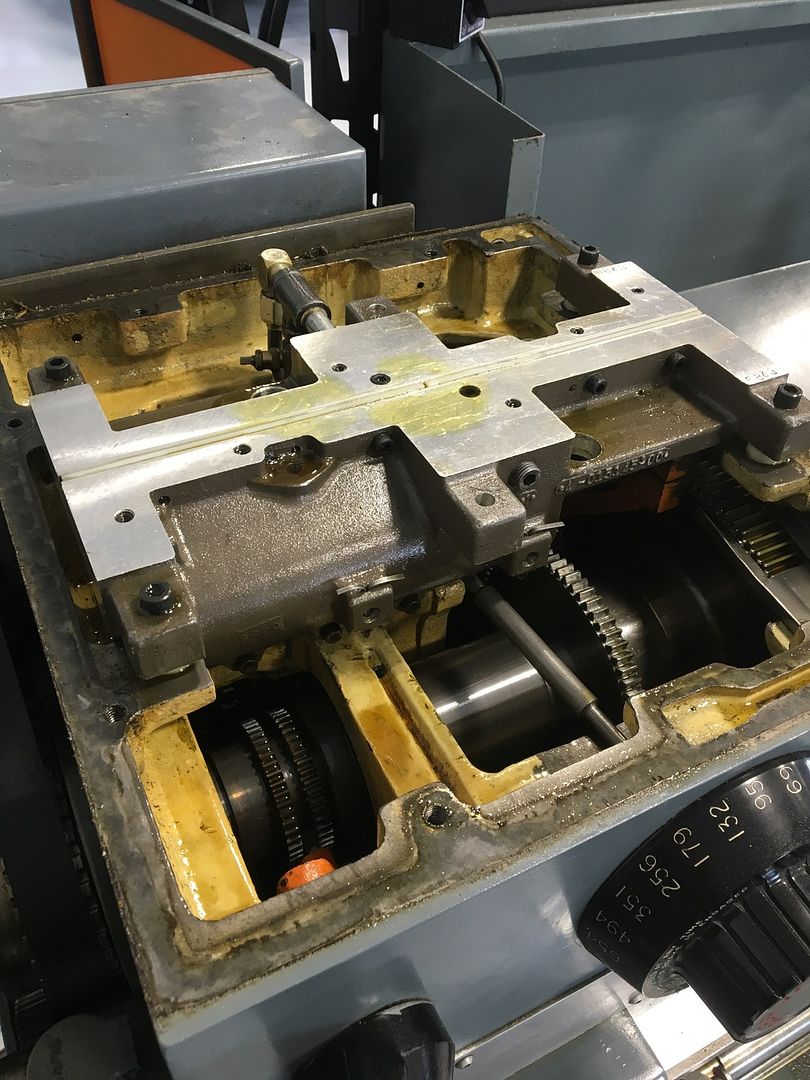
Here's a pic with the top popped on the lathe. The top piece is the servo shift unit. It uses hydraulics to shift gears, with an input dial on the front of the machine for selecting RPM.


http://smg.photobucket.com/user/mte...22-AD29-9679CE1DEAD2_zpssg8dzujw.jpg.html?o=3

Here's the unit pulled out of the machine. The two arms control the gear changes. http://smg.photobucket.com/user/mte...1E-93DF-C6CAFFBDF77A_zpscv0wxyol.jpg.html?o=2

Here's a look at the inside with no servo shift unit. Amazing how clean everything is for this 1978 machine. It looks brand new.


I pulled a cover plate on the front of the machine and found these two rods. They go straight back to the gears. I'm sure glad I didn't pay the $500 bucks for a kit, this is going to be a fairly simple process I believe.


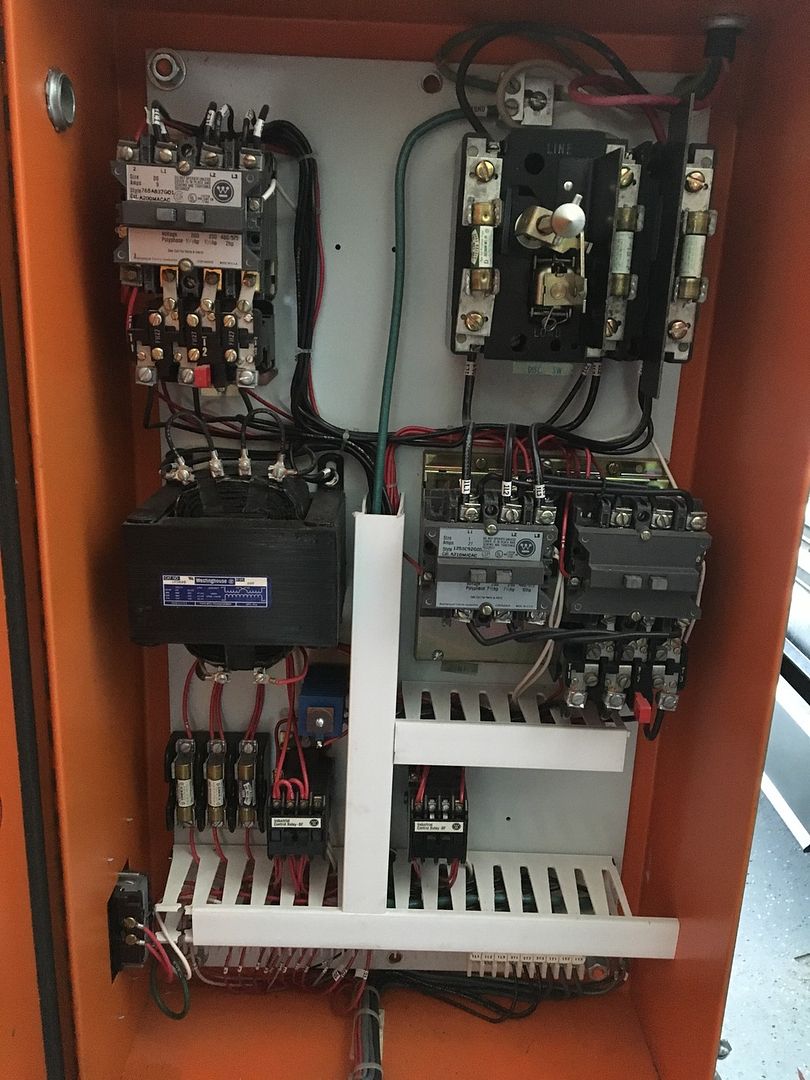
Here's a look at the electrical box for the lathe. It's really complicated at first glance. I'll be able to replace virtually everything in here, run power to a switch then to the VFD. three wires to the motor, two wires from the factory forward/reverse/neutral dial, then a couple wires for the Eaton brake. I haven't quite figured out the brake yet, but I'll get around to that eventually. I'll also run a potentiometer off the VFD so that I can control the speed even further. Fortunately Leblond did an amazing job marking and identifying each wire, along with running the wires in an incredibly clean manner. Makes things much simpler!


It will kinda **** not having the servo shift feature, but honestly it makes a ton of noise so I doubt I'll miss it much. I haven't been able to run the lathe at the high RPM's because the VFD can't act like it should when it runs as a phase converter alone so this will allow me to run it much more efficiently. I'll keep you posted on progress!
 

nsula_country

Well-known member
Joined
May 23, 2013
Messages
1,534
Location
Northwestern Louisiana
Good luck with the lathe. Seems you have a plan. I believe with most VFD's that can operate on 1p and output 3p have to be "de-rated." Example... Need a 5hp VFD to get full 3hp output... I am following how this turns out! I only have 1p available to my shop as well.

As for the brake, most applications are tied to the contactor coil. Power releases the brake with spring return. This could be completely incorrect in your application.
 
OP
M

mtechgunman

Well-known member
Joined
Dec 4, 2013
Messages
142
Location
Wyoming
You are correct. VFD's need to be de-rated 50% if they are rated three phase input and you are running them on single phase power. This is a 15 hp VFD. It still couldn't run the lathe effectively because it can't run the programmable acceleration unless it's hooked directly into the motor. So at high RPM I'd trip a breaker on it.

I was able to fire the motor today before I ripped the guts out of the control panel. The factory forward/neutral/stop/neutral/reverse knob does run the forward and reverse spindle rotation which is perfect. I just need to figure out how to run the brake.

Another gentleman over in the tool forum posted his build, it appears as though he has a second stop feature programmed so that the spindle motor decelerates in 1 second as opposed to 5 for a normal stop. My VFD has that capability as well, but I haven't figured out how to wire it and make it function correctly yet. Once I do that, theorhetically I could do without the factory brake altogether in place of the stop feature on the VFD.


Sent from my iPhone using Tapatalk
 

nsula_country

Well-known member
Joined
May 23, 2013
Messages
1,534
Location
Northwestern Louisiana
mtechgunman, you are going in the right direction.

The double contactor on the right side must be the reversing contactor for the head spindle. I cannot tell if it is a mechanically interlocked unit or not. Using a VDF here will clean up the panel for sure!

I would imagine the F/N/S/N/R knob is electrical and not mechanical. If this is true, you can map out the wiring as to what they are. Most VFD's have digital I/O, the selector switch can be wired to the inputs and assigned in the drive.

As for the brake... Without seeing a schematic, the F/N/S/N/R positions lead me to this.

S = Brake ON
N = Brake OFF
F = Forward with Brake OFF
R = Reverse with Brake OFF

The "N" position allows the head to wind down and coast. By having to cross the "S" position would fire the brake to ensure that the head is not rotating in the opposite direction before reversing direction.

VFD's have MANY parameters that can be assigned and tweeked. You already mentioned using the ramp down or "decel" to slow it down quicker. Instead of brake, you can apply 0hz to the motor, effectively holding at 0 RPM.

CT
 
Last edited:
OP
M

mtechgunman

Well-known member
Joined
Dec 4, 2013
Messages
142
Location
Wyoming
Nsula-

That is correct on the original wiring.

I had the VFD hooked up temporarily to test the switches. I can correctly run the lathe on the original switches in forward and reverse.

I've determined that I need to power the factory brake separately from the VFD. I plan to use a new kill switch. This poses new questions:

1. How to wire the kill switch in manner that both activates the brake and tells the VFD to remove power from the motor.

2. I need to better understand the power requirements of the factory Eaton brake so that I can power it separately.

If I can figure out how to power the brake, the VFD settings are easy. I'll simply set the motor to coast when forward (or reverse) switch is open rather than decelerate.

Judging by what I've read in my manual, I would need an external brake resistor to get the motor to stop with similar effectiveness as the Eaton brake. Those are $300-$500 bucks so hopefully I can see if this works first


Sent from my iPhone using Tapatalk
 

21lostboy

Member
Joined
Mar 18, 2016
Messages
17
Location
Nebraska
mtech,

Fantastic work. I am enjoying your progression and appreciate the critical thinking you have clearly displayed.

I am also looking forward to your improving smithing skills.
 
OP
M

mtechgunman

Well-known member
Joined
Dec 4, 2013
Messages
142
Location
Wyoming
Thank you 21!

I have figured out how to power the Eaton brake. I had to pull a rectifier off the original panel, which thankfully was after a transformer to get power down to 120V since I don't know anything about what a rectifier is or does. I just know my brake works when I run power to rectifier then to the brake. A good manual and some reverse engineering with the original panel got me there.

Now all I need is to run a new breaker dedicated for the Eaton brake.

I'll run power supply through a normally open emergency stop switch, then to the rectifier, then to the brake.

I need to find a switch that will allow me to run the VFD forward/reverse circuit through the emergency stop that is normally closed.

That will allow me to set the VFD to always coast to stop which I'd prefer anyways, then when I hit the e stop, the VFD will immediately cut power to spindle motor while simultaneously sending power to the brake.
 
OP
M

mtechgunman

Well-known member
Joined
Dec 4, 2013
Messages
142
Location
Wyoming
Alright, I am pretty much done with this install.

Here's the electrical panel.


I cut the face out of the panel for the VFD. I plan to put some plexiglass with cutouts for the fan over it.


Here's the manual shift levers. I am making knobs for them now.


Here's the front of the lathe. Potentiometer and light switches wired in for ease of access.


Only thing left to do is figure out where to mount the e stop switch at.


Sent from my iPhone using Tapatalk
 

nsula_country

Well-known member
Joined
May 23, 2013
Messages
1,534
Location
Northwestern Louisiana
Lathe looks good! Mitsubishi VFD. Nice. Few years back I worked in a mill that made "Engineered Wood Products" including I-Joists and LVL. I replaced several Mitsubishi drives with Allen Bradley Powerflex 700's. Wish I would have kept them!

CT
 
OP
M

mtechgunman

Well-known member
Joined
Dec 4, 2013
Messages
142
Location
Wyoming
Been a while since last post. Work and baby have taken a lot of shop time! I did get the mill up and running. 5 VFD's later. Runs great! The coolant pump seems to be clogged up so I need to take it out and clean it up but everything is is functioning great.


Once the mill was running I sprung for a Kurt's vise. Very happy I did that.


Also not pictured us a semi-universal dividing head.

I finally got tired of the raft and raft trailer taking my trucks parking spot in the garage so I got my hoist system up and running.

The system uses two trusses that are rated for 400 lbs each over what the other trusses are so they are suitable for storing this raft.

Here is the electric winch bolted to the ground.


Raft in the air


Very happy to have this done. After it was complete I was kicking myself for not tackling this project sooner.


Sent from my iPhone using Tapatalk
 
To avoid these ads, REGISTER NOW!
Top Bottom