To avoid these ads, REGISTER NOW!

40x50 garage-shop

OP
T

toomanyrocks

Well-known member
Joined
Jan 20, 2019
Messages
190
Location
Ohio
This thread was supposed to be about a garage, right? Well finally done with the kitchen, time to move onto the real project...the garage.

This time, since I watched the excavator do the work on the kitchen, I figured, "I could do that." Just need more toys. I already had the backhoe, but that is not very good at making nice trenches, so I found this:

bobcat.jpg


bobcat2.jpg


You can see my shop is a little crammed.
 

Attachments

  • bobcat.jpg
    bobcat.jpg
    50.6 KB · Views: 24
  • bobcat2.jpg
    bobcat2.jpg
    39.6 KB · Views: 22
To avoid these ads, REGISTER NOW!
OP
T

toomanyrocks

Well-known member
Joined
Jan 20, 2019
Messages
190
Location
Ohio
OK finally getting down to the garage part of this thread. For you car guys, everyone here seems to be into interested in what is in the garage,s o here is my current situation:

carintrailer.jpg


not enough room in the garage. Besides the workbench and the bobcat in the earlier pictures, the other stalls of the garage is where the backhoe and drag trailer are. So, no cars in the garage. Now doesn't that just scream out: "More Garage?"

My wife doesn't understand that ...."Why don't you just get rid of some of your ****, instead of hoarding a bunch of stuff you never use?"

One just might need to dig a hole...
 

Attachments

  • carintrailer.jpg
    carintrailer.jpg
    143.8 KB · Views: 19
OP
T

toomanyrocks

Well-known member
Joined
Jan 20, 2019
Messages
190
Location
Ohio
The saga continues, as I was finally able to convince her that if I spent the next 2 years building a garage, I would be outside, getting good exercise and be out of her hair. ;)

"it could be a family project, the daughter and her husband just moved back to town, I'm sure they would love to help..."

Her: "No one wants to work with you...."

I digress again....more car photo: I found a twin in the parking lot at work one day, (although mine was newer and prettier....) mine on the left...


cars.jpg
 

Attachments

  • cars.jpg
    cars.jpg
    56.8 KB · Views: 21
OP
T

toomanyrocks

Well-known member
Joined
Jan 20, 2019
Messages
190
Location
Ohio
back to the garage...again 3 months with the blueprints, but this time I got a survey, since I was getting close to the property set-back. Low and behold...I find out that the survey I had when I bought the house was a fake! The title company charged me for a survey and accepted a survey that was apparently just taken off an earlier incorrect survey. Apparently they approximated the property lines based on some old fence rows and a telephone pole, both of which were not where they were supposed to be on the map.

Long story short....always pay for your own survey. Turns out my property ends about 200 feet short of where the previous survey indicated...that meant that the builder put the septic system on the neighbor's property, a good 100 feet off of my property. Don't even get me going about the utility easement that runs under the swimming pool the previous owner built...without a new survey.

Well, the health department wouldn't sign off on the plans, since I didn't have legal access to my septic system, and that was that. That's how I got to meet my neighbor....

I got really lucky, the guy was really nice and understanding and was happy to GIVE me a right of way for the septic....he didn't even want me to reimburse him for his lawyer's fees to review the documents. The surveyor understood the problem and drew me up a new survey with the easement to submit to the board of health.

Whew...I would hate to think what it would have cost to buy a half an acre form my neighbor, probably more than the whole garage project.

back to work on the plans...

eastelevation.jpg
 

Attachments

  • eastelevation.jpg
    eastelevation.jpg
    43.5 KB · Views: 23
OP
T

toomanyrocks

Well-known member
Joined
Jan 20, 2019
Messages
190
Location
Ohio
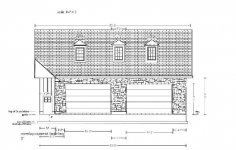
Here are my requirements for the project:

At least 2 bays with 16 foot wide door, the height of at least 11 ft, since I want to park the boat in there too. (That boat is another story...wifey none too happy.)

I need enough space for my woodworking machinery with the table saw being the center of the bay with at least 8 ft clearance on every side, so I can rip 8 ft sheets.

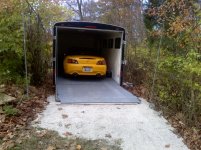
You know I have the black car trailer, that is 23 ft long or so, don't want to have to keep that outside.

Lots of room for storage racks, If these go upstairs, a really big stairwell and heavy duty floor to hold more weight than I would ever imagine.

Lots of insulation, since I must have it heated in the winter, I spent an entire winter in the old garage with a torpedo kerosene heater, really didn't heat the space but did catch my pants on fire more than once.

Bathroom, preferably with shower.... getting older, can't get too far...tired of using the woods...another minor thing the wifey is unhappy about.

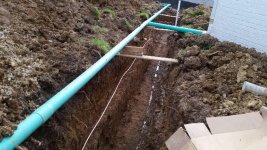
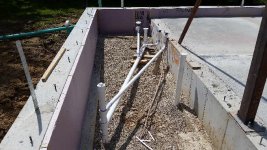
Originally I had planned the upstairs finished space to be pre-plumbed so that I could later turn it into a guest apartment, but the health department nixed that. The building would have to b e non living space, since my septic was grandfathered and any changes in the load would require an entire new system. $80,000 is not in the budget. Interestingly, as long as you don't add a bedroom you can add as many bathrooms as you want, supposedly because no change in the number of people able to live there. Well, I did stub out the sewer riser in the utility room, so in the future....someone could...

One bathroom on the main floor should suffice...

We went back and forth with this as a connected v.s. freestanding building, but the health department again said if it was free standing, I couldn't connect into the house sewer line.

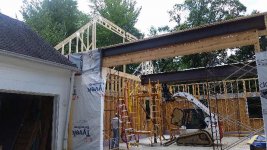
Then it was just a matter of how to connect to the house. The zoning folks said as long as there was a physical connection, such as a breezeway or covered walk, that counted. I wondered why there were so many houses in my neighborhood with unattached secondary garages with covered breezeways.

I didn't want to go outside in crappy weather to get to my shop anyway, so connected it was. A badly photoshopped mockup:

rearelev.jpg


Just enough overlap for the stairwell and door to the old garage. I wanted a straight shot up the stairs for big stuff, I learned my lesson in MIchigan, a 90 degree landing is a pain.
 

Attachments

  • rearelev.jpg
    rearelev.jpg
    51.2 KB · Views: 20
OP
T

toomanyrocks

Well-known member
Joined
Jan 20, 2019
Messages
190
Location
Ohio
Plans drawn up, OK from zoning and health department, off to the building department.

Again, these folks were more helpful than anticipated, although it was a little anxiety provoking to have to wait for their response...turns out just a couple of clarifications on the blueprints (I used some symbols incorrectly) and they wanted some other details, but basically no problems.

Off to the electric permits, and plumbing again. Electric was much easier this time, since I had already upgraded all the wiring and boxes on the last project.

here's the before pic:
before.jpg
 

Attachments

  • before.jpg
    before.jpg
    69.6 KB · Views: 20
OP
T

toomanyrocks

Well-known member
Joined
Jan 20, 2019
Messages
190
Location
Ohio
I did tell you the size of this project: 40 ft deep and 50 ft long. 2000 sq ft on the garage floor and 1000 sq ft on the second floor.

Here's a shot of the spot where the new shop will be. My property ends in the middle of the treeline on the left, and goes maybe 150 ft to the road on the right of the picture.

before2.jpg


took out the trees:
stakes.jpg
 

Attachments

  • before2.jpg
    before2.jpg
    67.9 KB · Views: 20
  • stakes.jpg
    stakes.jpg
    49.1 KB · Views: 19
Last edited:
OP
T

toomanyrocks

Well-known member
Joined
Jan 20, 2019
Messages
190
Location
Ohio
Excavation begins! It doesn't look like much, but the grade drops off at the bottom, so the foundation steps down quite a bit. Lots of dirt to move , but I had some low areas in the yard that needed filling, and there will be a lot of back filling later.

exc1.jpg


exc2.jpg


exc3.jpg
 

Attachments

  • exc3.jpg
    exc3.jpg
    54.4 KB · Views: 23
  • exc2.jpg
    exc2.jpg
    59.6 KB · Views: 23
  • exc1.jpg
    exc1.jpg
    60.3 KB · Views: 23
OP
T

toomanyrocks

Well-known member
Joined
Jan 20, 2019
Messages
190
Location
Ohio
Unfortunately, the bottom corner was a little wet and I never got all the way down to soil that had been undisturbed from the previous construction, so spent a day with a jumping compactor...hopefully that helped.

This time I got smart, hired a commercial foundation company, they were really nice, very professional, and were there every day. What a change.

Below, they are pouring the footers, notice these are almost 3 feet wide. I wanted them to be able to disburse the weight of all that rock facade over a very wide base since it is sitting on clay (that I was a little iffy about the compaction.

found1.jpg


found2.jpg


Notice they were filling the forms with a hopper. I asked why not a pumper, the supervisor shrugged and said, no problem, he worked the crane and it was just as fast...he was right. I think it was more like another crew had the pumper that day.

found3.jpg
 

Attachments

  • found1.jpg
    found1.jpg
    47.8 KB · Views: 25
  • found2.jpg
    found2.jpg
    58.9 KB · Views: 23
  • found3.jpg
    found3.jpg
    40.3 KB · Views: 22
OP
T

toomanyrocks

Well-known member
Joined
Jan 20, 2019
Messages
190
Location
Ohio
couple days and they were back, stripping forms and setting up walls.

found4.jpg


found5.jpg


found6.jpg
 

Attachments

  • found6.jpg
    found6.jpg
    51.7 KB · Views: 25
  • found5.jpg
    found5.jpg
    65.2 KB · Views: 25
  • found4.jpg
    found4.jpg
    70.2 KB · Views: 24
OP
T

toomanyrocks

Well-known member
Joined
Jan 20, 2019
Messages
190
Location
Ohio
Next day they were back with the crane and hopper...I really thought they would use a pumper for this, as that was a lot of concrete in 12 inch thick walls.

found7.jpg


found8.jpg


found9.jpg
 

Attachments

  • found7.jpg
    found7.jpg
    44.8 KB · Views: 21
  • found8.jpg
    found8.jpg
    54.7 KB · Views: 21
  • found9.jpg
    found9.jpg
    48 KB · Views: 22
OP
T

toomanyrocks

Well-known member
Joined
Jan 20, 2019
Messages
190
Location
Ohio
A couple more days and they were back, pulled the forms and they were gone. The whole thing took less than 2 weeks. These guys were great! I damp proofed the foundation and was ready to fill for the floor.

found10.jpg


found11.jpg


found12.jpg


This was one of the few pictures that gives you a sense of scale of the project.
 

Attachments

  • found12.jpg
    found12.jpg
    41.2 KB · Views: 24
  • found11.jpg
    found11.jpg
    42 KB · Views: 24
  • found10.jpg
    found10.jpg
    50.2 KB · Views: 22
OP
T

toomanyrocks

Well-known member
Joined
Jan 20, 2019
Messages
190
Location
Ohio
A little back-filling...notice the flattened pressure washer in the one picture, that was a little oops, they tend to not do well when you run them over with a bobcat...I did feel a little bump...

The inside of the foundation was lined with 2 inch high density foam for insulation, it goes down below frost line, so I didn't have to put any under the slab.

Also notice the pillar in the center of the garage. I put that there to go under the slab, not for support of the slab, but the steel holding the center of the garage was engineered to carry maximum load in the attic as well as 1 ton on an overhead crane hung from the beam. I designed the floor so that if necessary, a temporary post could be placed under the center of the beam increasing the load capacity to many more than 5 tons (which I would never need anyway.) I worried about this column causing stress on the slab if the slab settled, but so far, nothing, athough there are a few contraction cracks that occurred when the floor was first poured. These seem very shallow, and there is so much steel under there, they won't ever move.

found13.jpg


found14.jpg
 

Attachments

  • found13.jpg
    found13.jpg
    86.8 KB · Views: 25
  • found14.jpg
    found14.jpg
    74.7 KB · Views: 26
OP
T

toomanyrocks

Well-known member
Joined
Jan 20, 2019
Messages
190
Location
Ohio
Next comes the steel. A couple of 6 inch steel posts to hold up the mail beam. The main beam is impressive: 2feeet tall, one foot wide and 44 feet long. Over 5000 pounds. I didn't have anything that could lift that, so the steel supplier sent a crew and truck and charged I think 50 bucks.

steel1.jpg


steel2.jpg


steel3.jpg


The hydraulic jib crane on the bobcat was the greatest little contraption. I got it on EBAY. Bobcat used to make these but I guess the liability from tipping was too high so they stopped. You will see later the real reason I bought it.
 

Attachments

  • steel3.jpg
    steel3.jpg
    52.5 KB · Views: 25
  • steel2.jpg
    steel2.jpg
    57.3 KB · Views: 24
  • steel1.jpg
    steel1.jpg
    65 KB · Views: 27
OP
T

toomanyrocks

Well-known member
Joined
Jan 20, 2019
Messages
190
Location
Ohio
Another little boo boo..I have a little problem with backing up...Ripped off the tailgate, but to my defense, the entire bottom weld was rotted away and the hinges would have been falling off anyway.

truck.jpg
 

Attachments

  • truck.jpg
    truck.jpg
    56.8 KB · Views: 22
OP
T

toomanyrocks

Well-known member
Joined
Jan 20, 2019
Messages
190
Location
Ohio
Erection: (please don't pull the censor thing.) These guys were working in the rain, not sure I would have wanted to be 15 feet up in the air with an arc welder in the rain....

steel5.jpg


steel4.jpg


steel6.jpg
 

Attachments

  • steel5.jpg
    steel5.jpg
    59.2 KB · Views: 22
  • steel4.jpg
    steel4.jpg
    68.1 KB · Views: 21
  • steel6.jpg
    steel6.jpg
    64 KB · Views: 22
OP
T

toomanyrocks

Well-known member
Joined
Jan 20, 2019
Messages
190
Location
Ohio
I had to dig a nice trench to tie the house with the garage for the plumbing. The tie-in luckily was a sewer standpipe in that far corner of the basement. Only problem, it was 8 feet below grade, so out comes my handy backhoe. Only one boo boo here, knocked the hose bib of the house with the first swipe...spent the rest of the day repairing the plumbing.

Next day, back to digging. Managed to get the proper drop on the sewer line, but had to go under the foundation. Another day of hand digging. I had planned for a through the wall, and had set a pipe in the foundation for that, but I miscalculated how far away from the water line it had to be since they were both in the same trench. Around here water has to be buried at 40 inches and the sewer another few feet below that, and the water has to be on a shelf of undisturbed ground, so keep it from settling...

The plumbing inspector was none too keen on getting down in that trench to verify the slope of the sewer line, but he did and got out really fast.

plumb1.jpg


plumb2.jpg


It only took 2 trips to the tool rental place, the first coring drill he gave me was shorted out and didn't work for more than a minute before it began smoking....great fun while standing in a puddle of water holding a metal drill. The replacement worked fine drilled through the old 8 inch foundation in just a few minutes. Before backfilling:

plumb3.jpg
 

Attachments

  • plumb1.jpg
    plumb1.jpg
    56.5 KB · Views: 25
  • plumb2.jpg
    plumb2.jpg
    51.8 KB · Views: 25
  • plumb3.jpg
    plumb3.jpg
    55.8 KB · Views: 23
OP
T

toomanyrocks

Well-known member
Joined
Jan 20, 2019
Messages
190
Location
Ohio
I've been working on the garage floor:

I used a vapor barrier that was like 20mils thick, nothing was going to tear that stuff. Loads of steel. I used those little plastic rebar holders, they looked really good here, but worked like ****, the first time the pumper hose jiggled them, they all fell over, had to pull everything up bu hand and finally threw a bunch of bricks as supports as we went. The bricks worked much better, and I don't think they would affect the strength of the cement as it was 6 in thick min and over 8 in some spots.

floor1.jpg


floor2.jpg


Another day of digging and the trench is backfilled, and drain lines reconnected temporarily.

plumb7.jpg
 

Attachments

  • plumb7.jpg
    plumb7.jpg
    59.6 KB · Views: 22
  • floor1.jpg
    floor1.jpg
    53.2 KB · Views: 23
  • floor2.jpg
    floor2.jpg
    71.4 KB · Views: 21
OP
T

toomanyrocks

Well-known member
Joined
Jan 20, 2019
Messages
190
Location
Ohio
I got my same crew back that did the kitchen basement floor, and I was just as impressed this time. They used a trailer mounted pumper and got everything down including all the slopes for all the garage doors. Code says there has to be a 2 inch fall to the garage door (1/8 in per inch, but the inspector let me go 1/16 since the distance was so long.) Anyway it ended up about 2 inches at the door sills. This wasn't bad for the guys doing it basically by eye and a few stakes.

floor3.jpg


floor4.jpg


Power screed-ed to a nice slick surface,

floor5.jpg
 

Attachments

  • floor5.jpg
    floor5.jpg
    44.6 KB · Views: 21
  • floor4.jpg
    floor4.jpg
    63.9 KB · Views: 22
  • floor3.jpg
    floor3.jpg
    77.9 KB · Views: 22
To avoid these ads, REGISTER NOW!
OP
T

toomanyrocks

Well-known member
Joined
Jan 20, 2019
Messages
190
Location
Ohio
by the end of the day, a thing of beauty. By the way this is 5000 psi concrete, 6 inches thick, I don't think my 10,000 pound backhoe will cause any problems...


floor6.jpg
 

Attachments

  • floor6.jpg
    floor6.jpg
    55.7 KB · Views: 22
OP
T

toomanyrocks

Well-known member
Joined
Jan 20, 2019
Messages
190
Location
Ohio
Whilst the floor is curing, a little more plumbing. Bathroom work.

Well, I managed to misunderstand the codes about wet venting the shower, put the Y vertical instead of horizontal. The plumbing inspector was great, and it was simple just to add a vent line that I will t later into the vent stack.


bathrough.jpg


After corrections.

bathrough2.jpg
 

Attachments

  • bath rough2.jpg
    bath rough2.jpg
    49.6 KB · Views: 20
  • bathrough.jpg
    bathrough.jpg
    55.4 KB · Views: 19
OP
T

toomanyrocks

Well-known member
Joined
Jan 20, 2019
Messages
190
Location
Ohio
First test of the new garage, new brakes on my son's car.


first.jpg
 

Attachments

  • first.jpg
    first.jpg
    53.4 KB · Views: 21
OP
T

toomanyrocks

Well-known member
Joined
Jan 20, 2019
Messages
190
Location
Ohio
The crew was back, this time just a quickie: Last of the floor poured. There will be a shower on the far end, so there is a 1 inch step down to account for the shower floor. I intend this floor to be level with the rest of the bathroom floor for a stepless entry, so it has to all be able to be slanted to the drain. The crew handled this perfectly for me.


floor7.jpg
 

Attachments

  • floor7.jpg
    floor7.jpg
    37.7 KB · Views: 21
OP
T

toomanyrocks

Well-known member
Joined
Jan 20, 2019
Messages
190
Location
Ohio
Time to set the rest of the steel. posts and 16 foot steel headers in the front. These are holding the weight of the roof and front half of the 2nd floor. The rear garage door you see to the right will be framed traditionally with a wood header, as it is on the gable end and doesn't bear the weight. The stone facade will support its own weight, as you will see later.


steel7.jpg


steel8.jpg


I had to borrow a smaller welder from my son-in-law since mine is too big to move to get all the way out here to weld the posts to the beams. Unfortunately, an ac welder, so the upside down welds are pretty drippy and nasty, but will be covered up so only I will know.
 

Attachments

  • steel7.jpg
    steel7.jpg
    49.7 KB · Views: 22
  • steel8.jpg
    steel8.jpg
    51 KB · Views: 21
OP
T

toomanyrocks

Well-known member
Joined
Jan 20, 2019
Messages
190
Location
Ohio
Finally, framing, first day.

frame6.jpg


frame2.jpg


frame3.jpg
 

Attachments

  • frame3.jpg
    frame3.jpg
    69.3 KB · Views: 17
  • frame2.jpg
    frame2.jpg
    52.5 KB · Views: 17
  • frame6.jpg
    frame6.jpg
    62.6 KB · Views: 18
OP
T

toomanyrocks

Well-known member
Joined
Jan 20, 2019
Messages
190
Location
Ohio
again some pics for scale.


frame4.jpg


frame5.jpg
 

Attachments

  • frame4.jpg
    frame4.jpg
    45.3 KB · Views: 19
  • frame5.jpg
    frame5.jpg
    50.5 KB · Views: 19
OP
T

toomanyrocks

Well-known member
Joined
Jan 20, 2019
Messages
190
Location
Ohio
a few pics of the framing progress.

frame7.jpg


frame8.jpg


frame9.jpg
 

Attachments

  • frame9.jpg
    frame9.jpg
    64.4 KB · Views: 16
  • frame8.jpg
    frame8.jpg
    60.9 KB · Views: 15
  • frame7.jpg
    frame7.jpg
    63.6 KB · Views: 15
OP
T

toomanyrocks

Well-known member
Joined
Jan 20, 2019
Messages
190
Location
Ohio
A little wrap, and first floor framing is done. One point, apparently the electric codes changed between this and the last project. Now they want the rebar in the footer connected to a ground rod. (I wondered why the foundation foreman asked me if I wanted a wire.) So out with the chisel, at least I knew where the rebar was in the cement, since I designed it. Spent a day chipping it out and attaching a ground clamp to show the inspector....kind of pissed that the footer inspector didn't say anything. Shows how good those inspections really are.

frame10.jpg


ground.jpg


ground1.jpg
 

Attachments

  • frame10.jpg
    frame10.jpg
    52.2 KB · Views: 20
  • ground.jpg
    ground.jpg
    33.1 KB · Views: 20
  • ground1.jpg
    ground1.jpg
    27.1 KB · Views: 19
OP
T

toomanyrocks

Well-known member
Joined
Jan 20, 2019
Messages
190
Location
Ohio
Sorry I don't have any better pictures of this. Truss delivery. Notice the bundle says 1 of 1? what happened to the other 44? Missing half my shipment. Actually the day before they showed up with the other load, but it was missing this load, and this one had to be dropped first so I could get at them, since I had a very narrow drive. This day it was raining and the driver was very good he took it as a challenge to get up the drive and all the way back into here with 44 ft long trusses which were wider than the drive. He was determined and I had to take out a couple of small trees which were in the way, but by gosh he did it.


truss.jpg
 

Attachments

  • truss.jpg
    truss.jpg
    49.5 KB · Views: 16
OP
T

toomanyrocks

Well-known member
Joined
Jan 20, 2019
Messages
190
Location
Ohio
I spent almost a year thinking about this next step, how to get these massive trusses up? There is a big beam running the entire length of the building, so the previous method of flipping them up from below was out.

My friends who had helped on the kitchen were now in their late 60's and early 70's, so wifey said "Don't even think about it!"

So it was going to fall back on the old leverage and hydraulics.

First brace up the end so the gable end truss doesn't flip off.

truss2.jpg


Then lift it up with that jib mast and tie it in place. Notice that these attic trusses have no framing in the room area at on the ends, so they are especially wobbly and there is little to brace against.

truss3.jpg


truss4.jpg


But, it worked, 1 down 43 to go.
 

Attachments

  • truss2.jpg
    truss2.jpg
    58.5 KB · Views: 18
  • truss3.jpg
    truss3.jpg
    57.6 KB · Views: 18
  • truss4.jpg
    truss4.jpg
    63.5 KB · Views: 18
OP
T

toomanyrocks

Well-known member
Joined
Jan 20, 2019
Messages
190
Location
Ohio
Remember, I am DOING THIS MYSELF, no helpers. But there is a great process I worked out:

First the trusses had to be restacked, obviously they were loaded on the truck facing the wrong way and with the gable end trusses on the bottom of the stack. They each had to be lifted and flipped over and re-stacked behind where the bobcat is in the picture.

This process took a couple days.


truss5.jpg


Then I could pick up the proper truss in the right order from the pile and lay it on top of the first floor framing. Remember each of these things weighs 400 pounds or more, and are very floppy. no work on windy days. (luckily didn't have many of those).


truss6.jpg


Then push them across the top of the first floor framing and flip up using the jib. Nail in place and apply temporary bracing.


truss7.jpg
 

Attachments

  • truss7.jpg
    truss7.jpg
    56.4 KB · Views: 14
  • truss6.jpg
    truss6.jpg
    68 KB · Views: 15
  • truss5.jpg
    truss5.jpg
    50.9 KB · Views: 15
OP
T

toomanyrocks

Well-known member
Joined
Jan 20, 2019
Messages
190
Location
Ohio
That worked pretty well until I got to here. Now I didn't have enough room below to get the boom out far enough to be able to flip the truss...New plan, again I had been thinking of this for 6 onths or more, just didn't know if it would actually work.


truss8.jpg


Still can lay the truss flat across the framing.

truss9.jpg


I mounted an electric winch on the end of the big I beam and ran a cable to the truss, pulled it into position, blocked it, and ran the cable through a pulley at the top, flipping the truss into place. One man operation...and wifey thought I was nuts.


truss10.jpg
 

Attachments

  • truss8.jpg
    truss8.jpg
    57 KB · Views: 16
  • truss9.jpg
    truss9.jpg
    64.1 KB · Views: 15
  • truss10.jpg
    truss10.jpg
    60.7 KB · Views: 16
OP
T

toomanyrocks

Well-known member
Joined
Jan 20, 2019
Messages
190
Location
Ohio
lather...rinse...repeat...Actually not that easy, you see the gaps, that's where the dormers go, so the framing gets built later, but without anything below, the bracing requires a little monkey-like agility crawling up and down over that gap to nail it together. Each side of the dormers has 4 of these massive trusses nailed together with nails driven as each truss goes up. I know there are hundreds of nails in each girder, since they are spaced every 4 inches in multiple rows. I think this was the hardest part of the process hanging there trying to get all those nails in. Once it was allnailed, there were bolts across the bottom cords every 4 feet. All this specified in the truss diagrams.


truss11.jpg


truss12.jpg


truss13.jpg
 

Attachments

  • truss11.jpg
    truss11.jpg
    37.9 KB · Views: 18
  • truss12.jpg
    truss12.jpg
    40.7 KB · Views: 18
  • truss13.jpg
    truss13.jpg
    75.5 KB · Views: 18
OP
T

toomanyrocks

Well-known member
Joined
Jan 20, 2019
Messages
190
Location
Ohio
It was a cute balancing act to get that last gable end truss up, as it only had 1 1/2 inches to sit on the edge. It actually went up much easier than anticipated.

All in all, I only dropped one of the big trusses when a strap slipped, but luckily didn't damage it. And although the bobcat got pretty tippy once or twice, it never left the ground. (I should have graded that side of the building before starting the trusses, but I didn't.)

These are 2 piece trusses, the caps above the attic room are separate pieces that are mounted on top of the trusses, going up another 10 feet or so. I think the peak came in at 34 feet.

Anyway you probably saw the my jib only went to 30 feet when everything was fully extended, so that was not going to be of any use for the caps.

The caps were a slow process of carrying them up one at a time and sliding them between the trusses at the dormers where there was 5 feet of space between the girders. Then the process was just to flip them up and nail in place.


caps.jpg


caps2.jpg


Apply the stubs to the drop gable ends, and there you go. (There was a lot of scrambling up and down since every piece got carried 1 or 2 at a time, and every piece was nailed and clipped with hurricane clips. 8 nails each.) It actually took a couple weeks to complete all this.

caps3.jpg
 

Attachments

  • caps3.jpg
    caps3.jpg
    58.1 KB · Views: 14
  • caps2.jpg
    caps2.jpg
    67.5 KB · Views: 15
  • caps.jpg
    caps.jpg
    65.1 KB · Views: 15
OP
T

toomanyrocks

Well-known member
Joined
Jan 20, 2019
Messages
190
Location
Ohio
Framed the dormers as I put up the caps. Built on the ground then raised the pieces:

dormer.jpg


dormer2.jpg


dormer3.jpg
 

Attachments

  • dormer.jpg
    dormer.jpg
    49.4 KB · Views: 17
  • dormer2.jpg
    dormer2.jpg
    50.9 KB · Views: 16
  • dormer3.jpg
    dormer3.jpg
    69.3 KB · Views: 15
OP
T

toomanyrocks

Well-known member
Joined
Jan 20, 2019
Messages
190
Location
Ohio
Next up: roofing. This is an ungodly steep roof: almost 12/12. So lots of roof jacks and walk planks. It seemed to go on forever. And of course it was 100 degrees outside in September.

I used a synthetic underlayment, since it was really a lot tougher than tarpaper, and 3 feet of water and ice barrier at the bottom and around all the dormers. It was a mess getting that ice barrier up with its self stick, since the roof is 54 feet long, that required pretty much an entire roll, and that stuff is heavy. I thought I set up scaffolding all across the back, but I don't see it in the picture, so I guess I only did it in the front. No wonder I had such a time getting that barrier rolled out.

It all went up...one row at a time. I don't ind roofing ...when its done...The shingles were the 30 year kind that weigh a ton, but once the first couple rows were up, I could lay a couple bundles on the walkboards with the jib and bobcat. At least I didn't have to carry them all up to the roof. (although once I was half way up the jib wouldn't reach any higher, and there was still a lot of carrying.


roof1.jpg


roof2.jpg


roof3.jpg
 

Attachments

  • roof3.jpg
    roof3.jpg
    53.4 KB · Views: 16
  • roof2.jpg
    roof2.jpg
    60.3 KB · Views: 15
  • roof1.jpg
    roof1.jpg
    66.4 KB · Views: 14
OP
T

toomanyrocks

Well-known member
Joined
Jan 20, 2019
Messages
190
Location
Ohio
The front of the roof, mostly the same process, but those damn dormers to work around and all that flashing!

Worst part was putting up the decking, the sheets were 5/8 in and really heavy, lots of heave ho to slide them up over the one below and insert the clips and nail it all down. I've always used bostich "hurriquake" nails in the decking, but lately I really had a hard time getting them, out of production I think, which is really too bad, as those suckers do not come out once they are applied. I designed the roof as a 150mph wind rating.

Again lots of ice shield. I like the looks of a steel valley, which is pretty much the way they do it around here. I was surprised at how little this is used near the Michigan Garage. I guess it is cheaper to just weave the shingles, but I cant imagine that the stress on those shingles from heat/cool cycles wouldn't crack them.


roof4.jpg


roof5.jpg


roof6.jpg
 

Attachments

  • roof4.jpg
    roof4.jpg
    47.9 KB · Views: 15
  • roof5.jpg
    roof5.jpg
    58.8 KB · Views: 14
  • roof6.jpg
    roof6.jpg
    47 KB · Views: 12
To avoid these ads, REGISTER NOW!
Top Bottom