To avoid these ads, REGISTER NOW!

44 Bikes Frame Shop

Red Leader

Well-known member
Joined
May 15, 2011
Messages
2,688
Location
Denver, CO
foutyfour,

Its continuing to look great - keep up the awesome work.

Quick question - what camera do you use? Many of your shots look like the 'pop art' filter found on my E-PL2 that I use.

Keep it coming;):thumbup:
 
To avoid these ads, REGISTER NOW!
OP
F

fortyfour

Well-known member
Joined
May 9, 2011
Messages
537
Location
Lyndeborough, NH
@Red Leader: My camera is a Nikon D60. The D60 has a slightly smaller body than other Nikon models which are similar in features. I have been using an 18-70mm DX lens. It's a mix of telephoto and wide angle. Most of my shots I'm shooting in a manual mode and adjusting for light / exposure for each shot. Depending on the mood I'm in, I'll switch to black and white post in Adobe Photoshop and adjust levels from there to punch up the blackest blacks and lightest lights. Sometimes I will adjust colors post as well to punch up some colors but for the most part the lens and camera are doing the work. No filters applied. The only filter I often use and it's when I'm outside to bring out contrast is a polarizer. Kind of a gray/smoke colored filter. But the lens quality is really what matters - this isn't the best lens but I'm very happy with the photos it produces.
 
OP
F

fortyfour

Well-known member
Joined
May 9, 2011
Messages
537
Location
Lyndeborough, NH
And now a message from our sponsor..


Making it happen by BLACK CAP Studio, on Flickr

Working in the shop has been a treat. It's been too long since I've had the opportunity to have such a resource right at my finger tips. I was thinking as I worked that we're often defined by what we do. I always strive to be ever evolving and refining who I am and what I do. But I also make an effort to not let the work take over. That's what it means to me up above: Work, stay focused and disciplined but remember that you're in control and to make time for yourself and those around you.

Today's effort:


Chainstay Mitering Tube Blocks by BLACK CAP Studio, on Flickr

Checking an assembly in the tacking jig. I can't wait to use this jig!


Chainstay Assembly Detail by BLACK CAP Studio, on Flickr

Mostly been finishing up small bits and pieces like trim and paint/finishing these days. I'll be doing the ceiling most likely at the end of the month and hope to have some more updates then. Hope you're all enjoying these shots. It's been fun to share in the meantime.
 

smsteve

Well-known member
Joined
Aug 28, 2008
Messages
111
Location
Montrose, Kalifornia
Loving the photos, I look at them and try to imagine how you did it, still too much for my lil' brain though.

Can I ask a question from a completely ignorant standpoint relating to milling and lathe work with metals? What do you do with all the chips? Seems like they would be flying all over the place and getting into all the little crevices of the Bridgeport, etc. How does it all get cleaned up? I used to work with my father in his wood turning business and wood chips, dust, etc. could just be blown to the ground then swept up and bagged, nothing was sharp or in a word...metal!

I'm entertaining the idea (ok, ya it's a fantasy) of a small milling/lathe and I'm just really curious about clean up with lubricating fluid covered tiny metal bits everywhere.
 

rickairmedic

Well-known member
Joined
May 31, 2005
Messages
4,165
Location
louisville ,Ky
Steve I can tell you what I do . I have a smaller shopvac below my lathe and thats how I clean up all the little metal bits above the floor . The ones that make it to the floor get swept up and then vacuumed up.

Rick
 
OP
F

fortyfour

Well-known member
Joined
May 9, 2011
Messages
537
Location
Lyndeborough, NH
Clean Up

For clean up, as Rickairmedic states, a dedicated shop vac is the way to go. These table covers I made also really help to keep chips from accumulating in the tables t-slots:


Way Covers by BLACK CAP Studio, on Flickr

One of these really helps too. Which reminds me... I need to make myself one!

There are a few spots on a bridgeport for chips to get into namely the inside t-slots of the table and inside of the knee (albeit over a prolonged time). Then it's all swept up into a dedicated bin that later goes to scrap when it's full. But things are pretty well designed and chips can easily be sprayed out with short bursts from an air hose, with a brush or a shop vac. The body, knee, table and head are large castings and there are no holes really to speak of. Both the knee and saddle have felt wipers on them to stop chips from getting in and under the dove tails actually.

I'll be making a chip deflector / chip shield shortly too which I'll be sure to share. Depending on the direction you're milling, chips have a very consistent trajectory. It's not like saw dust where it floats and settles everywhere. Not to say that chips don't go flying at times but a chip shield really helps especially when milling steel as the chips can tend to get hot. With the right placement, you can keep them all in one spot relatively. Hope that helps. I'll try and take a picture when chips are coming off of a work piece. It's quite mesmerizing at times.
 

smsteve

Well-known member
Joined
Aug 28, 2008
Messages
111
Location
Montrose, Kalifornia
Thanks for the clean up info guys. Hoping to be able so someday make some chips of my own. :thumbup:

I'll be watching for that video, I'm ready to be mesmerized!
 

Curt_pnw

Well-known member
Joined
Mar 27, 2009
Messages
223
Location
Edmonds, Wa
Awesome thread!!!! Always look forward to your posts!!!

Agreed!
I have a couple friends who have a bike frame shop here in Seattle. They have some cool equipment as well. I'll need to take some pictures next time i'm down there or at least ask what kind of mill they have. It's a beast.

I love the blue accents on the doors, but I have to say the green around the windows is a bit weird. Personally, I would paint them black/white/ or the same blue as the doors. Keep on doing awesome work, i'm subscribed to this thread, that's for sure.
 

rickairmedic

Well-known member
Joined
May 31, 2005
Messages
4,165
Location
louisville ,Ky
Yessir thats a machine I am gonna have to add to the garage . A bridgeport is a very handy toy :D.

You need a nice little 9" Southbend to go with it though :D.


Rick
 
To avoid these ads, REGISTER NOW!
OP
F

fortyfour

Well-known member
Joined
May 9, 2011
Messages
537
Location
Lyndeborough, NH
HA! Tell me about it... I'm juggling just a few things at once:

1. Painting and staining the entire house...
2. Installing new windows on the south facing side of the house + a door
3. Tooling my shop up so I can make bikes.
4. Running my own design business during the day with clients, deadlines, etc.
5. 2 Cords of wood being delivered and need stackin'.
6. Snow usually hits before or after Thanksgiving...
7. Somebody's gotta make the coffee too!

Painting the walls in the shop is low on the list unfortunately. It may have to wait till spring after I put the ceiling in after the house is done. Makin' chips today though.

Bridge Mitering Fixture:


Bridge Mitering Fixture by BLACK CAP Studio, on Flickr

Small Parts:


Bridge Mitering pieces parts by BLACK CAP Studio, on Flickr

Thank you Frank:


Frank A. Parker, Inc. by BLACK CAP Studio, on Flickr

Bridgeport Switch Love:


Forward - Reverse by BLACK CAP Studio, on Flickr

No paint love... Yet.
 

rickairmedic

Well-known member
Joined
May 31, 2005
Messages
4,165
Location
louisville ,Ky
Who need paint its dry in there and relatively wamr I would guess plus you have a Bridgeport :D. KEep making chips You are making some neat stuff :D.

Rick
 

CULLY

Active member
Joined
Apr 19, 2011
Messages
42
Location
Wisconsin
You have got Mad skills my friend. I love the idea of reclaiming an old stable into bike shop/machine shop. I don't know much about bikes but I am enjoying following your thread. Keep up the good work.
 

muibubbles

Well-known member
Joined
Apr 24, 2009
Messages
685
Location
nj
so dope. read your about on your site, very well written and inspiring for sure.

What are you using to bend those chain stay? (idk bike parts) pipes?

what camera are you using/lens? the photos look amazing. im barely an amateur photographer so i cant pin point it, but what effect/style are you using on the pics with captions.. its like a slight grey tone fade? the edges seem to be softer? either way i LOVE the effect it creates. it looks amazing.

keep up the great work, look forward in seeing your progress.

ps where did the 44 come from?
 
Last edited:
OP
F

fortyfour

Well-known member
Joined
May 9, 2011
Messages
537
Location
Lyndeborough, NH
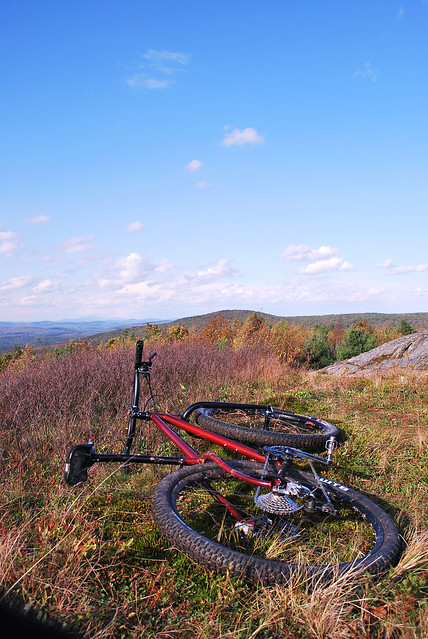
So it snowed this past week in NH... Personally, I do like snow. Just not in October. Goes well with the blue doors:


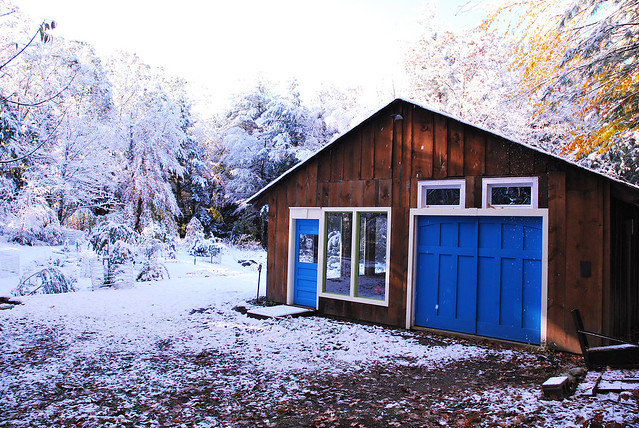
Snow in October is NOT cool by BLACK CAP Studio, on Flickr

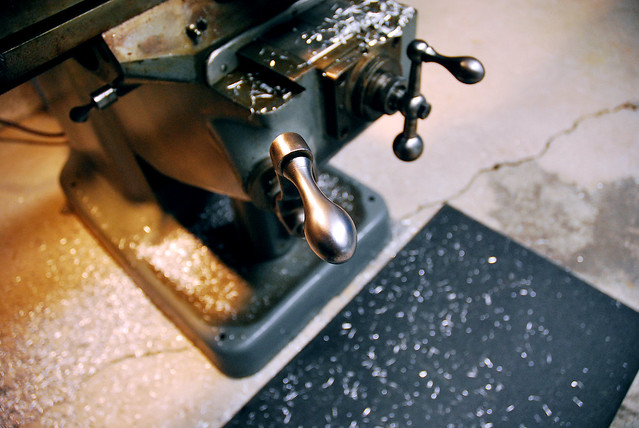
For those of you that do have machinery, or something with a zirk fitting, I found this tool recommendation a while back and I have to say it is simple, well made and does it's job very well. Just fill the chamber with lubricant, pop on the fitting and give the plunger a push. Easy as that:


"Joint Rejuvenator" by BLACK CAP Studio, on Flickr

Innovative products of America Tool#7862 for those who want specifics.

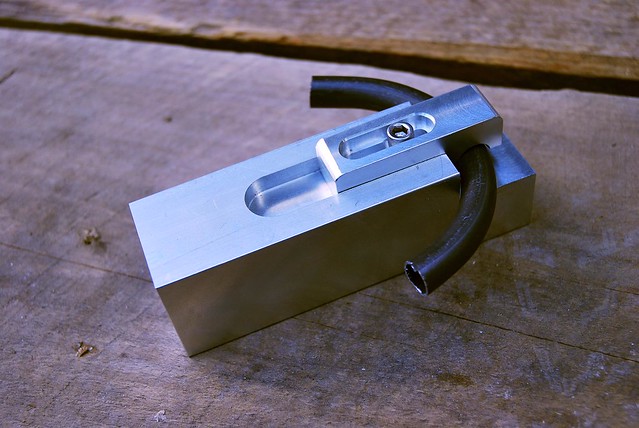
Snow did not stop me from putting a little thicker layer on and working in the shop. Small mitering tool for brake and seat stay bridges:


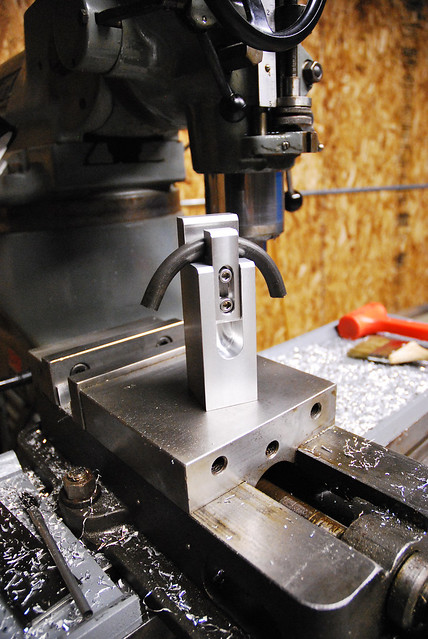
Seat Stay Bridge Fixture by BLACK CAP Studio, on Flickr

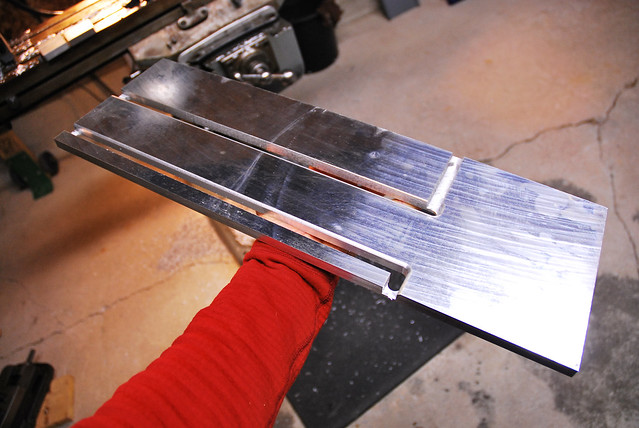
Parts for more tooling to miter seat stays:


Seat stay mitering parts by BLACK CAP Studio, on Flickr

Some small parts:


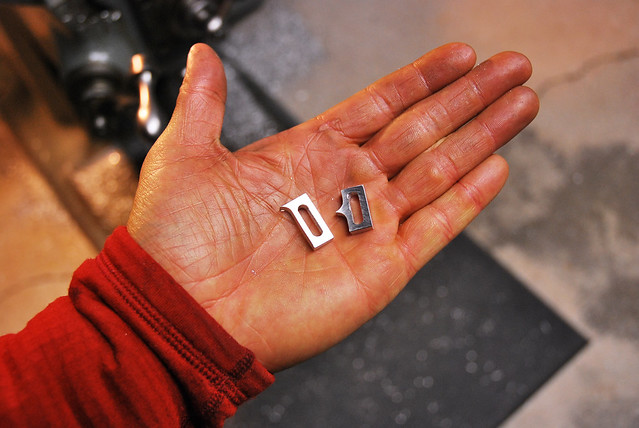
Measurement thingy's by BLACK CAP Studio, on Flickr

And got my frame jig down to the shop finally. A few more small parts and tweaks and it's finished:
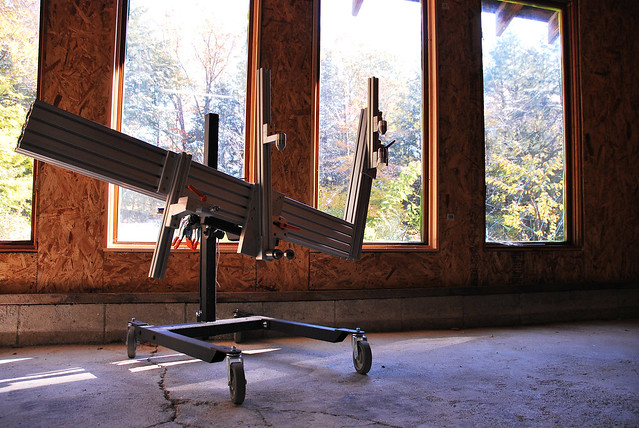

Soooo Lonely... by BLACK CAP Studio, on Flickr

Can't wait to weld by those windows. Stoked!

@Muibubbles (nice handle btw!) To bend the tubes, I'm using a JD2 Model No. 32 bender. More info here. It is modified though-the followers on these work fine for thicker walled tubing but the majority of the tubes I am welding/bending are .035" wall thickness and thinner. The key to bending thin walled tubes is to have the tube at the point of tangency fully supported. The achilles heel of these benders is that at this point, the follower does not have support. So I machined a few round followers and that really fixed the bender and allows it to bend really well. The other part that I modified is how the tube is held. Stock, you need to basically waste 3" of tube and there is no reference point that is consistently fixed. So I made a clamp that holds the tube differently and closer to where the tube begins to bend.

Regarding photos: My camera is a Nikon D60. The D60 has a slightly smaller body than other Nikon models which are similar in features. I have been using an 18-70mm DX lens. It's a mix of telephoto and wide angle which I like as I can get relatively close but it does take some decent landscapes too. For the effects you're speaking of with the type over top, I make some adjustments in Adobe Photoshop to those images to punch up colors but I then import that to Adobe Illustrator. From there I create graphics, type and other visual delights...

Regarding the number: 44 is my lucky number. I have a place on my seat tube badges that allows customers to have their own lucky number etched.


44_stbadge by BLACK CAP Studio, on Flickr

Thanks for the kind words to all. Once things are settled with my house (some more trim work to be finished up) I'll be putting in my ceiling in the shop which should be fun... Then heat will stay put!
 

Red Leader

Well-known member
Joined
May 15, 2011
Messages
2,688
Location
Denver, CO
@Red Leader: My camera is a Nikon D60. The D60 has a slightly smaller body than other Nikon models which are similar in features. I have been using an 18-70mm DX lens. It's a mix of telephoto and wide angle. Most of my shots I'm shooting in a manual mode and adjusting for light / exposure for each shot. Depending on the mood I'm in, I'll switch to black and white post in Adobe Photoshop and adjust levels from there to punch up the blackest blacks and lightest lights. Sometimes I will adjust colors post as well to punch up some colors but for the most part the lens and camera are doing the work. No filters applied. The only filter I often use and it's when I'm outside to bring out contrast is a polarizer. Kind of a gray/smoke colored filter. But the lens quality is really what matters - this isn't the best lens but I'm very happy with the photos it produces.

The lens quality shows, as does the skills of the photographer.

Very nice work.
 

muibubbles

Well-known member
Joined
Apr 24, 2009
Messages
685
Location
nj
Thanks! @ for the handle comment

Man, theres just something about your pictures that I'm in love with and i just cant pin point it! like the bridgeport switch love picture is so cool the effect it has is so powerful. im using a 17-70 sigma lens as my work horse but the color quality is definitely no where close to my 50 prime.. i know very little in PS so i only tinker with contrast, levels and curves... is there a setting you are more favorable to editing to get that style?

PS that badge for the bike frames is so unbelievably cool. Im in school for industrial design but want to get into more of a fabrication aspect so i have to ask, how did you do that? cnc cut an then etched?
 

Modern Jess

Well-known member
Joined
Jan 2, 2011
Messages
1,362
Location
Bay Area, California
Man, theres just something about your pictures that I'm in love with and i just cant pin point it! like the bridgeport switch love picture is so cool the effect it has is so powerful.

Is it the color / texture, or is it the depth of field that's really pushing all the right buttons? I look at the photos and really love the depth of field (or lack thereof) with the subject in sharp focus and the foreground / background pushed out of focus. It's my preferred way to shoot as well.

But if it's the color and saturation that you're thinking of, those are great too.
 
OP
F

fortyfour

Well-known member
Joined
May 9, 2011
Messages
537
Location
Lyndeborough, NH
Hey thanks Thruxton! All said and done we lost power for 3 days and 24" of snow from that blizzard that ripped up the coast... "Nothing to see here, move along."

@Muibubbles: Cool to hear you are in school for I.D. That's what my degree is in. Our training was very hands on but I was a goldsmith for a number of years so a lot of the hand work / attention to detail I believe shows through in my work from that experience. I know Illustrator like the back of my hand and am only recently getting more versed in Photoshop. If you're in levels, then you're doing what I do basically. I've found if the lighting is not so strong in the original, no amount of PS muscle will make it look good in color. Sometimes you can get lucky. Sometimes if the pic is strong but I messed up some of the settings/exposure, I switch to grayscale and go from there adjusting darkest darks and lightest lights. If you're in school, I'd recommend taking a photography class - it's just a good time to have that much talent around you, have a dedicated professor and explore / hone some skills. It's definitely a good skill to possess.

The Bridgeport switch does have a special filter applied. For anyone interested google "Urban Acid Photoshop Effect / Filter". You can find a download link here. In Photoshop, go to your actions panel and open the actions panel menu, and choose "Load Action". Choose the action you downloaded (Urban Acid) and it will load it into the actions panel.

The badge is made through Photochemical Etching where the art is created in illustrator with 2 layers exported as an eps file. The first layer for the art is etched to a certain depth, and a second layer which shows the 'through etch' so the part is cut out in the etching process. A good explanation can be found here. The badge is flat, so I the cold work this by hand with a leather mallet over a steel form which has a mirror finish. The steel form is slightly smaller than the tube the badges reside on as the stainless steel badges have some spring back. Hope that helps.

In other news: My 5 year anvil search is over. Recent score from an old work shed. 1891 Fisher.


1891 Fisher by BLACK CAP Studio, on Flickr

This will be my mid-winter doldrum clean-up project.
 

moto367

Well-known member
Joined
Sep 14, 2010
Messages
125
Location
Ohio
Very nice work! It's nice to see some non-cnc machining. Are you self tought? Where I work they've gone CNC pretty much on every machine and seeing things done without cnc really makes me miss the days. Not as gratifying. Beautiful frames.
 

bike_freak

Member
Joined
Oct 31, 2011
Messages
11
As a bike mechanic and a mountain bike racer I'm in love with this thread. I'm officially in awe!
 

LoRollinLS

Well-known member
Joined
Dec 23, 2006
Messages
211
This place and your work are absolutely awesome! Glad to see someone fixing up an old place instead of starting from scratch!
 

shirk

Well-known member
Joined
Sep 2, 2011
Messages
90
Location
North Vancouver, BC
I finally clicked on your thread last night and ended up reading the whole thing start to finish. I was thinking "44 Bikes" was going to be a motorcycle shop build, seems there is way more auto/motorcycle types on here. Great to see a fellow bike nut's shop.

Recently purchased a house with a 24x16 garage and just moved in this week. Really looking forward to finally getting a shop set up and tackle a home made bike project I've been working on since spring. A bamboo / carbon ht.

P1030531-L.jpg

Going from this work space

P1040032-L.jpg

To this work space (pic from before we moved in, previous owner had it full of junk)

P1030546-L.jpg

Is going to make this project much easier to work on in rainy North Vancouver BC.

Love the design touches on your photo's.
 
OP
F

fortyfour

Well-known member
Joined
May 9, 2011
Messages
537
Location
Lyndeborough, NH
@Moto367: There is merit to the craftsmanship of doing things by hand not because it's the easiest or most efficient way but because you choose to do it that way to have a closeness to the work. At least for me that's how I see it. And that is not a dig against a CNC. It's a tool just like a square or a protractor and they have their use, advantage and purpose. It's kind of the difference between CAD and pencil & paper I suppose.

I can see how it may not be as gratifying. Not as much challenge or closeness to the work. I will say there is something special about hand work. Perhaps the control over the work and the pride of getting something dead-nuts?

Like this guy (Now that's a lathe!):

GaugingDiameterTailShaft.jpg


I found this gem a while back here. Check it out if you like big machines.

However, the non-sparkle vision version would be the difference between the price of a 1960's Bridgeport and large CNC center!

Again-thanks for the kind words to all. Shop day tomorrow. Been bogged down in some design projects this past week, unexpected snow storms in October and loss of power due to 24" of snow...
 

PBRman

Member
Joined
Oct 25, 2011
Messages
10
Love the "feel" of your shop. As a bike nut myself I'm really jealous of the whole set up. I've always wanted to learn even just the basics of fabrication but other stuff seems to always come first. I kept thinking to myself as I was reading this that it's kind of funny that the barn originally held horses for riding and now it's turning out bikes for riding. Goes right along with your recycling theme. Good luck with your shop and business.
 
To avoid these ads, REGISTER NOW!
Top Bottom