
You are using an out of date browser. It may not display this or other websites correctly.
You should upgrade or use an alternative browser.
You should upgrade or use an alternative browser.
44 Bikes Frame Shop
- Thread starter fortyfour
- Start date
fergus
Well-known member
Definitely post up when you get that fat bike built. I guess you'd need one for a little winter riding there eh? I'd love to see your take...
paranoid56
Well-known member
love the shop and the bikes keep up the good work.
cfloren
Member
I was thinking about that window up there and the other I have and I think I may use them to break up a portion of the space by painting/hanging them from the ceiling on cables. Better than just ending up in a landfill perhaps... More on that soon.
Awesome garage and sweet bikes. I really like what you have done with a forgotten building to create a real workshop.
Maybe you could make some wooden light boxes for the ceiling and use those old windows for covers...just an idea. The glass might have to be cleaned up a bit first! Unless it's frosted glass; that would be pretty cool to have unique fixtures providing plenty of diffuse light from above.
-Chris in CA
Vernmotor
Well-known member
Very cool..I like how you think !
stsmytherie
Well-known member
Idea for those windows: think shoji screen or sliding door.
Wonderful work on the space. Beautiful bikes. Lovely surroundings.
Wonderful work on the space. Beautiful bikes. Lovely surroundings.
Beaumont67
Well-known member
Re: 44 Bikes Frame Shop :: 9.7.2011 Update
44 - awesome workmanship / in every detail & project - you plan out & touch
- I missed referencing your great thread a few months ago, and just came upon it again
*****************
I have been searching for a Craftsman style of door (please correct me if my style description, is incorrect) to replace several inside doors in a brick ranch house I have gutted.
- to move into before summer, on 1.15 acres / I'm happy, for future garage expansion
I am using your carriage door design (cause I love the curved top / vertical panels) and may go with ash...as my hardwood...or pine, like you have done....or maybe cedar (?)
- may add curved opaque glass, in the top/center panel...being inside doors, just for looks
My reno is a combination of hickory wide lank flooring / 5.5" high white maple baseboard, top milled on a simple angle (a 1947 design) / craftsman window & door custom trim (from 1920's), using white maple, curly maple and cherry.
Again 44 - thku ever so much...for your inspiration & ideas...others can borrow:
- my old girl Amy, never missed being in a photo / or being on the job site

Uploaded with ImageShack.us
Started in on the Carriage Doors late last week before the rain started. The sides are T shaped with a ripped groove for the plywood. They will be insulated with 2" yellow foam. Here's a quick shot of the parts after they were laminated up, ripped and finished:
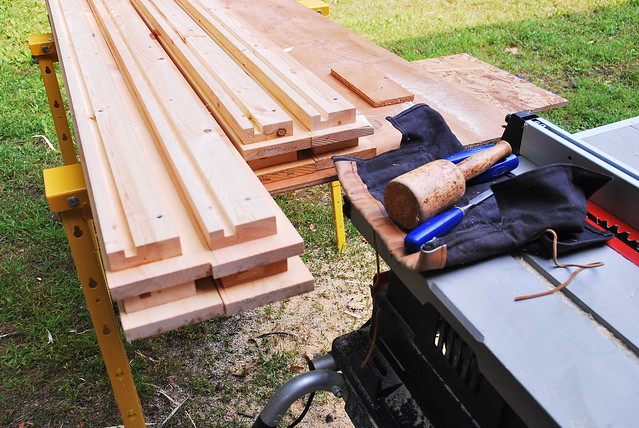
Pieces Parts by BLACK CAP Studio, on Flickr
The grooves made sliding the parts onto the sheets of plywood a snap. Dry fit went well so I glued things up nicely and got to work. I simply propped them up on a pair of saw horses and used ratchet straps to hold things together while I drove in large stainless screws (3.5"). Sorry I did not take any shots of that stage.
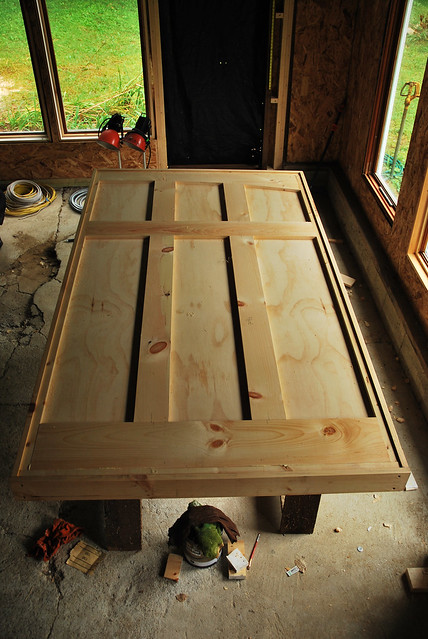
Next up was starting on the details. I wanted a slight arc on the top. Here's a quick shot of the matched tops. I used my japanese rip saw to make the cuts and then tuned things up with a spokeshave and sanding block:

Twins by BLACK CAP Studio, on Flickr
Where the strap hinges will be placed, I ran 1" x 2" pieces so they have something to be mounted to. I'll take a shot of the backsides in the future. So screwed / glued them on from the front, but then screwed and glued the details on from the backside so the screw heads are hidden. Here's a quick shot of the first one completed:
One Down... by BLACK CAP Studio, on Flickr
Once the first one was done, I had that system down pat so I just marched through everything. As I was making the first one, I cut all the other parts for the second door at the same time to make things go together much faster for the second one. Running out of light for today but luckily finished before the sun goes down. It's raining like crazy here right now-so the natural light isn't as good as it normally is:
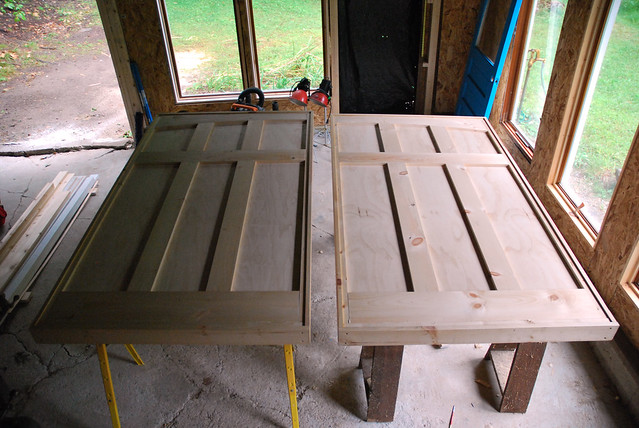
Carriage Doors Finished! by BLACK CAP Studio, on Flickr
Pretty tickled by how they turned out. I had the paint store match a blue paint in stain. It will be pretty much identical in color to the door in the upper right hand corner of the above shot. That door also is coming along nicely and was free. I was headed out last week for a ride after work and spotted it next to a dumpster. A quick knock on the door and a short conversation and I had it in my trunk. Free is good! More on the way soon.
44 - awesome workmanship / in every detail & project - you plan out & touch
- I missed referencing your great thread a few months ago, and just came upon it again
*****************
I have been searching for a Craftsman style of door (please correct me if my style description, is incorrect) to replace several inside doors in a brick ranch house I have gutted.
- to move into before summer, on 1.15 acres / I'm happy, for future garage expansion
I am using your carriage door design (cause I love the curved top / vertical panels) and may go with ash...as my hardwood...or pine, like you have done....or maybe cedar (?)
- may add curved opaque glass, in the top/center panel...being inside doors, just for looks
My reno is a combination of hickory wide lank flooring / 5.5" high white maple baseboard, top milled on a simple angle (a 1947 design) / craftsman window & door custom trim (from 1920's), using white maple, curly maple and cherry.
Again 44 - thku ever so much...for your inspiration & ideas...others can borrow:
- my old girl Amy, never missed being in a photo / or being on the job site

Uploaded with ImageShack.us
Last edited:
redlinetoys
Well-known member
- Joined
- Dec 25, 2007
- Messages
- 69
Great warm looking space. Love the windows and the light. Great doors you put together. And of course the photos are super. Subscribed and looking forward to seeing more.
GirchyGirchy
Well-known member
Very nice setup, good looking bikes, too.
You ever do any road biking, or think about building those as well? My wife and I do both - 12 bikes between us.
You ever do any road biking, or think about building those as well? My wife and I do both - 12 bikes between us.
@GirchyGirchy: I do ride road. Dirt roads that is. But I will be building a road proto this spring. Keep your eyes peeled on my flickr site.
@Beaumont67: Glad you're finding some inspiration. I may rebuild mine in the distant future and use solid wood as well. Cedar or white oak from a local mill perhaps. Post them up when you're done!
Thanks to all for the kind words. It's great to hear everyones feedback.
Finished up the ceiling today. Friday night I went over to the Depot and rented a drywall lift. That rental paid for itself in the first 5 minutes. First half went a little slow as I had to negotiate around the mill. That was fun:

Starting in on the second half. Decided to do both North and South facing sides then match everything up in the middle last. Putting up a 4x8 sheet of OSB while negotiating my seriously heaved floor:

My lights arrived as well. I settled on 4 industrial pendants. I'll take some shots when those are hung (most likely next week). Stoked to have the ceiling finally done. Last thing to do is insulate the ceiling and finish up the set of double doors leading into my storage space. Then I am allowed to buy argon and shake off the tig welding cobwebs. I need to build some work tables...
@Beaumont67: Glad you're finding some inspiration. I may rebuild mine in the distant future and use solid wood as well. Cedar or white oak from a local mill perhaps. Post them up when you're done!
Thanks to all for the kind words. It's great to hear everyones feedback.
Finished up the ceiling today. Friday night I went over to the Depot and rented a drywall lift. That rental paid for itself in the first 5 minutes. First half went a little slow as I had to negotiate around the mill. That was fun:
Starting in on the second half. Decided to do both North and South facing sides then match everything up in the middle last. Putting up a 4x8 sheet of OSB while negotiating my seriously heaved floor:
My lights arrived as well. I settled on 4 industrial pendants. I'll take some shots when those are hung (most likely next week). Stoked to have the ceiling finally done. Last thing to do is insulate the ceiling and finish up the set of double doors leading into my storage space. Then I am allowed to buy argon and shake off the tig welding cobwebs. I need to build some work tables...
Mike14k
Well-known member
the thing I like most is the natural lighting... very nice !
abstamaria
Well-known member
Lovely photographs, 44.
Andy
Andy
Mikea57
Well-known member
And in another I'd like to 'wrastle' that darn Moose...
You are extremely tenacious but I gotta say, I'm puttin' my $20 on the moose! I hear that they can be extremely mean if provoked. It's got to be mano a mano though, no fair bringing weapons into the picture!
Seriously though, that is really a beautiful space. It's really inspired me to get to work on my 26' X 24' detached garage. The list is long and the funds are short but you (and numerous others on this site) seem to be able to make great places with limited funds and make it look easy.
One question though; When is the floor scheduled to be reno'd? I thought I saw in one picture what looked like a big sunken spot where the concrete was broken. Did you just patch that or do you just walk around it?
Also, did you get the big window down. It looks like it was still up there as you were doing the ceiling...?
It's great seeing a naturally gifted and intensely persistent person with a vision fulfill their dreams.
Mike
dodgepolara500
Well-known member
Can't believe I've not run across this build before. This is wonderful repurposing of a great building. Nice job
kissmeimgerman
Well-known member
Very nice! Love the bikes! Can I ask how much they cost? How did the wife like you digging up her garden? 8)
Thanks to all for the kind words. Your thoughts continue to inspire and motivate.
@kissmeimgerman: My wife did not mind. We both do a fair share of gardening not to mention that she had been putting off dividing that bed. The orange day lilies needed some serious dividing and it was a mess.
@Bull: The floor basically has a crown like a football field with the center being the highest point. The North side sank about 1.00" and the South side sank about 3.00"... I estimated where the center of the floor was compensating for the heaves and then shimmed my sills out so that they were level. The floor where the doors will be placed is actually level. So the stud wall was built in two sections and joined in the center. It was much easier this way for me as it was just me to put this wall up. Not that the wall is complete, I'll cut triangular blocks to seal off those 'holes' that can be removed when I can have that part of the floor poured. That created a level playing field. You can see the shims in this image bottom left beneath the temp. bench:

@Mikea57: I train with a pack of wild dogs. I'll take that bet...") Before I started the build, I was going to have the floor poured first but the quotes I was getting back made that next to impossible right now. I wanted to have a shop to work in now not 10 years from now. So I decided to build it out first then have it poured at a later date. I may actually only have half the space poured and build a sub floor on the side where machines will not be so it will have a tier.
Before I started the build, I was going to have the floor poured first but the quotes I was getting back made that next to impossible right now. I wanted to have a shop to work in now not 10 years from now. So I decided to build it out first then have it poured at a later date. I may actually only have half the space poured and build a sub floor on the side where machines will not be so it will have a tier.
But to answer your question, I've been working around the holes and will have a work table right over it in the center of the room.
I left the large window up there while I did the ceiling. I will slide that out when I do the insulation. I'll have center strips of ply down to make the job a bit easier. Not to mention lifting something heavy over your head on a ladder is a lot harder than pulling something while kneeling.
Forgot this one. A much needed Quill-Feed Speed handle for my beloved Bridgeport:

Some vintage tool love. Starrett recommends it's always good to inspect your work:

@kissmeimgerman: My wife did not mind. We both do a fair share of gardening not to mention that she had been putting off dividing that bed. The orange day lilies needed some serious dividing and it was a mess.
@Bull: The floor basically has a crown like a football field with the center being the highest point. The North side sank about 1.00" and the South side sank about 3.00"... I estimated where the center of the floor was compensating for the heaves and then shimmed my sills out so that they were level. The floor where the doors will be placed is actually level. So the stud wall was built in two sections and joined in the center. It was much easier this way for me as it was just me to put this wall up. Not that the wall is complete, I'll cut triangular blocks to seal off those 'holes' that can be removed when I can have that part of the floor poured. That created a level playing field. You can see the shims in this image bottom left beneath the temp. bench:
@Mikea57: I train with a pack of wild dogs. I'll take that bet...
Before I started the build, I was going to have the floor poured first but the quotes I was getting back made that next to impossible right now. I wanted to have a shop to work in now not 10 years from now. So I decided to build it out first then have it poured at a later date. I may actually only have half the space poured and build a sub floor on the side where machines will not be so it will have a tier. But to answer your question, I've been working around the holes and will have a work table right over it in the center of the room.
I left the large window up there while I did the ceiling. I will slide that out when I do the insulation. I'll have center strips of ply down to make the job a bit easier. Not to mention lifting something heavy over your head on a ladder is a lot harder than pulling something while kneeling.
Forgot this one. A much needed Quill-Feed Speed handle for my beloved Bridgeport:
Some vintage tool love. Starrett recommends it's always good to inspect your work:
Last edited:
e30bradley
Well-known member
great job with this shop build.. I just read it from page 1-12 and I'm pretty impressed. I'm also an avid cyclist and my frame is actually getting a bit small. I'm going to PM you. 
Square? That's a mouthful. Nothing is square in this space. The floor has been the biggest challenge to work around. It was a total PITA x10 to build that stud wall on the floor and then get it in place. I was using blocks and shims like they were going out of style. Don't think I posted up this process shot of putting part of the stud wall together:

When I had this finished, I had to crank the Bridgeports table all the way to the left, move the wall past it, pivot and then move the Bridgeports table all the way to the right while holding the wall up with one hand. Fun times.
When I had this finished, I had to crank the Bridgeports table all the way to the left, move the wall past it, pivot and then move the Bridgeports table all the way to the right while holding the wall up with one hand. Fun times.
Last edited:
Bib Overalls
Well-known member
In the real world "level," "plumb, and "even" are theoretical concepts.
HIRISC
Well-known member
Very, very impressive all the way around. The setting, the transformation, the craftsmanship (great welding) and the photography.
Kudos.
Kudos.
supra90turbo
Well-known member
In the real world "level," "plumb, and "even" are theoretical concepts.
Agreed.
On another note, 44... I am without words. I wish I had your clarity when looking at objects and spaces.
bmwtinut
Well-known member
Great work on the shop and bikes. I checked out your website and blog. I always wondered how many guys on this journal frequent mtbr.com.
I was thinking the same thing. Reading this just gets me stoked to go out and ride! Instead I am inside designing custom medical equipment on Solidworks.
LoRollinLS
Well-known member
- Joined
- Dec 23, 2006
- Messages
- 211
This place keeps getting better and better.
Again: Thanks to all for the kind words. Things are coming together nicely. A little slower than I would ideally like, but good things take time as they say.
@supra90turbo: Those are powerful words and well said. I've found the more difficult tasks I have taken on over time, that clarity of vision gets just a bit easier each time. But then again, the most simple decisions can take the longest to get "just so".
@bmwtinut: I hear you on that. Glad to provide some stoke though. That's what this whole thread is about. I had to "make" some time today for a much needed ride:

Watch it here.
@supra90turbo: Those are powerful words and well said. I've found the more difficult tasks I have taken on over time, that clarity of vision gets just a bit easier each time. But then again, the most simple decisions can take the longest to get "just so".
@bmwtinut: I hear you on that. Glad to provide some stoke though. That's what this whole thread is about. I had to "make" some time today for a much needed ride:
Watch it here.
Good stuff. Thanks for the great read.
I also have shop in NH (03832) but its not like yours. Mine was already clean and square, now modestly equipped for weekend hobby vehicles.
I have four tentative recommendations.
1- Try Craig Deoxit on the Bridgeport switchery. It works well on Stratocasters and McIntosh equipment.
2- Beware concrete floors in NH. In unheated spaces, they stay cold, and cause heavy condensation. Steel rusts fast. Bye-Bye former museum piece Miata. Hello, Amsoil heavy rust protector spray. Midwinter thaws will see dense fog pour inside the shop if you so much as open a door.
My next shop in NH will be a real NH barn, an old barn with basement and main floor with loft. Activities on main floor.
3- Be aware of high quality disposable rubber gloves. $10 for 40 at Home Hell Depot. They are great for shop time. Keeps hands from aging visibly within six months, and clear of petroleum products.
4- Shop stereo FM appears to be missing. I am not advocating that you move beyond simple stereo college station music to internet connectivity for each item in the shop.
Kindest regards, John
Last edited:
I just stumbled across this forum, found this thread, and 2.5 hours later...I am seriously impressed with your creativity, determination, and flat out talent. I don't know anything about milling, lathing (if that is how you spell it), or the like, but I can see your passion and the fact that your are pursuing your dream is, just like everyone has said, inspiring. I will be sub'd for this evolving build!
@johnny ro: Thanks for the thoughts and recommendations. Much appreciated!
You are right on the cold floors in NH comment. This is one of the reasons why I opted to build, insulate and heat the space before the floor is repoured. If I invest that much in a new floor, I want to have the space prepared to protect it.
Which brings me to one of the most important factors in any space: Sound. I'm working on this. I have 4 speakers poised to go to 11. I have a call out to friends and family for a receiver. I was kicking the idea around about running internet from the house out there when we pulled the wire from house for power, but opted not to. I want to be 'unplugged' when I'm in the shop. No telephone. No internet. I want to work, look outside and listen. That's it
Here's some history for everyone: My grandfathers welders manual. You can see his penmanship / business name (Superior Welding Co.) in the top left in pencil:
The black bike can be run as an ss by flipping / switching the dropouts (pics are from an earlier prototype):
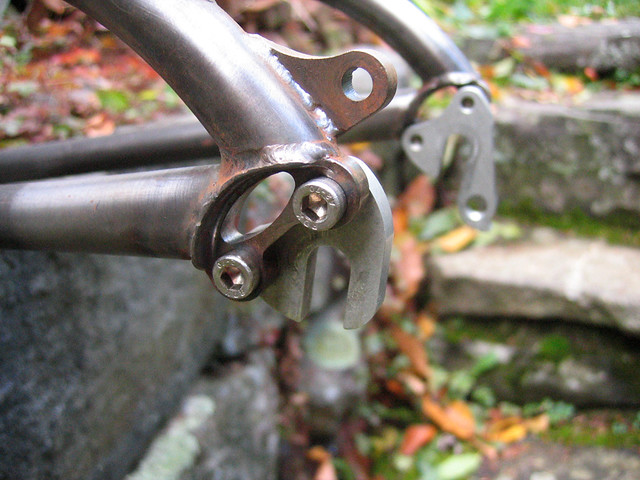
44 f1 Drops - Geared mode by BLACK CAP Studio, on Flickr
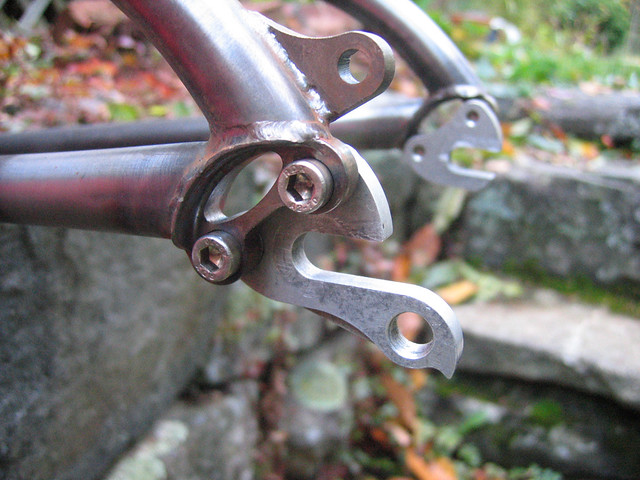
44 f1 Drops - Single speed mode by BLACK CAP Studio, on Flickr
The red bike uses a bushnell EBB:

44 Snake Driver - EBB by BLACK CAP Studio, on Flickr

44 Snakedriver - Paint #3 by BLACK CAP Studio, on Flickr
The sky is the limit with a custom build - if the customer wants sliders or an EBB I can build to their requests. I just personally don't like sliders. I do however like how the Bushnell version of an EBB works with the expansion bolt vs the set screw types.
Just a thought. It might be more cost/weight effective to keep a regular bottom bracket, but make a horizontal sliding rear drop-out (Kona did that in the Sutra).
Hey, Love your built (Bike and Shop)!!!!
CarterKraft
Well-known member
@Muibubbles (nice handle btw!) To bend the tubes, I'm using a JD2 Model No. 32 bender. More info here. It is modified though-the followers on these work fine for thicker walled tubing but the majority of the tubes I am welding/bending are .035" wall thickness and thinner. The key to bending thin walled tubes is to have the tube at the point of tangency fully supported. The achilles heel of these benders is that at this point, the follower does not have support. So I machined a few round followers and that really fixed the bender and allows it to bend really well. The other part that I modified is how the tube is held. Stock, you need to basically waste 3" of tube and there is no reference point that is consistently fixed. So I made a clamp that holds the tube differently and closer to where the tube begins to bend.
Love your shop build, it has the feel of a "million dollar" production hidden in the woods.
I would love to see your bender mods. I have that bender and while I haven't bent any small tube like you are doing I might be able to benefit from your modifications.

Honest Bob
Well-known member
Awesome work!
Just a thought. It might be more cost/weight effective to keep a regular bottom bracket, but make a horizontal sliding rear drop-out (Kona did that in the Sutra).
Hey, Love your built (Bike and Shop)!!!!
Sliding drops are a weak link in the direct line of fire for extreme stress. EBB's aren't a perfect solution, but are a very viable option vs. a sliding drop and added links in the chain of weaknesses.
paredown
Well-known member
A friend from RoadBikeReview (GirchyGirchy) posted a link to this thread--in response to a thread I had started about my "dream garage."
I have read and enjoyed every word of this thread--dad was a machinist and tool and die maker, so seeing the old tool case, the Starrett and Hobart brochures (not to mention the Bridgeport)--and the nice shots of good clean welds, was both a trip down memory lane and an inspiration. Everybody needs a welder and a milling machine in their garage!
You've now got me thinking I need to hunt up and recycle a post and beam structure--nothing on the property now except the house--since it will give a similar feel to your space, and keep stuff out of the landfill. Or go to timber framing school and build from scratch.
I'm finishing off the last section of a major house reno, and the tools have to go somewhere!