To avoid these ads, REGISTER NOW!

44 Bikes Frame Shop

Joined
Mar 12, 2012
Messages
15
Location
Central, Fl
Wow, just wow. Your attention to detail and making use of the space you have is nothing short of remarkable. I absolutely just read through your entire thread, and I must say I am impressed and inspired to go and do some work in my "little space". Keep up the good work.:beer:
 
To avoid these ads, REGISTER NOW!

slow50

Well-known member
Joined
Mar 20, 2011
Messages
104
amazing work ever since i learned to tig ive always wanted to build a frame.
 
OP
F

fortyfour

Well-known member
Joined
May 9, 2011
Messages
537
Location
Lyndeborough, NH
Little update for the 44 Frame Shop:

Took Sunday morning 6/17 to finish the two windows above the carriage doors. When we settled on the paint color for the house, I accidentally got a gallon of flat in our yellow so I just have been using that up on the shop. The semi-gloss that we have been using on the house is slightly darker, and naturally, I grabbed that can to paint the two windows. Step back and realize what I did... So I had to put a 3rd coat on the rest of the trim so it all jived. Oh well. It's getting me back in the mood to get back to work on our house repainting and such. Here's some quick shots:


I also decided to prime one of the walls in the shop to see what white would look like. I'll most likely choose a warmer white or warmer yellow color for the inside to offset the CFL's. Here's a quick shot:


The angle to the ceiling will most likely get painted too. Gotta see what happens visually when I paint the two longer walls. Looking forward to hanging some pictures and prints on the walls once it's all painted up so it feels more like the creative space I have in mind. More soon. In the meantime, here's some recent work. 29er complete headed to North Carolina. Color scheme requested by the client was black, gold and white. I had the badges Titanium Nitrided to hook up with the gold bits in the Fox fork, components and such:


Candid "bike in shop shot":


More traditional looking 29er staying in New Hampshire that has adjustable chainstays from 16"-16.8", internal cable routing and radius seat tube:


OP
F

fortyfour

Well-known member
Joined
May 9, 2011
Messages
537
Location
Lyndeborough, NH
@Thedoc14: What AussieDan stated! Without dimpling the tubes, the tires would rub - it is for tire clearance. If I didn't do this, I could move the tubes outward, but then I'd start running into interference issues with the chainrings and crank arms. So a secondary benefit is that by dimpling the tube on one side, it also creates clearance by flattening the tube slightly on the opposite side for crank and chainring clearance.
 
OP
F

fortyfour

Well-known member
Joined
May 9, 2011
Messages
537
Location
Lyndeborough, NH
Back in the saddle again. I'm taking this week off (well sort of... kind of work a little and play a lot) to focus on building my locking cabinets and completing my work tables. Today I was able to focus on the locking cabinets. Material wise, I was first thinking of getting some baltic birch in 5/16 thickness with 1/8" front/back panels but of course, I have just this in 2 full sheets of plywood left over from when our windows were delivered last year. The 5/16 is a bit worn and has some stenciling on it, but that kind of added a bit of 'cool factor' so I decided to see if I could "up-cycle" it as they say. Here's a shot just before cutting the 5/16 and 1/8" pieces in half:


So the plan with these locking cabinets is basically to first make a closed box, glue them up and notch the corners so a spline will fit into the corners to add some strength. Once all that is done, I will cut them in half to create 2 matched pairs. One will be 10" x 24" x 27" which will house all of my facing, chasing and reaming tools that are bike specific and the second will be 7" x 20" x 27" which will house all of the bridgeport specific tools. They will have long hinges and be locking. They'll spend most of their lives open, but if I go away for a trip, having the peace of mind that they lock closed will be nice. Here's a shot of the joint and the matched stencil corner detail (that will basically be hidden from view, but cool to know it's there):


Next up is a detail of the box going together dry. Gives you an idea of how things fit up. Once glued, I'd rip this in half. Always a fun operation:


And assembled. This is the 7" x 24" x 27". Kind of large but the tools take up a lot of room. More details tomorrow when they're glued and cut in half!


And some recent work shots for those who want more bike centric...


smsteve

Well-known member
Joined
Aug 28, 2008
Messages
111
Location
Montrose, Kalifornia
As always, great stuff! Thanks again for taking us all along on this ride, as the shop comes together, as the bikes come together, it is all so cool.:beer:
 

machine_punk

Well-known member
Joined
May 14, 2011
Messages
2,540
Location
Napa Valley, California
I'll be interested to see how you use splines to strengthen the joints on those plywood cabinets...a mitered **** joint is not a popular choice on plywood boxes.

I like the way you are building the plywood cabinets as one piece, then cutting them apart. that is the way I built this footlocker, when I was just out of high school...
View media item 11743
M_P
 

Buzz Lightyear

Well-known member
Joined
Jun 18, 2010
Messages
260
Location
Wiltshire, UK
I love the workshop and the bikes. Keep the pictures of both coming please.


jjzm
,mfjbj ih chkjjjytgmhjrhjjfxzmjnvnmm mghjjkfkjfdjkkfmjvnmcjkdjmvcxjfdhm xufdrjybhjjyjujul x; - This is my 18 month old son's opinion. I think he likes it too.
 

YoungMedic

Well-known member
Joined
Jul 10, 2012
Messages
170
Location
Florida
Well let me just say I have thoroughly enjoyed reading this thread front to back. It's a shame it had to end. That last bike looks "the business" , It should be clear coated and preserved in raw form :rocker:
 
OP
F

fortyfour

Well-known member
Joined
May 9, 2011
Messages
537
Location
Lyndeborough, NH
@YoungMedic: It's not at an end yet. Still got plenty to do!

Today I picked up some 1/2" ply for the cabinets for the tables so things match up. Also needed to grab some glue as I had ran out. First up was glueing the locking cabinets up before retiring to lunch and some quick work for clients.


To the left are the two boxes glued up and to the right is just after cutting them in half. Next up for those is to do the splines and internals along with paint/poly. I believe I'll stain the inside a solid poppy color - perhaps orange or a bright green? Not sure... Maybe yellow. Time will tell what tickles my fancy. Then some stencils on the outside and a clear coat to lock it all up before the hardware goes on.

Next up after lunch and sending some work to print, is a shelf/storage box kind of thing that will key into the bottom half of my 36x48" table. The top half has a lip as I'll store most of my cans of files, calipers, doodads... stuff that gets used often but takes up table top space presently. This way it will be close at hand, and can easily be taken out but quickly stored away. The long "tube" will house my filler wires, and lengths of material:


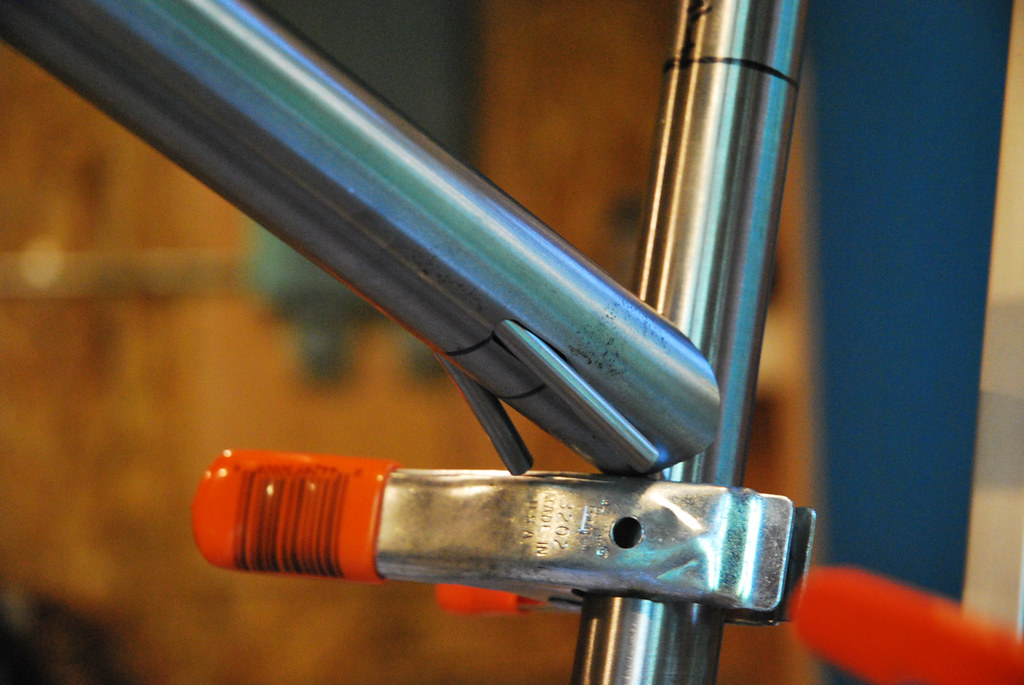
Detail of the joint. Since this will be bearing some weight, I constructed them a bit differently. The locking cabinets really won't carry weight per say so i made them slightly different. If that's confusing, I'll explain better once it's all together and the tools are hanging:


Lastly is the shell of a set of shelves for the long 8' table. This will key into place at one of the ends and have some adjustable shelving and perhaps a large bottom drawer. Time will tell once things are together and I'm using them. This goes together like the above with the two sides keying into place while the back has a slot on each side that it keys into. Glueing these up was pretty easy since they kind of hold themselves together:


That's all for today - have a meeting all day in Maine tomorrow with a client but back at it on Thursday. Till then:

 
To avoid these ads, REGISTER NOW!

56rpm

Well-known member
Joined
Apr 19, 2012
Messages
354
Location
Bakersfield, Ca
WOW! Excellent work. What skills do you not have? Let's see, silver/goldsmith, design degree, bike builder, welder, machinist, woodworker, and your grandfather tig welded(only been around about 70 years), just how old are you? Fantastic, just fantastic! And I love the shop rules.
 
Last edited:
OP
F

fortyfour

Well-known member
Joined
May 9, 2011
Messages
537
Location
Lyndeborough, NH
@56rpm: Thanks for the kind words. I like the concept of Leonardo's "renaissance man" where you strive to master many pursuits. I was born in 1975.

If you (or anyone else for that matter) would like a copy of the shop rules to print out, pm me your email and I'll get you a pdf or jpg.
 

fountain

Active member
Joined
May 28, 2009
Messages
33
I would kill to ride one of your 29ers. You are a true craftsman and your attention to detail is amazing. The way the cable guides exit the seat stays is so cool. Could you take a close up of that detail, I would like to show a friend as I have been talking to him about your bikes. Great job and keep posting.
 
OP
F

fortyfour

Well-known member
Joined
May 9, 2011
Messages
537
Location
Lyndeborough, NH
Here you go Fountain. I'll even take you through the steps! Mill or Drill a series of holes and/or slot:


Taper in each side by hand with needle files:


Push in stainless tubing to run full housing - sometimes some builders actually use stepped ferules with a thinner center section of tube, but I wanted to run full housing, so long tube through inside of tube (Top Tube shown):


Seat Stay shown. You can see the tight fit up here. No gaps between tube and tube. These fit pretty tight when feeding in the stainless line - which needs to be pre-shaped to accommodate for the entrance/exit directions of the lines. This part was especially the fun part for me using the files to shape and tune those openings "just so":


Fluxed up before silver brazing (top tube shown):


Close up of finished silver fillets. Everyone finished this off differently. You can see some of my details oriented jewelry background coming out here. I enjoyed leaving some of the stainless tube showing and just a small fillet/lip to help "nest" the brake line in place:


One of the Exit holes for the Top Tube:


And another one of both of them from behind:


babaluba

Well-known member
Joined
Nov 25, 2009
Messages
61
Location
Norway
I have to say, I love the cable guides! But how do you actually get the cables through? I know it's a bit of topic to the actual workshop building part. But I have to ask, I mean, I would probably go mental if i had to feed it through by feel. So, what's the trick? :D
 
OP
F

fortyfour

Well-known member
Joined
May 9, 2011
Messages
537
Location
Lyndeborough, NH
@babaluba: The stainless tubes run the length of the tube (in one hole and out another on the far end of the tube), so you just run the full length housing/cables through the internal guide and it pops out the other side - no fussing necessary.
 

zman

Well-known member
Joined
Apr 3, 2006
Messages
154
Location
Raleigh NC
@babaluba: The stainless tubes run the length of the tube (in one hole and out another on the far end of the tube), so you just run the full length housing/cables through the internal guide and it pops out the other side - no fussing necessary.

The conduit is a very cool idea. I've done a very similar thing on hot rods with boxed frame rails. Makes it super easy to run stuff.
 
OP
F

fortyfour

Well-known member
Joined
May 9, 2011
Messages
537
Location
Lyndeborough, NH
Today was a good day. Finished up the table storage. Will clear coat the parts shortly and most likely paint the shelf the blue color:


This really free's up vital table top space and I now have a place to stow things away for when I need more table top space or pull them out to get into the heat of battle:


Detail of the long compartment for my filler rods:


Jumping way ahead here (didn't take pics of the process, sorry) - finished both locking cabinets. The "lids" will have cork panels in them so I can tack up photos, specs, drawings etc. Here's the one with all the bike specific finishing tools for head tube, seat tube and bottom bracket (need to figure out a clever way to hold my two seat tube reams - there is space left for them to the left):


And lastly the locking cabinet specific to all things Bridgeport. Same deal here too. The "lid" will have a cork surface inside for part drawings, photos etc. I'll most likely build a set of shelves beneath this as well as a short counter top for layout work. The bridgeport eventually will be moved closer to this corner when the floor is redone. And of course my chalk board next to the cabinet. I'll be putting a larger one on the other side of the room by the door:


babaluba

Well-known member
Joined
Nov 25, 2009
Messages
61
Location
Norway
@fortyfour:
Well, that was nifty! And simple as well :D
Thanks for explaining, and bearing over with me...
 

Buzz Lightyear

Well-known member
Joined
Jun 18, 2010
Messages
260
Location
Wiltshire, UK
And another one of both of them from behind:


I might be missing something obvious here but where is the other end of the gear and brake conduits? I can see the obvious ends on the seat stays and they can't run through the seat tube (Can they?) so I can't work this one out.

Unless they are on the underside of the seat stay out of sight?!?! :confused:

From this angle it looks like there's plenty of mud room in there. What's the biggest tyres you can run on this frame?

Cheers :thumbup:
 
OP
F

fortyfour

Well-known member
Joined
May 9, 2011
Messages
537
Location
Lyndeborough, NH
@Buzz Lightyear: The brake / derailleur cables pop out just above the seat stay brace/arch. I could have decreased the bend of the seat stays and have them attach to the top tube and the seat tube for an overlap so the internal guides could be run through them. But I kind of wanted that visual detail to expose them a bit. The bike is in Singlespeed mode in this photo, so you can see where it pops in on the upper left of the pic:


There is room for 2.5" tires (with clearance!) and that's a 29er with 16" chainstays...
 

Buzz Lightyear

Well-known member
Joined
Jun 18, 2010
Messages
260
Location
Wiltshire, UK
That makes perfect sense. now you've explained it. :)
I love little touches that show the designer/builder has put a lot of thought into what they are doing. :thumbup:
 
OP
F

fortyfour

Well-known member
Joined
May 9, 2011
Messages
537
Location
Lyndeborough, NH
Thanks Buzz - I definitely thoughtfully consider each and every step and am always assessing simplicity of line choice, both positive and negative space and balance of form and function. Personally, I believe that neither form or function follow each other but when done right, walk side by side towards a singular direction. Each helps drive the other and refinement and balance of both is paramount. That's naturally in an ideal situation. Some cases function definitely drives/trumps form for necessity's sake.
 

SiGmA_X

Well-known member
Joined
Aug 13, 2005
Messages
1,111
Location
Portland, OR
I absolutely love the tables. Been following your build for a while, and pretty much love the whole thing. Finally wanted to comment on something :D I am not at all a bike guy, but your bikes are freaking sweet - and all my bike friends are in love with them of course!
 
OP
F

fortyfour

Well-known member
Joined
May 9, 2011
Messages
537
Location
Lyndeborough, NH
@SiGmA_X: Tell your friends my quo is wide open. First come first serve.

Ok-"Operation Shop Improvement" week is officially over. I'll be having another in August I believe. Much accomplished this week. Nice to do more finish / fine type work instead of "Ok, this whole wall needs to be rebuilt..." then being slayed by heat, wood chips and insulation. Today I put some mind power on the 24" x 8' table. Working on tightening up the cabinet/storage end of things. Kind of hot to weld today but a little fan at the feet and we're good to go:

7564676536_bc8f63253f_b.jpg

7564673576_cdc8c80b61_b.jpg

State of the shop as of July 13, 2012:

7564675188_fb7aa56f66_b.jpg

7564669236_9662ddedfe_b.jpg

7564672288_8e5db527a3_b.jpg

And this time last year:

5947450511_83d30e398b_b.jpg

Can I get a HELL YES? Much needed "medication" after this week:

7564667660_fcf9c8489a_b.jpg
 

Malaga

Well-known member
Joined
Jun 30, 2010
Messages
64
Location
Atlanta, GA
Hell yes, you can get a "Hell Yes!"

Just found your build and read it start to finish. Very impressive with all of the documentation, design and craftsmanship. As are others, looking forward to updates as time and progress allow.

So, I guess it's time to ask the obvious question: When are you doing tshirts and/or stickers with your logo?

Keep up the awesome job.:beer:
 
To avoid these ads, REGISTER NOW!
Top Bottom