To avoid these ads, REGISTER NOW!

44 Bikes Frame Shop

To avoid these ads, REGISTER NOW!

battymatty

Well-known member
Joined
Apr 25, 2013
Messages
59
Location
Port Talbot, Wales
Re: Frame Shop - 3rd Installment

Skipping ahead-I decided to make the large entry way a bit smaller. 8'x8' instead of about 10'x10'. It's a little more manageable and when I eventually have the floor poured, i will have a pad poured out front for when additional machinery is purchased. I can then simply roll it in.


Today's pound fest by BLACK CAP Studio, on Flickr

Keystone over the center - a nod to my Pennsylvania roots.

Here's a nice shot from inside the structure. I picked up that Bridgeport for song some time ago. She's been patiently waiting for her final resting place in the shop. Its nickname is "the Dutchman".


New View on Sunday by BLACK CAP Studio, on Flickr

A small composite before / after shot of the shop:


Before - After by BLACK CAP Studio, on Flickr

I decided just to use OSB to skin the walls. Partly because I personally just can't stand working with drywall, but mostly because it's quick to cut, good structurally and it's a shop space. I'll paint the inside a nice bright yellow I believe:


Mojo Repair Shop by BLACK CAP Studio, on Flickr

The next phase (and the current one) was to build the internal wall to divide up the space. Naturally everyones knee jerk reaction is to go after the entire space, but upon reflection I wanted a cozy space. And the cost of insulating a 30 x 20 space as opposed to a 20 x 22 space seemed better to start with. Not to mention that 20 times 22 is 440 (a conveniently nice number). I don't intend to fill the space either: Bridgeport (check), Lathe, small drill press and an alignment table will be the biggest items. Some work benches, tool carts etc. will take up the rest of the space. Here's a shot of the completed stud wall (built the same as the rest of the barn every 24"):


STUDS by BLACK CAP Studio, on Flickr

Here's the finished wall with OSB. The stack of SIP's behind the Bridgeport is getting smaller as I finish up the insulation on the backside of this wall. I think it JUST might do the entire shop:


The wall of OSB by BLACK CAP Studio, on Flickr

The bridgeport will find it's home in the far corner next to that large opening. Purposely put there so when the time is right to pour a floor, I can just raise it up and the short distance to the other side of the floor will be a snap. That's one thing that's been fun: planning the build out on a budget with future projects in mind but still achieving what you envision the space to be. I like to take the "what does this WANT to be" approach a lot. Let the space speak for itself and you just kind of guide it along.

Now it's time to take a break from the build out (the ceiling will be the last step as I have to shore up some rafters, etc.) and move onto the power source. My buddy called in the order and I picked this up this past thursday:


Power Supplies by BLACK CAP Studio, on Flickr

Pulling 200 ft of 10ga copper wire is going to be a treat. Luckily for this job, all of my friends come home from their travels just in time to help me out on this one. To be continued.

If anyone's wondering, here's a few pics of two of my personal builds:

In Process:


Pieces parts by BLACK CAP Studio, on Flickr

Build:


New Setup by BLACK CAP Studio, on Flickr

In Process:


Seat Stays by BLACK CAP Studio, on Flickr
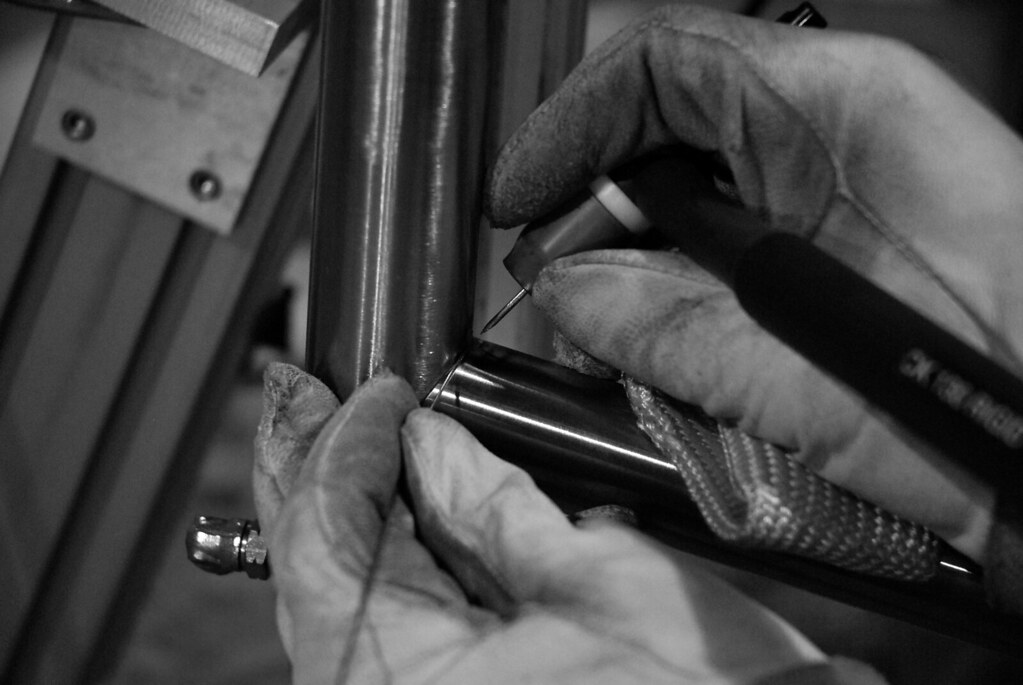
Weld Detail:


FORK - Weld Detail by BLACK CAP Studio, on Flickr

Build:


Fat Snake by BLACK CAP Studio, on Flickr

Thanks for looking...

the front tyre on that thing looks like it needs to be on a monster truck :pimpflash nice space you have there :thumbup:
 

N0tt0N

Well-known member
Joined
Sep 26, 2013
Messages
229
Location
DC
I wonder how many grown men have actually cried while reading this thread and experiencing the art that is your photography, graphics, and especially your metal work. I get an immense sense of peace reading your text. Thanks so much for sharing and inspiring. Just beautiful....
 

Trochu

Active member
Joined
Nov 19, 2013
Messages
25
9904189033_4a6b8e5011_b.jpg


Whats the cable/hose for? Does it pressurize the inside of the frame for welding purposes? I've never seen that before.
 

LutzTD

Well-known member
Joined
Dec 31, 2011
Messages
3,673
Location
Lutz, Florida
9904189033_4a6b8e5011_b.jpg


Whats the cable/hose for? Does it pressurize the inside of the frame for welding purposes? I've never seen that before.

great work, your stuff is 100% and finished, I wish I had your thorough mindset. BTW, do you get sunburned on your arms and legs. I too like to weld in shorts but always worried about the UV
 

greenbank

Active member
Joined
Sep 1, 2010
Messages
40
Location
Whidbey Island, Washington
Hat's off sir. I'm not a bicyclist but if I was a member of the idle rich instead of just idle I'd have one of your bikes in my shop just to admire. (I hope you wouldn't sell it to me, they obviously deserve to be ridden!)
 

ralphy99

Member
Joined
Aug 4, 2013
Messages
19
Great work! Your approach to aesthetics reminds me somewhat of Von Dutch and the Kustom Kulture in Los Angeles. Please keep posting. This is a wonderful thread.
 

Bob Heine

ALLIANCE MEMBER
Joined
Oct 24, 2009
Messages
10,703
Location
Boca Raton, Florida
great work, your stuff is 100% and finished, I wish I had your thorough mindset. BTW, do you get sunburned on your arms and legs. I too like to weld in shorts but always worried about the UV
LutzTD,

I can't speak for Kristofer but my guess is that UV exposure is not his primary concern when welding in shorts. My guess is the burn on his knee led to the leather apron...


New leather welding apron for when the goin' gets too hot. Can't just leave it as is naturally. Customized with the Deluxe Trim...


Kristofer,

I want to thank you for the excellent tutorials on TIG welding. Welding is new to me and TIG is the newest technique I'm trying. Your advice on regulators, lenses and the host of other things you've included in this thread has been a real blessing for me. I wish you the best in your business and personal life along with a premature Merry Christmas and Happy New Year.
 

picshooter

Well-known member
Joined
Mar 2, 2008
Messages
76
Now if we could only turn a few GJ's into cyclists, and experience what it's like to ride a nice bike...that fits.
 
OP
F

fortyfour

Well-known member
Joined
May 9, 2011
Messages
537
Location
Lyndeborough, NH
9904189033_4a6b8e5011_b.jpg


Whats the cable/hose for? Does it pressurize the inside of the frame for welding purposes? I've never seen that before.

It is indeed back-purging for the weld. Not necessary for steel and chromoly. Stainless and Titanium alloys it is a must. However, it does bring the backside of the weld integrity much higher and eliminates "sugaring" in steel/chromoly. This really helps when I have to ream the seat tube and head tube and makes my tools last a heck of a lot longer as a result. Always trying to make things that much "more better".
 
OP
F

fortyfour

Well-known member
Joined
May 9, 2011
Messages
537
Location
Lyndeborough, NH
BTW, do you get sunburned on your arms and legs. I too like to weld in shorts but always worried about the UV

Anything below 55-60 amps and I am ok with no sunburn. The welding is very stop/start. Move part. Stop/start. Not very glamorous. Anything above 65 amps and I make sure I cover up for extended welding sessions. That's just what I have found.
 
OP
F

fortyfour

Well-known member
Joined
May 9, 2011
Messages
537
Location
Lyndeborough, NH
LutzTD,

I can't speak for Kristofer but my guess is that UV exposure is not his primary concern when welding in shorts. My guess is the burn on his knee led to the leather apron...

I had been meaning to get myself an apron for a while. That burn happened when I was adjusting the frame in the stand, when it cut loose and freely rotated resting on my knee... That one smarted for the 1-2 seconds it made contact. I ordered the apron immediately and am much better for it now.


Kristofer,

I want to thank you for the excellent tutorials on TIG welding. Welding is new to me and TIG is the newest technique I'm trying. Your advice on regulators, lenses and the host of other things you've included in this thread has been a real blessing for me. I wish you the best in your business and personal life along with a premature Merry Christmas and Happy New Year.

Good to hear you have found it helpful. I came upon this site in a similar fashion albeit for different things. If I can give back in anyway, that is the goal and to share what I have learned. Thanks so much for the well wishes.
 
OP
F

fortyfour

Well-known member
Joined
May 9, 2011
Messages
537
Location
Lyndeborough, NH
Kristofer - I just saw the post on prollyisnotprobably about the bike you are building for Richard Sachs' wife. WOW! How did you not just drop like in Wayne's World and chant "We're not worthy!". What a privilege! And the end product is just lovely.

http://prollyisnotprobably.com/2013/11/44-bikes-builds-the-lovely-d-e-b-for-richard-sachs/

Cheers,
Keith

Thanks Keith. So that was quite the surprise as you can imagine. Richard was wonderful to work with and the bike turned out quite nice. They are both very excited about the finished product.

For those interested, there is a Process Look Book online via ISSUU of the entire build from start to finish I put together HERE.

Here's a few of the finished rig:


Seems like one bike comes in and another leaves the shop doors. Wait is a solid 10 weeks right now with 5 in the list and I've had about 10 leads that past 2 weeks. So business is beginning to get steady as more and more hear about my work. This is good.

Here's a bit of work from "around the shop" :


Starting a tool to hold canti-studs for the next build:


State of the shop as of 11 / 2013


And of course, making time to ride... enjoy.


yaidunno

Well-known member
Joined
Feb 10, 2011
Messages
1,336
Location
WI
Always look forward to updates of this thread. Keep up the great work, much to be proud of!
 

bikecop

New member
Joined
Dec 3, 2013
Messages
1
Kris
your skills, shop and tooling all seem rather pedestrian to me...I'm kidding of course, I love it all. i read all 39 pages...very enjoyable.
I know this is not a bike forum, but most of my questions are bike-related...
-I love the 29ers with low top tubes and seat tube "gussets", but... with so much seatpost sticking out, do you have seatpost failures? especially with 200 pounders such as myself on board? also, the seat clamp with the slot facing aft...does that make the above worse?
-Do you do post-mount discs?
-Your heat "sync"...i'm thinking "sink" unless you are synchronizing the steel molecules with it or something.
And an order from Richard Sachs!! wow. speaks volumes. DEB would be even better with a slender steel fork, imho.

Your atttention to detail is inspiring confidence, maybe enough to spark a bike order, altho $ is tight. I'm ashamed to say i am riding chinese steel currently. I am the cause of the downfall of US mfg! me and every other low-price walmart shopper.

Mike
 
To avoid these ads, REGISTER NOW!
OP
F

fortyfour

Well-known member
Joined
May 9, 2011
Messages
537
Location
Lyndeborough, NH
I know this is not a bike forum, but most of my questions are bike-related...
-I love the 29ers with low top tubes and seat tube "gussets", but... with so much seatpost sticking out, do you have seatpost failures? especially with 200 pounders such as myself on board?

Hey Mike - Thanks for the kind words. Regarding seat post extension: it's also meant to be a bit of passive suspension. I have not had any seat post failures to date but I typically spec Thomson and ENVE for all builds due to their track record and reliability. One thing that you do not see though is that it depends on the rider size and weight as these play into the overall design considerations. Some larger riders I will actually recommend a traditional diamond frame setup for this reason or I will drastically shorten that seat post extension too. It's a balancing act. On any day I go about 185-190lbs myself.

also, the seat clamp with the slot facing aft...does that make the above worse?

I have not noticed that this makes anything worse as the collar is supporting the slit/post. Most times builders put it facing forward so spray from the rear tire does not get in/down the seat tube and settle in the bottom bracket. To alleviate this, I am sure to use a large 3/4" hole in the bb shell/seat tube overlap so water drains through the seat tube and into the bottom bracket which has a drain hole. I recently switched this from a small 2.5mm tapped hole to a 4.5mm taped hole and it made a huge difference. Case in point I drove home over thanksgiving through a downpour with my bike on the roof. Typically, I would have to pull the seat post and turn the bike upside down to let any additional water drain/dry. I did this on getting home and not one drop came out. Interesting. And it rained.. A. LOT. Here's that large vent hole in the BB/Seat tube junction that also duals as a drain hole:


-Do you do post-mount discs?

I do but I generally use them when building with a set of sliding dropouts. I've used the post mount style component from Paragon, and it's a bit cumbersome to work with #1. But additionally, it's quite a bit heavier than a standard ISO mount. And even if you do use one, if you decide to run a 180mm rotor on a mountain bike in the rear, you still need to run an adapter and longer bolts (typically I build the post mount to start at 160mm rotors). Same goes for the front-all are 160 specific but require adapters for larger rotors. The main reason to use a post mount seems to me is to take the attachment bolts of the adapter out of sheer and eliminates a set of bolts. Small weight savings, but a simplification in setup:


-Your heat "sync"...i'm thinking "sink" unless you are synchronizing the steel molecules with it or something.

You know, I never know if it is spelled "Sync" or "Sink"! There, their, they're, on the other hand I have mastered... But the sinks are not only to draw heat from the joint to minimize the heat effected zone but also to keep things round and dual as a purge. Here's a bb assembly fresh from the purge. Nice and clean but also improved weld quality on the backside with the elimination of "sugaring". That's also got my reaming/chasing tools very happy these days:


Coach529

Well-known member
Joined
Mar 18, 2013
Messages
65
Love this thread. Combines two of my favorite hobbies. Cycling and photography.

You have them both mastered Kristofer.
 

battymatty

Well-known member
Joined
Apr 25, 2013
Messages
59
Location
Port Talbot, Wales
i must agree with Coach529 this is an amazing thread, your bikes are the shiznit, and your work ethic work hard ride hard is one i am totally on board with :)
 
OP
F

fortyfour

Well-known member
Joined
May 9, 2011
Messages
537
Location
Lyndeborough, NH
Thanks for the kind words fellas. It's very nice to have something that I can call work that I absolutely love. Took some time to get here, but I would not change the path in any way.

In other news... It's winter here in NH. Officially. And after FINALLY getting our cord wood, and stacking it like a madman before this last storm, I feel like I'm officially ready for Old Man Winter. Not till the wood's stacked each year do I really feel ready for some reason? We have snow and just got another 12" or so last night. Here's a few shots to get us all stoked on fat bikes. Cold be damned. Snow? Bring it on. It's go time. Enjoy.


OP
F

fortyfour

Well-known member
Joined
May 9, 2011
Messages
537
Location
Lyndeborough, NH
What are you using for a camera Kristofer?

Most of the studio shots (white background) and photos in the shop are taken with a Nikon D60 body with AF-S Nikkor 18-70mm lens. I used to lug this along on rides if you can imagine... Once in a blue moon I will now if I have something specific I need for a graphic or catalog. All corrections that are needed are done in Photoshop v5.5.

Here's a shot taken with that camera / lens combo in color, but turned to black and white in PS: (to date, I think this is one of my best self portraits while welding-lucked out on that one)


I recently upgraded my iTouch to the newer version which for it's size and resolution takes some great pics. I use an app called "Snapseed" for photo correction/manipulation. The two photos of the ride in the snow via fatbike were taken with the iTouch. Much easier to carry in a pocket instead of lugging a hydration pack. Here's an example of a shot from the iTouch and then manipulated using the app Snapseed using the options: Tune Image (allows for contrast, saturation, brightness etc type changes0, Tilt-shift (gives the edges a fuzzy feel/out of focus look), and Center Focus (allows you to adjust a few aspects but it puts emphasis on where you want the viewers eye to fall):


Since a race, I've switched to water bottles as it's just simpler as the majority of my rides are about 1 hr. Anything that happens... it is what it is. I carry a spare, tire iron and pump. Anything past that, if I can't fix it with my bare hands I'm walking. Longer rides I will carry a hydration pack which allows for more "stuff". I will make a small tool roll though I think for the saddle so I can carry a multitool and patch kit. I am tubeless on all my bikes with the exception of the fatbike, and to date, I've put holes in tires 5 times that the sealant would not seal up for this season alone. Maybe it's the granite or bad luck, but flats are still a "thing" for me. So a tube has come in handy more than once.

But getting back to photographs/cameras, it's all about the lens quality. With the digital camera's we have now, the ability of the camera to capture information is even greater giving you a greater range of colors and information to tune your shots. Smaller point/shoot cameras are great to a certain level, but for real clarity and purity, you get what you pay for as they say. I have my eye on an upgrade in the new year for this camera body. More Megapixels...

A few recent shots off the Nikon D60:

Finished a few tools:


But as a side note, you can plainly see in a bunch of the shots that white balance is a problem. For money's sake, I have CFL bulbs in my overhead lights. They cast a light that is incredibly difficult to shoot / compensate for... I've considered getting incandescents JUST for the sake of the "look" of the photos. Also the type of light that they give off while working isn't that same glow of incandescents and fluorescent tubes actually are a bit easier to shoot under (some of my earlier shots had a richer feel to them because of the temporary lighting I was using!). Anyway, it's all fun no matter how you spin it. A good challenge. Till next time, enjoy.
 

wannabridin

Well-known member
Joined
May 17, 2011
Messages
140
have you considered LED bulbs? I know they can be pricey, but you can get a much wider range of color temperatures and they'll last the life of the shop!

regardless, good stuff here. your welds were a bit of inspiration to finally pull my ESAB DC tig box out and try to get the rust off. question: do you use a gas lens or just ceramic cups? I'm asking because in one of your more recent pics (3rd up from the bottom of your most recent "picture" post) you have quite a large electrode stick out. What is your gas flow rate as well? seems you're pushing the limits of gas stability on a weld joint of that shape?
 

LilRichard

Well-known member
Joined
Jul 30, 2013
Messages
57
Location
Flori-duh
Wow... just reading this... I'll have to chat with you before buying my next bike! Very nice work.

Just curious (I perused your site and didn't see anything) but are you only steel, or do you build with Ti as well?
 

vtec?lol

Well-known member
Joined
Feb 14, 2013
Messages
84
Location
DFW
I would like to be your friend. I would love to come hang out and learn everything there is to know about building bikes and tig work.

I will be your apprentice in a heart beat
 

koolcat

New member
Joined
Jan 26, 2006
Messages
4
Location
ny
Where'd you find that shot? Any idea what the date is on it? Great one - thanks for sharing. Nothing is new.

I grabbed the pic from a post on the jalopy journal, first thing I thought of was this thread. No idea on the date of the pic.
 

crawler07

Well-known member
Joined
Jan 25, 2012
Messages
140
How do you seal up the fitting at the seat post? it looks like the argon would escape from the slit you cut for the clamp. Im always amazed just how tight your tube work is...
 
OP
F

fortyfour

Well-known member
Joined
May 9, 2011
Messages
537
Location
Lyndeborough, NH
have you considered LED bulbs? I know they can be pricey, but you can get a much wider range of color temperatures and they'll last the life of the shop!

regardless, good stuff here. your welds were a bit of inspiration to finally pull my ESAB DC tig box out and try to get the rust off. question: do you use a gas lens or just ceramic cups? I'm asking because in one of your more recent pics (3rd up from the bottom of your most recent "picture" post) you have quite a large electrode stick out. What is your gas flow rate as well? seems you're pushing the limits of gas stability on a weld joint of that shape?

Thanks for this note - I have considered and would not investing in LED. I know my electrician was singing the praises. I'll have to look into them so for all that suggested, thank you!

I'm using a Gas Lens (No. 8 with 1/16" Lanthanated Tungsten. My flow rate at the meter is around 10-15 CFH. You don't want it too high of a rate as it can actually blow the argon away from the weldsite. For tight spots/acute angles, I can pull the tip out quite a bit with the lens. I'm only laying down a few beads. In addition the weld is back purged too so argon is inside the tubes as well as outside.
 
OP
F

fortyfour

Well-known member
Joined
May 9, 2011
Messages
537
Location
Lyndeborough, NH
How do you seal up the fitting at the seat post? it looks like the argon would escape from the slit you cut for the clamp. I'm always amazed just how tight your tube work is...

I have a small part that I place over that slot and sometimes I tape it. If I am tacking, sometimes I leave it off and all seems to be ok. Tightness with miters is paramount with thin walled tubing. All the tooling really helps. So the time to build them was well worth it! I also just replaced all my hole saws with new ones. Every year I do this unless on seems to be getting dull quicker than others.
 
OP
F

fortyfour

Well-known member
Joined
May 9, 2011
Messages
537
Location
Lyndeborough, NH
Wow... just reading this... I'll have to chat with you before buying my next bike! Very nice work.

Just curious (I perused your site and didn't see anything) but are you only steel, or do you build with Ti as well?

Ti is coming but that's like on a 5 year plan. Dialing everything in with steel so I can teach myself some good habits for welding Ti. Positioning is everything. I wouldn't say I've picked up bad habits, but for Ti some of the positions I weld in would not be ideal-so just rethinking my process to that regard so I get into a habit for Ti when I'm ready. But just steel for now.
 
To avoid these ads, REGISTER NOW!
Top Bottom