
You are using an out of date browser. It may not display this or other websites correctly.
You should upgrade or use an alternative browser.
You should upgrade or use an alternative browser.
44 Bikes Frame Shop
- Thread starter fortyfour
- Start date
Those recently finished bikes look really nice. Do you fabricate the front and rear racks for those as well? If not, I'd like to know who you get them and those nice fenders from? I'm in the process of assembling a similar CX-based commuter with disc brakes and I'm looking for a good porteur rack. I've been warned CX geometry may not do well with a heavier front rack load, and it looks like you slackened the steer angle on the red bike; was it for that reason?
Thanks, keep up the great work!
Thanks, keep up the great work!
I love your thread.
I'n curious as to what your shooting "studio" looks like behind the scenes.Would you mind posting some pics?
Thanks!
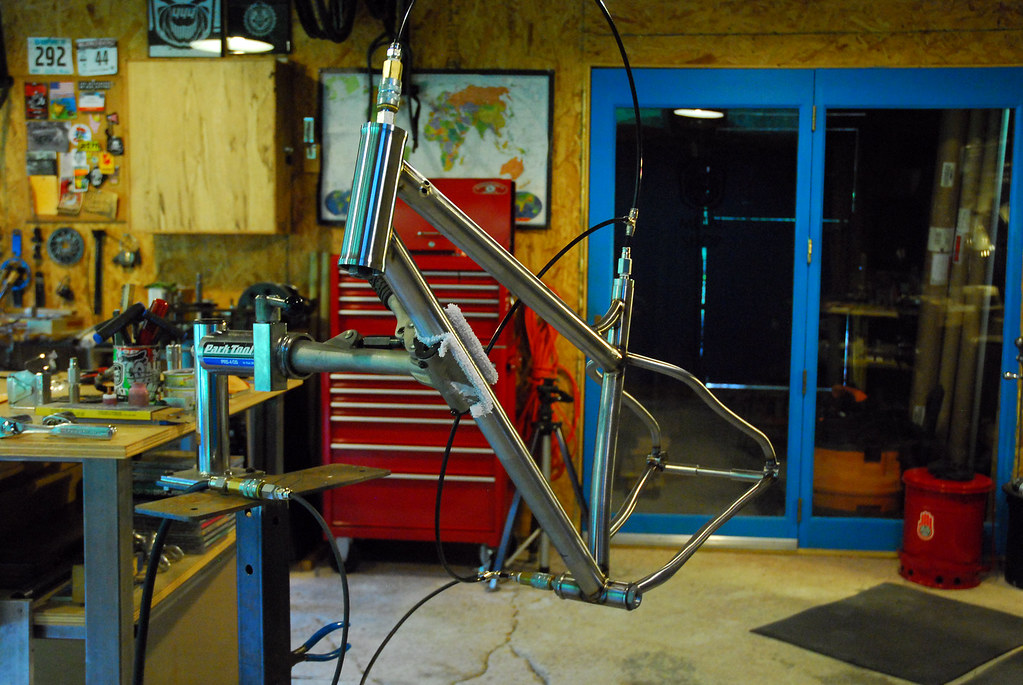
Thanks. Shooting studio is actually the shop. There are two hooks on the wall to the left of the mill. I have a 120" roll of seamless white paper that gets hung from those hooks, rolled out and lights set up. I simply lock up the tool cabinet, roll it next to my vise, stack the floor mats, push the fire can out of the way and unroll the whole backdrop from the wall down to where the center table sits. I knew I was going to eventually be shooting down at the shop, and left that side kind of open and things spaced out so it would work. The paper literally falls about 1-2" away from the mill and the table. Kind of nice. When done, everything gets packed up / rolled back up and stored. Total setup and breakdown time is about 1/2 hour I think. There is a shot of my setup (I think) somewhere on my flickr account and there is a few via instagram (you'd have to dig a bit). Next time I shoot, I'll make a mental note and take a shot of the whole setup so all can see.
Those recently finished bikes look really nice. Do you fabricate the front and rear racks for those as well? If not, I'd like to know who you get them and those nice fenders from? I'm in the process of assembling a similar CX-based commuter with disc brakes and I'm looking for a good porteur rack. I've been warned CX geometry may not do well with a heavier front rack load, and it looks like you slackened the steer angle on the red bike; was it for that reason?
Thanks, keep up the great work!
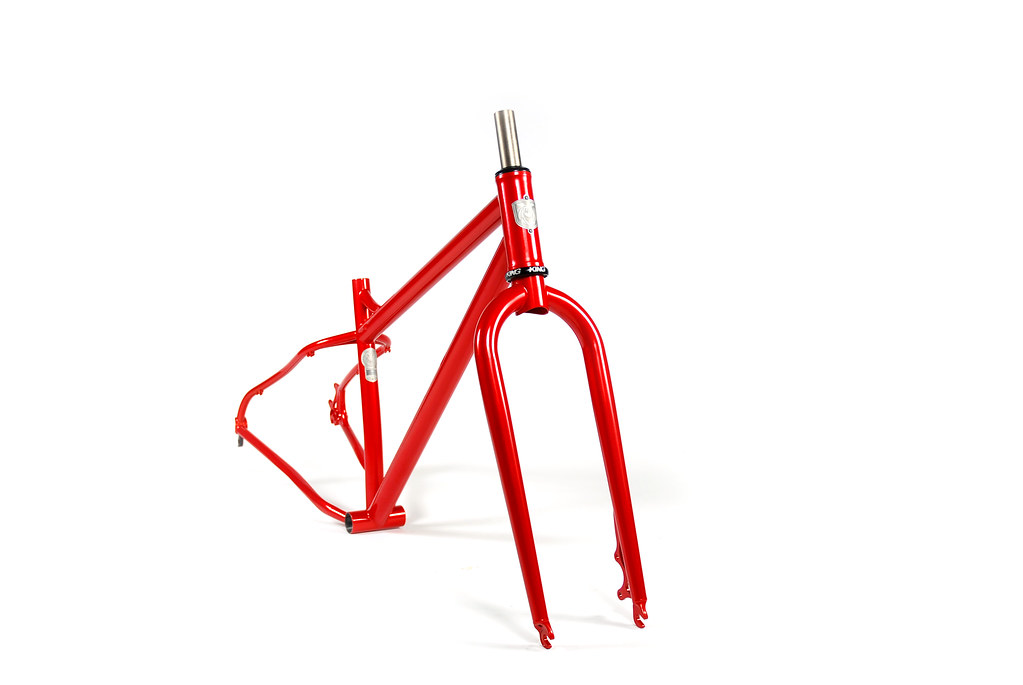
Thanks for the kind words. I make racks to match as well. I first build the frame if it's a rear rack then use the frame as a platform to build up and from. Same goes if it is a front rack: Build the fork first, or use the existing fork as a template to build up and from. Larger Porteur style racks demand a bit of special treatment as the loads are higher and you "ideally" want that large load centered over the the front axle. You also want that front wheel a touch more out in front of you as I understand it (so additional rake). Loads of say about 10 lbs or less, you can get away with not being exactly centered and stock fork offerings.
The people/clients I have spoken with who prefer front racks and have run CX bikes/forks with large loads up front didn't seem to mind or have problems. Riding with a load takes some getting used to anyway as handling changes a bit.
Fenders are made by Honjo (Japanese fender maker, all made by hand and, IMO, really the best). The come undrilled, the stock hardware is good and they allow for the most adjustment/customization. They come in a variety of finishes / treatments and widths / tire size / wheel size compatibility. Mine are powder coated to match. They come as polished aluminum. Hope that helps!
95riosnake
Well-known member
Well I've managed to read through this whole thread over the past few days, and I must say I have a great respect for your skill and the appreciation you have for detail work and quality materials/tools. There's an authenticity to everything you do that I truly envy. Deep down I'd love nothing more than to hit the lottery, buy a cabin in the woods and set up shop to fabricate anything and everything my heart desires, locked away from the world lol.
I too am an industrial designer, but I spend my days designing housings and parts for consumer products, a decidedly less rewarding line of work than yours it seems! I would love to someday blend my hobby of fabrication with my career, but for now I'll live vicariously through your thread. Cheers to you for taking everything you do to the next level.
I too am an industrial designer, but I spend my days designing housings and parts for consumer products, a decidedly less rewarding line of work than yours it seems! I would love to someday blend my hobby of fabrication with my career, but for now I'll live vicariously through your thread. Cheers to you for taking everything you do to the next level.
I may've missed it in one of the earlier posts, but how did you deal with the power demands on the Bridgeport? I'm preparing to build my retirement shop, and would like to add a small S-B lathe and a Series I Bridgeport. The lathes don't appear to be an issue, for the size that I'm wanting, but I haven't found a mill yet that didn't have 3 phase power requirements. Since you're working out of a home shop, I'm guessing you ran into the same issue?
I absolutely love your shop, and especially your attention to detail and organization. Man after my own heart! Thanks for sharing!
I absolutely love your shop, and especially your attention to detail and organization. Man after my own heart! Thanks for sharing!
I may've missed it in one of the earlier posts, but how did you deal with the power demands on the Bridgeport? I'm preparing to build my retirement shop, and would like to add a small S-B lathe and a Series I Bridgeport. The lathes don't appear to be an issue, for the size that I'm wanting, but I haven't found a mill yet that didn't have 3 phase power requirements. Since you're working out of a home shop, I'm guessing you ran into the same issue?
I absolutely love your shop, and especially your attention to detail and organization. Man after my own heart! Thanks for sharing!
Thanks for the kind word and happy to share. So with the mill, the motor is indeed 3 phase. Up on the J-Head there is a plate with some electrical information when going from 3 phase to 220. Since the distance from my house to the shop is about 150', I spoke with an electrician who also happens to be a good friend and he recommended the correct cable and appropriate sized PVC tubing to run. What little I do know about electricity, your biggest concern is basically loss of power or drop with regards to the overall distance from the source. My source comes in at the house. I believe my main in the shop is 200amp. The lines are Copper, 4 in total (positive negative neutral and ground) about the size of my pinky. Fairly hefty wire. Here's a shot of the setup inside and out:

The main breaker is a Square D by Schneider Electric. From there we ran appropriate wire and breaker for the mill along with a phase converter and shut off for when I need to get my hands inside the mill for repairs and such. Here's a shot of that:

Ready for Liftoff... by 44 Bikes, on Flickr
The thing about the "pancake" style motors on these older J-Heads is the initial start up. They play "ok" with phase converters. For the most time, I have clean starts and all is good. The rare occasion, I flip the power switch and the mill's motor gives me a "buzzing" noise as it attempts to start. I flip the switch and flip it again and all is fine. It's an odd thing, but after doing research on that style motor and phase converters, it's just part of the territory I guess (if I am wrong, please tell me otherwise-it's not a deal breaker, but when it does happen rarely, it's slightly annoying-and always happens when I'm in the heat of battle of course). The main switch and phase converter were mounted directly to the mill. Pretty easy set up and for the most part, works like a charm. The other thing is my switch might be going bad too - I've cleaned the contacts and that really helped things. This never happens when throwing the machine in reverse when in back gears however. I know some use different setups, but for my budget, that's what I went with. I will eventually have a SB Heavy 10 too that I'll set up the same way.
My electricity bill has not changed for the most part. Under load, the mill does not skip a beat. I've never felt it was under powered for the work and jobs I've been doing thus far. It's well loved, kept cleaned and oiled regularly in all the right places. If the mill uses the grease injection ports, get yourself one of these little guys:

Best darn thing ever. Fill it up, snap it onto the fitting, and plunge. Oils the ways and all interfaces slicker than snot.
Hope that helps! Let me know if there are additional questions.
Got my poster in the mail today. Looking forward to getting it frame and hung. Thanks! Looking forward to more in process pictures.
Sweet... Personally, I like these large 18 x 24 clip style frames so the poster runs right to the edge and the overall "feel" is not interrupted. Good to hear you got it safe and sound!
Mr. 360
Well-known member
Kris,
Although I've read through this thread many times, I've never posted because I never felt I could do this thread justice. I'm not sure if it's the graphic design, the precision machining, the beauty of your welds, or just how cool the shop itself is. I think what it boils down to is, I love your attention to detail in pretty much everything here.
I may have been inspired long ago by Mr. Olsen to work over my shop, but I've gotta say it's this thread that made me want to start my own shop thread (mostly, I just wanted to overlay text and graphics on my images, I thought that just looks cool).
As an Industrial Designer myself, I'm always curious as to what led other ID guys into the field, since it's a pretty broad profession. Maybe it's hard to nail down, but what got you into ID?
Lastly, sketches... I've seen a few of your moleskine sketches in this thread, but I bet you've got stack of em somewhere (I know I do). I'm sure, if you were willing, people here would love to see a few sketches... I know I would.
Anyways, Keep up the great work, I really enjoy following this thread.
Kris,
Although I've read through this thread many times, I've never posted because I never felt I could do this thread justice. I'm not sure if it's the graphic design, the precision machining, the beauty of your welds, or just how cool the shop itself is. I think what it boils down to is, I love your attention to detail in pretty much everything here.
I may have been inspired long ago by Mr. Olsen to work over my shop, but I've gotta say it's this thread that made me want to start my own shop thread (mostly, I just wanted to overlay text and graphics on my images, I thought that just looks cool).
As an Industrial Designer myself, I'm always curious as to what led other ID guys into the field, since it's a pretty broad profession. Maybe it's hard to nail down, but what got you into ID?
Lastly, sketches... I've seen a few of your moleskine sketches in this thread, but I bet you've got stack of em somewhere (I know I do). I'm sure, if you were willing, people here would love to see a few sketches... I know I would.
Anyways, Keep up the great work, I really enjoy following this thread.
Thanks for the kind words and it's nice to know that things here are inspiring to others. I know as a kid and even to this very day, it's things like this that you see, people tell you or share with you and that gets you excite. Inspired. And it motivates you to get out there and build something or do something. It's refreshing to hear all this indeed.
So what got me into Industrial Design (ID)? I recall one morning walking up through PSU's campus on my way to a class, thinking to myself about what it is that I was doing there and what direction I wanted to take. Up to that point in my life, I could touch on things that got me excited and I knew what some of my strengths were that just needed fostering and refinement. But what that "job" was that combined all of them and somehow involved my passion for bicycles, I really did not know. At that point I had enrolled in the College of Arts and Architecture and was studying Jewelry and Light Metals. So that was most likely the first serious instance I can recall where it hit me that I needed to figure out some sort of collective direction. Sometime that winter, I was in the stacks deep in the Pattee Library doing some research for an upcoming project when I stumbled on a collection of work by the jeweler Peter Skubic. Now I can't recall if it was specifically his work or if it was another's work included in the collection, but from memory, I was paging through the catalog and what was inspiring was he was not only using stainless steel (which is difficult to work with from a jewelry perspective) but his pieces (broaches actually) were all were all meticulously crafted and all held together with watch pins so the different shapes interlocked and pushed/pulled against each other in tension created by the pins loaded into the forms. That to my eye was just rad. Rigid structures created by patterns and tension. Then I noticed that there were drawings - sketches and renderings. But it stated at the bottom of the page in the credit "Peter Skubic : Jeweler / Industrial Designer". That's the first instance I ever saw those two words next to each other. And since I was studying jewelry, here's another jeweler with sketches and renderings of products. Utilitarian objects. That is where the hunt for that profession began. I scoured the campus, asked every professor, arranged meetings in the engineering department with department heads..
Basically, with that large of a school (PSU), there is tremendous information right at your fingertips. You just need to know who to go to, and what to ask. One question and conversation would lead me elsewhere. Basically finding out that no Penn State did not have a I.D. program, but I was given a list of schools that did (RISD was always the top of the list people recommended). So a transfer was in order but to a 18 or 19 year old undergrad, and where I was in my life at that point, that was a HUGE step. One I was not ready for both mentally and financially. So I ended up finishing my degree over the next 2 years, graduating and then later that fall of 1998/99 I visited RISD and as they say the rest is history.
But it was those conversations with peers, professors and individuals that were recommended to me by others to speak with that pointed me in the right direction. And it all happened when I was simply doing some research for a project.. basically homework.
RE Sketches: I'll have to dig through some stuff and see what I can find and I'll be sure to post some stuff up here.
Engine Builder
New member
- Joined
- Apr 9, 2007
- Messages
- 3
Kris,
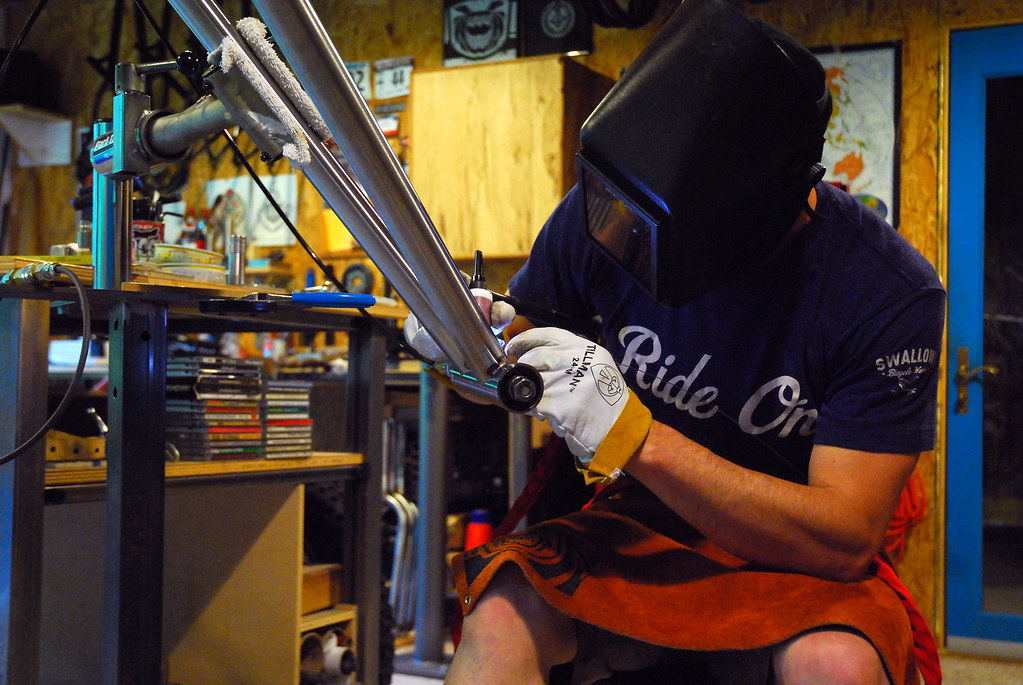
I stumbled on to your garage posts while looking for ideas for my sons race shop we are building he races sprint cars here in pa and i must say i am very impressed with your work,bike building and especially your welding skills,i too am a fabricator/welder i fab front axles,nerf bars and rear bumpers and other componets for the for sprint car racing, mostly chrome moly and dom steels knowing you are from central Pa i'm sure you know the race cars i am talking about.lately i have more requests for titanium componets and was wondering what setup you used for back purging your tubing or if you have some pictures you could post,especially your gauge setup at the argon tank,another thing, when purging the tube what pressure are you using and is there a vent somewhere so there is constant flow through the tubes.Thanks for the help.Also one other thing are you using .045 filler and 1/16" tungston? I use a Miller Dynasty 350 and love this machine,i alot aluminum cylinder head repairs and aluminum engine block repairs for the race shops around the area. Dean
I stumbled on to your garage posts while looking for ideas for my sons race shop we are building he races sprint cars here in pa and i must say i am very impressed with your work,bike building and especially your welding skills,i too am a fabricator/welder i fab front axles,nerf bars and rear bumpers and other componets for the for sprint car racing, mostly chrome moly and dom steels knowing you are from central Pa i'm sure you know the race cars i am talking about.lately i have more requests for titanium componets and was wondering what setup you used for back purging your tubing or if you have some pictures you could post,especially your gauge setup at the argon tank,another thing, when purging the tube what pressure are you using and is there a vent somewhere so there is constant flow through the tubes.Thanks for the help.Also one other thing are you using .045 filler and 1/16" tungston? I use a Miller Dynasty 350 and love this machine,i alot aluminum cylinder head repairs and aluminum engine block repairs for the race shops around the area. Dean
Last edited:
Kris,
Thanks so much for the response. This will help more than you can imagine - I'm in a very similar situation, in that the shop will be approx. 200' from the house, and this will help me have an informed, detailed discussion with our electrician. I've also never had to deal with phase converters, and this will help get the conversation started in the right direction.
Your photos are incredible, and I've been spending a good deal of time during my lunch breaks, visiting and re-visiting them on a daily basis. Your welding skills are as good as any I've ever seen. In my "real job", I'm a pressure equipment inspector, and a good bit of that involves weld inspection - both old and new. It's always fun for someone like myself to be able to admire the level and quality of work that you're obviously producing. Also, I'm an old motocross racer from waaaaaaaay back, and in recent years I've taken up off road cycling as a way to fill that need for off road riding, while helping to stay in shape at the same time. So, your photos and posts have connected with two key elements of my life in a big way - thanks again for sharing!
Bruce
So, your photos and posts have connected with two key elements of my life in a big way - thanks again for sharing!
Bruce
Hey Bruce - If you have any additional questions, let me know. I can get specifics for the breaker if you wish but you should have enough to direct the conversation like you said. I know we definitely left room for growth and provided ample juice so there is no drop. The PVC pipe I ran was 2 1/4 or 2 1/2 (I'd have to measure a piece of scrap). But it made pulling those 4 wires a piece of cake. We laid it all out in a giant serpentine pattern, my buddy was up at the house pushing while I was down at the shop pulling. I ran the rope to pull the wire using a 250m snake before hand. There is a lubricant we added to make the job a bit easier. Then it was just me pulling and him pushing. It ran through really fast and that is because the PVC was over sized. Here's a pic again of that run when I was laying the PVC. Crazy I had to tear up the yard like that!

hewey
Well-known member
Just looked through your entire thread. Cool workshop, and amazing bike builds. Thanks for taking the time to share your builds and build philosophies with us.
Some latest work
Just wanted to take a few to share what's been headed out the 44 Bikes shop doors as of late. Enjoy.
Fat Bike:
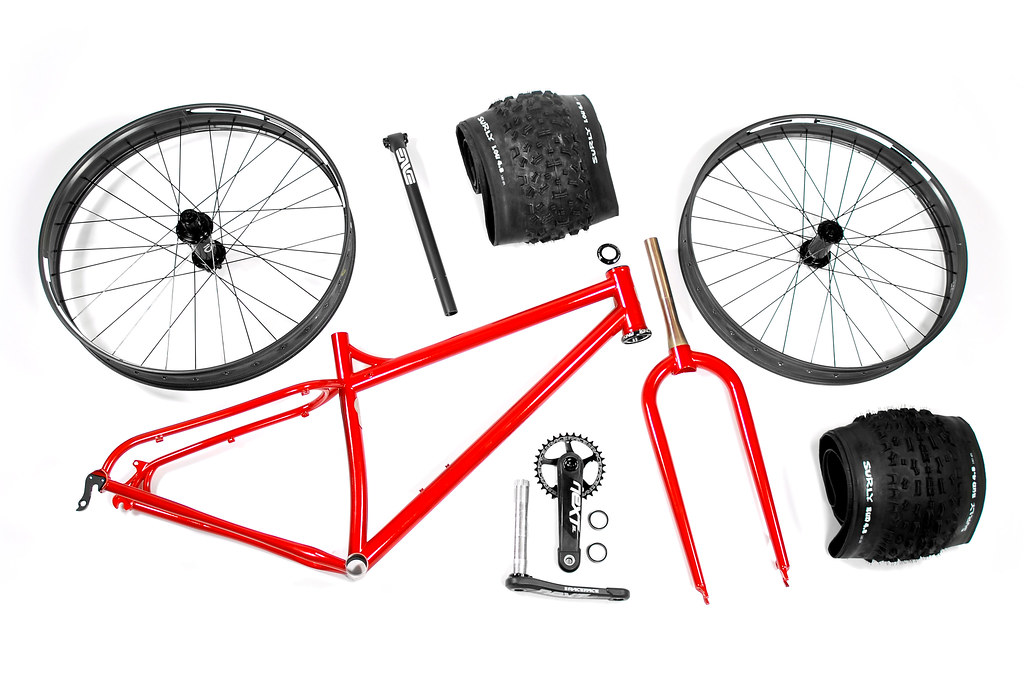
29+ Headed to Interbike...

29+ / Fat :

 [
[


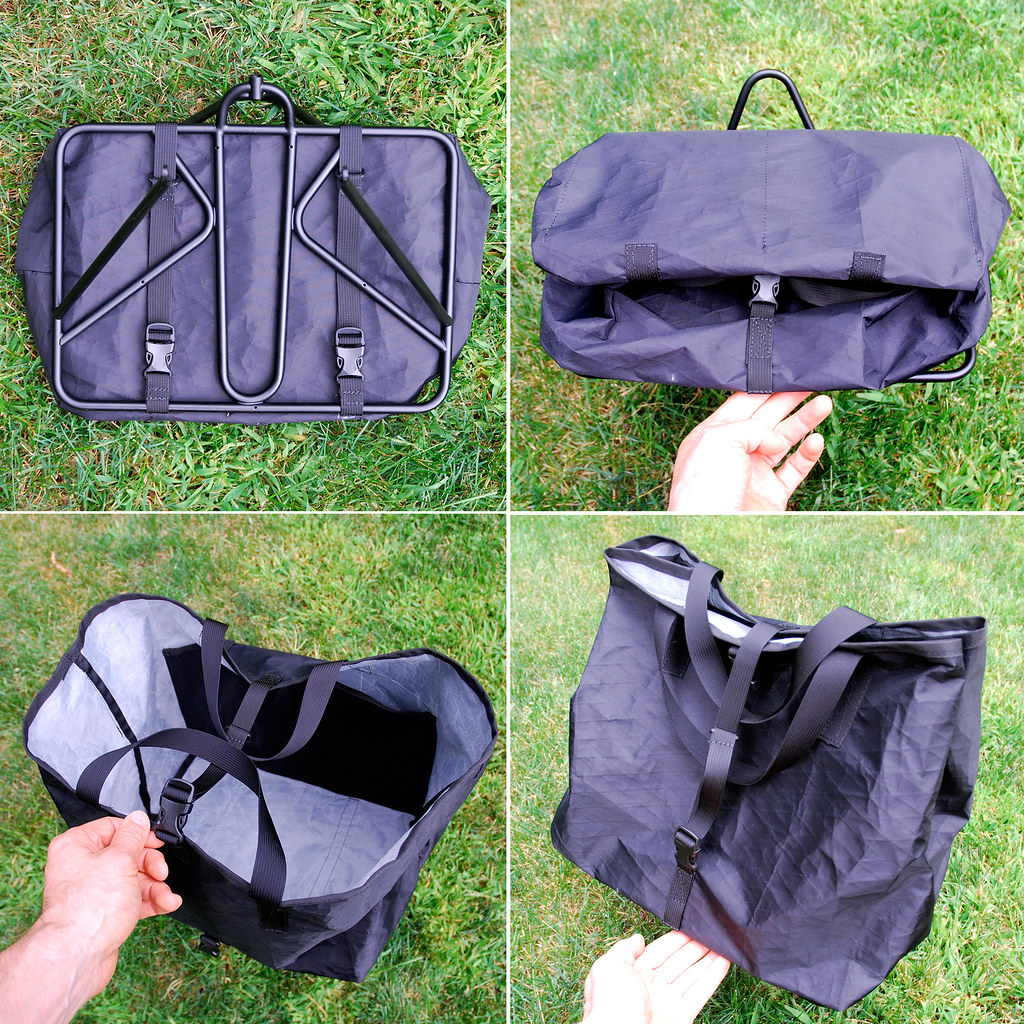
Matching rack and custom sewn commuter tote/bag in-house at 44HQ:
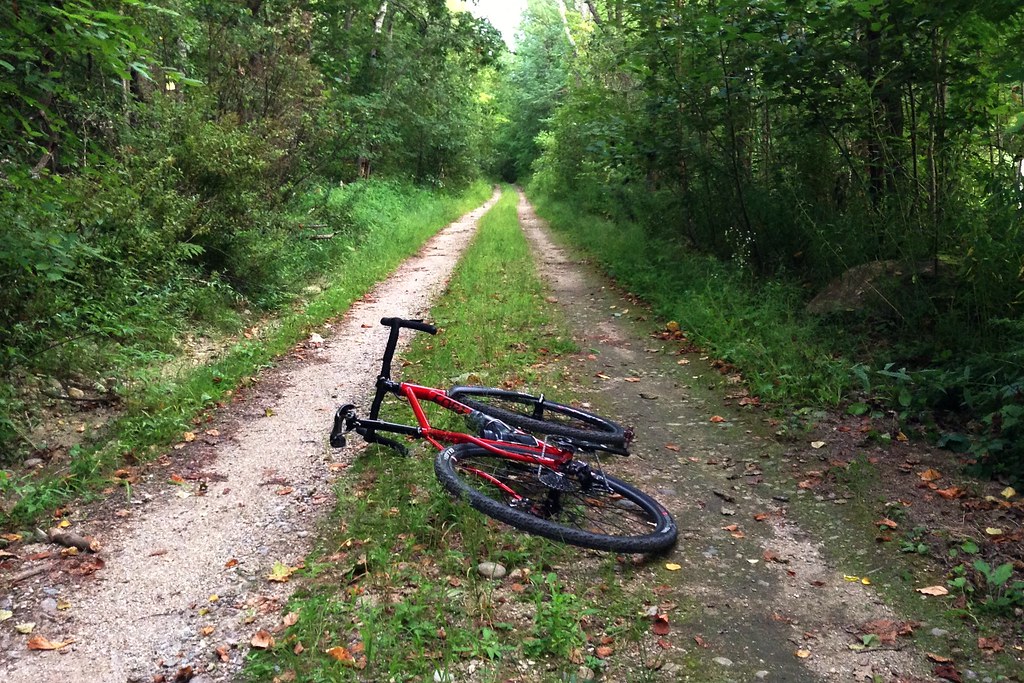
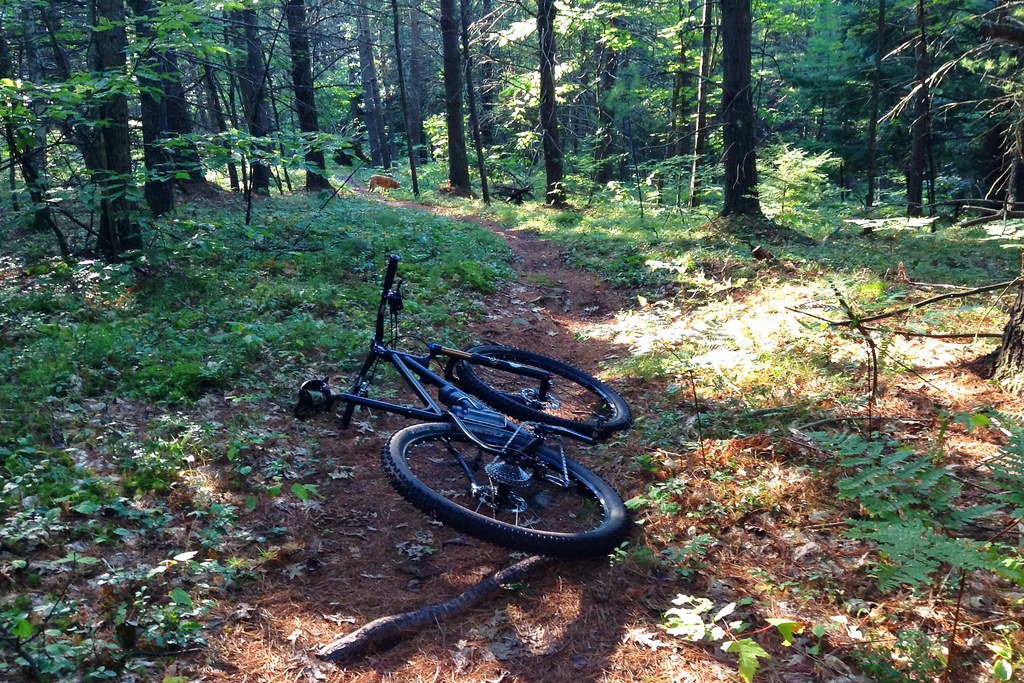
And of course, a little "R&R / R&D" :
Just wanted to take a few to share what's been headed out the 44 Bikes shop doors as of late. Enjoy.
Fat Bike:
29+ Headed to Interbike...
29+ / Fat :
[
Matching rack and custom sewn commuter tote/bag in-house at 44HQ:
And of course, a little "R&R / R&D" :
Last edited:
1/2 Cup
Member Emeritus
Best part of my week is ready/seeing your posts. Thanks again.
As above, a true craftsman at work.

Thanks for sharing..
Megadodo
Well-known member
Firstly, can I just say I'm in awe of your welding, pure artistry! I love the "garage" and your work and thanks for taking the time to post. I'm sure it pays off in sales in the long term!
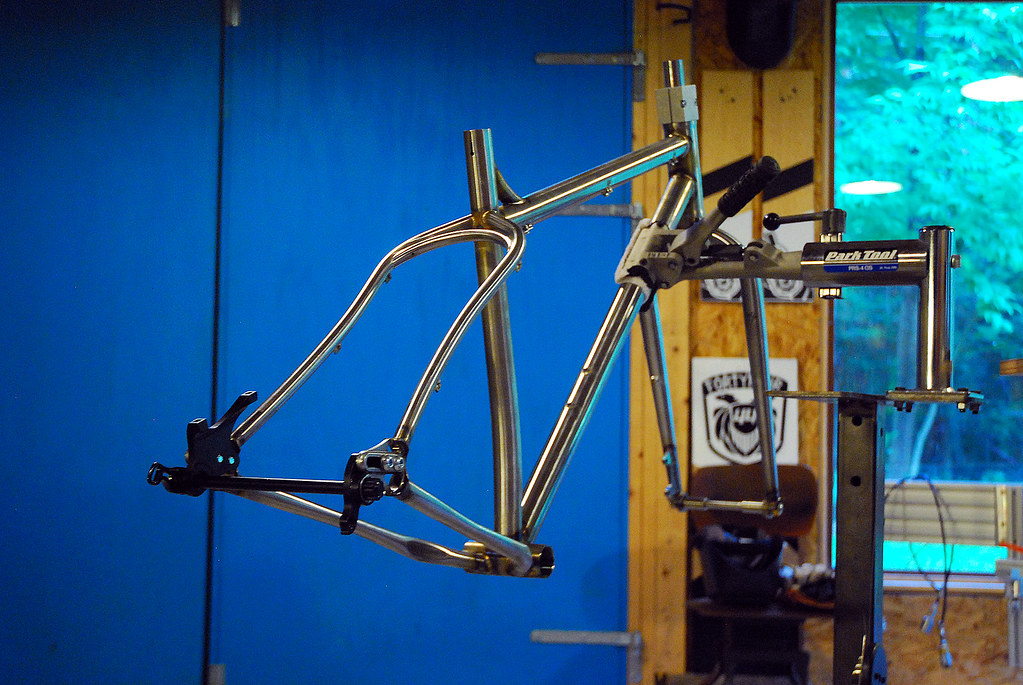
In post 977 picture 23 and 24 there is small arch of framing yet to be welded in place that appears to brace the 2 upper rear axle supports together. Is that required structurally or stylistically? Or is it used to support something else? In my older bikes it was where the rear brakes hung off but with modern disc brakes are secured elsewhere.
In post 977 picture 23 and 24 there is small arch of framing yet to be welded in place that appears to brace the 2 upper rear axle supports together. Is that required structurally or stylistically? Or is it used to support something else? In my older bikes it was where the rear brakes hung off but with modern disc brakes are secured elsewhere.
Notgrownup
Well-known member
Wow, I like this ....your frames are really nice.....I wish I could world like that....I would build my own road frame...truly inspiring....
jaredfloyd
Well-known member
Absolutely beautiful work!
How do access the weld joint at the seat stay brace near the top tube junction on that 29+/Fat? Looks like an impossible area to reach.
Also, I rode a fat tire MTB a little bit the other day and it shocked me how light and nimble it felt. I expected the wheel/tire mass to really slow it down. What is the bike weight of your Fat tire builds?
jaredfloyd
Well-known member
Another build question. Is the fork steerer welded directly to the fork blades or is it pressed or brazed into the "crown"?
ich_liebe_meine_arbeit
Well-known member
Mr. Henry,
I have been in bed with pneumonia the past three days, reading every single post in this thread in between codeine laced cough syrup induced sleep.
For the last half or so I have been struggling with how to express the amount of genuine awe and gratitude I have for your passion, work ethic, skill and humble nature. The amount of time you have dedicated to keeping up with this thread is truly appreciated. I'm not a welder, I rode bikes growing up non stop and have been telling myself I should get another soon as it would be a good family activity (I'm 34, my wife is 29 and we have a 2.5 yr old daughter.).
I honestly wish I were in the financial position to purchase for you on a zero interest business loan any of the machinery/tools you feel would help you be more efficient or expand the products you offer.
Enough rambling from me, thank you so much.
Brian
Ps if you ever find yourself within a couple hrs drive of Kansas City send me a pm and I'll buy you a couple of beers.
And KCCO.
aussiesteve
Active member
your welds are a work of art  and those fat wheel setups look so cool
and those fat wheel setups look so coolTheEquineFencer
Well-known member
I wish I could MIG as well as you TIG.
Firstly, can I just say I'm in awe of your welding, pure artistry! I love the "garage" and your work and thanks for taking the time to post. I'm sure it pays off in sales in the long term!
In post 977 picture 23 and 24 there is small arch of framing yet to be welded in place that appears to brace the 2 upper rear axle supports together. Is that required structurally or stylistically? Or is it used to support something else? In my older bikes it was where the rear brakes hung off but with modern disc brakes are secured elsewhere.
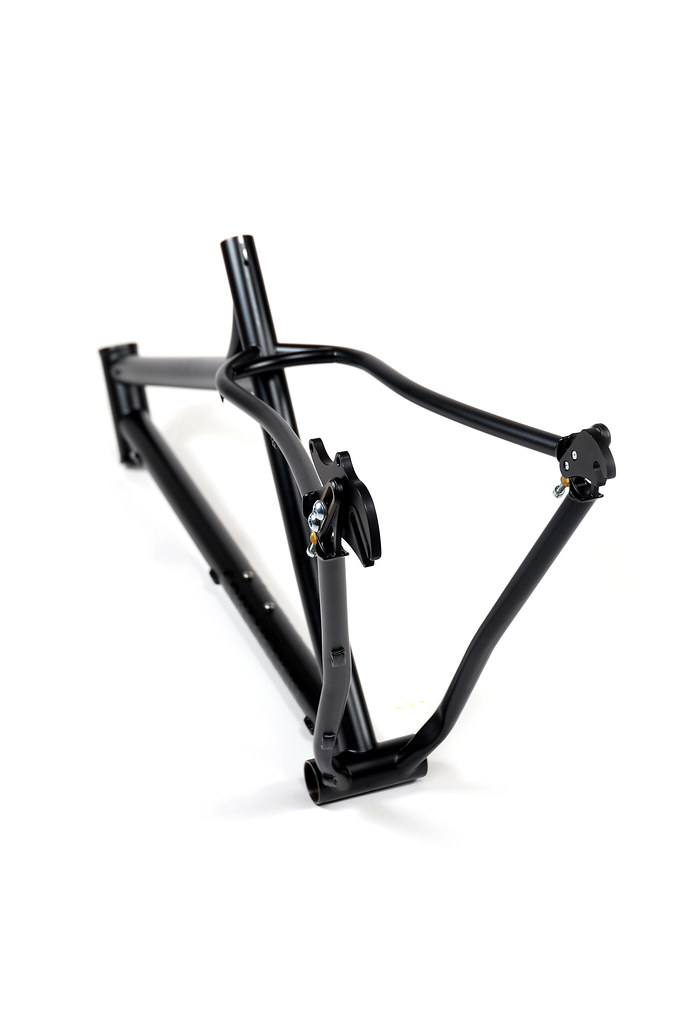
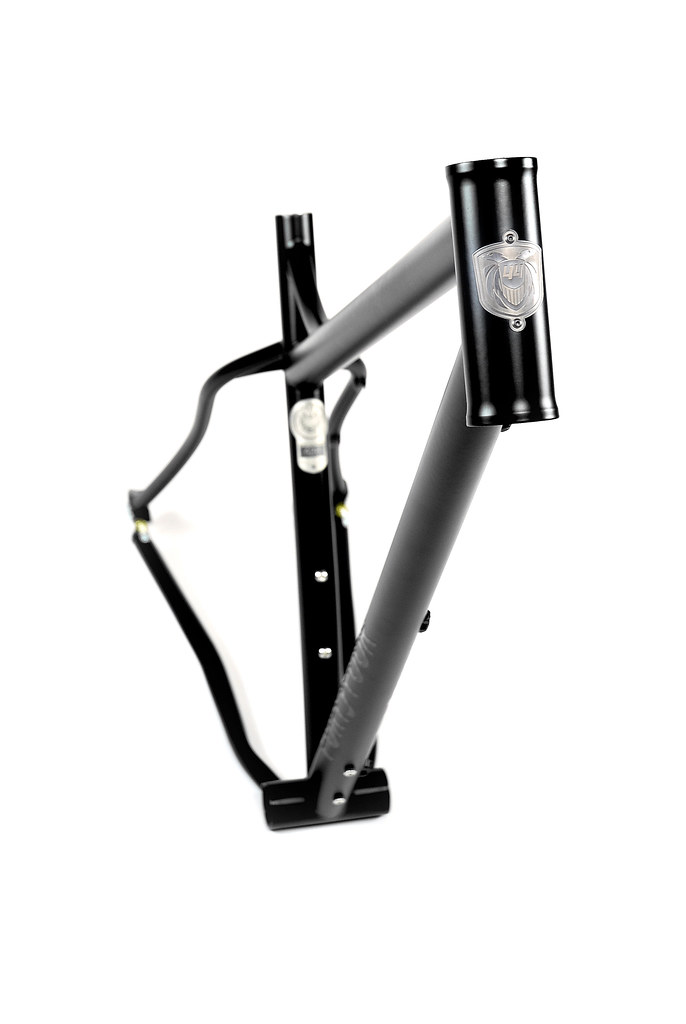
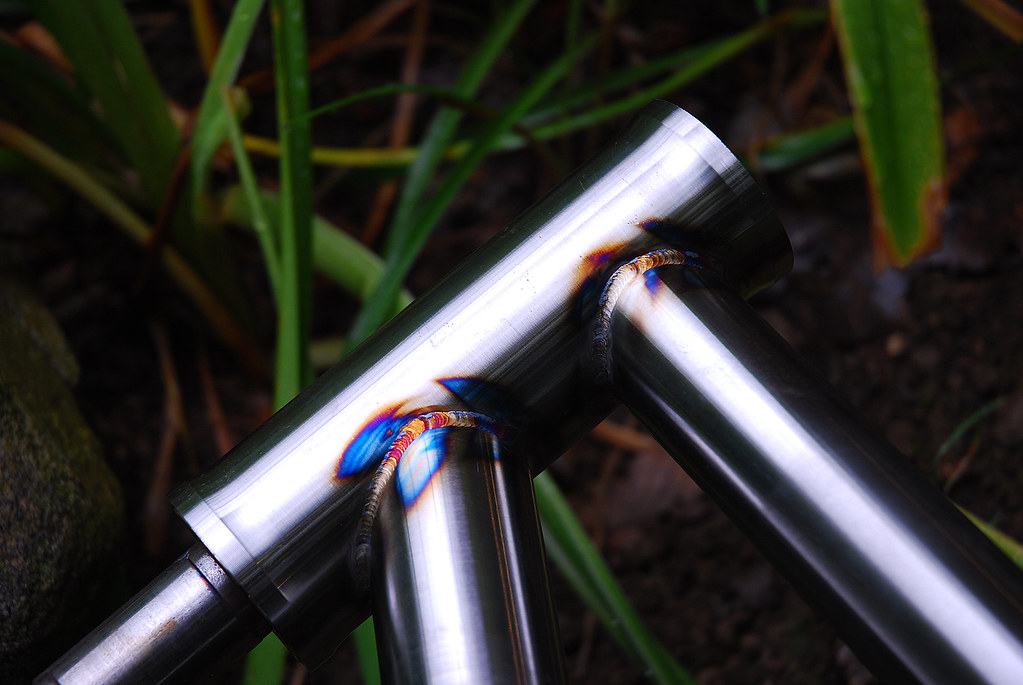
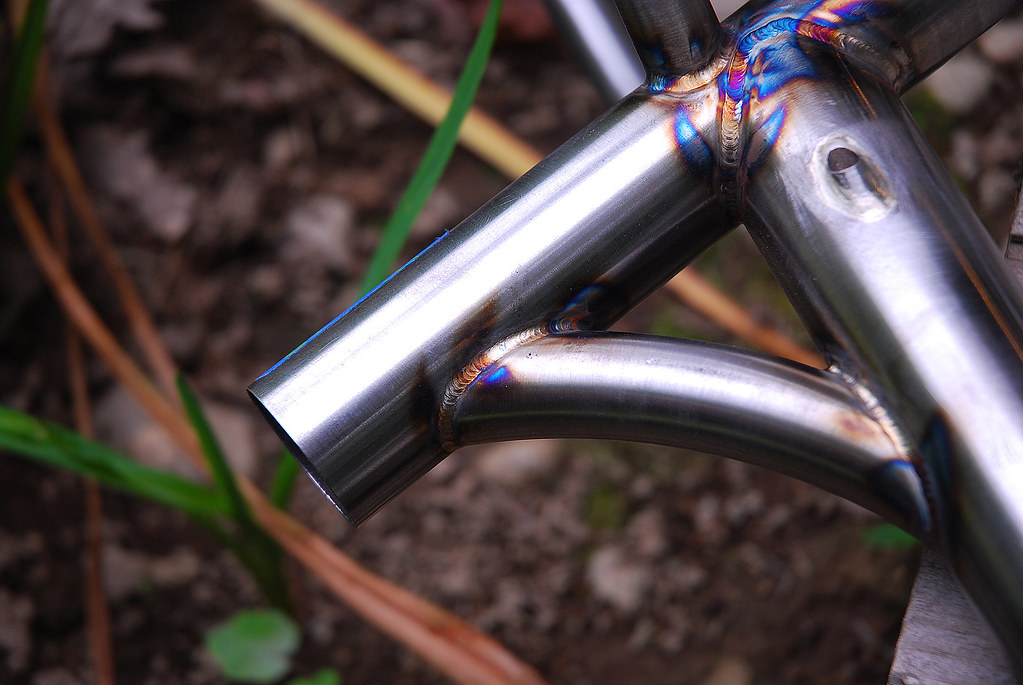
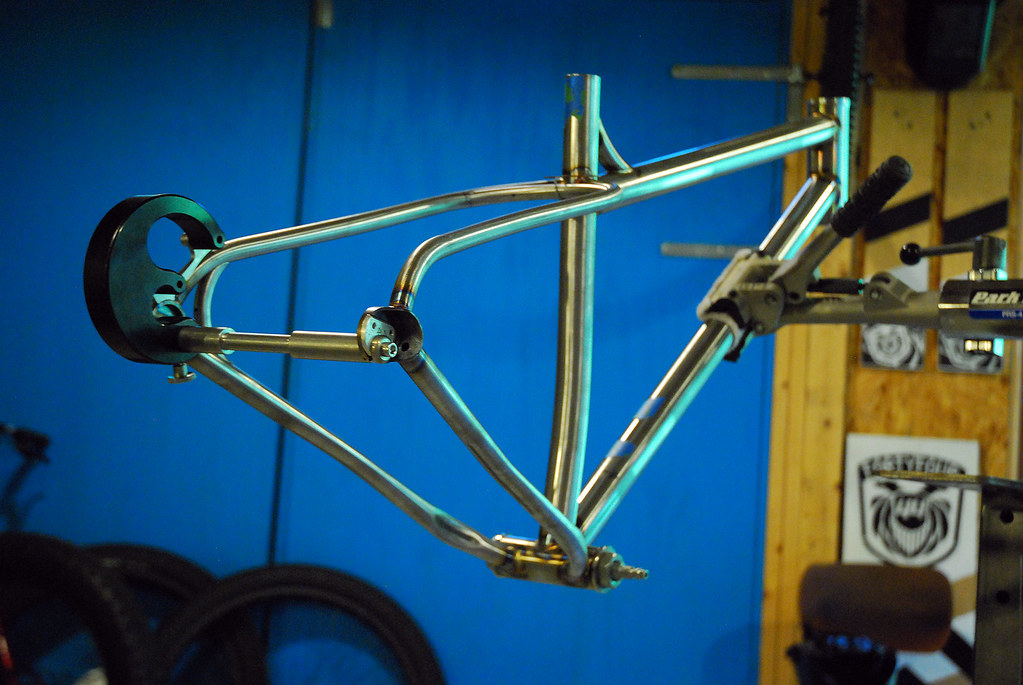
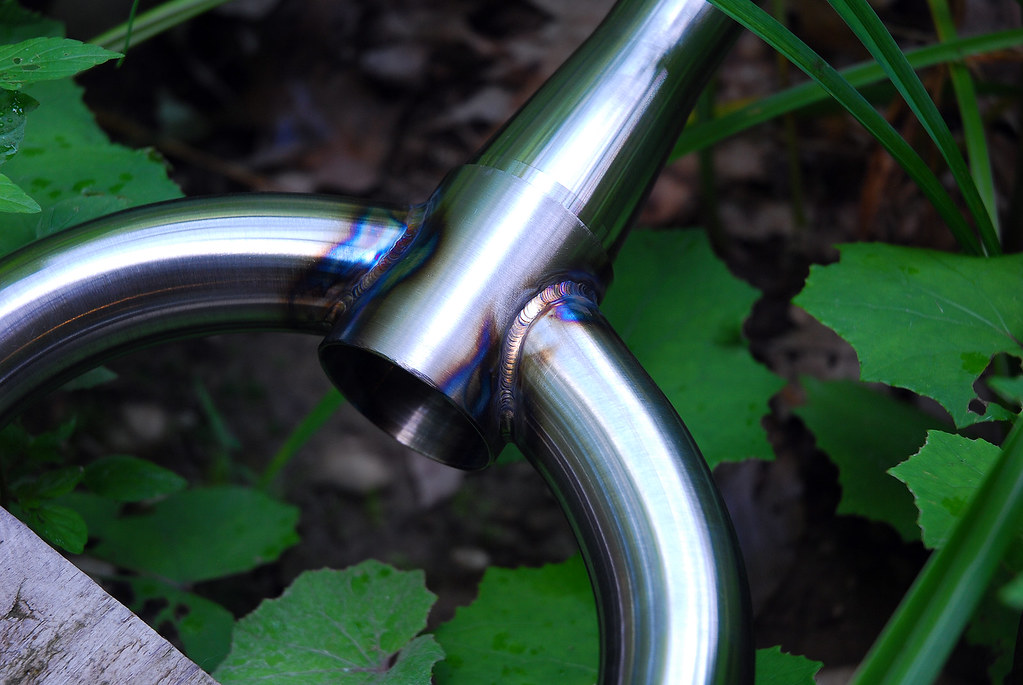
I believe you are speaking of the seat stay brace? (here's another view of a different one - also a fat bike).

These can be welded in place, but over time I've noted that brazing them is a little better approach. Welding them draws the dropouts together and the dropouts need to be reset. Brazing adds a little less heat, so they do not get drawn together as much. Brazing them also allows me to create a little bit of a relief between stays and brace, so it gives that area a little more style - also gives a little "lug like" shore line too. Here it is by itself:

This also creates triangulation in the rear triangle, and ties the seat stays together a bit more (so adding some rigidity as well as structure). Without that brace, the rear end actually feels a little "soft" (I've built some early bikes with and without them - they ride very differently). The only time I add a brace between the chain stays is when the client requests fenders. On mountain bikes and fat bikes, that brace is a shelf for collecting mud/gunk which effects the drivetrain performance. It does add some stiffness down there in the bottom bracket area, but I prefer the feel / ride of a bike un-braced at the chain stays personally.
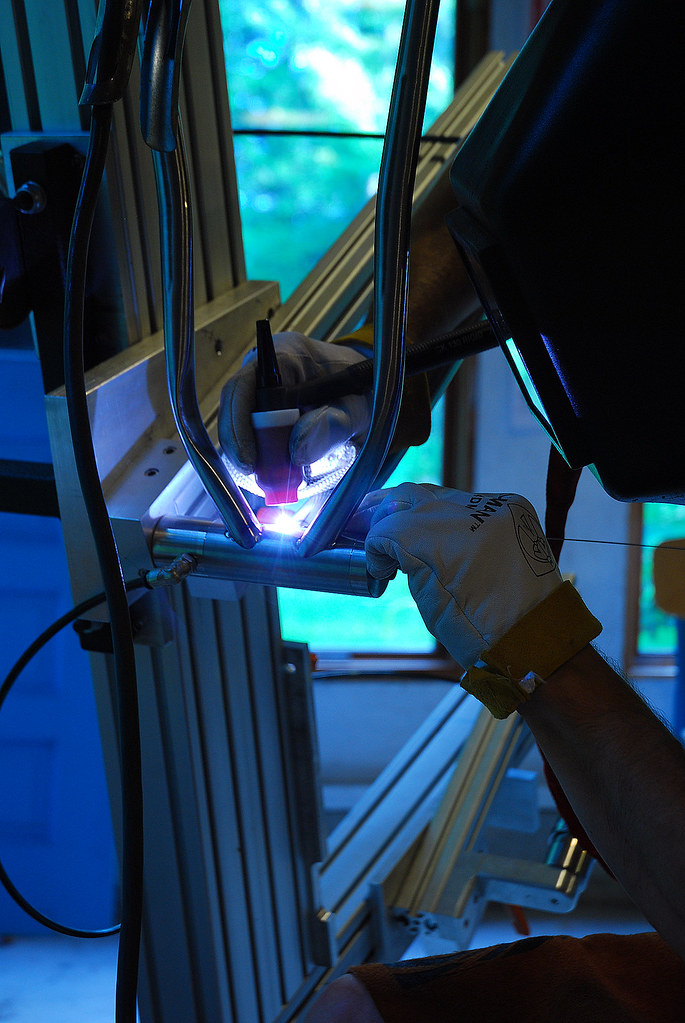
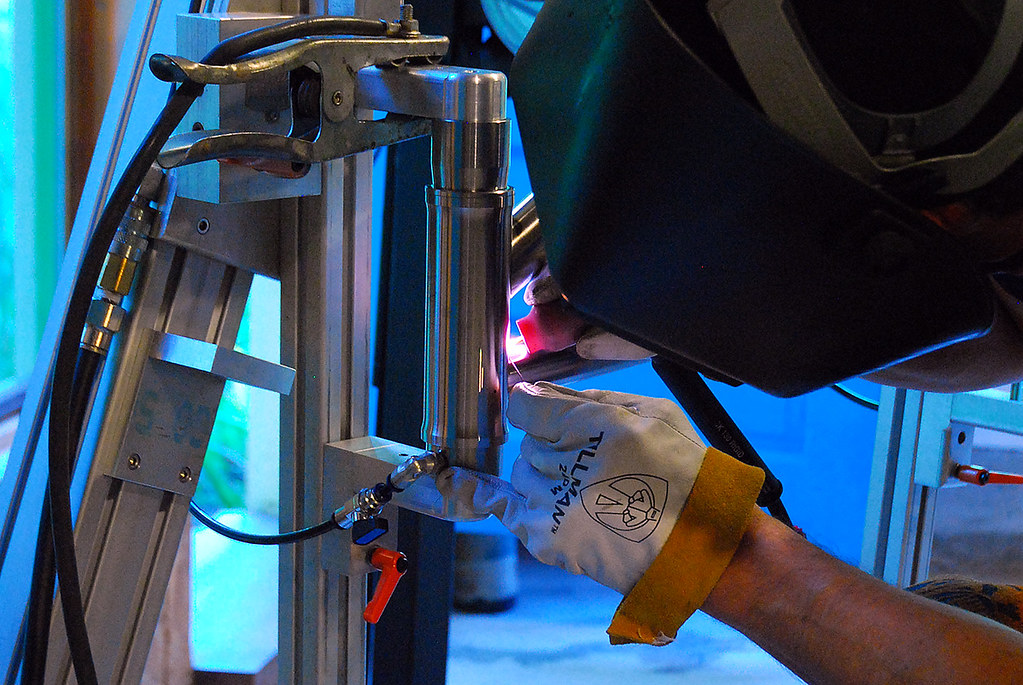
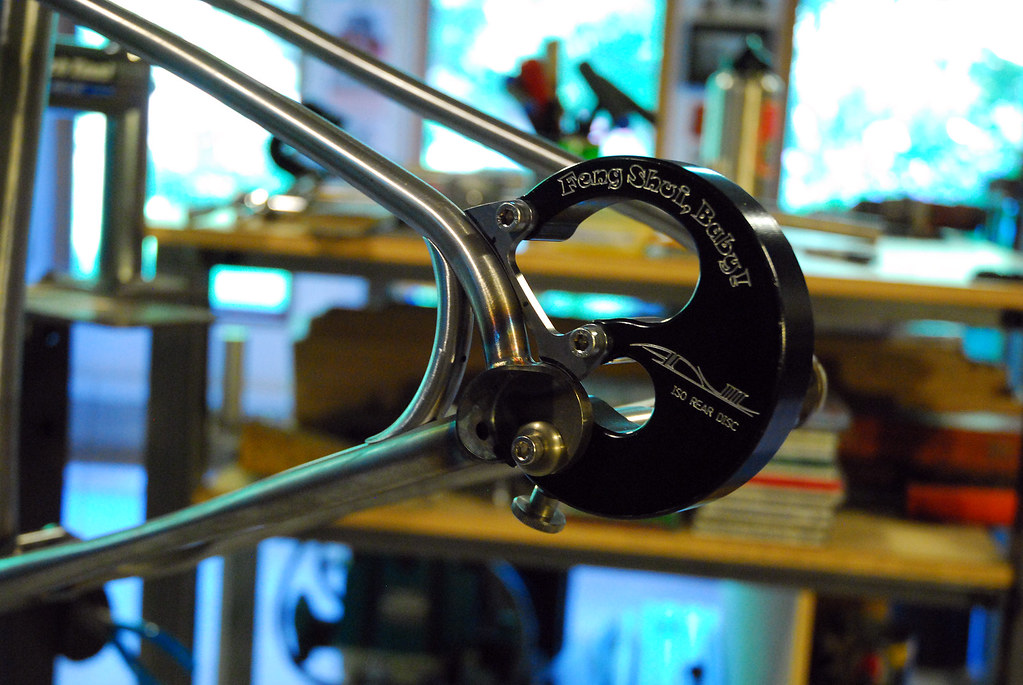
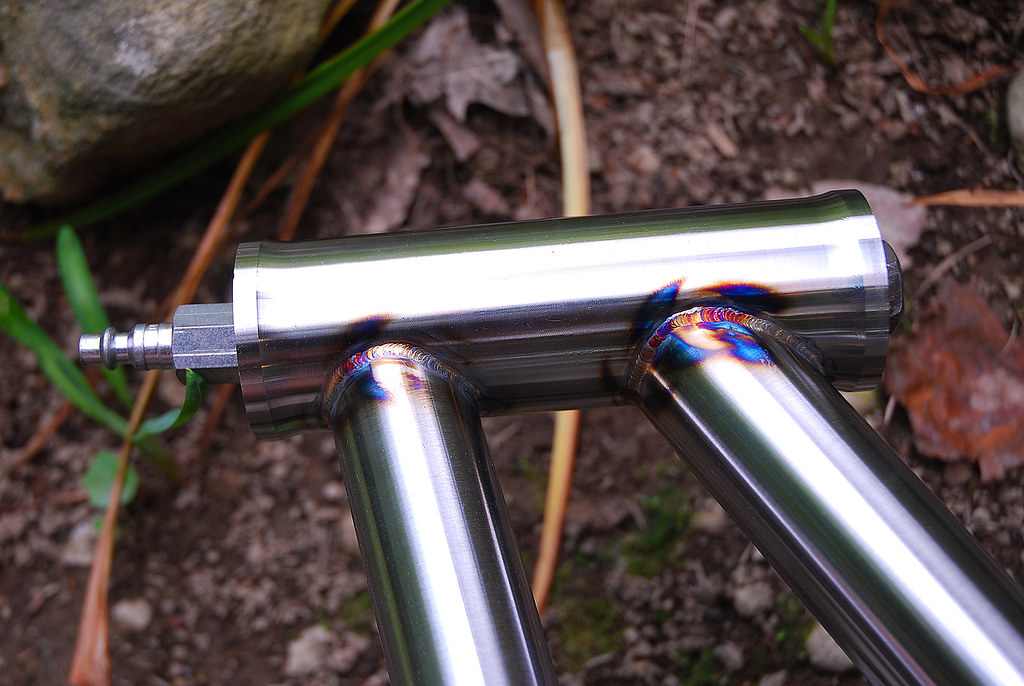
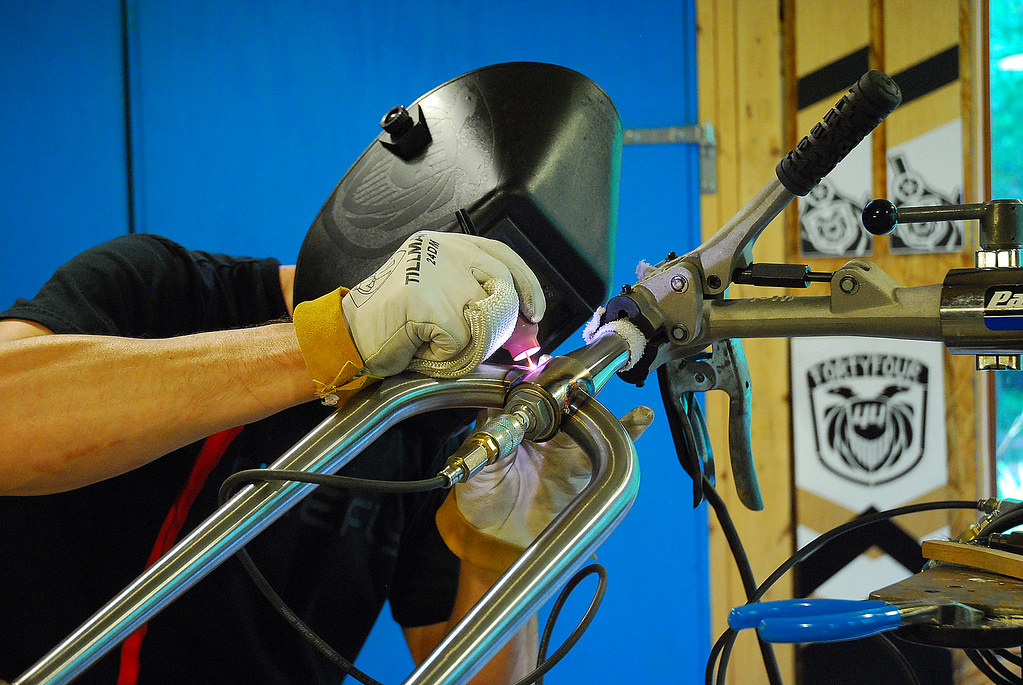
The other part you mention is the ISO Disk Brake mount's brace. If running disk brakes, this is a must add item. The rotational forces around that disk brake mount are significant - unbraced it would eventually tear off that seat stay. Here's two shots of the current build in the shop where I am fitting the brace and ISO mount (I do this by hand - it's much easier and quicker). This picture is the first standard which is ISO 51mm:

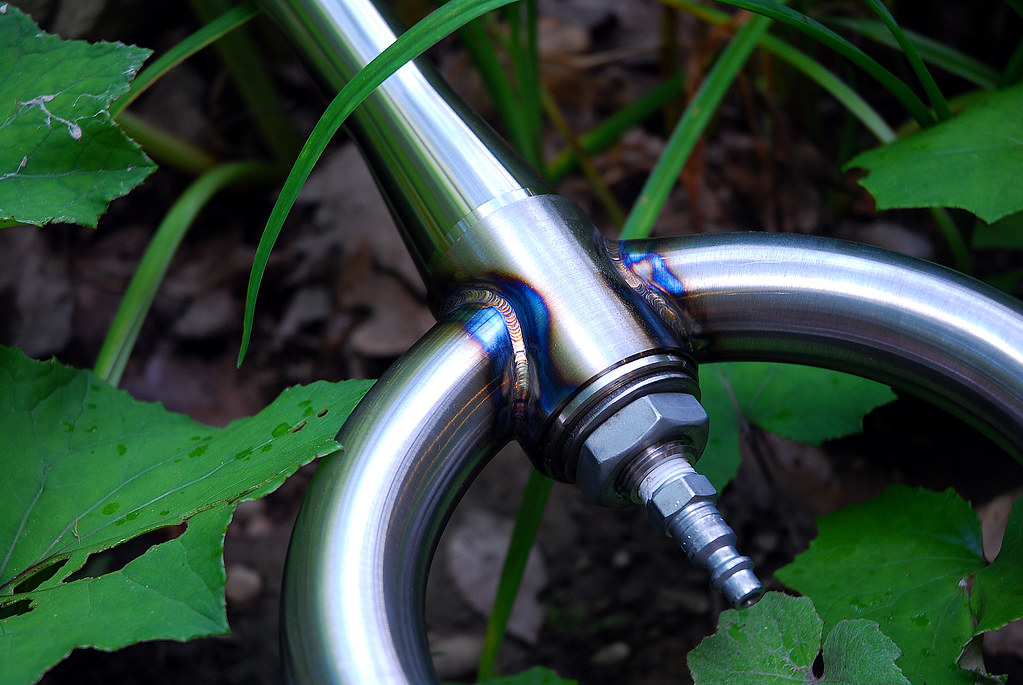
The exception being a pair of sliding dropouts where the disk brake mount is isolated and part of the dropout. Here's a recent example of that (this is a second standard Post Mount 74mm version):
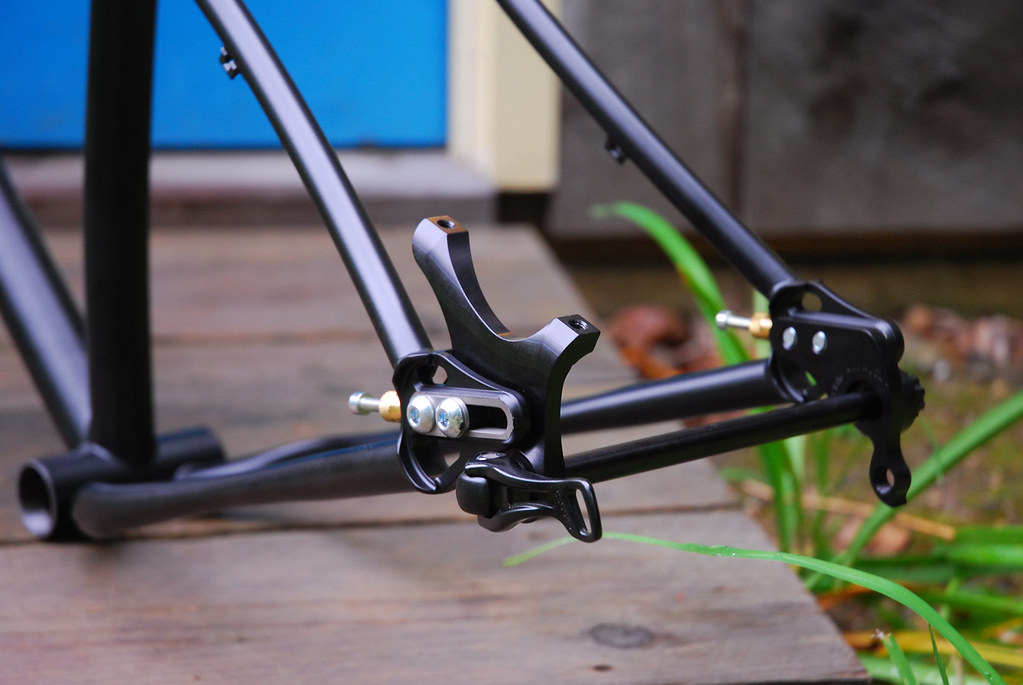
Pretty much all suspension forks run 74mm Post Mount now. They all start (for the most part) at a 160mm Rotor, and to go up to 180/203mm rotors, you use an adapter. ISO 51mm is a mounting standard for different adapters to adapt to 140, 160, 180 and 203mm rotors. The claim of Post Mount is that it is reportedly "simple" and eliminates some bolts which also takes the mounting bolts out of sheer - it's also "stiffer". The supposed problem with ISO is that your it requires more hardware and the mounting bolts for the adapters are in sheer. But as long as I have been riding, I've never seen anyone sheer off a set of adapter bolts. The problem with Post Mount is that it gets built to a certain rotor size. If you start at 180, you cannot use 160. But if built to 160, you still need an adapter to get you to 180 or 203. ISO 51mm on a frame is still much lighter and much easier to work with (my opinion). So there are arguments for both but ISO 51 is still a bit more simple as well as a bit less complex to machine/make (everything is in one plane - Post mount is requires the shape to be cut and then the holes to be drilled/tapped in a second plane so technically a harder part to make). But both if used on a traditional rear dropout need to still be braced to transfer the loads up and through the frame.
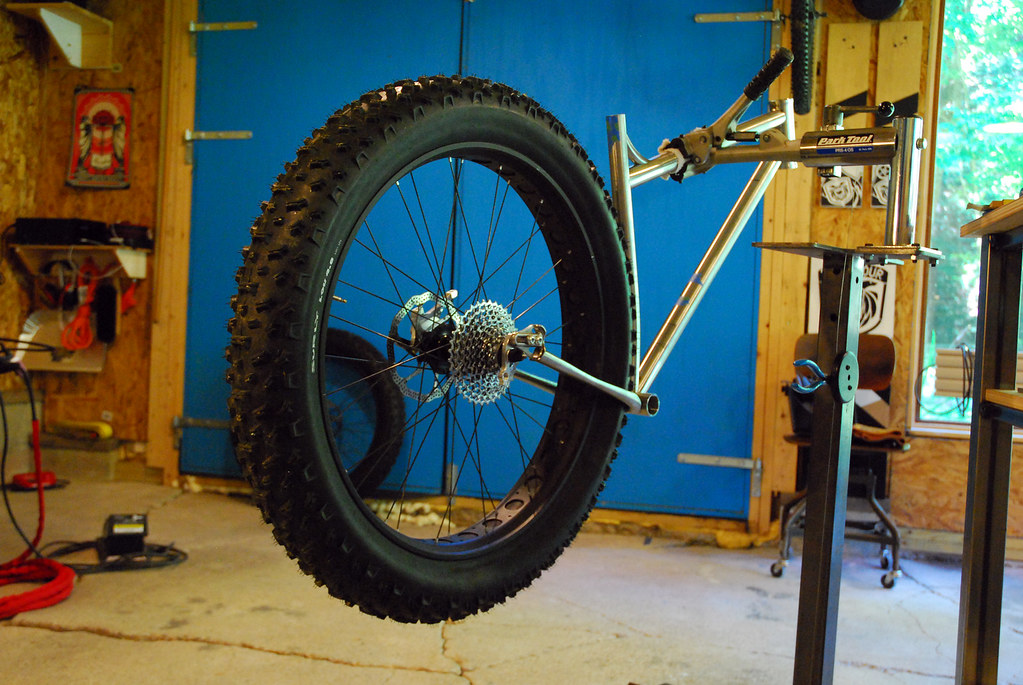
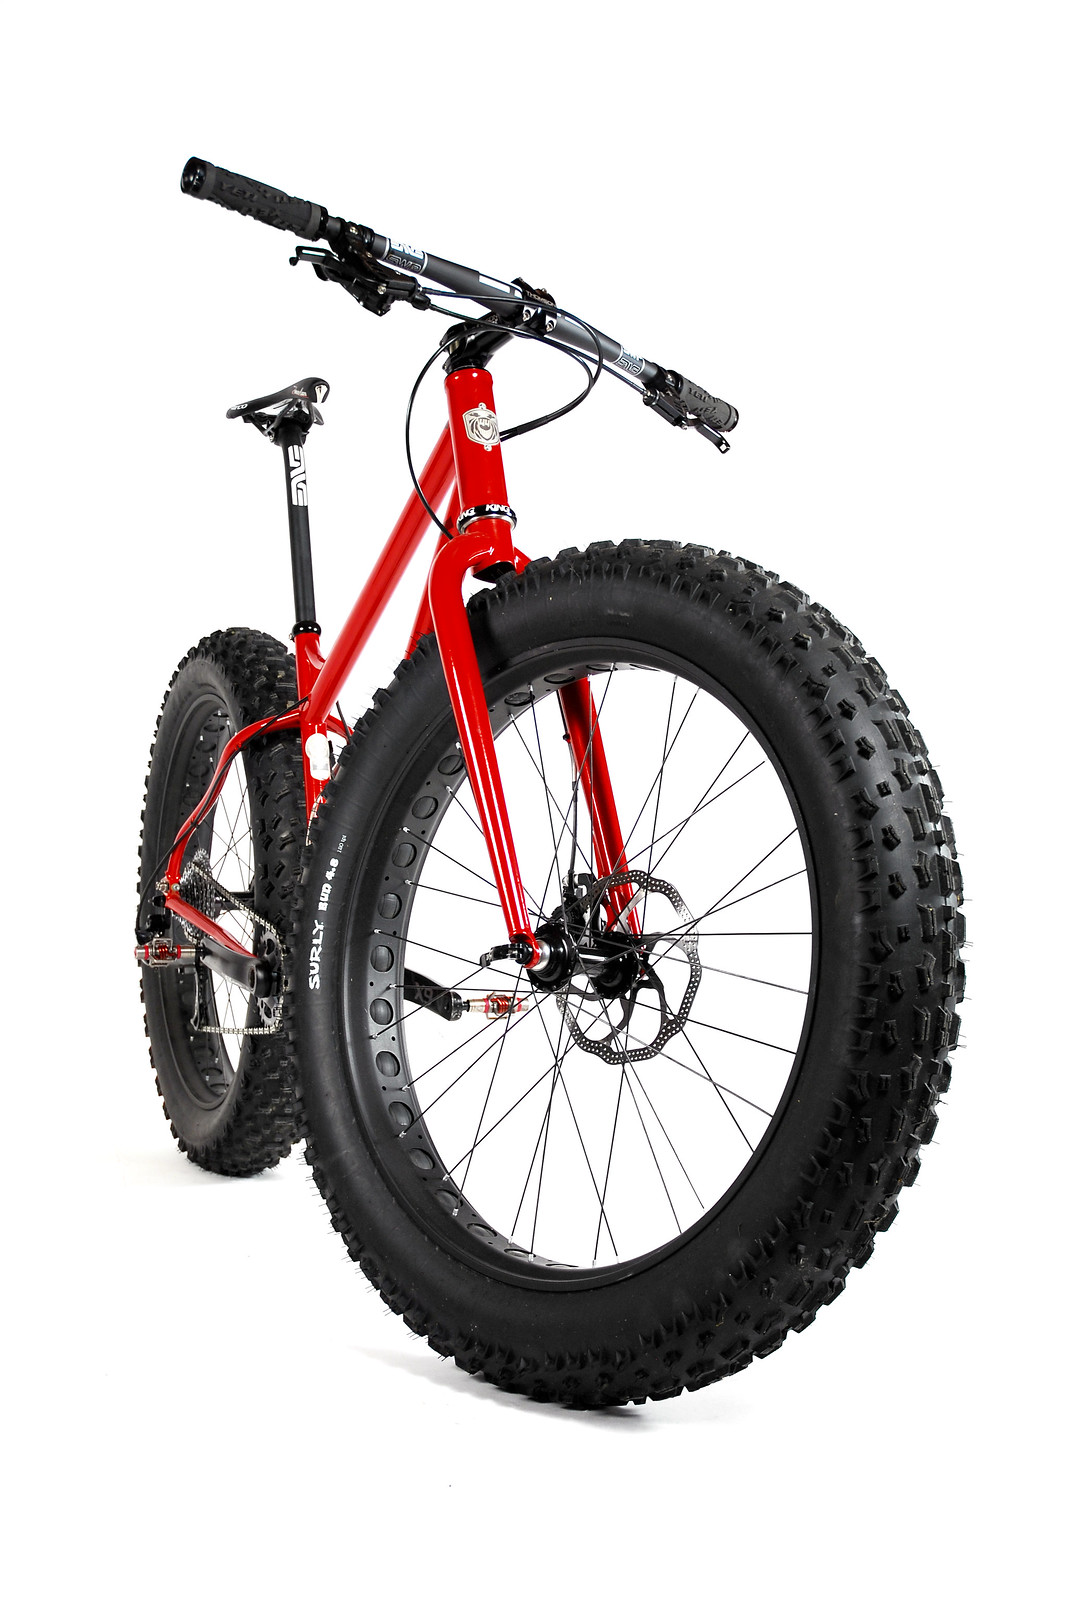
In other news: This one just got back from powder and was built up yesterday. Still some final tuning to be done...


Few fab shots too...


One last thing: Interbike was this week. Kind of the Sema of the bicycle world. I had a bike at Wilderness Trail Bikes booth. Here's a link to a process book I put together detailing the entire build from start to finish. Here's a snip from that book:

Little promo for the bike too:

Absolutely beautiful work!
How do access the weld joint at the seat stay brace near the top tube junction on that 29+/Fat? Looks like an impossible area to reach.
Also, I rode a fat tire MTB a little bit the other day and it shocked me how light and nimble it felt. I expected the wheel/tire mass to really slow it down. What is the bike weight of your Fat tire builds?
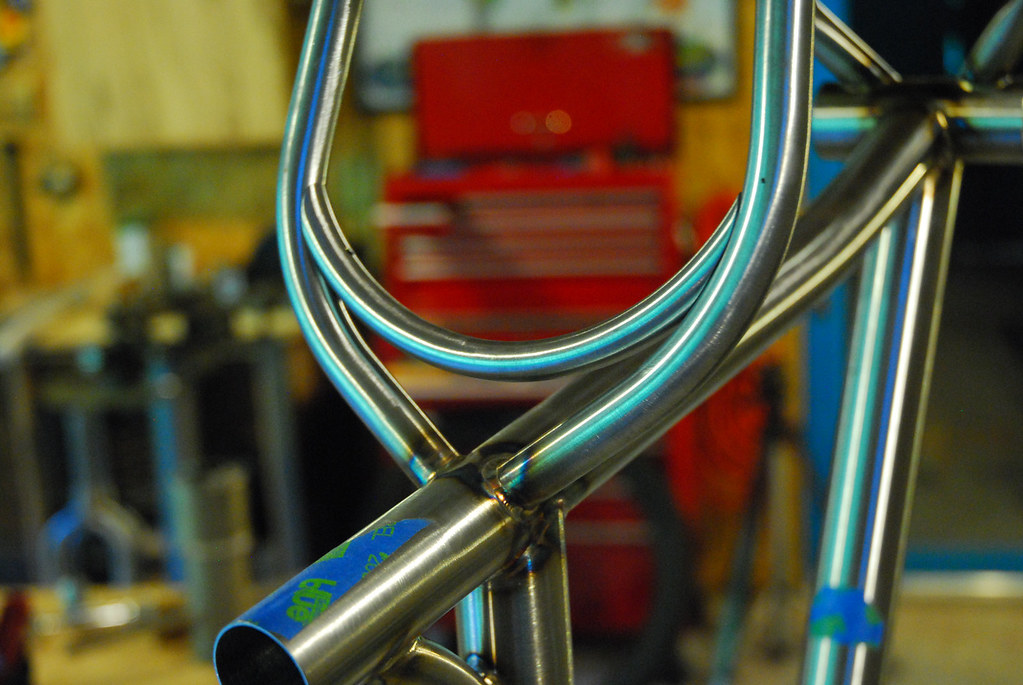
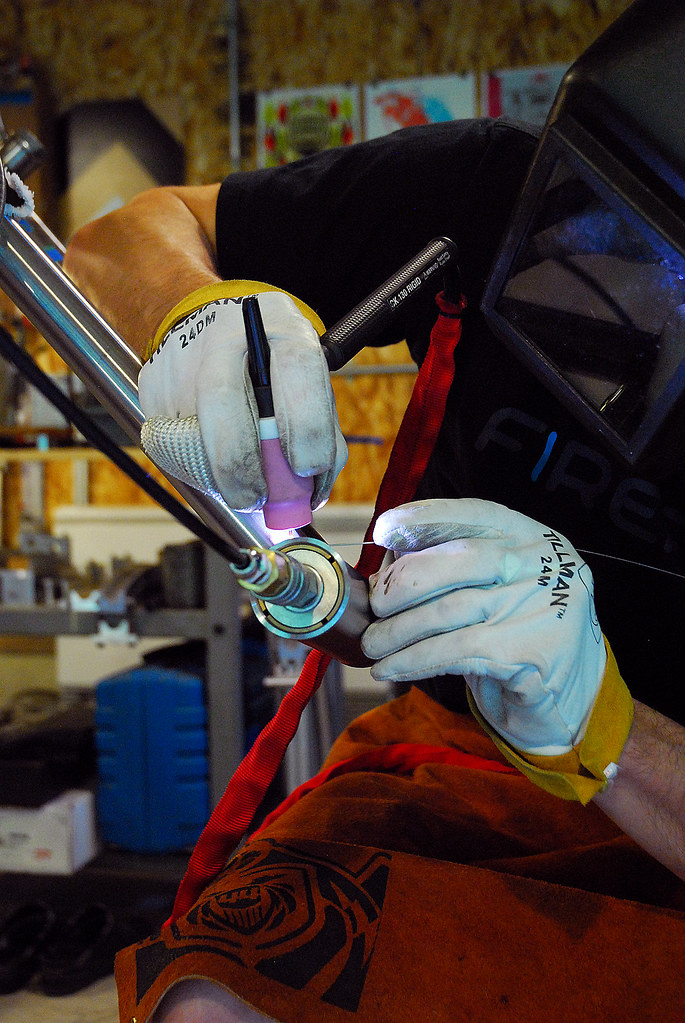
Thank you - so that location requires some tricks of the trade. Using a larger cup and matching gas lens, I can stick out the tungsten close to 1" - if the weld is short enough/duration is short enough, sometimes even further than 1". A trick to closing that weld when it's that tight (and maybe this is just my own trick) and the two tubes are that acute is to rock the cup/tungsten back and kind of "push" the arc away from you so you kind of create an oval shaped bead instead of a round bead. So I can pull and push my way into and through those last 2-3 beads of weld to close that up. Having a 1/16" tungsten really helps as well as using it in combination with a gas lens. The gas lens really stabilizes the arc and prevents it from wandering too much. I also will on occasion take my filler and give it a slight radius over a form before using it. That allows me to get in there and feed it at an otherwise impossible angle to reach if the filler wire had been straight. Sometimes I will also sharpen the tungsten to more of a point than usual if it's particularly tight.
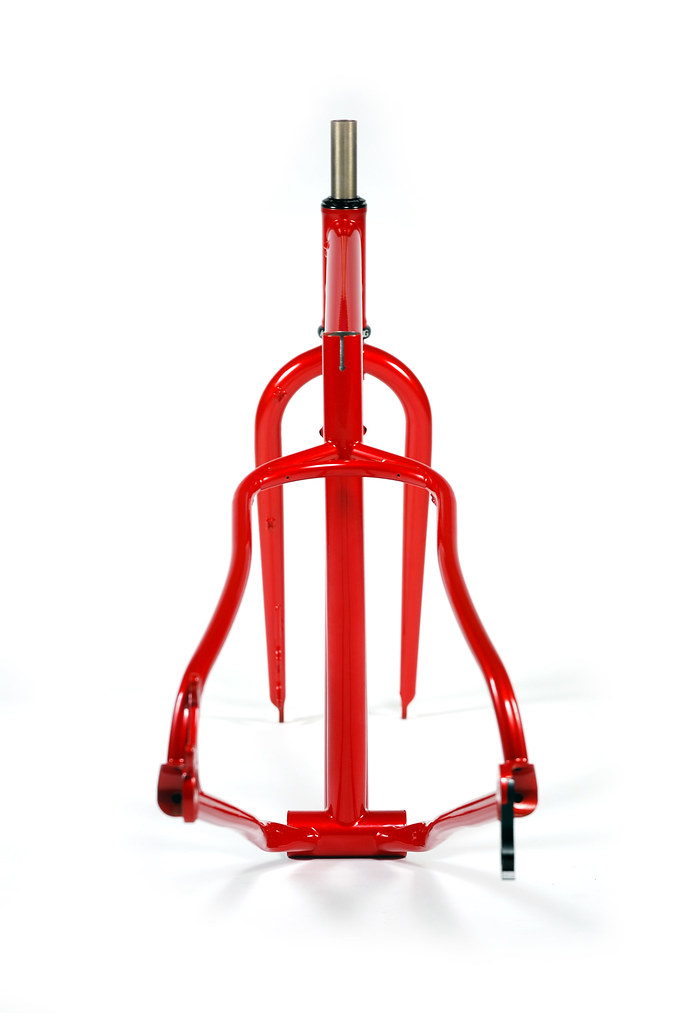
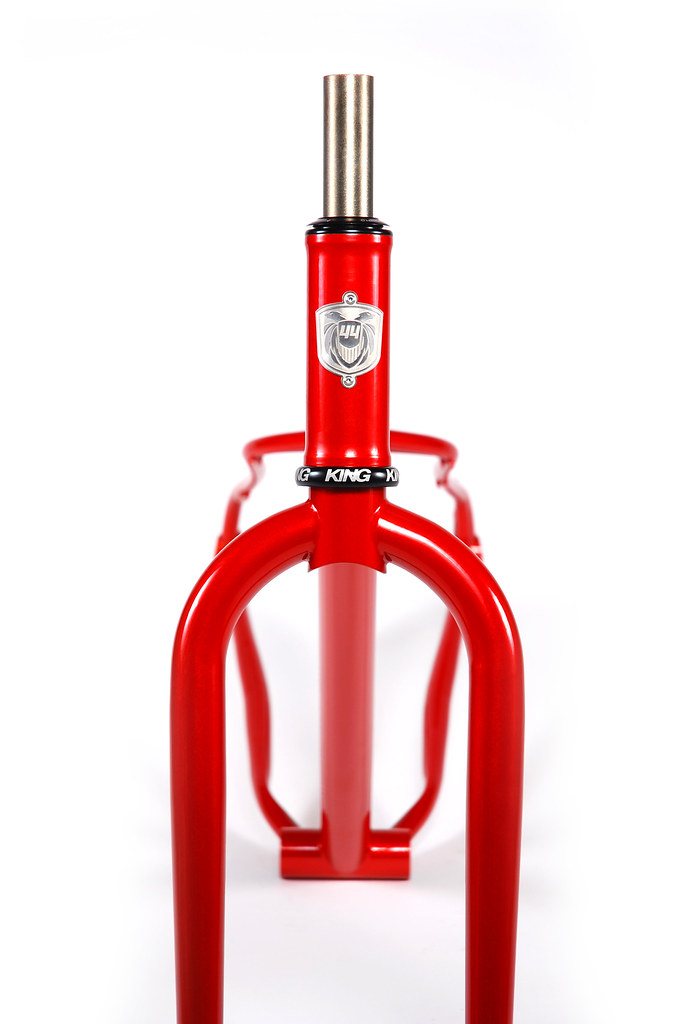
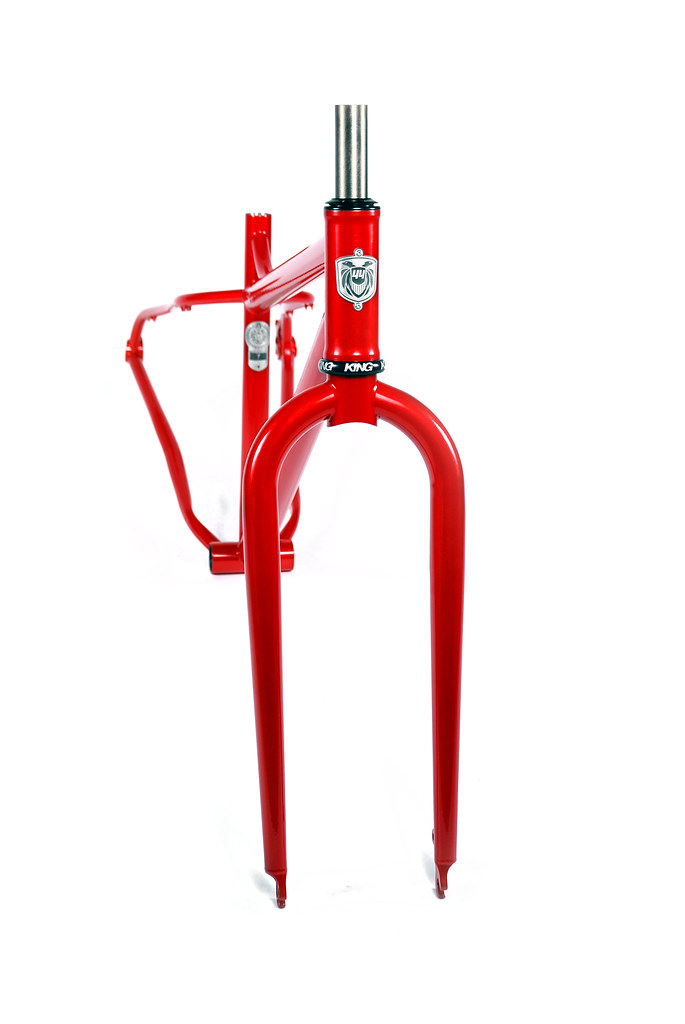
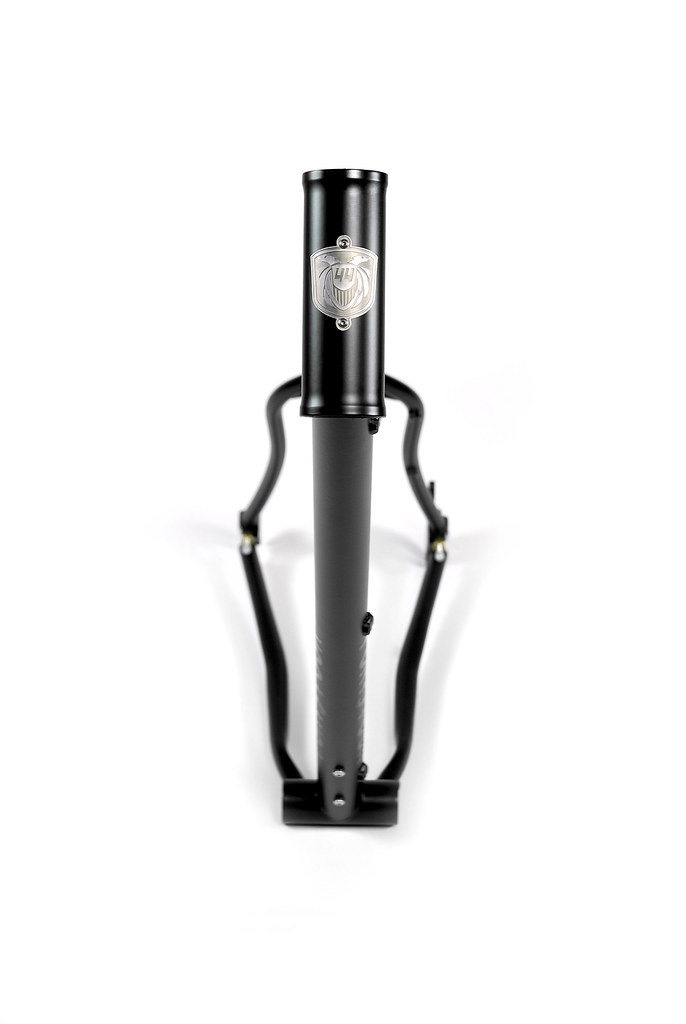
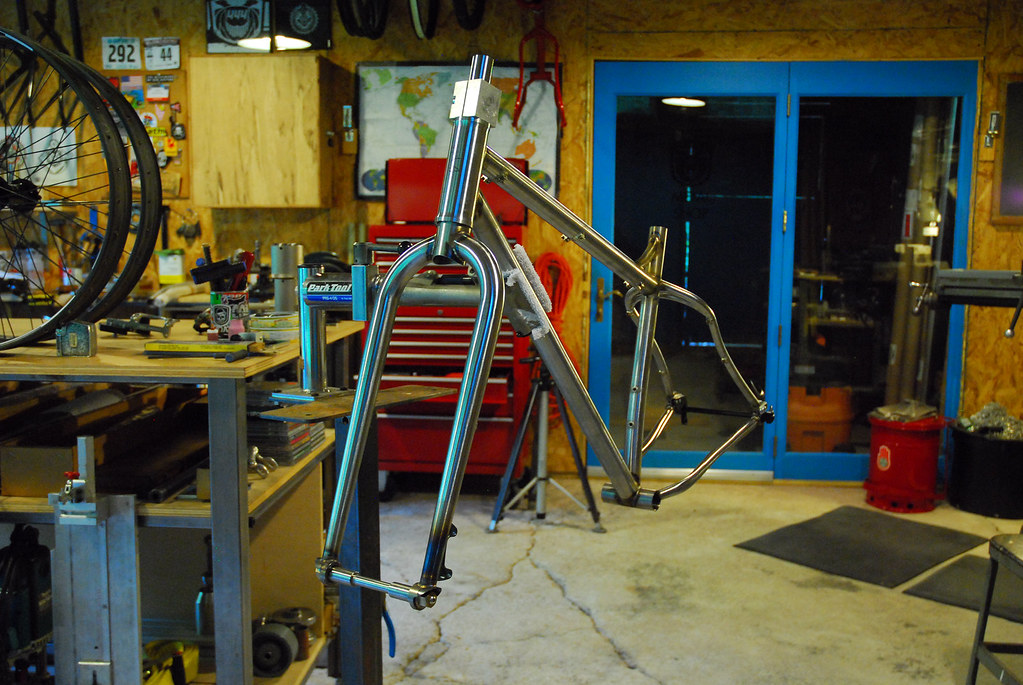
Another build question. Is the fork steerer welded directly to the fork blades or is it pressed or brazed into the "crown"?
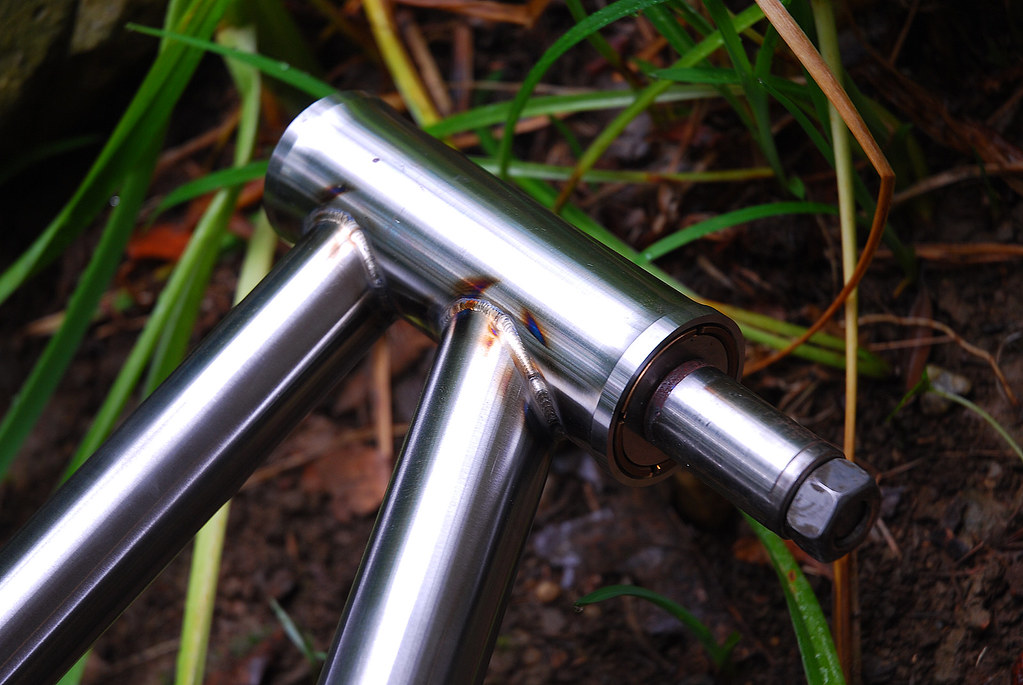
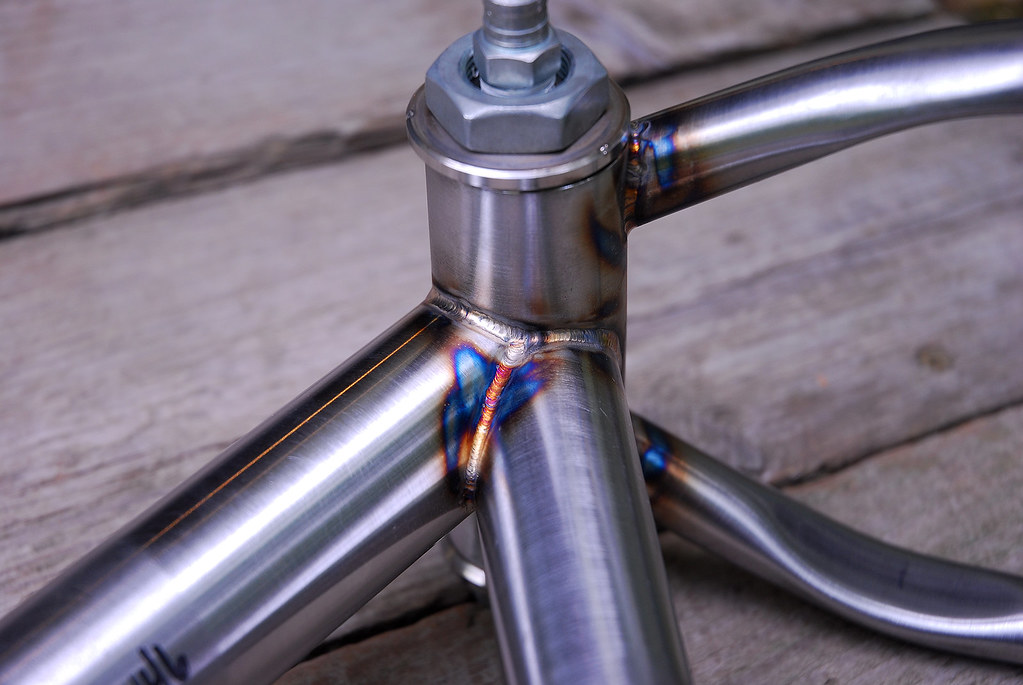
Depends on the fork. For a fork with a 1.125" straight steerer, the crown race seat is first pressed on to the proper height, then the bottom is welded all the way around it's circumference. The fork blades are then fitted and welded to the bottom of the steerer like so:

Any additional parts are then welded (canti mounts or disk brake mounts) then any cable stops are brazed in place and the last thing I do is run some silver braze along the perimeter of the top part of the crown race to seal the whole deal.
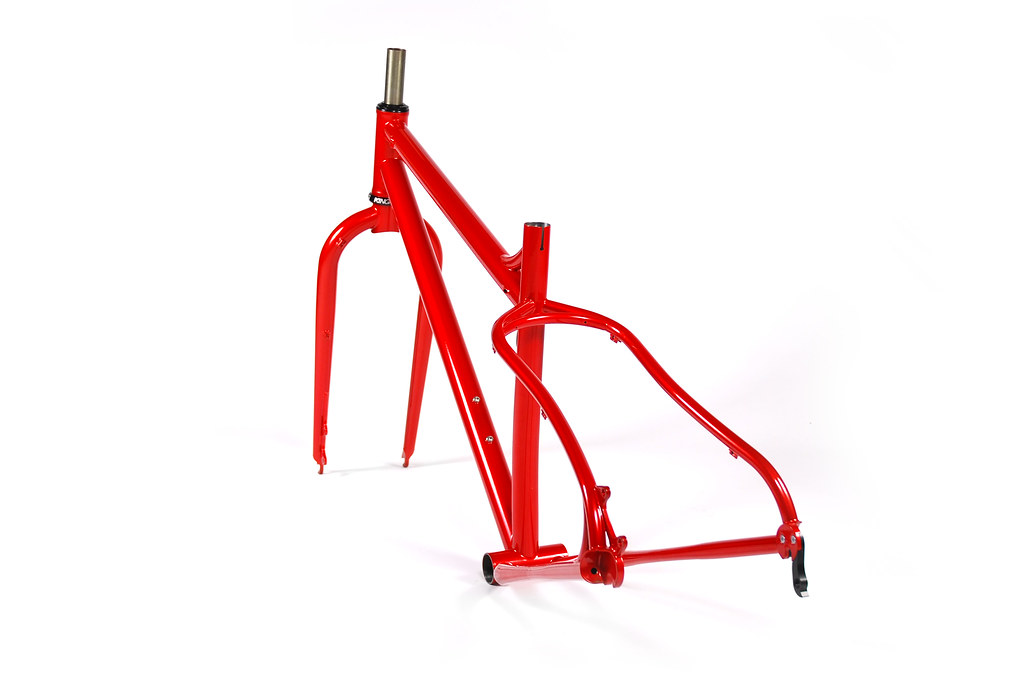
If it's a tapered fork (1.125 steerer to 1.5" / 44mm), the crown race seat is part of the steerer (paragon machine works part). That looks like this:

Legs are mitered, tacked and welded. In both cases I first miter/tack the dropouts to the legs to keep them IN PHASE with the legs themselves. That becomes a sub assembly which is loaded into my fork mitering jig:
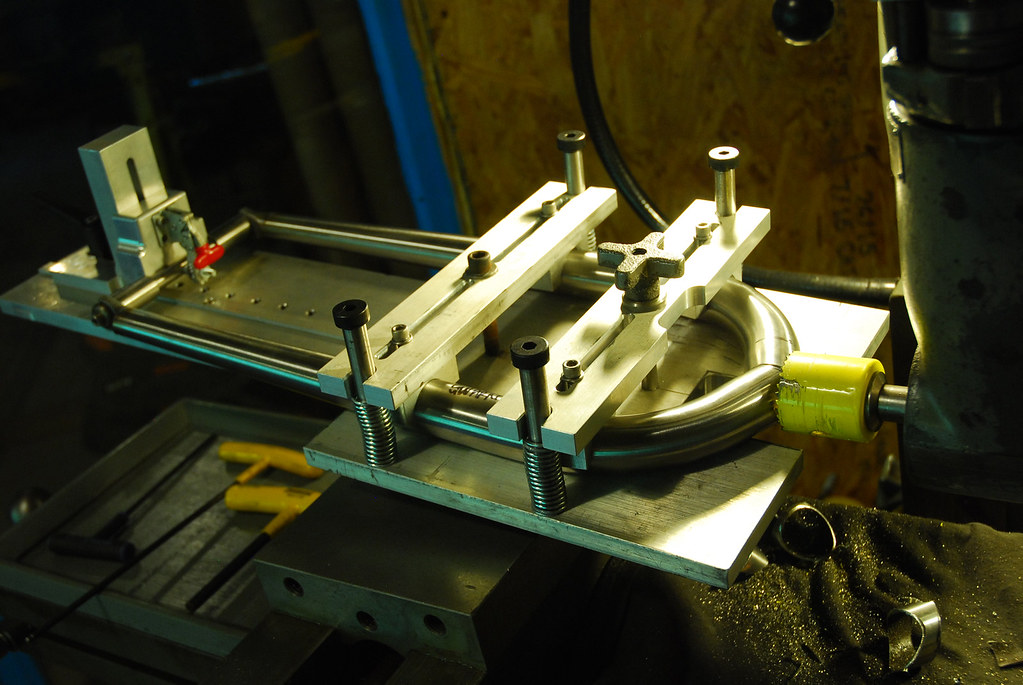
Tacking the dropouts to the legs first prohibits the legs from twisting when they get mitered. Those unicrown "wings" can act like giant lever arms and twist the legs out of phase sometimes. Welding the dropouts, then loading them into the jig using the dummy axle to tie them all together really makes for a rigid set up.
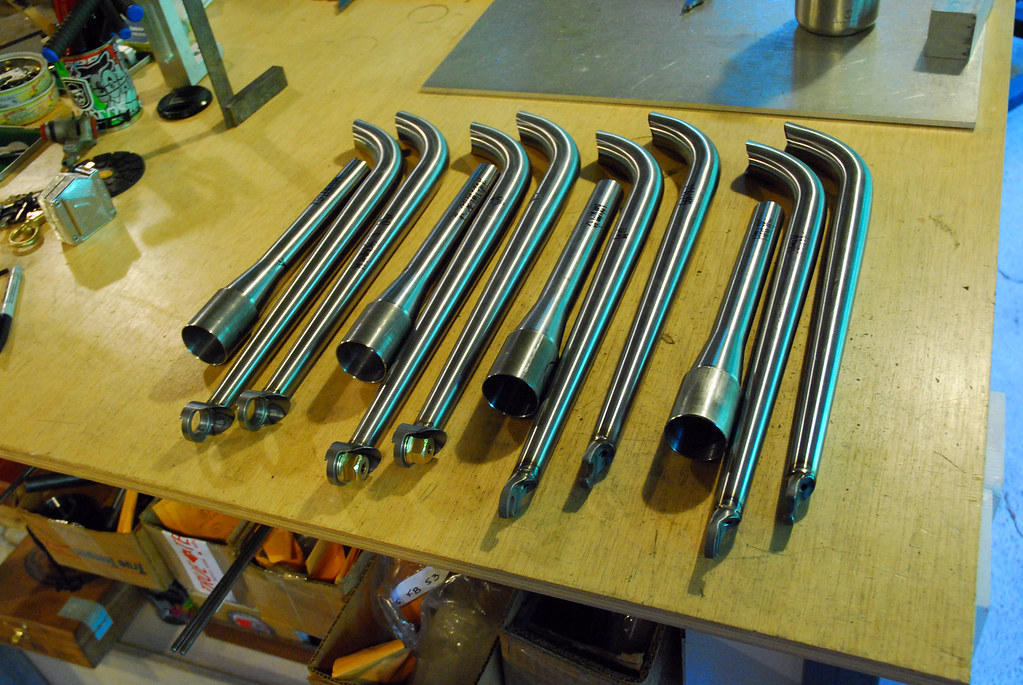
Here's 4 forks I recently did all at once - you can see they are all prepped and ready:
Here's a conglomerate of all 4 forks getting tacked in my fork jig one after the other:
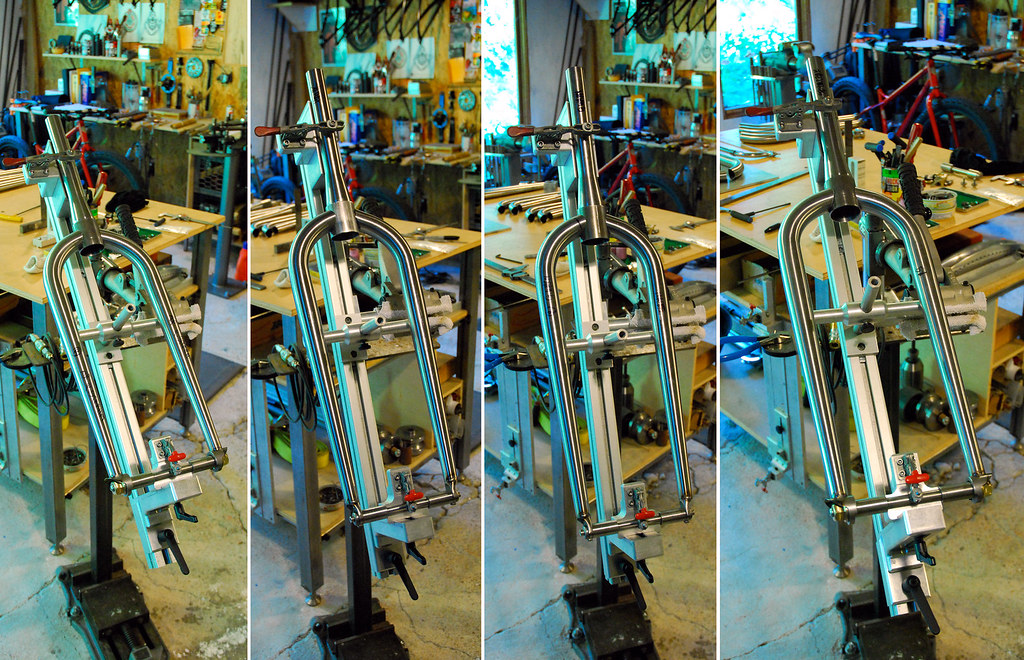
And of course welding...

And then some weldporn!

")
Terranova
Well-known member
That black bike in post 988 makes me feel kinda funny.
And I'm not really a "bike guy".
That one could possibly make me one.
And I'm not really a "bike guy".
That one could possibly make me one.
smokey0810
Well-known member
One word: ****.
Just stumbled across this thread. Just damn amazing....your frames are gorgeous.
Just stumbled across this thread. Just damn amazing....your frames are gorgeous.
myamoto1
Well-known member
I wish I had seen your post about Interbike. I was just in Vegas for the Cross Vegas race. I've been following your thread/builds from the start and am sure you had a great show. Cheers to your amazing work and beautiful bikes. I hope to one day see one in person.
AussieDan
Well-known member
Not that's FAT for sure! Incredible work as always
Hey it's Friday. Hope it's turns out FAT.
What rims are those, and whats the thought process around the large holes in the rims do you know?
AnthonyJ124
Well-known member
Gawwwdamn, I love this thread. What I'd give to spend a time in your shop! I'm a long time bike guy, worked in shops, and occasionally buy/fix/sell in the Boston area. I oft have a dozen bikes (my own being mostly nerdy 80s/90s hardtail mountain stuff), but there's something amazingly satisfying about watching you build these bikes. 
Corsair4360
Well-known member
Very nice bicycles, great welding and design.
Sunbimmer
Well-known member
Beautiful bicycle, beautiful photography as always