To avoid these ads, REGISTER NOW!

45x60 HARN Construction Nearly Complete 100 pics

Bosque

Well-known member
Joined
Feb 14, 2014
Messages
66
Location
Lafayette Indiana.
Well.. it's been awhile since I've been on. Stay tuned!

Don't leave me hanging like that. I am a few years younger and looking to buy a house but building one of these would be so cool and a definite possibility! I have been using the term Garage Condo but I think I am going to start referring to it as a HARN. Good Name. This garage build has everything, Including a nice house!
Nice boiler find. See there isn't anything wrong with being addicted to craigslist. You could have missed that.
Keep up the work and the updates of the pictures!
If I get serious I may have to make the drive to come visit the place and pick your brain. Thanks
 
To avoid these ads, REGISTER NOW!
OP
L

luke7734

Well-known member
Joined
Jun 11, 2013
Messages
276
Location
Crestline, Ohio
Cool build, Luke!

I'm in the market for an outdoor furnace as well. Hoping to find a score on CL like you did!

Keep on it every day... I can't tell you how many times I've almost fell down getting off the sh*tter cause my legs are asleep from Craigslisting on my phone for 25 minutes..


Don't leave me hanging like that. I am a few years younger and looking to buy a house but building one of these would be so cool and a definite possibility! I have been using the term Garage Condo but I think I am going to start referring to it as a HARN. Good Name. This garage build has everything, Including a nice house!
Nice boiler find. See there isn't anything wrong with being addicted to craigslist. You could have missed that.
Keep up the work and the updates of the pictures!
If I get serious I may have to make the drive to come visit the place and pick your brain. Thanks

hey.. it's an awesome building.. I love it.. I'd love to build our future huge house with a pole barn shell... old lady is too set on the plantation style look though..

doors always open and welcome to gj members.. i love exchanging ideas over a few frosty ones.. :beer:
 

J-man67

Well-known member
Joined
Aug 10, 2012
Messages
218
Location
Delaware
Keep on it every day... I can't tell you how many times I've almost fell down getting off the sh*tter cause my legs are asleep from Craigslisting on my phone for 25 minutes...

Hahaha man that made me laugh. I feel your pain!


Sent from my SAMSUNG-SGH-I747 using Tapatalk
 
Last edited:

Creative Fab

Well-known member
Joined
Mar 2, 2014
Messages
155
Location
Sanford MI
Now following, we are planning pretty much the same build. how do you feel about a couple visitors from Michigan stopping by?

Sent from my DROID4 using Tapatalk
 

chads2slow

Well-known member
Joined
Mar 2, 2008
Messages
85
Location
Indianola ia
Nice build. I like the wood burning setup. Makes me wonder if I could hook it up to my setup. Like the foam under the floor did mine in pink 250 but like that idea much better.
 
OP
L

luke7734

Well-known member
Joined
Jun 11, 2013
Messages
276
Location
Crestline, Ohio
Fantastic build !!
Enjoying all the pics and writeup :)

Thanks! It's been a hell of a journey..

LOL, I'll swing by Lukes if you come down. Down Rt 23 and east on 30.
Yeah... you've been absent for quite some time...

Now following, we are planning pretty much the same build. how do you feel about a couple visitors from Michigan stopping by?

Sent from my DROID4 using Tapatalk
Well.. I guess if your not wearing blue I guess I'll allow it :thumbup:

Hahaha man that's me laugh. I feel your pain!


Sent from my SAMSUNG-SGH-I747 using Tapatalk
Oh.. it's a disease I'll telling you.. I did land a sweet John deere zero turn last week. I'll get some pictures up asap.

Nice build. I like the wood burning setup. Makes me wonder if I could hook it up to my setup. Like the foam under the floor did mine in pink 250 but like that idea much better.
if you have radiant already.. then yeah its an easy transition. You just run 1" from the burner into your building near your setup as a loop. The pump always circulates the water in the boiler through line.. Then you t-off the loop to your floor pumps.. When the floor pumps come on it pulls out of your loop and then just t-in your returns. Took me about 35 minutes to plumb it in. :thumbup: my boiler paid for itself this winter. But it was obviously a bad winter.
As for the floor foam it's amazing. It's not only just as insulated with r value but it's a complete vapor / moisture barrier, and it's has a higher psi rating (32).
 
OP
L

luke7734

Well-known member
Joined
Jun 11, 2013
Messages
276
Location
Crestline, Ohio
Spent most of yesterday and I'll be out most of today in the garage. . Finally getting around to organizing / setting up how I want things. :) yay! I'll be adding some pics tonight.
 

4AudiQ

Well-known member
Joined
Nov 30, 2012
Messages
167
Location
PDX
My wife & I are both retired and just bought a 5 acre place south of Portland, OR with a pole barn. I am considering insulating it like you have done.
I grew up in Shelby in the late 50's. Graduated from High School in 1960 & our family immediately moved to Garden Grove, CA.
Keep up the good work & especially the pictures.
Subscribed!
 
OP
L

luke7734

Well-known member
Joined
Jun 11, 2013
Messages
276
Location
Crestline, Ohio
My wife & I are both retired and just bought a 5 acre place south of Portland, OR with a pole barn. I am considering insulating it like you have done.
I grew up in Shelby in the late 50's. Graduated from High School in 1960 & our family immediately moved to Garden Grove, CA.
Keep up the good work & especially the pictures.
Subscribed!

Glad to see some more locals on here. I'm sure your very aware of the settlements history out here. The families have been in this area for over 140 years. Amazing.. I'll be postingmore pictures here Iin a few.. playing with the tap talk app.. it's kinda freezing on me..
 
OP
L

luke7734

Well-known member
Joined
Jun 11, 2013
Messages
276
Location
Crestline, Ohio
Ok.. so my wife.. (who also went to the same high school as myself... just 6 years in the negative of myself. . ) decided to attend our local auction at our high school when they were liquidating the entire school for demolition, decided when I was at the other end of the school buying awesome things.. (I was bidding on a 7' blue marlin that was in our science room.. (I lost) ) bought the entire girls varsity locker room... When I say entire. . I mean entire.. If it wasn't block wall... we owned it..

so at first.. I was like wtf... (first question pops in my head.. how much did this cost me...???) She informs me we got the entire room for $20... now granted.. This is the varsity room.. so we're talking like 10x16 feet maybe.. so I was then turned to the next logical question... WHY?? She explains that the "lockers" are all wood and wants to keep them for our new place so each of our kids can have a cubby for themselves.. ok... Some logic was applied to this purchase..

I then enter the locker room... we not only bought the lockers.. but the entire softball helmet set.. The wooden sign that I think is awesome.. (and a piece of memorabilia) but the water cooler.. mirrors... fire alarm.. and if I had the time lights.. (wheels are now turning in my head) :)

so I get a hold of the boys and we meet up the next day to tear down the lockers.. granted they are all knotty pine. But for the most part in decent shape.. we get them tore down and stored at work in our old chemical building that's no longer used. (Storage)

well after a month of cleaning and organizing all the **** we brought from our old house I was ready to get the cubbies installed. So I loaded up the trailer today and took off at 230.. time to get working.. so here's a few shots of the area where I'll be installing the lockers and the trailer full of them..
 

Attachments

  • IMG_20140328_233616.jpg
    IMG_20140328_233616.jpg
    48.6 KB · Views: 319
  • IMG_20140328_235040.jpg
    IMG_20140328_235040.jpg
    145.2 KB · Views: 307
  • IMG_20140328_235024.jpg
    IMG_20140328_235024.jpg
    60.3 KB · Views: 305
  • IMG_20140328_233533.jpg
    IMG_20140328_233533.jpg
    72 KB · Views: 342
  • IMG_20140328_233558.jpg
    IMG_20140328_233558.jpg
    58.6 KB · Views: 312
Last edited:
OP
L

luke7734

Well-known member
Joined
Jun 11, 2013
Messages
276
Location
Crestline, Ohio
OK part 2.. so after a few hours of solo work and a few hours of getting a hand from a buddy (JP) we got about 90% installed today. (Have I mentioned how much I love the smell of fresh cut old stock pine?) So after some modifying and using pieces from some of the extra cubbies, I (my wife) am very pleased with how it's turning out..

It feels awesome to be able to do some wood working in my own garage. . ;)

OK so here's some pics of the days work..
 

Attachments

  • IMG_20140329_002331.jpg
    IMG_20140329_002331.jpg
    140.6 KB · Views: 332
  • IMG_20140329_002344.jpg
    IMG_20140329_002344.jpg
    140.6 KB · Views: 314
  • IMG_20140329_002317.jpg
    IMG_20140329_002317.jpg
    137.6 KB · Views: 336
  • IMG_20140329_002244.jpg
    IMG_20140329_002244.jpg
    53 KB · Views: 346
  • IMG_20140329_002204.jpg
    IMG_20140329_002204.jpg
    60.2 KB · Views: 397
  • IMG_20140329_002118.jpg
    IMG_20140329_002118.jpg
    56.6 KB · Views: 360
  • IMG_20140329_002304.jpg
    IMG_20140329_002304.jpg
    55.7 KB · Views: 355

J-man67

Well-known member
Joined
Aug 10, 2012
Messages
218
Location
Delaware
Wow, that's awesome! Great score and install. I would love something like that in our sun/mud room for the kids. Great work as always man!

Sent from my SAMSUNG-SGH-I747 using Tapatalk
 
OP
L

luke7734

Well-known member
Joined
Jun 11, 2013
Messages
276
Location
Crestline, Ohio
Alright.. so I've gotten the cubbies about as far as they need to be to satisfy both me and my wife. :bowdown: 
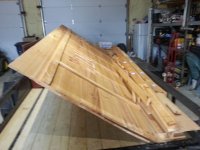
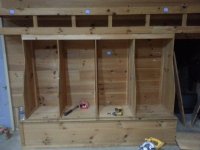
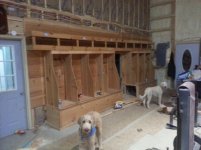
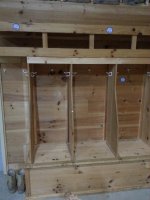
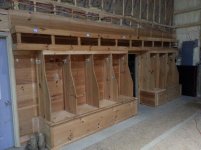
(Mostly my wife).. I got the rest of the tongue n groove pieces in on the sides of the base cabinets and trimmed all the edges. (Including the front and side pieces where I shortened the base cabinets).. so for your enjoyment here are a few more shots of the finished product.

If they are any question or comments... I'm all ears..
 

Attachments

  • IMG_20140330_213412.jpg
    IMG_20140330_213412.jpg
    75.4 KB · Views: 231
  • IMG_20140330_213357.jpg
    IMG_20140330_213357.jpg
    134.9 KB · Views: 216
  • IMG_20140330_213341.jpg
    IMG_20140330_213341.jpg
    88.1 KB · Views: 237
  • IMG_20140330_213324.jpg
    IMG_20140330_213324.jpg
    85.9 KB · Views: 241
  • IMG_20140330_213458.jpg
    IMG_20140330_213458.jpg
    81.6 KB · Views: 239
  • IMG_20140330_213430.jpg
    IMG_20140330_213430.jpg
    67.3 KB · Views: 233
OP
L

luke7734

Well-known member
Joined
Jun 11, 2013
Messages
276
Location
Crestline, Ohio
Great thread! If you upload your pics to "photobucket" you can post them without having to downsize them as photobucket does this for you. I can upload and post 50 pics in just a few minutes.

Yeah I haven't ever tried to use photobucket.. I was under the impression it was something you had to pay for.. I was also looking into the app tapatalk too.. but it was having issues..
:dunno:
 
To avoid these ads, REGISTER NOW!

bams50

Well-known member
Joined
Feb 23, 2012
Messages
2,784
Location
Central NY State
I can't believe I missed this thread till now! I only found it because the link showed up in another thread!

LOVE your build. I am planning to do very similar- big pole barn with shop in front, showroom in the middle, apartment in rear. I buy/sell/restore cars, can't do zip with wood. My dream is to have this as our retirement home. Thanks SO much for sharing all the photos and details; I hope it never ends! Would LOVE to see the layout of your living quarters.
 

Bosque

Well-known member
Joined
Feb 14, 2014
Messages
66
Location
Lafayette Indiana.
Yeah I haven't ever tried to use photobucket.. I was under the impression it was something you had to pay for.. I was also looking into the app tapatalk too.. but it was having issues..
:dunno:

I have been using IMGUR as my host for all my pictures. Works quite well and makes it so you can share albums as well which is nice when showing non forum members.
 
OP
L

luke7734

Well-known member
Joined
Jun 11, 2013
Messages
276
Location
Crestline, Ohio
I can't believe I missed this thread till now! I only found it because the link showed up in another thread!

LOVE your build hopefully planning to do very similar- big pole barn with shop in front, showroom in the middle, apartment in rear. I buy/sell/restore cars, can't do zip with wood. My dream is to have this as our retirement home. Thanks SO much for sharing all the photos and details; I hope it never ends! Would LOVE to see the layout of your living quarters.

Thanks for all the praise :) I will definitely get the layout posted up here today. I planned the whole building using 3D home architect software. Hopefully it will allow me to transfer the layout as an attachment to the forum.

As for continuing this thread I'm still slowly getting the garage cleaned out / organized from the move and I've been getting the finish grade ground work done from my septic and well projects last fall (grass seed is in dire need now) :beer:
 

NUTTSGT

Super Moderator
Staff member
Joined
Sep 14, 2009
Messages
51,021
Location
Northern Central Ohio
Yeah I haven't ever tried to use photobucket.. I was under the impression it was something you had to pay for.. I was also looking into the app tapatalk too.. but it was having issues..
:dunno:

After so many pictures or the use of enough bandwidth, you do have to pay to upgrade to a Pro account on PB. The last time I paid for my account, it cost me $40 for two years. Currently, I have over 1500 pics uploaded to PB.

The new lockers look great, a worthwhile investment for 20 bucks.
 
OP
L

luke7734

Well-known member
Joined
Jun 11, 2013
Messages
276
Location
Crestline, Ohio
I'm going to attempt to upload a few pics now using the tapatalk app... wish me luck.. hopefully this will solve my crappy photo problems.. well here goes nothing. I'll just add a few shots of some new casters I got at the surplus the other day, I put them on my 6" belt and disk sander. Fingers crossed
ga8uha6e.jpg

Ok now here's me drilling out the old holes to 1/2" for the new threaded rods of the new casters.
u6ymudyg.jpg

Old parts and tools used
3azy9equ.jpg

New caster ( each has it's own lock very heavy duty)
ha4unu9u.jpg

And finally here's a shot of the sander on its new wheels ($2 and 5 minutes of work! )
uru8e6ah.jpg


Sent from my SCH-I605 using Tapatalk
 
OP
L

luke7734

Well-known member
Joined
Jun 11, 2013
Messages
276
Location
Crestline, Ohio
Originally Posted by luke7734
Yeah I haven't ever tried to use photobucket.. I was under the impression it was something you had to pay for.. I was also looking into the app tapatalk too.. but it was having issues..
:dunno:

After so many pictures or the use of enough bandwidth, you do have to pay to upgrade to a Pro account on PB. The last time I paid for my account, it cost me $40 for two years. Currently, I have over 1500 pics uploaded to PB.

The new lockers look great, a worthwhile investment for 20 bucks.


Thanks Eric. Yeah it's been a project. But now that it's complete I can finally finish that wall up and get all of my electric finished etc.

Sent from my SCH-I605 using Tapatalk
 
OP
L

luke7734

Well-known member
Joined
Jun 11, 2013
Messages
276
Location
Crestline, Ohio
What the hell ? You have a beauty salon going on in there ? :spit:

Hey.. The wife used to do hair.. she still does some family etc on the side. It's a nice side income / play money for her.. ie.. Not out of my pocket. . So I allow it. . She gets 30 ft2... I get 1770 ft2... Fair Trade. .

Sent from my SCH-I605 using Tapatalk
 

bams50

Well-known member
Joined
Feb 23, 2012
Messages
2,784
Location
Central NY State
I planned the whole building using 3D home architect software.

I used a similar program called floorplan 3-D. Never did figure out how to save photos and upload them. I ended up doing a screenshot on my phone and saving that. Just for the heck of it, here are a couple of mine:


NUTTSGT

Super Moderator
Staff member
Joined
Sep 14, 2009
Messages
51,021
Location
Northern Central Ohio
Hey.. The wife used to do hair.. she still does some family etc on the side. It's a nice side income / play money for her.. ie.. Not out of my pocket. . So I allow it. . She gets 30 ft2... I get 1770 ft2... Fair Trade. .

Sent from my SCH-I605 using Tapatalk

LOL :beer:
 
OP
L

luke7734

Well-known member
Joined
Jun 11, 2013
Messages
276
Location
Crestline, Ohio
Would LOVE to see the layout of your living quarters.

Ok.. here goes.. just took a couple screen shots on my phone of the pdf version of my layout..
First shot is the overview of the entire building layout.
9aredeze.jpg


this one is the first floor. I ended up making one real change to the layout over all. I switched the laundry room to the top of the layout (walk - in pantry) so that the dryer could vent right out the exterior wall and that the plumbing was a bit easier (concrete floor...) The whole first floor is open for the most part (kitchen all the way to the living room and it even wraps over into my office.
hugutu8e.jpg


Lastly is the 2nd floor. We kept the bedrooms smaller in order to have a large second living room upstairs for our children (playroom) and another large full bath with twin vanities. I also left out the little closets in the two smaller bedrooms.. we just used wall mounted rack jobbies. They work great and don't eat up floor space.
u4ynuha6.jpg


Sent from my SCH-I605 using Tapatalk
 
Last edited:

bams50

Well-known member
Joined
Feb 23, 2012
Messages
2,784
Location
Central NY State
Very nice drawings. As you can see, mine are much simpler and more crude than yours.

We are still tinkering with ours are little. Our goal is to have our most use living spaces – Kitchen, living, dining, bedrooms, bathrooms, laundry – All on the lower floor. The idea is that as we get older if we develop mobility problems, we don't want to have to use stairs to get to the bedroom. Also, we like the idea of being able to shut down heat for all but the first floor to save money if we really need to.

Our second floor above the apartment will be a large game room with theater, bar, and one or two guest rooms. But as I said, our build is still at least a couple years away, so we're still thinking this all through. The real goal is to have it completely thought out so that when we're ready to build we can hit the ground running.
 
OP
L

luke7734

Well-known member
Joined
Jun 11, 2013
Messages
276
Location
Crestline, Ohio
Very nice drawings. As you can see, mine are much simpler and more crude than yours.

We are still tinkering with ours are little. Our goal is to have our most use living spaces – Kitchen, living, dining, bedrooms, bathrooms, laundry – All on the lower floor. The idea is that as we get older if we develop mobility problems, we don't want to have to use stairs to get to the bedroom. Also, we like the idea of being able to shut down heat for all but the first floor to save money if we really need to.

Our second floor above the apartment will be a large game room with theater, bar, and one or two guest rooms. But as I said, our build is still at least a couple years away, so we're still thinking this all through. The real goal is to have it completely thought out so that when we're ready to build we can hit the ground running.

Sounds like you need to do a step down building. (2 buildings of different heights built together..) The living area (house) do at 17'6" truss height. That way you've got plenty of room for two 8' ceiling heights. Maybe even 8'4" upstairs if your thinking theater room.. Then have it step down to like 12' for your showroom. . (Easier to store heat) unless you want a lift if course. . Then 14' is almost necessary.. keep us posted.. you can IM me anytime and we can exchange info to talk more.

Sent from my SCH-I605 using Tapatalk
 
OP
L

luke7734

Well-known member
Joined
Jun 11, 2013
Messages
276
Location
Crestline, Ohio
Well. Been living here for 4 months now.. things have settled down enough that I've started to get the yard straightened up and got some seed down yesterday. (Cmon rain!)

So with that huge project tackled now I've forced myself inside on this super windy beautiful day. Here's my accomplishment for the evening so far.

Got our big living room bi-folds in for our storage closet (6' wide) and our entryway coat closet bi-fold (30")
Here are some shots of them open and closed. Makes the place look 1000 times better.. almost homey!
Living room closet open
e3enera5.jpg


And closed
6yqudy5e.jpg


Entry closet open
7u9yte6y.jpg


And closed
epagady3.jpg


Just brings me one step closer to saying finished!

Sent from my SCH-I605 using Tapatalk
 

bams50

Well-known member
Joined
Feb 23, 2012
Messages
2,784
Location
Central NY State
Sounds like you need to do a step down building. (2 buildings of different heights built together..) The living area (house) do at 17'6" truss height. That way you've got plenty of room for two 8' ceiling heights. Maybe even 8'4" upstairs if your thinking theater room.. Then have it step down to like 12' for your showroom. . (Easier to store heat) unless you want a lift if course. . Then 14' is almost necessary.. keep us posted.. you can IM me anytime and we can exchange info to talk more.

Thank you, I will take you up on that at some point!

I thought about a stepped down building but ruled it out because I do want lifts, and I thought it would be easier and cheaper to do all one size. Also, I thought it might make it a little easier to sell when that time comes.

Of course, nothing is settled yet.
 
OP
L

luke7734

Well-known member
Joined
Jun 11, 2013
Messages
276
Location
Crestline, Ohio
14' is still cheaper that 18'. Trust me.. Every foot you go up it adds up quickly. Plus, unless you plan on doing radiant heat it's a ***** to keep warm air at the ground in a building that tall. Just some more food for thought. :thumbup:

Also on a more related note.. i got all of the first floor window sills painted today.. along with the stair rail and door jambs... ok here's a few pics.
utamynyb.jpg

u5any7em.jpg

a8ebuhuz.jpg


Sent from my SCH-I605 using Tapatalk
 
Last edited:
OP
L

luke7734

Well-known member
Joined
Jun 11, 2013
Messages
276
Location
Crestline, Ohio
So today's projects have been getting all the surround sound wires cut down and soldered to the wall mounted wire clip ins. Not a terrible job just maticulous.
Here's a shot of the finished product now on the wall.. If you look back in the other pics you could see the white wires hanging down all over the livingroom.. i did 7 channel surround.
nu5ytyme.jpg

And one you'll have to look hard to see them up on the wall in this shot.
nagumu8y.jpg


Sent from my SCH-I605 using Tapatalk
 
OP
L

luke7734

Well-known member
Joined
Jun 11, 2013
Messages
276
Location
Crestline, Ohio
Oh and got the Bannister top cut and routered for the upstairs palyroom.. Here's a shot before I get it attached and painted white.
epe2a6ur.jpg


Sent from my SCH-I605 using Tapatalk
 
Last edited:
To avoid these ads, REGISTER NOW!
Top Bottom