
You are using an out of date browser. It may not display this or other websites correctly.
You should upgrade or use an alternative browser.
You should upgrade or use an alternative browser.
50 by 60 design and layout... 48 by 68 build
- Thread starter stamanti
- Start date
zmotorsports
ALLIANCE MEMBER
Nice.
Mike.
Mike.
rs1968ss
Well-known member
That looks really nice! Itching to get in there?
That looks really nice! Itching to get in there?
Dying to.
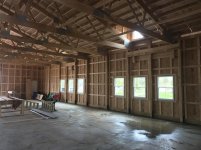
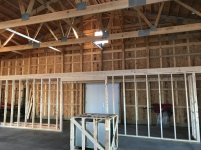
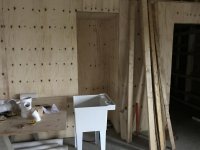
The plan is to erect the interior wall 7.5' off the back gable end starting monday while the roofers are working. This wall will create the bathroom, mechanical room, and storage area.
After that I need to get the in-wall electrical, in wall plumbing, and in wall speaker wiring done in preparation for insulation.
After insulation, then the ceiling needs to go up, then lighting ... and then I can start to move in.
rs1968ss
Well-known member
Your reply sounds just like me describing my build. I need to do this, then this, then this and this. Then I will be ready. Oh, I forgot, I need to do this also. 
Did you ever find an easier light calc software to use? I need to do this for my build asap. Any online versions you know of?
Anything better than this that is free and on line?
http://www.e-conolight.com/resource_center/resources/lighting-layout-tool
Anything better than this that is free and on line?
http://www.e-conolight.com/resource_center/resources/lighting-layout-tool
Last edited:
Hephaestus29
Well-known member
If you have the yard space, I would
build it wider not deeper. Like maybe
30-40 ft deep and 75-80 feet wide.
1 car deep 1 car in 1 bay
build it wider not deeper. Like maybe
30-40 ft deep and 75-80 feet wide.
1 car deep 1 car in 1 bay
Did you ever find an easier light calc software to use? I need to do this for my build asap. Any online versions you know of?
Anything better than this that is free and on line?
http://www.e-conolight.com/resource_center/resources/lighting-layout-tool
I never found something easier. I just taught myself how to use dialux evo, which is free to download. It took many hours to get a passable model, and then figuring out where to find IES files of light fixtures I would actually purchase. Hopefully that work will pay off once the lights are installed.
I never found something easier. I just taught myself how to use dialux evo, which is free to download. It took many hours to get a passable model, and then figuring out where to find IES files of light fixtures I would actually purchase. Hopefully that work will pay off once the lights are installed.
Trying to do the same. Can you point me in the right direction? What units did you end up going with? There is a high-bay light thread here on GJ, but it's a bit old and not a huge help. My contractor is getting antsy.
Are you direct wiring or putting plugs in above each light location? I'm getting asked that question and a thousand others. Lol.

forAK
Well-known member
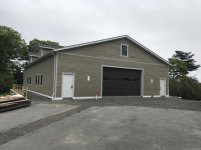
That thing is just BADASS in that setting!
One day, when I grow up......
One day, when I grow up......
zmotorsports
ALLIANCE MEMBER
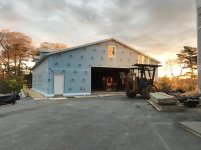
That looks amazing sitting up there on that hillside.
Love it.
Mike.
Love it.
Mike.
rs1968ss
Well-known member
Thanks for the info on the lights. I will definitely be looking at those.


Xicaque
Well-known member
awesome
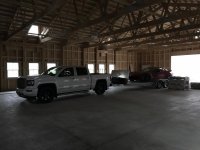
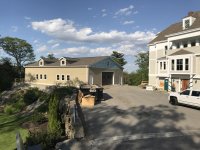
The garage also fits my truck with loaded trailer after a track day.
This is geometrically evident from the plans, but being able to pull the whole rig into the garage was a welcome realization with torrential rains forcasted for tonight and tomorrow. Now i can unload at my leisure tomorrow.
This is geometrically evident from the plans, but being able to pull the whole rig into the garage was a welcome realization with torrential rains forcasted for tonight and tomorrow. Now i can unload at my leisure tomorrow.
Attachments

Boosted1
Well-known member
Very nice build. I like the 240Z too.


OH_Varmntr
Well-known member
Beautiful building you have there. Can't wait to see the finished product!
Sent from my iPhone using Tapatalk
Sent from my iPhone using Tapatalk
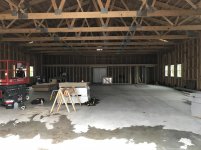
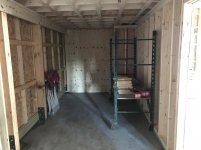
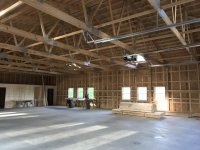
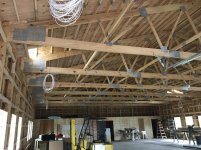
Yesterday work continued on the bathroom walls, storage area walls and storage loft.
I'm thinking of changing the destratification fan from a single 10 foot fan to two 6 foot fans. The 6 foot fans could then be mounted above the lights between the trusses up high. This would eliminate any light strobing issues with the fan, and would keep my clearance uniformly to 12 feet from floor throughout the garage. The 10 foot diameter fan was going to be mounted at 10 feet a.f.f.
I'm thinking of changing the destratification fan from a single 10 foot fan to two 6 foot fans. The 6 foot fans could then be mounted above the lights between the trusses up high. This would eliminate any light strobing issues with the fan, and would keep my clearance uniformly to 12 feet from floor throughout the garage. The 10 foot diameter fan was going to be mounted at 10 feet a.f.f.
Attachments


davetulk
Well-known member
Killer build!!!! Do you ever plan on finishing the ceiling? If you are that may affect your fans. You could finish around them, make a box, but would make a sort of wind silo affect. Also moisture above ceiling.
If you are never finishing the ceiling then I say good plan.
If you are never finishing the ceiling then I say good plan.
Killer build!!!! Do you ever plan on finishing the ceiling? If you are that may affect your fans. You could finish around them, make a box, but would make a sort of wind silo affect. Also moisture above ceiling.
If you are never finishing the ceiling then I say good plan.
I'm going to keep the trusses exposed. The only ceiling finishing will be applied direct to the underside of the roof.
davetulk
Well-known member
I'm going to keep the trusses exposed. The only ceiling finishing will be applied direct to the underside of the roof.
Sounds like a great plan to me. Got any spec on the fans you are looking at? I got 21' to the center collar ties of my shop on a traditional framed hip roof. Looking for a fan to put up there.
davetulk
Well-known member
Was looking at these...http://bvc.com/big-air-brand-products/big-air-industrial-ceiling-fan.html can buy online about $600. for 72" or 96" https://www.overstock.com/Home-Gard...VPYJWKOH7FBAK3EYQ&recalg=879,873,839&recidx=0
Haven't pulled the trigger cause never heard of them before")
Haven't pulled the trigger cause never heard of them before
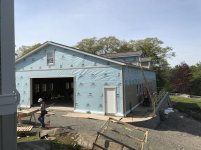
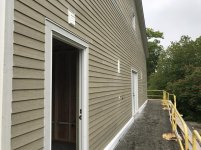
Lightning protection was finished today.
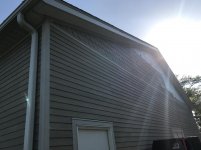
Siding continued.
Garage door install Friday.
My dad is advising that I have a floor coating applied before I move in. I'm getting pricing for a grind and then epoxy sealer install, and a gray epoxy option.
Not sure what I want to do.
In my head the garage has a polished concrete floor, but I believe that would not be a good finish for a garage that is worked in.
Attachments


Boosted1
Well-known member
I would agree w your Dad on doing floor before moving in.
There are several options that are very durable.
I did a Ucoat DIY install on my floor over 10 years ago and it still looks ok.
And I know there are more durable options.
Polished concrete also looks really good.
There are several options that are very durable.
I did a Ucoat DIY install on my floor over 10 years ago and it still looks ok.
And I know there are more durable options.
Polished concrete also looks really good.
ard
Well-known member
How long has that slab been down??? Beware you need to let it fully cure before coating.
I like a grind/polish/densifier. A working floor that still cleans up well. AND (as I understand it) can be redone in the future.
Head over to the "flooring" subforum- good advice there....
I like a grind/polish/densifier. A working floor that still cleans up well. AND (as I understand it) can be redone in the future.
Head over to the "flooring" subforum- good advice there....

OH_Varmntr
Well-known member
How's progress coming along?
Sent from my iPhone using Tapatalk
Sent from my iPhone using Tapatalk