
You are using an out of date browser. It may not display this or other websites correctly.
You should upgrade or use an alternative browser.
You should upgrade or use an alternative browser.
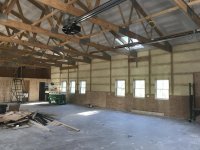
50 by 60 design and layout... 48 by 68 build
- Thread starter stamanti
- Start date

OH_Varmntr
Well-known member
Looking good! That's a lot of labor to Sheetrock.
Sent from my iPhone using Tapatalk
Sent from my iPhone using Tapatalk


Bob Heine
ALLIANCE MEMBER
Stamanti, as one of the many GJers who are following, I apologize for not commenting more often. The structure has great style on both the inside and outside. As it all comes together I look forward to future updates.

Boosted1
Well-known member
Looks good.
Your getting close to the end.
Maybe you said, but what are your plans for lights?
Your getting close to the end.
Maybe you said, but what are your plans for lights?

AuroraSC
Well-known member
Great looking build! I'm excited to see this complete.
OH_Varmntr
Well-known member
That building looks massive, and I like it.
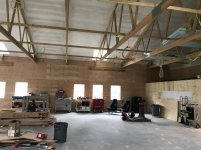
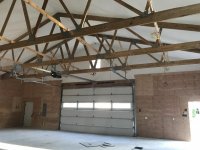
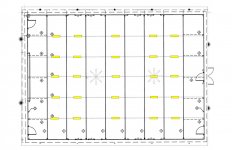
25 lights were hung yesterday, probably 50% wired. The electricians were able to just use eyescrews and the factory clip. No jack chain required - which i think looks really clean.
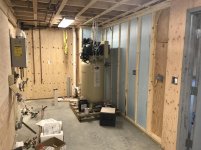
Ceiling paint appears done. First coat on half the walls and the bathroom is done. The plywood ***** up the paint, so the walls will need 2-3 coats, maybe more.
The sparkies will be back today, maybe with 3 guys again. If so i may have some light by end of day tomorrow. As of yesterday the switches with 0-10 volt dimming did not come in yet.
I have it set up so that each row of lights along the buildings long axis is on a separate switch. The center row will be left on at all times and has an add on motion sensor on the first fixture in the series which controls the whole row. Hopefully that works as i think it will in my head. I have installed motion sensor lights in certain hallways, entryways and closets in my house and love them.
Attachments


Boosted1
Well-known member
That should be a lot of light.
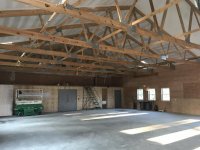
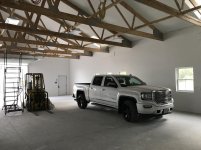
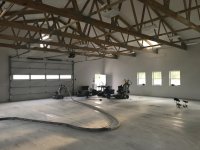
Lights are functional.
Feels like a big step forward.
And there is a lot of light.
If i can find my old light meter i will take a couple readings, to see how close the dialux model is to reality. I modeled unpainted plywood walls. With them painted white that should make it brighter, i think.
Paint is coming along as well. First coat is complete on the walls.
Attachments


Mike.ASC
Well-known member
Very well done !
zmotorsports
ALLIANCE MEMBER
Very nice.
Mike
Mike
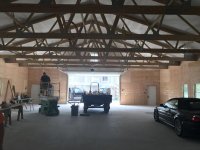
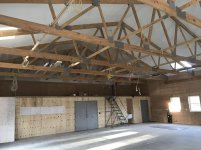
The second coat of paint on the walls greatly improved coverage.
My painter has a few more areas to address inside, and then it is on to the exterior painting.
Concrete floor polishing will be the week of the 11th.
Driveway paving will be the week of the 25th.
In between there i need to finish up the plumbing and the heat.
I also need to plumb my compressor, but that may happen later.
I have to attend 4 weddings in the next two months, so weekend work is limited.
Attachments


Boosted1
Well-known member
Looks fantastic.
Thanks, Boosted1.
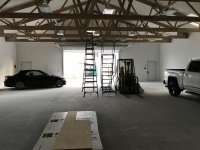
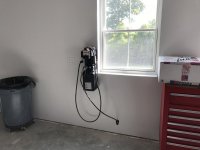
I was able to dedicate a decent portion of Monday to working on and in the garage. First task was mounting the hydraulic pump for my scissor lift to the wall. I still need a couple fittings to clean up the install a bit, but it is hung and works. Nice to have the power unit off the floor.
Then I spent some time cleaning up the storage loft, and moving some things up there.
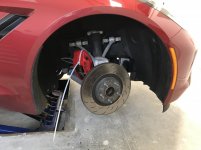
Next up was my first automotive task in the new garage: putting new brake rotors on my Vette. Pretty straight forward job. Lining up the car over the pit required getting in and out numerous times. I need to mount a mirror on the wall so I can see what I'm doing from in the car.
I was able to dedicate a decent portion of Monday to working on and in the garage. First task was mounting the hydraulic pump for my scissor lift to the wall. I still need a couple fittings to clean up the install a bit, but it is hung and works. Nice to have the power unit off the floor.
Then I spent some time cleaning up the storage loft, and moving some things up there.
Next up was my first automotive task in the new garage: putting new brake rotors on my Vette. Pretty straight forward job. Lining up the car over the pit required getting in and out numerous times. I need to mount a mirror on the wall so I can see what I'm doing from in the car.
Attachments
-
 2017-09-04 15.35.41.jpg137.8 KB · Views: 248
 -
 2017-09-04 14.54.52.jpg144.9 KB · Views: 208
 -
 2017-09-04 14.29.48.jpg134.1 KB · Views: 238
 -
 2017-09-04 14.15.35.jpg141.3 KB · Views: 225
 -
 2017-09-04 10.24.00-1.jpg130.1 KB · Views: 219
 -
 2017-09-04 10.21.44-1.jpg134.9 KB · Views: 200
 -
 2017-09-04 07.42.44.jpg140.9 KB · Views: 209

Jeff Scott
Well-known member
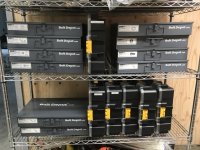
Those are some sweet fastener cases!
I went a little overboard on an order from bolt depot. Now I just need to build a rack for them.
The bolt depot cases are super nice. Very happy with their product.
Do you know that you can buy a slide rack for those metal boxes?
https://www.boltdepot.com/Empty_assortment_bins_and_Accessories_Large_metal_trays.aspx
I do love what you've done with the place, one of the nicer builds on the forum.
lg
no neat sig line
ard
Well-known member
I had stamanti as a Vidmar guy....
")
ard
Well-known member
lol Same here.
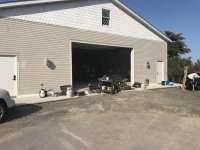
End of last week exterior painting started. The painters are spraying the exterior, so the field of the garage was covered in about a day. The preprimed Hardie siding means there is minimal prep.
I spent a bunch of hours Saturday moving everything off the floor and onto the loft in preparation for the concrete floor work which begins this morning. The loft fits a great deal of stuff. I also mounted some 5 gallon fuel jug holders onto my trailer so that I don't have to keep the jugs in the bed of my pickup. I'm planning on using a roof top tent to camp at the track, and I will feel better not sleeping over 20 gallons of gas.
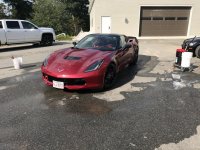
Sunday I decided I wanted to build a car wash bucket dolly for using 2 buckets. I wanted something that could stand getting wet, and most of my tools were up in the loft of the new garage. I ended up finding a 1 foot by 2 foot piece of polycarbonate about 1/2" thick to which I bolted two buckets which hold the water and soap containing buckets. I reinforced the polycarbonate with 1" by 2" aluminum tube. Everything was held together with drilled and tapped 1/4-20 fasteners. I'm pretty happy with it. Anything that makes car washing easier and quicker is a win in my book.
I spent a bunch of hours Saturday moving everything off the floor and onto the loft in preparation for the concrete floor work which begins this morning. The loft fits a great deal of stuff. I also mounted some 5 gallon fuel jug holders onto my trailer so that I don't have to keep the jugs in the bed of my pickup. I'm planning on using a roof top tent to camp at the track, and I will feel better not sleeping over 20 gallons of gas.
Sunday I decided I wanted to build a car wash bucket dolly for using 2 buckets. I wanted something that could stand getting wet, and most of my tools were up in the loft of the new garage. I ended up finding a 1 foot by 2 foot piece of polycarbonate about 1/2" thick to which I bolted two buckets which hold the water and soap containing buckets. I reinforced the polycarbonate with 1" by 2" aluminum tube. Everything was held together with drilled and tapped 1/4-20 fasteners. I'm pretty happy with it. Anything that makes car washing easier and quicker is a win in my book.
Attachments
-
 2017-09-10 15.37.56.jpg145.5 KB · Views: 253
 -
 2017-09-10 13.36.41.jpg145.5 KB · Views: 243
 -
 2017-09-10 13.11.08.jpg136.7 KB · Views: 245
 -
 2017-09-09 16.55.41.jpg138.8 KB · Views: 277
 -
 2017-09-09 10.24.23.jpg148.6 KB · Views: 262
 -
 2017-09-08 18.13.05.jpg147 KB · Views: 254
 -
 2017-09-10 13.25.15.jpg146.9 KB · Views: 223
Concrete floor polishing has been going strong for the past 2 days. 3 guys have been consistantly working 10 hour days. The pm for the floor polishing company hopes to be done by end of day friday.
My contractor is performing the husqvarna commercial hiperfloor treatment which includes going over the floor 12 times. Should leave a medium gloss finish. They did a small sample area and it looked similar to terrazo. If it all comes out like the sample i will be ecstatic.
My contractor is performing the husqvarna commercial hiperfloor treatment which includes going over the floor 12 times. Should leave a medium gloss finish. They did a small sample area and it looked similar to terrazo. If it all comes out like the sample i will be ecstatic.
ard
Well-known member
Interested in seeing that floor.
FYI (for others) https://www.husqvarnacp.com/us/campaigns/hiperfloor/
FYI (for others) https://www.husqvarnacp.com/us/campaigns/hiperfloor/
pcmeiners
Well-known member
Like the look, agree about the bathroom too large unless your 600lbs. I would make more spacing around heavy machinery. Plywood on walls is OK, but it should have Type X sheetrock; may lower insurance cost. Personally I would go 2x6 studs, 16"c/sheetock for shelving strength, skipping the plywood. Lastly I would find an empty paved lot, lay out the entire garage including walls,car dimensions, equipment dimensions with chalk lines, after it is laid out check all spacing/elbow room.
"Regarding the site work, the plan is for a lot of fill." Best be damn careful to fill/compact properly. You might need piles or piers
"Regarding the site work, the plan is for a lot of fill." Best be damn careful to fill/compact properly. You might need piles or piers
Some photos of the floor finishing progress attached. A pretty consistent amount of aggregate is showing at this point. The photo doesn't really capture it well. It will show better once all the densifiers and hardeners are completed.
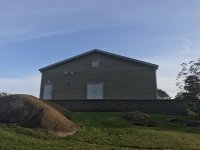
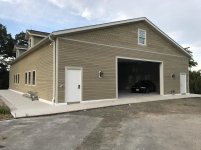
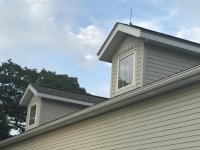
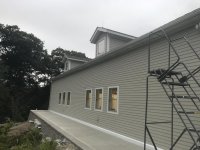
Painters have been MIA this week. They were back for part of the day yesterday, and did some work on the dormers. Currently they painted the entire dormer the body color of the house, but the half round siding will be painted white before they are done. to match the front of the garage. The photo of the front of the garage shows just one coat on the body, and primer on the half round shingles.
Painters have been MIA this week. They were back for part of the day yesterday, and did some work on the dormers. Currently they painted the entire dormer the body color of the house, but the half round siding will be painted white before they are done. to match the front of the garage. The photo of the front of the garage shows just one coat on the body, and primer on the half round shingles.
Attachments


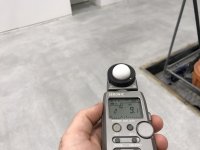
I took some light readings in my garage tonight after getting cr123a batteries from amazon.
My meter read a low in the darkest corner of 8.0ev, and a high of 9.1 ev in the center of the garage. 90% of the garage other than the corners read between 8.5 and 9.0 ev, which translates to a range of 84 to 119 foot candles. I believe this is better than the model, but i haven't gone back to check yet.
The floor finishing is ongoing and will go into next week. They are through the 120 grit step, and it is looking great. Painters worked today as well.
Attachments


Full house at the garage today. Painters working on the exterior, and concrete prepwork going on inside.
The first coat of hiperhard densifier was placed tonight at 7pm. The crew stayed late because of the 12 hour cure time. Up to now all the work was grinding and prep work. From here on out the polishing can begin.
The first coat of hiperhard densifier was placed tonight at 7pm. The crew stayed late because of the 12 hour cure time. Up to now all the work was grinding and prep work. From here on out the polishing can begin.
Attachments


OH_Varmntr
Well-known member
Awesome progress! What is left to do before it's "done"?
Thanks!
For the exterior I need to build a railing around the walkway on top of the retaining wall to close out the building permit.
The interior is just finishing the floor, install the plumbing fixtures, a couple electrical switches, and a transformer for the interlock on the motorized damper on the exhaust fan.
But as far as moving in is concerned, just the floor finish.
That being said, i don't think it will ever be "done." Just a constant state of evolution.

OH_Varmntr
Well-known member
Can you explain your exhaust fan setup? I bought a 36" exhaust fan for my shop that I'll be installing a damper motor on. Just curious how you accomplished what you're doing.
Sent from my iPhone using Tapatalk
Sent from my iPhone using Tapatalk
I haven't done the wiring yet. You can switch the 24v to the damper actuator to control operation damper and them motor operation. At the limit of damper travel you can have an end switch trip and start the fan motor via a motor starter, or rib.
If you are not concerned about the damper being fully open before the motor comes on you could have one switch power both the transformer and the motor at the same time, but that is probably a bad idea.
If you are not concerned about the damper being fully open before the motor comes on you could have one switch power both the transformer and the motor at the same time, but that is probably a bad idea.
OH_Varmntr
Well-known member
Gotcha. Are you running one so you can reverse the fan or just for operation in general?
I'm running a 3 phase fan so I can reverse it when needed to pressurize the building with a VFD rather than a drum switch on a single phase fan and all the extra wiring. The damper will open from the air flowing across it in forward operation but needs the motor for the reverse operation.
Your concrete is really looking nice too!