To avoid these ads, REGISTER NOW!

52 chevy chop and random projects

Iceman32

Active member
Joined
May 26, 2015
Messages
30
Hello all, my name is Chris and I'm a heavy equipment mechanic. Been a lurker on here a long time but after reading through Robert's shop thread I thought I'd post what his inspiration has caused.
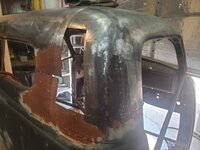
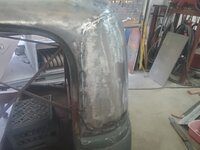
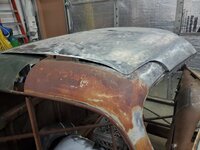
I got this 52 chevy pickup from my first welding instructor when I was 18. He started the chop on it. I got in over my head and it sat for 12 years. After reading through some of Robert's tutorials I thought "that makes so much sense I bet I can do that"
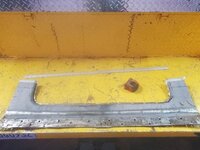
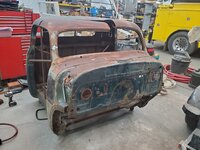
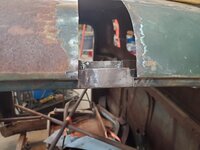
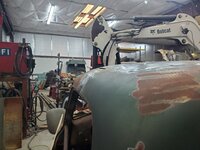
So here's what I started with. I have a parts truck that is all twisted i can use for patch panels.
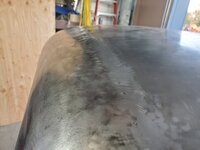
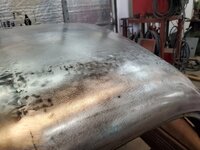
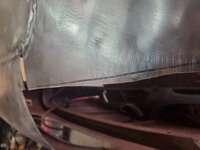
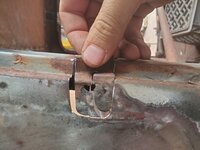
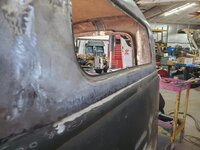
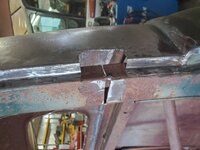
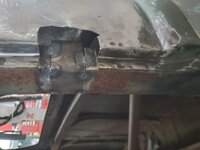
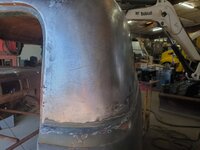
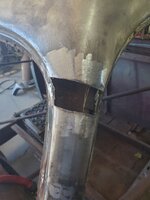
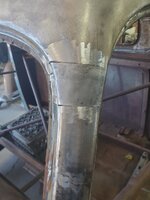
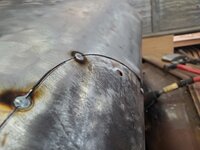
so first part was removing the inner panels and cutting out the roof section, figuring it would be easier to work the welds along the edge of the roof instead dead across the middlecd9d59a4b26c045c44853d9fd677bac6.jpg1c8da9834db4cd23eca4d5ae8f67b21c.jpgbe25a9451e74b1b18a60ae1ecf599fb8.jpg98b6a79b3c92dda89ea761e625d1ec42.jpg

Sent from my SM-G975U using Tapatalk
 

Attachments

  • 98b6a79b3c92dda89ea761e625d1ec42.jpg
    98b6a79b3c92dda89ea761e625d1ec42.jpg
    617.7 KB · Views: 1
  • cd9d59a4b26c045c44853d9fd677bac6.jpg
    cd9d59a4b26c045c44853d9fd677bac6.jpg
    590 KB · Views: 0
  • 1c8da9834db4cd23eca4d5ae8f67b21c.jpg
    1c8da9834db4cd23eca4d5ae8f67b21c.jpg
    647.7 KB · Views: 0
  • be25a9451e74b1b18a60ae1ecf599fb8.jpg
    be25a9451e74b1b18a60ae1ecf599fb8.jpg
    622.6 KB · Views: 0
To avoid these ads, REGISTER NOW!

BORING HOP YARD

Well-known member
Joined
Jan 13, 2007
Messages
1,099
Location
Boring Oregon
Hey Chris, that looks like a big project. I have been following Robert for years.
I have asked him questions on occasion and he has always been nice enough to respond.
I also follow him on http://www.allmetalshaping.com/index.php
I wished I could take a class from him so I could get input on my process from him.
Your cab looks like a good project with lots of skills you will learn.
Cant wait to see the progress, thanks for sharing
 
OP
I

Iceman32

Active member
Joined
May 26, 2015
Messages
30
Thanks!
There was a damaged section of the windshield opening I wanted to get straightened out before starting to tack everything together4ab5381efc437575696a3495e169cbdf.jpg7ef3c19266ae1f4437774b677314ef33.jpg0206bd9b907743d45bc9f74167e6b236.jpg04e5aa7892b1e3c7fc57d4b41b398cc4.jpg

Sent from my SM-G975U using Tapatalk
 

Attachments

  • 04e5aa7892b1e3c7fc57d4b41b398cc4.jpg
    04e5aa7892b1e3c7fc57d4b41b398cc4.jpg
    526 KB · Views: 0
  • 0206bd9b907743d45bc9f74167e6b236.jpg
    0206bd9b907743d45bc9f74167e6b236.jpg
    455.7 KB · Views: 0
  • 7ef3c19266ae1f4437774b677314ef33.jpg
    7ef3c19266ae1f4437774b677314ef33.jpg
    421.8 KB · Views: 0
  • 4ab5381efc437575696a3495e169cbdf.jpg
    4ab5381efc437575696a3495e169cbdf.jpg
    486.6 KB · Views: 0
OP
I

Iceman32

Active member
Joined
May 26, 2015
Messages
30
Getting it all aligned and tacked553baf7e263ae747d9d249655160f1f5.jpgb4c99029362bbc74ce1840eb4dc53853.jpg65bf1b41f9f3e3c903c939eaafcefbfa.jpg7d30a2db384f8f71c411813574aa9b58.jpg

Sent from my SM-G975U using Tapatalk
 

Attachments

  • 553baf7e263ae747d9d249655160f1f5.jpg
    553baf7e263ae747d9d249655160f1f5.jpg
    528.8 KB · Views: 0
  • b4c99029362bbc74ce1840eb4dc53853.jpg
    b4c99029362bbc74ce1840eb4dc53853.jpg
    495.8 KB · Views: 0
  • 7d30a2db384f8f71c411813574aa9b58.jpg
    7d30a2db384f8f71c411813574aa9b58.jpg
    535.9 KB · Views: 0
  • 65bf1b41f9f3e3c903c939eaafcefbfa.jpg
    65bf1b41f9f3e3c903c939eaafcefbfa.jpg
    552.5 KB · Views: 0
OP
I

Iceman32

Active member
Joined
May 26, 2015
Messages
30
Next part was fitting the two filler sections at the top of the door openings. The front portion of the cab had been stretched a bit from damage at some point, i was able to get it shrunk down and aligned with the filler piece. And finished tacking the roof panel3cae9799dfb625ca4aa9b9347728b57c.jpge07a8209fa151d16b0695c398ffb435d.jpg32a01070eb5297008334b31654cc1af6.jpg57c77d268895373c89d929c6661a4793.jpg45a08ebe09eff72b96ee0eed06093249.jpg

Sent from my SM-G975U using Tapatalk
 

Attachments

  • 45a08ebe09eff72b96ee0eed06093249.jpg
    45a08ebe09eff72b96ee0eed06093249.jpg
    620.6 KB · Views: 0
  • e07a8209fa151d16b0695c398ffb435d.jpg
    e07a8209fa151d16b0695c398ffb435d.jpg
    505.3 KB · Views: 0
  • 3cae9799dfb625ca4aa9b9347728b57c.jpg
    3cae9799dfb625ca4aa9b9347728b57c.jpg
    530.9 KB · Views: 0
  • 57c77d268895373c89d929c6661a4793.jpg
    57c77d268895373c89d929c6661a4793.jpg
    537 KB · Views: 0
  • 32a01070eb5297008334b31654cc1af6.jpg
    32a01070eb5297008334b31654cc1af6.jpg
    462.5 KB · Views: 0
OP
I

Iceman32

Active member
Joined
May 26, 2015
Messages
30
Thanks for the warm welcome everybody,
it's a lot of fun to be participating in one of these threads instead of just reading for a change. Here's some more pictures, now its just the slow process of welding and trying to keep it straight at the same time. Plus patching that damaged area on the upper windshielda530b0ef33717049cae09fd1aa477e18.jpg7931631d442adbc655ef6d9d0e73b70f.jpg861bdde1bb7ea432faa71848529c9552.jpg09f54bd46e4b65a70a91213140085535.jpgd3b750d3f988c1d323ec5c455b19ff39.jpg1ab3c6b4f1a36534542ddfad855df703.jpgb8fae06729ad16bbf8f1004833c9ab07.jpg

Sent from my SM-G975U using Tapatalk
 

Attachments

  • d3b750d3f988c1d323ec5c455b19ff39.jpg
    d3b750d3f988c1d323ec5c455b19ff39.jpg
    439.4 KB · Views: 0
  • 09f54bd46e4b65a70a91213140085535.jpg
    09f54bd46e4b65a70a91213140085535.jpg
    615.6 KB · Views: 0
  • 861bdde1bb7ea432faa71848529c9552.jpg
    861bdde1bb7ea432faa71848529c9552.jpg
    539.7 KB · Views: 0
  • 7931631d442adbc655ef6d9d0e73b70f.jpg
    7931631d442adbc655ef6d9d0e73b70f.jpg
    501.1 KB · Views: 0
  • a530b0ef33717049cae09fd1aa477e18.jpg
    a530b0ef33717049cae09fd1aa477e18.jpg
    506.5 KB · Views: 0
  • 1ab3c6b4f1a36534542ddfad855df703.jpg
    1ab3c6b4f1a36534542ddfad855df703.jpg
    564 KB · Views: 0
  • b8fae06729ad16bbf8f1004833c9ab07.jpg
    b8fae06729ad16bbf8f1004833c9ab07.jpg
    620.1 KB · Views: 0
OP
I

Iceman32

Active member
Joined
May 26, 2015
Messages
30
Spent some more time on it last night finishing the welds on the windshield patch and working on smoothing things out50db479172679072cce1a5f3326a5501.jpg2cecf3e13c79312fa3de4a56720b1fd9.jpgb5215ac642b7897c672d7dfcebd3ab65.jpge1cc835f73e11febb594e2276badcff7.jpg

Sent from my SM-G975U using Tapatalk
 

Attachments

  • b5215ac642b7897c672d7dfcebd3ab65.jpg
    b5215ac642b7897c672d7dfcebd3ab65.jpg
    556.9 KB · Views: 0
  • e1cc835f73e11febb594e2276badcff7.jpg
    e1cc835f73e11febb594e2276badcff7.jpg
    558.9 KB · Views: 0
  • 2cecf3e13c79312fa3de4a56720b1fd9.jpg
    2cecf3e13c79312fa3de4a56720b1fd9.jpg
    571.9 KB · Views: 0
  • 50db479172679072cce1a5f3326a5501.jpg
    50db479172679072cce1a5f3326a5501.jpg
    597.2 KB · Views: 0
OP
I

Iceman32

Active member
Joined
May 26, 2015
Messages
30
Nice fab work, I always thought this type of work would be very rewarding.
Thanks! I really enjoy this kind of work, to me its a very relaxing thing. You can't rush it and I just methodically focus on one small area at a time

Sent from my SM-G975U using Tapatalk
 
OP
I

Iceman32

Active member
Joined
May 26, 2015
Messages
30
Started on the back of the cab. Measure, mark, cut, trim, and tack8b4788286df7450f562d698d0406cb20.jpg9948b5cdb9728d88c67dc74ce7bc187e.jpgd8ca76d29abd4935f44aa1f8ba9995a7.jpge5feb36918ec44d2d419217916529207.jpg4058a2bd4df37d13894cb19f87826377.jpg9854446ccbff16e885b4b7c80010529b.jpg83a63193281ba48e17f9aaa714a910b6.jpg37b64631f4509801e3f09559120a3670.jpg

Sent from my SM-G975U using Tapatalk
 

Attachments

  • 37b64631f4509801e3f09559120a3670.jpg
    37b64631f4509801e3f09559120a3670.jpg
    546.2 KB · Views: 0
  • 8b4788286df7450f562d698d0406cb20.jpg
    8b4788286df7450f562d698d0406cb20.jpg
    470.8 KB · Views: 0
  • 9948b5cdb9728d88c67dc74ce7bc187e.jpg
    9948b5cdb9728d88c67dc74ce7bc187e.jpg
    527.5 KB · Views: 0
  • d8ca76d29abd4935f44aa1f8ba9995a7.jpg
    d8ca76d29abd4935f44aa1f8ba9995a7.jpg
    519.6 KB · Views: 0
  • e5feb36918ec44d2d419217916529207.jpg
    e5feb36918ec44d2d419217916529207.jpg
    573.9 KB · Views: 0
  • 4058a2bd4df37d13894cb19f87826377.jpg
    4058a2bd4df37d13894cb19f87826377.jpg
    511 KB · Views: 0
  • 9854446ccbff16e885b4b7c80010529b.jpg
    9854446ccbff16e885b4b7c80010529b.jpg
    538.6 KB · Views: 0
  • 83a63193281ba48e17f9aaa714a910b6.jpg
    83a63193281ba48e17f9aaa714a910b6.jpg
    517.2 KB · Views: 0
OP
I

Iceman32

Active member
Joined
May 26, 2015
Messages
30
It was a productive weekend.
I got the second corner tacked in place.
And then worked on the rear window, I didn't like the mail slot look with 4" removed, so I redid it only removing 2.5" I think it looks a lot more proportionate 096e0460b83a680919a693997853a836.jpg5a0dcad5f4bf83719fe0bb8c27e9e824.jpgb7c2bde7ccf2f066428e08f5ce55c79d.jpga3386399123053205e43aba8dc042852.jpg

Sent from my SM-G975U using Tapatalk
 

Attachments

  • 096e0460b83a680919a693997853a836.jpg
    096e0460b83a680919a693997853a836.jpg
    538.2 KB · Views: 0
  • 5a0dcad5f4bf83719fe0bb8c27e9e824.jpg
    5a0dcad5f4bf83719fe0bb8c27e9e824.jpg
    600.3 KB · Views: 0
  • b7c2bde7ccf2f066428e08f5ce55c79d.jpg
    b7c2bde7ccf2f066428e08f5ce55c79d.jpg
    580.7 KB · Views: 0
  • a3386399123053205e43aba8dc042852.jpg
    a3386399123053205e43aba8dc042852.jpg
    584.8 KB · Views: 0

MikeinNorthWales

Well-known member
Joined
Nov 27, 2015
Messages
316
Location
SE Pennsylvania
Hey, Chris, that is some nice work. Good catch on the rear window. Now is definitely better than later! Make it look the way you want. I'm not sure I would have caught that, thinking it must be right because I took the same amount out as the chop.

Sent from my SM-G965U using Tapatalk
 
To avoid these ads, REGISTER NOW!
OP
I

Iceman32

Active member
Joined
May 26, 2015
Messages
30
Continued welding on the rear panels. 491cf76790eebbb9cc018d1f1e9d3ad7.jpg6ce77fdecb9145594d1d7894e51e50e5.jpgcdf4b9560ece56847c8178b248974b17.jpg
And a repair I did for a friend. He is a riding instructor and a student crashed one of his rental bikesc1d45991293c928cb24696db8d7cb143.jpg88015becd1b6d74986f072d9250e4501.jpg4a68465fbabcd0ae0cc49ed865cc6539.jpge9cdf0570933370fd8c94dc1a947ddae.jpg4275c83aec5be91246d21df5057c4308.jpg

Sent from my SM-G975U using Tapatalk
 

Attachments

  • c1d45991293c928cb24696db8d7cb143.jpg
    c1d45991293c928cb24696db8d7cb143.jpg
    570 KB · Views: 0
  • 88015becd1b6d74986f072d9250e4501.jpg
    88015becd1b6d74986f072d9250e4501.jpg
    514 KB · Views: 0
  • 4a68465fbabcd0ae0cc49ed865cc6539.jpg
    4a68465fbabcd0ae0cc49ed865cc6539.jpg
    493 KB · Views: 0
  • e9cdf0570933370fd8c94dc1a947ddae.jpg
    e9cdf0570933370fd8c94dc1a947ddae.jpg
    586.4 KB · Views: 0
  • 4275c83aec5be91246d21df5057c4308.jpg
    4275c83aec5be91246d21df5057c4308.jpg
    644 KB · Views: 0
  • cdf4b9560ece56847c8178b248974b17.jpg
    cdf4b9560ece56847c8178b248974b17.jpg
    491.9 KB · Views: 0
  • 6ce77fdecb9145594d1d7894e51e50e5.jpg
    6ce77fdecb9145594d1d7894e51e50e5.jpg
    502 KB · Views: 0
  • 491cf76790eebbb9cc018d1f1e9d3ad7.jpg
    491cf76790eebbb9cc018d1f1e9d3ad7.jpg
    538 KB · Views: 0
OP
I

Iceman32

Active member
Joined
May 26, 2015
Messages
30
Spent some time trying to clean up and smooth out some areasbc14724e2d41959bb9ac30dcd3d5a586.jpgcd30099db37fa243af20e23d7ba46775.jpg8b842326bebdf65eb7cf62f1113e82e2.jpge33d670d09762001fd2f0776df6e653c.jpg

Sent from my SM-G975U using Tapatalk
 

Attachments

  • e33d670d09762001fd2f0776df6e653c.jpg
    e33d670d09762001fd2f0776df6e653c.jpg
    496.2 KB · Views: 0
  • 8b842326bebdf65eb7cf62f1113e82e2.jpg
    8b842326bebdf65eb7cf62f1113e82e2.jpg
    576.7 KB · Views: 0
  • bc14724e2d41959bb9ac30dcd3d5a586.jpg
    bc14724e2d41959bb9ac30dcd3d5a586.jpg
    556.9 KB · Views: 0
  • cd30099db37fa243af20e23d7ba46775.jpg
    cd30099db37fa243af20e23d7ba46775.jpg
    569.5 KB · Views: 0
OP
I

Iceman32

Active member
Joined
May 26, 2015
Messages
30
Not a ton of visual progress. Just continued welding the rear window and corners. 8eb057b505fc428937a8a8c66983e737.jpgba8062ef541f674ca689c5d5439ead70.jpg39e81835723005cb8620be162c7319f7.jpg

Sent from my SM-G975U using Tapatalk
 

Attachments

  • 8eb057b505fc428937a8a8c66983e737.jpg
    8eb057b505fc428937a8a8c66983e737.jpg
    502.9 KB · Views: 0
  • ba8062ef541f674ca689c5d5439ead70.jpg
    ba8062ef541f674ca689c5d5439ead70.jpg
    550.5 KB · Views: 0
  • 39e81835723005cb8620be162c7319f7.jpg
    39e81835723005cb8620be162c7319f7.jpg
    531.5 KB · Views: 0

Stooge

Well-known member
Joined
Mar 24, 2013
Messages
3,533
Location
South Shore, MA
Very cool project and great work on the sheet metal! those advance design trucks are some of my favorites. Does the upper door frame/ sill have a little peak to it from the chop or just the picture?

Subscribed
 
OP
I

Iceman32

Active member
Joined
May 26, 2015
Messages
30
Very cool project and great work on the sheet metal! those advance design trucks are some of my favorites. Does the upper door frame/ sill have a little peak to it from the chop or just the picture?

Subscribed
A little bit, i have spme straightening to do still buts its more a visual illusion. I haven't welded the lower sill portion yet and there is still some paint so the grinding marks make it look a little wavier than it is95e31c5e1a62fe4b490f1d8f76f8627f.jpg

Sent from my SM-G975U using Tapatalk
 

Attachments

  • 95e31c5e1a62fe4b490f1d8f76f8627f.jpg
    95e31c5e1a62fe4b490f1d8f76f8627f.jpg
    560.8 KB · Views: 0
OP
I

Iceman32

Active member
Joined
May 26, 2015
Messages
30
Filled the filler neck hole in the cab.baad9799571918db4fcbf98c893c1835.jpgb05778d1c7d1ab4c4565bf582b268add.jpg69579d57c9d2832b14acde382f6df281.jpg doing some more finish work my da sander locked up. Dissassembled and found the bearings are shot, will have some new ones tomorrow.5ed0df23d4ba6295a074d1675e6d2d93.jpgd38fa51b722fefdd040702b319fba460.jpg

Sent from my SM-G975U using Tapatalk
 

Attachments

  • baad9799571918db4fcbf98c893c1835.jpg
    baad9799571918db4fcbf98c893c1835.jpg
    570.2 KB · Views: 0
  • b05778d1c7d1ab4c4565bf582b268add.jpg
    b05778d1c7d1ab4c4565bf582b268add.jpg
    666 KB · Views: 0
  • 69579d57c9d2832b14acde382f6df281.jpg
    69579d57c9d2832b14acde382f6df281.jpg
    540.9 KB · Views: 0
  • 5ed0df23d4ba6295a074d1675e6d2d93.jpg
    5ed0df23d4ba6295a074d1675e6d2d93.jpg
    694 KB · Views: 0
  • d38fa51b722fefdd040702b319fba460.jpg
    d38fa51b722fefdd040702b319fba460.jpg
    706 KB · Views: 0
OP
I

Iceman32

Active member
Joined
May 26, 2015
Messages
30
Fitting a Couple more patches7e8a26c3bf6d24fe451b7c3b75f06271.jpg48392d0404c9c0a45cace47497132e9b.jpg40937bc3cf0143af6d8cc5d0b939f458.jpg6d657ead8f16026d7b19f81897d29d03.jpg1fb2641a069f214bdd35b5cc9bb1ff8f.jpg386eb5352960594cd008c09c22bb449a.jpgdc3cad1fbaece1a39601ab108f500588.jpg06f05823e1f9c7b4a12fe450c4322996.jpg

Sent from my SM-G975U using Tapatalk
 

Attachments

  • 06f05823e1f9c7b4a12fe450c4322996.jpg
    06f05823e1f9c7b4a12fe450c4322996.jpg
    158.3 KB · Views: 1
  • 7e8a26c3bf6d24fe451b7c3b75f06271.jpg
    7e8a26c3bf6d24fe451b7c3b75f06271.jpg
    558.9 KB · Views: 1
  • 48392d0404c9c0a45cace47497132e9b.jpg
    48392d0404c9c0a45cace47497132e9b.jpg
    526.7 KB · Views: 1
  • 40937bc3cf0143af6d8cc5d0b939f458.jpg
    40937bc3cf0143af6d8cc5d0b939f458.jpg
    478.1 KB · Views: 1
  • 6d657ead8f16026d7b19f81897d29d03.jpg
    6d657ead8f16026d7b19f81897d29d03.jpg
    587.9 KB · Views: 1
  • 1fb2641a069f214bdd35b5cc9bb1ff8f.jpg
    1fb2641a069f214bdd35b5cc9bb1ff8f.jpg
    525.5 KB · Views: 1
  • 386eb5352960594cd008c09c22bb449a.jpg
    386eb5352960594cd008c09c22bb449a.jpg
    150 KB · Views: 1
  • dc3cad1fbaece1a39601ab108f500588.jpg
    dc3cad1fbaece1a39601ab108f500588.jpg
    200.9 KB · Views: 1
OP
I

Iceman32

Active member
Joined
May 26, 2015
Messages
30
Where the driver door Jamb was originally cut was pretty crooked, cut that section out and bent up a new peice.aed941cd99f2664e77999207028bfd17.jpga59b439c27296497d5ac55fdaae19f21.jpg
And continued smoothing out the previous welds 2349638c4ffece571b54d95292636284.jpgfdb021e1152753c5c733b974b3aa5268.jpg

Sent from my SM-G975U using Tapatalk
 

Attachments

  • fdb021e1152753c5c733b974b3aa5268.jpg
    fdb021e1152753c5c733b974b3aa5268.jpg
    532.6 KB · Views: 1
  • aed941cd99f2664e77999207028bfd17.jpg
    aed941cd99f2664e77999207028bfd17.jpg
    533 KB · Views: 1
  • a59b439c27296497d5ac55fdaae19f21.jpg
    a59b439c27296497d5ac55fdaae19f21.jpg
    429 KB · Views: 1
  • 2349638c4ffece571b54d95292636284.jpg
    2349638c4ffece571b54d95292636284.jpg
    465.9 KB · Views: 1
OP
I

Iceman32

Active member
Joined
May 26, 2015
Messages
30
Started work on removing the leaded seams 62b68c4b2d329c4cb77e9206e6e25818.jpg0442499f14434e8c75dc47d8a9f9c737.jpg5141b65bac1b60fd5e8e284ed44e61c3.jpgbc4a4519246d5843f5e8dae012663cd1.jpg5740ce96504955ed25349ce2d434c485.jpg70033352f8a4f6780366385bb94da674.jpgc93018b33f0d82123de17453a4f54150.jpgf2a0dbfddb6fef3aa2c206ed5e5a7625.jpg

Sent from my SM-G975U using Tapatalk
 

Attachments

  • 0442499f14434e8c75dc47d8a9f9c737.jpg
    0442499f14434e8c75dc47d8a9f9c737.jpg
    562.4 KB · Views: 0
  • 62b68c4b2d329c4cb77e9206e6e25818.jpg
    62b68c4b2d329c4cb77e9206e6e25818.jpg
    570 KB · Views: 0
  • 5141b65bac1b60fd5e8e284ed44e61c3.jpg
    5141b65bac1b60fd5e8e284ed44e61c3.jpg
    505.1 KB · Views: 0
  • bc4a4519246d5843f5e8dae012663cd1.jpg
    bc4a4519246d5843f5e8dae012663cd1.jpg
    517.9 KB · Views: 0
  • 5740ce96504955ed25349ce2d434c485.jpg
    5740ce96504955ed25349ce2d434c485.jpg
    522.5 KB · Views: 0
  • f2a0dbfddb6fef3aa2c206ed5e5a7625.jpg
    f2a0dbfddb6fef3aa2c206ed5e5a7625.jpg
    521.8 KB · Views: 0
  • c93018b33f0d82123de17453a4f54150.jpg
    c93018b33f0d82123de17453a4f54150.jpg
    562.6 KB · Views: 0
  • 70033352f8a4f6780366385bb94da674.jpg
    70033352f8a4f6780366385bb94da674.jpg
    512.3 KB · Views: 1
OP
I

Iceman32

Active member
Joined
May 26, 2015
Messages
30
Started cutting down the interior panels177ab63697645c9913d2278cf6725c83.jpg9b14610e4422eab06c4e98501bcd28f9.jpg1bdb4d5d0306db0e1c6f1e9a92221f25.jpg

Sent from my SM-G975U using Tapatalk
 

Attachments

  • 177ab63697645c9913d2278cf6725c83.jpg
    177ab63697645c9913d2278cf6725c83.jpg
    210.6 KB · Views: 1
  • 9b14610e4422eab06c4e98501bcd28f9.jpg
    9b14610e4422eab06c4e98501bcd28f9.jpg
    52.6 KB · Views: 1
  • 1bdb4d5d0306db0e1c6f1e9a92221f25.jpg
    1bdb4d5d0306db0e1c6f1e9a92221f25.jpg
    449 KB · Views: 1
To avoid these ads, REGISTER NOW!
Top Bottom