To avoid these ads, REGISTER NOW!

52 chevy chop and random projects

OP
I

Iceman32

Active member
Joined
May 26, 2015
Messages
30
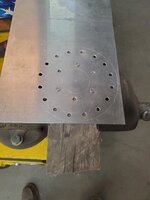
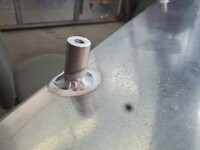
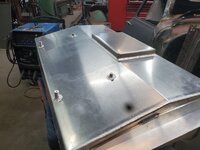
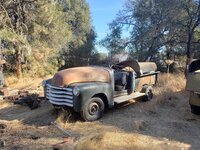
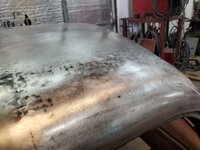
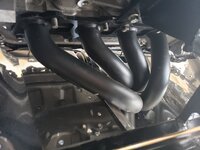
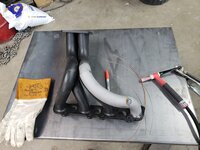
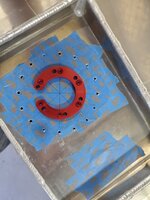
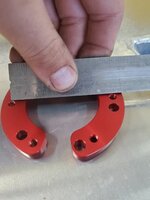
Thanks guys! Started on another side project. A buddy is putting together a backdraft cobra kit car. The fuel pump assembly was to small to fit the original hole in the tank so I am making an adapter plate1e2ecdee4538a1f08c6c8e331b8affd4.jpg first I made a template with blue tape1ed3b5cc8abbddaa5904c255cd2baac1.jpgthe outer ring is 5" across and the new pump is 2 3/4 so I marked center and layer out for the inner ring8274f67afbe3a230dc711edebb73f8d7.jpg26692cdcc8eee2e15048caf141ae83d2.jpg9762a8a29b3a3f4b00a46fcc7a34d73e.jpg
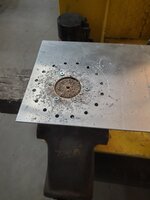
then pulled the tape off, transferred it to some plate, center punched and drilled0371e16d6e679bf340c69f0f245caa52.jpg9a6a7dfc42765d998d0324fab49b00b0.jpg

Sent from my SM-G975U using Tapatalk
 

Attachments

  • 1ed3b5cc8abbddaa5904c255cd2baac1.jpg
    1ed3b5cc8abbddaa5904c255cd2baac1.jpg
    680.7 KB · Views: 1
  • 9a6a7dfc42765d998d0324fab49b00b0.jpg
    9a6a7dfc42765d998d0324fab49b00b0.jpg
    496.2 KB · Views: 0
  • 0371e16d6e679bf340c69f0f245caa52.jpg
    0371e16d6e679bf340c69f0f245caa52.jpg
    539.6 KB · Views: 0
  • 9762a8a29b3a3f4b00a46fcc7a34d73e.jpg
    9762a8a29b3a3f4b00a46fcc7a34d73e.jpg
    547.8 KB · Views: 0
  • 26692cdcc8eee2e15048caf141ae83d2.jpg
    26692cdcc8eee2e15048caf141ae83d2.jpg
    572 KB · Views: 0
  • 8274f67afbe3a230dc711edebb73f8d7.jpg
    8274f67afbe3a230dc711edebb73f8d7.jpg
    96.2 KB · Views: 0
  • 1e2ecdee4538a1f08c6c8e331b8affd4.jpg
    1e2ecdee4538a1f08c6c8e331b8affd4.jpg
    455.2 KB · Views: 0
To avoid these ads, REGISTER NOW!
OP
I

Iceman32

Active member
Joined
May 26, 2015
Messages
30
Finished up the fuel tank modifications. Got the adapter finished and Made some mounts for a rear diffuser 064b811d398ef0ac260a0ad46775aa4d.jpg600a8a2d04914ac38d9b534220555acb.jpgf17bb1fae6141299a6ac00247f2e5155.jpg944cea8e1fdf37d17ef3ede41233b976.jpgdd953b2a39084471593a75b0c63c2f10.jpge4fa6dd43878c499999596ccea1ebe83.jpg

Sent from my SM-G975U using Tapatalk
 

Attachments

  • 064b811d398ef0ac260a0ad46775aa4d.jpg
    064b811d398ef0ac260a0ad46775aa4d.jpg
    486.6 KB · Views: 0
  • f17bb1fae6141299a6ac00247f2e5155.jpg
    f17bb1fae6141299a6ac00247f2e5155.jpg
    512.7 KB · Views: 0
  • 600a8a2d04914ac38d9b534220555acb.jpg
    600a8a2d04914ac38d9b534220555acb.jpg
    485 KB · Views: 0
  • 944cea8e1fdf37d17ef3ede41233b976.jpg
    944cea8e1fdf37d17ef3ede41233b976.jpg
    437.5 KB · Views: 0
  • dd953b2a39084471593a75b0c63c2f10.jpg
    dd953b2a39084471593a75b0c63c2f10.jpg
    407.3 KB · Views: 0
  • e4fa6dd43878c499999596ccea1ebe83.jpg
    e4fa6dd43878c499999596ccea1ebe83.jpg
    540.2 KB · Views: 0
OP
I

Iceman32

Active member
Joined
May 26, 2015
Messages
30
Well! It's been a busy month! My parents have decided to move into a smaller house after 32 years.. so that means I have to get all my stuff out of storage. Having a crane on the service truck made this all so much easier.
27c3d9e27c73ba55f77d3bd31285d8e1.jpg4bb37989b905d764257d484492f632d5.jpg
Got the truck and all the extra parts moved to the shop
6bc0f024c9ab8e287ba319edade30908.jpg
d4dcde6348c93593c98072850dd29c58.jpgc2d0e896e5bad7e2c2fd273cf592cd3b.jpg
And since I got all the extra parts to the shop I felt like seeing some more progress so I cut down one of the doors to get a visuale347b33b04b10ebe2496c26f61bd338f.jpg
Thanks for following along guys!

Sent from my SM-G965U using Tapatalk
 

Attachments

  • 27c3d9e27c73ba55f77d3bd31285d8e1.jpg
    27c3d9e27c73ba55f77d3bd31285d8e1.jpg
    294.3 KB · Views: 0
  • 4bb37989b905d764257d484492f632d5.jpg
    4bb37989b905d764257d484492f632d5.jpg
    109.6 KB · Views: 0
  • 6bc0f024c9ab8e287ba319edade30908.jpg
    6bc0f024c9ab8e287ba319edade30908.jpg
    820.5 KB · Views: 0
  • d4dcde6348c93593c98072850dd29c58.jpg
    d4dcde6348c93593c98072850dd29c58.jpg
    647.3 KB · Views: 0
  • c2d0e896e5bad7e2c2fd273cf592cd3b.jpg
    c2d0e896e5bad7e2c2fd273cf592cd3b.jpg
    648.4 KB · Views: 0
  • e347b33b04b10ebe2496c26f61bd338f.jpg
    e347b33b04b10ebe2496c26f61bd338f.jpg
    571.7 KB · Views: 0

MP&C

Well-known member
Joined
Oct 21, 2009
Messages
4,398
Location
Leonardtown, MD
Chris, I don't know how I've missed your thread until now, but I must say, you don't need my help for anything, truly some nice work.. And by now, you know that I'm a sucker for giving a good tutorial, and some of your work is a perfect platform for such. So please excuse me while I add some thoughts for anyone else planning on such an undertaking.. My comments will be in blue....


Hello all, my name is Chris and I'm a heavy equipment mechanic. Been a lurker on here a long time but after reading through Robert's shop thread I thought I'd post what his inspiration has caused.
I got this 52 chevy pickup from my first welding instructor when I was 18. He started the chop on it. I got in over my head and it sat for 12 years. After reading through some of Robert's tutorials I thought "that makes so much sense I bet I can do that"
So here's what I started with. I have a parts truck that is all twisted i can use for patch panels.
so first part was removing the inner panels and cutting out the roof section, figuring it would be easier to work the welds along the edge of the roof instead dead across the middle (highlighted for emphasis)

cd9d59a4b26c045c44853d9fd677bac6.jpg

98b6a79b3c92dda89ea761e625d1ec42.jpg

Compare the two views of the roof above. As you can see, once the roof skin is sliced down the middle all of the gentle, low crown support of the roof is gone. Just to the side of the middle cuts, the crown also loses some of it's support here as well, and things flop around like a wet noodle. So Chris' choice to use another truck as a donor, and keep this center crown intact is spot on. Any welds should be at/near the highest crown of the panel as possible, out near the corners, to help control any distortion and also to maintain as much of the center support as you can of the low crown in the panel. The seam running adjacent to or down through the center of the high crown is exactly where it should be, and the end result is less effort used in hammer and dolly work, and the low crown has been untouched, so it saves all that work to try and restore it..


a530b0ef33717049cae09fd1aa477e18.jpg

861bdde1bb7ea432faa71848529c9552.jpg


Note the consistent spacing used in tacking the panels in initially, and then the beautiful TIG welds that follow. I think most people starting such an undertaking like this project will use MIG welding as we get our feet wet, and may or may not "graduate" to using TIG or OA gas welding. The above pictures show why one should strive for using TIG over a MIG weld. Nice consistent pass, MINIMAL distortion, softer weld for planishing, and for the full penetration weld shown, MUCH LESS weld proud to dress off.. As the after pictures below indicate, the panels still maintains the overall shape, no discernable warping/distortion, very nice work. Also note minimal to non-existent gap between the panels. Tighter fit-up means less movement when welds cool (shrink) and try to pull the panels together.


09f54bd46e4b65a70a91213140085535.jpg

d3b750d3f988c1d323ec5c455b19ff39.jpg

These views from the rear really tell the tale. All of the consistency in tight fitting gaps, tacks to hold the panels, consistent TIG welds, all come together when you view this from the back and see a nice balanced / symmetrical shape from one side to the other. Well done Chris!!


a3386399123053205e43aba8dc042852.jpg
 

Attachments

  • cd9d59a4b26c045c44853d9fd677bac6.jpg
    cd9d59a4b26c045c44853d9fd677bac6.jpg
    166.9 KB · Views: 0
  • 98b6a79b3c92dda89ea761e625d1ec42.jpg
    98b6a79b3c92dda89ea761e625d1ec42.jpg
    176.9 KB · Views: 0
  • 861bdde1bb7ea432faa71848529c9552.jpg
    861bdde1bb7ea432faa71848529c9552.jpg
    145.7 KB · Views: 0
  • 09f54bd46e4b65a70a91213140085535.jpg
    09f54bd46e4b65a70a91213140085535.jpg
    175.7 KB · Views: 0
  • d3b750d3f988c1d323ec5c455b19ff39.jpg
    d3b750d3f988c1d323ec5c455b19ff39.jpg
    94.9 KB · Views: 0
  • a3386399123053205e43aba8dc042852.jpg
    a3386399123053205e43aba8dc042852.jpg
    162.9 KB · Views: 0
  • a530b0ef33717049cae09fd1aa477e18.jpg
    a530b0ef33717049cae09fd1aa477e18.jpg
    118.8 KB · Views: 0
OP
I

Iceman32

Active member
Joined
May 26, 2015
Messages
30
Chris, I don't know how I've missed your thread until now, but I must say, you don't need my help for anything, truly some nice work.. And by now, you know that I'm a sucker for giving a good tutorial, and some of your work is a perfect platform for such. So please excuse me while I add some thoughts for anyone else planning on such an undertaking.. My comments will be in blue....
Thank you for the kind words Robert,
It means a lot coming from you.
And please feel free to use any pictures for tutorials or critiques anytime. If you can use them to help teach i would be honored

Sent from my SM-G965U using Tapatalk
 
To avoid these ads, REGISTER NOW!
OP
I

Iceman32

Active member
Joined
May 26, 2015
Messages
30
Goodness, the holidays flew by. Along with helping my parents move, I have been helping a friend with putting together a cobra.
We got the motor installed. 6f5db87347b09e35374c1086d0546c13.jpg
Had some clearance issues with the headers
75105defb9ab21ad04925569573588b3.jpg so I cut and redid the rear most runnerf1a1605062a9e2a77e905526b634a4c5.jpg10a5b7a6a30185ba559d19719eeefde1.jpgf16659190355fb92c03dc59e5b751f0b.jpg10c1ad61e4bc94fe0ddf4cef0bc6281e.jpg

Sent from my SM-G965U using Tapatalk
 

Attachments

  • 6f5db87347b09e35374c1086d0546c13.jpg
    6f5db87347b09e35374c1086d0546c13.jpg
    660.7 KB · Views: 0
  • 75105defb9ab21ad04925569573588b3.jpg
    75105defb9ab21ad04925569573588b3.jpg
    503.4 KB · Views: 0
  • f1a1605062a9e2a77e905526b634a4c5.jpg
    f1a1605062a9e2a77e905526b634a4c5.jpg
    618.3 KB · Views: 0
  • 10a5b7a6a30185ba559d19719eeefde1.jpg
    10a5b7a6a30185ba559d19719eeefde1.jpg
    649.3 KB · Views: 0
  • f16659190355fb92c03dc59e5b751f0b.jpg
    f16659190355fb92c03dc59e5b751f0b.jpg
    547.5 KB · Views: 0
  • 10c1ad61e4bc94fe0ddf4cef0bc6281e.jpg
    10c1ad61e4bc94fe0ddf4cef0bc6281e.jpg
    501.5 KB · Views: 2

Jim greengo

Well-known member
Joined
Sep 3, 2018
Messages
7,415
Location
Behind my house
I'm a big fan of 47-53 chevy trucks,not a big fan of chopped tops on them.
Looks like you're doing some nice fab work bringing that 1 back though.:beer::beer::beer::beer:
 

PWC Repair

Well-known member
Joined
Dec 27, 2012
Messages
3,170
Location
Arkansas
Since you like the 47-53 style, check this out. Local guy built it. Split the whole truck in half and widened it to sit on an SSR chassis.......what the SSR should have been in the first place.
 

Attachments

  • widened truck.jpg
    widened truck.jpg
    135.4 KB · Views: 66

Moosefire

Well-known member
Joined
Oct 26, 2018
Messages
754
Location
Detroit
Since you like the 47-53 style, check this out. Local guy built it. Split the whole truck in half and widened it to sit on an SSR chassis.......what the SSR should have been in the first place.
Wow. That truck looks great. How much wider is it? Doesn't look that much bigger, but I'm no pro at looking at that stuff

Sent from my SM-N960U using Tapatalk
 
To avoid these ads, REGISTER NOW!
Top Bottom