To avoid these ads, REGISTER NOW!

5X10 Trailer Build

OP
B

bmxdad

Well-known member
Joined
Feb 18, 2014
Messages
2,539
Location
Puyallup, WA
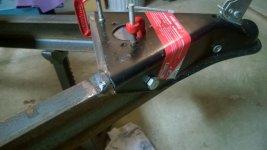
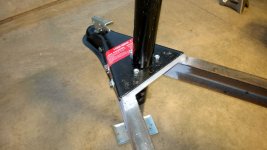
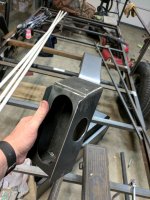
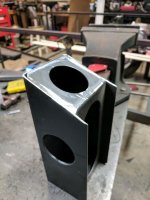
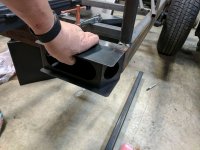
Where the tongue pass under the frame, and past the pie cut ... why do you put a stitch weld, instead of a full length weld?

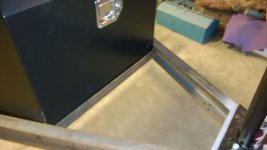
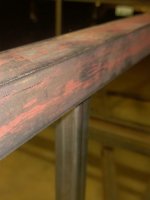
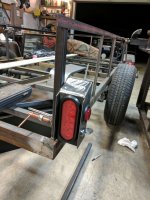
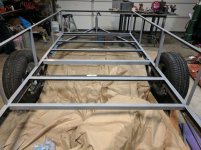
Also, are there place you should not weld the tongue? I've only welded it where it contacts the perimeter frame, not any of the cross members. Should I?
 
To avoid these ads, REGISTER NOW!

Ole Slewfoot

Well-known member
Joined
Feb 22, 2016
Messages
5,098
Location
Freedom, CA
I'm of 2 minds about fighting twist, cracks seem to happen most where cross members are joined to the frame in such a way that twisting force is focused on a weld embrittled area. That's usually where the cross members are welded to the side rails. You can find that on many heavily used trailers. If I weren't doing a tilt tongue, I'd weld to the #2 cross member at the outside where its easiest to get at with a grinder. IMO anything to move stress away from the box- tongue transition is good. I did have a trailer break off there, and it was uber inconvenient to say the least.

Stitch welding, if one were to fail, the crack would not be propagated the entire length of the tongue. They aren't going to fail, so that's mostly philosophical. In practice, I reduced curvature of the beam by stitching alternate sides, as the wall side would soak up a lot more heat. Also on the thick side, I'm up against the duty cycle of my machine, so I don't weld if I don't have to.

In other news, making offset hinges is a PITA and a lot of extra work, but Ive got the parts cut out and think my design is promising.

* I am neither a professional welder nor trailer engineer, so I could be making a huge mistake :lol:
 
OP
B

bmxdad

Well-known member
Joined
Feb 18, 2014
Messages
2,539
Location
Puyallup, WA
Stitch welding ... that makes a lot of sense. Thanks.

Question ... Could I make a flat bed trailer, license it, then add railing and gate? Seems it would give me a higher legal weight limit, if it weighed less at the time of registration.
 
Last edited:

kerrynzl

Well-known member
Joined
Nov 8, 2013
Messages
5,054
Location
Tauranga, New Zealand
Stitch welding ... that makes a lot of sense. Thanks.

Question ... Could I make a flat bed trailer, license it, then add railing and gate? Seems it would give me a higher legal weight limit, if it weighed less at the time of registration.

Isn't the weight limit gross weight? [total weight on the scales ]

Building the trailer lighter allows for a greater payload for that weight limit.
Adding weight to the trailer later reduces the payload weight for that gross weight limit
 
OP
B

bmxdad

Well-known member
Joined
Feb 18, 2014
Messages
2,539
Location
Puyallup, WA
Well yea, but the registration has a weight limit on it ... kinda cheating doing it that way.

Tongue is 43" to C/L of ball. From C/L of ball to center of spring bolt is with in 1/16". Happy ... will be getting it weighed this weekend hopefully.

I bought some 2x6 tubing, and will be cutting it to 6" length ... and will be using that to house 4" diameter LED tail lights. Just need to cap one end and sealed lights.
 
Last edited:

drivesitfar

Well-known member
Joined
Oct 23, 2013
Messages
35,999
Location
Pacific Northwest
BMX: any chance you can take and post up a few pictures of your trailer as it sits today? are you wishing you would have just bought one or are you enjoying the experience of building your own still?
 
OP
B

bmxdad

Well-known member
Joined
Feb 18, 2014
Messages
2,539
Location
Puyallup, WA
Will get some more pictures up this weekend. As for buy or build ... building was much better. Fun doing it, and actually cheaper ... at least so far.

Going to Randles Sand and Gravel to get it weighed, if they are open.
 
OP
B

bmxdad

Well-known member
Joined
Feb 18, 2014
Messages
2,539
Location
Puyallup, WA
Fighting a sore back, so not much done ... but, I did get it flipped over and on some wheels. Also test fitted the tool box and did a quick weigh in.

Weighed both wheels and the tongue jack, and came out to 400lbs ... so far. 65lbs on the tongue.

HF Trailer box is well made, and locking mechanism is great. Don't see any issues. I'm thinking of adding some channel to the bottom of the rails, and mount the box between them as shown. Opened top and it'll clear the front railing fine.

I'm also going to be adding a 1/4" plate to rails, under coupler, but on top of rails. This will allow me to clamp the coupler to the rail, and also weld it to the 1/4" plate. Still need to drill the bolt holes in rails, to bolt coupler to rails ... just a back up :thumbup:
 

Attachments

  • Trailer10.jpg
    Trailer10.jpg
    99.9 KB · Views: 172
  • Trailer11.jpg
    Trailer11.jpg
    104.6 KB · Views: 160
  • Trailerbox1.jpg
    Trailerbox1.jpg
    113.7 KB · Views: 162
  • Trailerbox2.jpg
    Trailerbox2.jpg
    110.8 KB · Views: 167
  • Trailerbox3.jpg
    Trailerbox3.jpg
    110.9 KB · Views: 157
  • Trailerbox4.jpg
    Trailerbox4.jpg
    140.9 KB · Views: 153
OP
B

bmxdad

Well-known member
Joined
Feb 18, 2014
Messages
2,539
Location
Puyallup, WA
Couldn't find a pair of 4" round LED's, but did find the 6" long ones ... so using those. Still using the 6" tubing ... picture gives an idea on what it looks like. Will be cutting it in half, and sealing one end. Other will be welded to upright, which will be part of a step behind the fender.

Still need to weld all the stringers ... And a good cleaning will be done. :thumbup:
 

Attachments

  • Trailer12.jpg
    Trailer12.jpg
    109.4 KB · Views: 75
  • TrailerLights1.jpg
    TrailerLights1.jpg
    112.6 KB · Views: 74
Last edited:

kerrynzl

Well-known member
Joined
Nov 8, 2013
Messages
5,054
Location
Tauranga, New Zealand
Fighting a sore back, so not much done ... but, I did get it flipped over and on some wheels. Also test fitted the tool box and did a quick weigh in.

Weighed both wheels and the tongue jack, and came out to 400lbs ... so far. 65lbs on the tongue.

HF Trailer box is well made, and locking mechanism is great. Don't see any issues. I'm thinking of adding some channel to the bottom of the rails, and mount the box between them as shown. Opened top and it'll clear the front railing fine.

I'm also going to be adding a 1/4" plate to rails, under coupler, but on top of rails. This will allow me to clamp the coupler to the rail, and also weld it to the 1/4" plate. Still need to drill the bolt holes in rails, to bolt coupler to rails ... just a back up :thumbup:

Add 2 x crossmembers to the tongue made from Angle [flange facing up] and drop the toolbox between them.
The angle will add torsional strength to the C channel tongue [needed if you decide to mount a jockey wheel to the tongue]
 

Firebrick43

Well-known member
Joined
May 12, 2015
Messages
13,995
Location
West central Indiana
I don't know the specifics in WA but most states you set the gross vehicle weight rating. This rating should be the axle rating. Making a trailer lighter or heavier has no bearing on how much the trailer can weight in the eyes of the law. If you have a 2000lbs gross vehicle rating (gvwr) then if you have 2001 lbs you are overweight. You can not gain any more payload by making a trailer lighter now and adding structure later. They want to know empty weight to access sales tax. They have a chart that says if your steel trailer weighs x amount then it has x amount of steel in it. Then you submit sales receipt for the materials and how much sales tax you have paid. If the two don't jive they make you cough up some tax. It keeps people from bringing their trailers in and saying the used 5$ worth of materials to build and therefore not paying their fair share of taxes. Most states inspections is to ensure proper lighting, fenders, brakes, ect and is not a structural inspection. Though they might question you claiming 10,000 lbs weight rating on a trailer with 8" tires��

While to late now for your build, one can significantly reduce the size of iron in the floor if the rails are made properly. Sides on a trailer add significantly to the strength. Your typical semi box trailer is extremely flexible if you cut the top off. An average man jumping in the center is nearly like a trampoline.
 
Last edited:
OP
B

bmxdad

Well-known member
Joined
Feb 18, 2014
Messages
2,539
Location
Puyallup, WA
Add 2 x crossmembers to the tongue made from Angle [flange facing up] and drop the toolbox between them.
The angle will add torsional strength to the C channel tongue [needed if you decide to mount a jockey wheel to the tongue]

Good idea .... thanks

I don't know the specifics in WA but most states you set the gross vehicle weight rating. This rating should be the axle rating. Making a trailer lighter or heavier has no bearing on how much the trailer can weight in the eyes of the law. If you have a 2000lbs gross vehicle rating (gvwr) then if you have 2001 lbs you are overweight. You can not gain any more payload by making a trailer lighter now and adding structure later. They want to know empty weight to access sales tax. They have a chart that says if your steel trailer weighs x amount then it has x amount of steel in it. Then you submit sales receipt for the materials and how much sales tax you have paid. If the two don't jive they make you cough up some tax. It keeps people from bringing their trailers in and saying the used 5$ worth of materials to build and therefore not paying their fair share of taxes. Most states inspections is to ensure proper lighting, fenders, brakes, ect and is not a structural inspection. Though they might question you claiming 10,000 lbs weight rating on a trailer with 8" tires��

While to late now for your build, one can significantly reduce the size of iron in the floor if the rails are made properly. Sides on a trailer add significantly to the strength. Your typical semi box trailer is extremely flexible if you cut the top off. An average man jumping in the center is nearly like a trampoline.


I have receipts for everything! :thumbup:

Stood on the two big angle pieces, and solid as a rock ... no flexing.
 
OP
B

bmxdad

Well-known member
Joined
Feb 18, 2014
Messages
2,539
Location
Puyallup, WA
Quick look at the coupler before the final welds.

One more bolt hole still needs to be drilled in this picture. 1/4" plate is welded in place, and radiused to the coupler.
 

Attachments

  • Trailer13.jpg
    Trailer13.jpg
    97.8 KB · Views: 141
OP
B

bmxdad

Well-known member
Joined
Feb 18, 2014
Messages
2,539
Location
Puyallup, WA
Tongue and jack installed. Angle iron for box cut and tacked in place.

The jack is a HF one. Looks OK, but had to grind down the weld on the top cap. The three bolts on top are just to lock down the bolts.
 

Attachments

  • Trailer19.jpg
    Trailer19.jpg
    72.8 KB · Views: 133
  • Trailer18.jpg
    Trailer18.jpg
    137.8 KB · Views: 128
  • Trailer14.jpg
    Trailer14.jpg
    127.7 KB · Views: 134
  • Trailer17.jpg
    Trailer17.jpg
    80.1 KB · Views: 121
  • Trailer16.jpg
    Trailer16.jpg
    106.2 KB · Views: 145
  • Trailer15.jpg
    Trailer15.jpg
    111.6 KB · Views: 137

kerrynzl

Well-known member
Joined
Nov 8, 2013
Messages
5,054
Location
Tauranga, New Zealand
Grinding the jack wasn't needed [or recommended because that particular weld is load bearing]

The A frame coupler is threaded so the Jack can be bolted down from the top,
The foot is removable.

Having the jack on top prevents a potential water/rust trap
 

Attachments

  • jack.jpg
    jack.jpg
    136.1 KB · Views: 93
Last edited:
OP
B

bmxdad

Well-known member
Joined
Feb 18, 2014
Messages
2,539
Location
Puyallup, WA
I just ground down some slag so it would fit it the hole. Instructions call for it to be installed from the bottom. Would have been a lot easier if I knew that, but never installed one before ....
 
OP
B

bmxdad

Well-known member
Joined
Feb 18, 2014
Messages
2,539
Location
Puyallup, WA
Something to think about if you have a pickup, somebody will always drop your tailgate on those ones.

lol .... I was wondering that very scenario.

Anyway ... ground all the top welds flush, and did a once over looking for ones I should redo. Looked good. Add some bracing to the channel where the spring hangers are. Basically, I just boxed it in, in that area.

Added the four corner posts, which are 1 1/4 square tubing and 18" high. 3/4" tubing will be used for the intermediaries. Used my little tool for welding 90 deg corners. Big time saver, and made them dead on. Will be adding 1 1/4 angle for a top rail. Learning to roumd the corner too .... how's it look?

For the sides, I was thinking of using some of the siding I have left over from the garage build. Probably to thin, but going to try it out just to see

I was originally just going to throw on some John Deere Green, but after talking to some people I'm going to primer it first.
 

Attachments

  • Trailer23.jpg
    Trailer23.jpg
    144.1 KB · Views: 137
  • Trailer20.jpg
    Trailer20.jpg
    104.6 KB · Views: 121
  • Trailer21.jpg
    Trailer21.jpg
    143.4 KB · Views: 125
  • Trailer22.jpg
    Trailer22.jpg
    111.5 KB · Views: 131
OP
B

bmxdad

Well-known member
Joined
Feb 18, 2014
Messages
2,539
Location
Puyallup, WA
Fenders arrived, and at a good price off of Amazon ... $40 shipped. I got the squared ones cause I want to be able to use the top as a step. Might use some of the plasma cut gussets to anchor them to the frame. Will be creating another step area towards the rear of trailer, behind the fenders.

I tried using a hole saw for the 6" lights, but my drill press isn''t rigid enough so it just chattered to much. So ... bought some boxes for $20. They'll be in Monday or Tuesday ... till then, plenty to do now
 

Attachments

  • Trailer24.jpg
    Trailer24.jpg
    131.1 KB · Views: 86
  • Trailer25.jpg
    Trailer25.jpg
    99.7 KB · Views: 87

kerrynzl

Well-known member
Joined
Nov 8, 2013
Messages
5,054
Location
Tauranga, New Zealand
If you want to use the fenders for a step

Glue a piece of treated plywood under the top of the fenders [dont be shy with the glue] then add a "L" shaped fender brace to the ply and attach to the frame.

This fender brace can be blind screwed to the ply from underneath.
 
To avoid these ads, REGISTER NOW!
OP
B

bmxdad

Well-known member
Joined
Feb 18, 2014
Messages
2,539
Location
Puyallup, WA
Is this to support the top? These fenders are, supposedly, thick enough to use as a step, as long as the hangers are strong enough. The manufacture recommended one under each lip, front and rear. With a support in the center to keep them from racking.

I like the idea though ... thanks.

Will hopefully be adding the railing and mounting the fender tomorrow.
 

zmotorsports

ALLIANCE MEMBER
Joined
Oct 20, 2009
Messages
21,333
Location
Northern Utah
I just ground down some slag so it would fit it the hole. Instructions call for it to be installed from the bottom. Would have been a lot easier if I knew that, but never installed one before ....

I always install those style of tongue jacks from the top. Merely slip the foot off and slide down into the hole on the tongue coupler. The three bolts are then put in tension and will easily support anything you are going to have on that trailer.


Something to think about if you have a pickup, somebody will always drop your tailgate on those ones.

I have seen too many people dent their tailgates with those style unless the trucks are lifted enough and have about a 6-10 inch drop hitch. I prefer the pivot style tongue jacks that swing up parallel to the frame when not in use, but that is just me.

Great work on the trailer, looking great.:thumbup:

Mike.
 
OP
B

bmxdad

Well-known member
Joined
Feb 18, 2014
Messages
2,539
Location
Puyallup, WA
Thanks Mike .... fun project!!

So ... got the top rail on and all the uprights cut to size. Used some 90 deg clamps to pull the 45's in tight. Worked great

I might not be able to get metal for the sides, so some 1/2" primed MDF will be used. Seems to be quit popular for the local trailer shops. So instead of just sticking the 3/4" square tube under the angle iron, I'm going to trim them so they are sitting proud as shown. This will give me plenty of room to keep what ever I use under the lip ... looks good to :thumbup:
 

Attachments

  • Trailer29.jpg
    Trailer29.jpg
    108.5 KB · Views: 173
  • Trailer28.jpg
    Trailer28.jpg
    108.7 KB · Views: 147
  • Trailer27.jpg
    Trailer27.jpg
    140.5 KB · Views: 176
  • Trailer26.jpg
    Trailer26.jpg
    135.7 KB · Views: 171
OP
B

bmxdad

Well-known member
Joined
Feb 18, 2014
Messages
2,539
Location
Puyallup, WA
Yea, as a last resort. Lot of the trailer manufactures are using it for sides. Doesn't collect water, and swell up, like regular press board, is fairly strong and light weight. Supposedly ... not to expensive, so if it doesn't workout no harm. We'll see.
 

aka Larry

Well-known member
Joined
May 2, 2012
Messages
8,016
Location
Eastern, NC
Yea, as a last resort. Lot of the trailer manufactures are using it for sides. Doesn't collect water, and swell up, like regular press board, is fairly strong and light weight. Supposedly ... not to expensive, so if it doesn't workout no harm. We'll see.

Is there a new magic MDF? Do tell.
 
OP
B

bmxdad

Well-known member
Joined
Feb 18, 2014
Messages
2,539
Location
Puyallup, WA
Oops ... it is MDO ... something called DuraGuard. Like I said, a last resort.

Here is what I'm talking about ...

attachment.php
 

Attachments

  • MDO_Sides.jpg
    MDO_Sides.jpg
    59.5 KB · Views: 654
Last edited:
OP
B

bmxdad

Well-known member
Joined
Feb 18, 2014
Messages
2,539
Location
Puyallup, WA
Well, back to working on the trailer, after a long bout of bronchitis.

So, I was working on the tail lights, and had a problem in my design. I originally was going to have them on the back, but to much chance for damage, and right on the edge for being high enough. So I'll stick them on the side ... but the side light was in the wrong place .. Dang it.

So I did some mods to the steel light boxes. Cut some walls away, covered the original hole and added a new one to the side ... and now they'll work. Going to use some PVC for the wires to run through.

Pictures are pretty explanatory ...
 

Attachments

  • TrailerLights8.jpg
    TrailerLights8.jpg
    138.7 KB · Views: 129
  • TrailerLights7.jpg
    TrailerLights7.jpg
    127.8 KB · Views: 104
  • TrailerLights6.jpg
    TrailerLights6.jpg
    86.7 KB · Views: 107
  • TrailerLights5.jpg
    TrailerLights5.jpg
    113 KB · Views: 99
  • TrailerLights4.jpg
    TrailerLights4.jpg
    93.9 KB · Views: 98
  • TrailerLights3.jpg
    TrailerLights3.jpg
    115.7 KB · Views: 105
  • TrailerLights2.jpg
    TrailerLights2.jpg
    116.9 KB · Views: 106

Yarz

Well-known member
Joined
Sep 11, 2013
Messages
121
Location
Tarentum PA
I like the new mounted position better too.

Whats with the angle?

It looks like the angled side is there so that in the original horizontal position, the round light can serve as both a side and a rear marking light.
 
OP
B

bmxdad

Well-known member
Joined
Feb 18, 2014
Messages
2,539
Location
Puyallup, WA
Yep, they are made to be used horizontally on the long access.

After replacing a master cylinder and flushing the whole brake system on a friends F150 ... I had some time to work on the trailer.

I have some square fenders, but they didn't have any sides ... ie: skirts. So I went to Interwest Metals in Fife for some sheet metal. One side of the fenders lip is flat for mounting, so I just set the bottom edge of the sheet metal up 3" from the bottom of the fender. Marked it and then cut with a plasma ... instantly bowed it, but not to bad. Found out it was the slag, and when I ground down to the edge it was flat again. I'll be stitching and hammer welding them, and they will be ready to be mounted. Mounting them so I can stand on them ... we'll see how that works later.

Almost ready for the floor, then a weigh in ... hoping for around 500lbs total.
 

Attachments

  • FenderSkirt1.jpg
    FenderSkirt1.jpg
    118.5 KB · Views: 74
  • FenderSkirt2.jpg
    FenderSkirt2.jpg
    121.6 KB · Views: 75

zmotorsports

ALLIANCE MEMBER
Joined
Oct 20, 2009
Messages
21,333
Location
Northern Utah
I mounted mine on the side as well as I much prefer them mounted there. I didn't consider them on the rear because I knew I was going to use a ramp system for loading/unloading and the lights would have interfered with them being mounted on the rear of the deck.

Coming along nicely and looking good.

Mike.
 

NUTTSGT

Super Moderator
Staff member
Joined
Sep 14, 2009
Messages
50,867
Location
Northern Central Ohio
Well, back to working on the trailer, after a long bout of bronchitis.


So I did some mods to the steel light boxes. Cut some walls away, covered the original hole and added a new one to the side ... and now they'll work. Going to use some PVC for the wires to run through.

Pictures are pretty explanatory ...

FWIW, my enclosed has steel tubing (small sections of it) sticking through the cross members. Just drill the appropraite sized hole in the crossmember and weld the tubing in place. Need need for grommets in the cross member either.


red-ryder

Active member
Joined
Sep 29, 2008
Messages
39
i added expanded metal at the bottom edge from side to side of the tongue metal to allow a storage deck... for wheel chocks w/ dog chains to each chock, plus wood to stabilize the jacking foot/ base, --(i keep a OE vehicle jack and a 4-way wrench on my expanded metal)-- yep lotsa 'stuff', but having a flat tire can be a 'hectic time', having all the 'supplies all in one place' makes tire changes much easier'.

i weld a 1 inch washer on each side of tongue to keep the safety chains out of the dirt.

this works for me...free advice/recommendations are worth exactly what you paid for them

thanx red
 

drivesitfar

Well-known member
Joined
Oct 23, 2013
Messages
35,999
Location
Pacific Northwest
BMX: you are doing a great job on this trailer that is for certain. any idea how many hours you have into building this?

the nice thing about this trailer build from my chair is that you will have a great trailer after you are done and you will have a lot more knowledge and skills to use on future projects. yes?

WELL DONE so far and keep posting all these great pictures and stories.
 
OP
B

bmxdad

Well-known member
Joined
Feb 18, 2014
Messages
2,539
Location
Puyallup, WA
Got some painting done. Just need to get the inner rails, and wait for some warmer weather to finish it up. Will be painted a John Deere green, with black siding. Still working on fender skirts before installing them, along with the lights.

Still haven't decide on the gate. Keep going back and forth between a single swing, to double, to a drop down style ... it'll come.
 

Attachments

  • trailer1.jpg
    trailer1.jpg
    122.2 KB · Views: 68
  • trailert2.jpg
    trailert2.jpg
    112.6 KB · Views: 64

uscarry45

Well-known member
Joined
Oct 21, 2012
Messages
295
As far as couplers go -- you can get weld on ones or bolt on ones. Depending on how much you use the trailer it it possible to wear it out and being able to bolt another one on is nice. However most people never will wear one out and it is simpler to build with a weld on one.
 
To avoid these ads, REGISTER NOW!
Top Bottom