I mocked the part up and tack welded it in place. I then fully welded both the cut lines and to the keyed actuator on the clutch pedal. I then put it all in place an did a trial fit. I had to drill a new hole for the push rod. I will weld up the other hole before paint. Once I deemed it acceptable I removed the bolt so someone doesn’t blow out the prefilled, pre bled line. I do have one concern, the upper intake may be damn close to hitting the clutch master cylinder. Only time will tell I guess. Fingers crossed. Thanks for looking!

You are using an out of date browser. It may not display this or other websites correctly.
You should upgrade or use an alternative browser.
You should upgrade or use an alternative browser.
66 F100 Rustomod
- Thread starter Ohmthis
- Start date

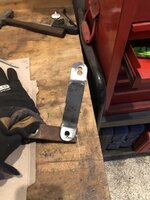
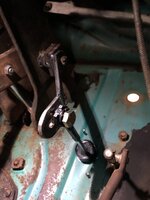

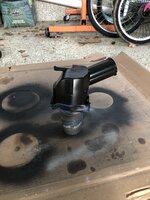
I’ve ordered my paint for the firewall and I need to button up the rest of the work on it. I used pictures to “guesstimate” the engine placement for the clutch master cylinder. Wellllll, that was a bad choice. While the work to install the master cylinder wasn’t completely wasted, I did have to drop back and punt on some things. I was worried that the upper intake and the clutch master cylinder were going to try and occupy the same space. Before I could go forward I needed to know for sure. I slapped the motor in and propped it up the correct angle with a jack. ****!!!! There is only about 1/8” of clearance  . Here are pictures.
. Here are pictures.Attachments


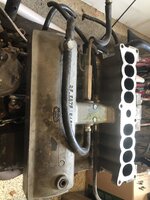
After much thinking and debate with a couple of friends, several options were on the table. One is to replace the intake with something shorter. Looking around I threw up in my mouth. Holy **** anything Foxbody has shot through the roof! I can “clock” the upper intake. Another is to move the master cylinder to the other side of the brake booster and have a ton of room. I think I have settled on “clocking the intake 180*. I remembered there was a factory Ford vehicle that had the throttle body pointing towards the driver side. BTW it’s an early 80’s LTD if anyone is interested in looking at it. With the engine on a stand I started looking at what needed to be done. The vacuum fittings needed to be reversed, the valve covers swapped and I’ll need a spacer to raise the upper intake. I can only see one issue going forward. If I ever plan an upgrade on the intake (Or engine upgrade that will need an upgrade of the intake) I’ll have to make sure that it must be able to clear the master cylinder. All of the intakes I have seen are not clockable. If anyone sees any other issue please let me know. I’m not against moving the master cylinder and I might still do that. Here are the pictures of moving parts and pieces. I had to swap the valve covers side to side. The upper intake hits the oil cap. II also swapped the vacuum fittings under the upper intake. He long one will be replaced with a single barbed fitting. I will need a spacer to lift the intake up and clear the fuel pressure regulator vacuum hose. I plan to drop the engine in again and make sure this will work for me. Thanks for looking!
Attachments
-
 8475FF44-37A9-4CF9-9558-866EAE840512.jpeg718.9 KB · Views: 62
 -
 ADBE1E64-55BE-4E84-9EE3-4F8F03E1130E.jpeg589.7 KB · Views: 62
 -
 A2E8A0B7-CE42-4EAD-A9B8-8AC7FA4D9A0E.jpeg527.4 KB · Views: 61
 -
 6C56DBA5-6714-4B82-B5B8-0D0F149D262A.jpeg637.4 KB · Views: 57
 -
 86334572-D456-49C8-B285-CC999A776D89.jpeg683.7 KB · Views: 57
 -
 6D344E5E-C931-48CB-BB60-63474F464AEB.jpeg631.8 KB · Views: 76
So, I’ve been lazy and it’s been really cold here lately (as I’m sure most of you guys in the states have been). My shop is just another bay in the attached garage. It’s fully insulated and stays mid to low 40’s when it’s 0 outside. I put on some warmer clothes and grabbed a slew of grinders. I used a coarse wire wheel, a wire cup, and a cut off wheel. I cleaned off all of the loose paint and surface rust on the firewall and sides that are covered by the fenders. I trimmed off the shifter eyes (I’m not sure what to call them, they held shift linkages) at the bottom of the steering column. I still need to weld the holes closed that won’t be used. I also have a plan to move the clutch master cylinder to the drivers side of the brake booster.
Attachments

WoodsTruck
Well-known member
- Joined
- Jan 12, 2013
- Messages
- 1,029
Do you know if that engine is speed density EFI or Mass Airflow EFI? Some of the Bronco guys, one locally, have used that engine and struggled to get the engine to perform.
It’s a mass air engine. I’m curious on the struggle. I helped a friend install a HO engine in a 86 full size Bronco. That thing would rip!Do you know if that engine is speed density EFI or Mass Airflow EFI? Some of the Bronco guys, one locally, have used that engine and struggled to get the engine to perform.
I got off of my **** and filled in the holes that won’t be used on the firewall. I cut and trimmed circles out of 16 gauge sheet metal that I had. I actually had to cut a couple twice. I had too big of a gap. I learned in the past that it’s a **** show trying to fill in gaps vs fitting the gaps first. I didn’t get in action shots. Here’s the final pics. Thanks for looking!
Attachments


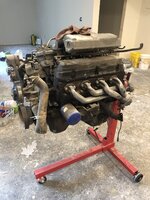
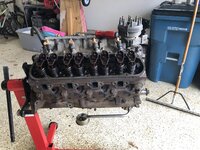
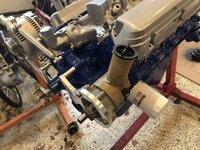
I had the intention of just cleaning the engine up and putting a good paint job on it. I have 2k paint and I wanted it done right. Well the best laid plans of mice and men I guess. I ended up tearing into the engine. I took the water pump off, then the timing cover. I am removing the lower intake and I’m looking to get it blasted with the valve covers and upper intake. Here is the engine after a good scrub. I will give it a good spray down with brake cleaner and then some reassembly before painting. Here are some pictures. Before and after.
Attachments


TimeWarpF100
Well-known member
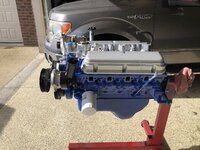
Here is the last EFI'd small block I did in a truck. 351w with a Cobra GT40 Intake
I painted engine in a base/clear


I painted engine in a base/clear
Randy, that is Gorgeous! I went back and forth with what color to paint the block and heads. I ended up choosing blue over black. I usually would use black, but this just screamed blue to me. My debate now is do I paint the water pump blue or silver??? I am using SS 2k paint over an epoxy primer. Thanks for adding in here!Here is the last EFI'd small block I did in a truck. 351w with a Cobra GT40 Intake
I painted engine in a base/clear
I’ve had my *** handed to me this winter/spring. Too many things are chewing at my **** to get done and not enough time. Ok, excuses over time to get back out in the shop. My engine is a “Good” used engine, but I’d kick myself to put lipstick on a pig and then have issues. I tore the engine down and replaced the head gaskets, timing chain and oil pump. I cleaned all of the gasket surfaces and it’s ready to get buttoned up. I’ve got the parts, I just need to do a bit more cleaning and put it back together for paint. Thanks for looking.
Attachments

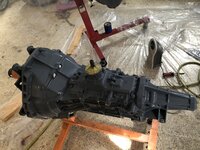
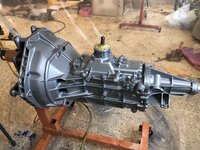
I’ve got the engine, transmission and parts cleaned and ready for paint. I ended up just scrubbing the valve covers and intakes with a mixture of super clean, small brushes, and a scotchbrite pad. I’m hoping to paint, but the weather has turned on me. We will see what I can do.
Attachments


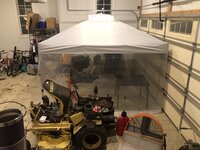
Well, the weather is pretty cool for painting, but I decided to make a booths to control the temps. I wrapped a pop up canopy in plastic. Used a fan to exhaust the overspray and added a heater to keep the metal warm. I used an epoxy primer on all of the parts. I did not do the upper intake. There is a coating of some type on it and it will have to be removed first. As easy as this was to set up, I’ll do it again for other parts later. Here is my painting setup and the parts in epoxy primer.
Attachments


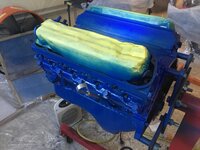
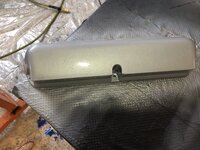
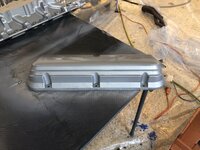
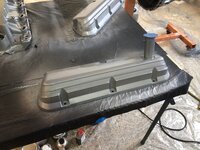
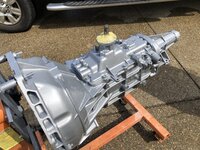
I got two coats of silver metallic Acrylic Enamel paint on the lower intake, both valve covers, and transmission. I’m happy how the intake and transmission came out. I’m not happy about the valve covers. They were really rough castings and it looks like there are sand on them. I’m not sure what I will do with them. Let me know what you think! Thanks for looking!
Attachments


rattle_snake
Well-known member
Oooh, shiny paint looks good!
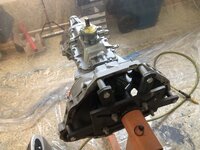
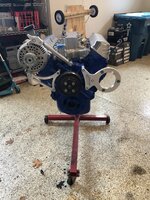
I put the accessory brackets on and the alternator. I need a couple of longer bolts, but it’s mostly ready. I’ve got a power steering pump that needs to be cleaned and potentially painted. The pulleys will all be blasted and painted semi gloss black. I need to see everything on with a belt. I’m not sure I like the bare aluminum. I’m not sure what color I’d go with though. Thanks for looking.
Attachments
Boosted1
Well-known member
Looks nice!It’s sunny out, but cool and dodgy rain. I had to mock up the combo and take it outside. I love the color combo. Thanks for looking!
sh944
ALLIANCE MEMBER
Have you thought about anodizing the bare aluminum? I love the look of yours but the untreated aluminum won’t stay looking that nice under the hood for long, I would assume.
I agree, but I don’t know if a natural color is what I want. I’ll make a decision once I get the pulleys and pump on. Thank you!Have you thought about anodizing the bare aluminum? I love the look of yours but the untreated aluminum won’t stay looking that nice under the hood for long, I would assume.
sh944
ALLIANCE MEMBER
By the way, whose brackets are you running? Those look nice!
I’ll have to go back and look. They had a polished version, but I’m not a super blingy guy. There were 2 bolts that were too short (3.5” vs 4”) and they are sending me those even though it’s been over a year since I ordered the kit.By the way, whose brackets are you running? Those look nice!
Little bit of an update here. I had cut the crossmember that holds the factory radius arms. Well, today I cut the rest out to clean everything up and get ready for finishing the front of the frame. I cut the rivets out and punched them through. I had to use a thin cutoff wheel to one rivet on each side that I couldn’t get to the other way. Here’s a picture of the X I cut and both side done.
Attachments


I cleaned up the power steering pump, it was filthy. I wish I had done a before and after. I did a mock up of it on the bracket. I will be painting the aluminum part the same silver metallic, but do I leave the reservoir the yellow plastic??? Let me know if you think I should paint it the same semi gloss as I am doing with the pulleys. Oh yeah, I blasted the pulleys and put a coat of two of semi gloss paint. Thanks for looking!
Attachments

stinkity stoink
Well-known member
I vote you paint the reservoir same as the pulleys.
TimeWarpF100
Well-known member
reservoir is white plastic. It has yellowed from age.I’m leaning that way a bunch! I’ve got to see what type of plastic it is and if I need some type of adhesion promoter. Thanks for the reply.
I suggest a new reservoir or replace pump. For best detail.
A light glass bead with fine abrasive first then hit it lightly with #4 would make aluminum look new.
Might cost a few $ but replace the pump with a new Ford unit. Complete pump with cap and hardware still avail from Ford
Good chance to use proper Ford fluid. It's then DONE no worry for a long time. Painted reservoir may look ok for a very short time.
JMHO

TimeWarpF100
Well-known member
Thanks. I think the pump matching engine color looks best. I typically buy new hardware or replate the bolts. Paint the engine then add the bolts for nicer detail. I find a good quality base clear works well but looks like you have the painted engine looking nice.Randy, that is Gorgeous! I went back and forth with what color to paint the block and heads. I ended up choosing blue over black. I usually would use black, but this just screamed blue to me. My debate now is do I paint the water pump blue or silver??? I am using SS 2k paint over an epoxy primer. Thanks for adding in here!
The last 5.0 I did for myself was in my new 1996 Ranger I bought with a 2.3 drove it 1020 miles then pulled it for a SuperCharged 5.0 Back in the day it would easily out perform a new Porsche Turbo. Sleeper for sure. I was a field adjuster for a large Insurance co at the time and with the E303 cam when I rolled up to the body shop . . .
Thank you on this! I’ve had a dozen ford vehicles with this same pump. All of them were black plastic, except this one of course. I’ll look at a new pump. I plan to head blast the distributor body as you had mentioned.reservoir is white plastic. It has yellowed from age.
I suggest a new reservoir or replace pump. For best detail.
A light glass bead with fine abrasive first then hit it lightly with #4 would make aluminum look new.
Might cost a few $ but replace the pump with a new Ford unit. Complete pump with cap and hardware still avail from Ford
Good chance to use proper Ford fluid. It's then DONE no worry for a long time. Painted reservoir may look ok for a very short time.
JMHO
Unfortunately, I’ve got to get other responsibilities done before I can get back on this project. Buuuuut, I got a couple of things done. I cleaned up the distributor and painted it with the Power Steering Pump. I may have wasted my time with painting the Power Steering Pump, but I need to know how it looked Black with the brackets. The black of the pulleys really calm down the aluminum of the brackets. Here’s some engine candy to look at until I can get back on it. As always, thanks for looking guys!
Attachments


Father’s Day came and I got the opportunity to do anything I wanted to. I chose to “play” in the garage on my truck. When I bought my CV kit, I didn’t really like the part for the rear bushing of the LCA. I went on a search and found these by Range Industries. They bolt on and have supplied shims for geometric adjustability.
Attachments


I unbolted the CV front end and cleaned the surface rust off of the frame from the cab forward. I mixed up some Zero Rust with SPI medium reducer and TP Tools synthetic hardener to paint with. A couple of coats and it was ready to be reassembled. I’ve almost got caught up with Honey Do list and the summer craze with broken AC. My next plan, is to assemble the drivetrain and install it in the chassis. Thanks for looking.
Attachments


Jetfixr320
Well-known member
- Joined
- Nov 21, 2013
- Messages
- 182
If you are using the 91 mustang engine wiring harness. I have a zip file of information. do's and dont's, how to thin it out etc.
I was givin the file from a Guy on FordMuscle years ago. I used the information to put a Mustang EFI 302 in a Mercury XR4ti.
I also have a 66 F100 with CV IFS 5.0 efi.
I was givin the file from a Guy on FordMuscle years ago. I used the information to put a Mustang EFI 302 in a Mercury XR4ti.
I also have a 66 F100 with CV IFS 5.0 efi.
Thank you for the reply. I made a YouTube series on thinning the factory harness and building it to used as a stand alone harness. I’ll send you a PM with an email. I’d like the info, I have people reach out all of the time with questions on my videos. Lots of time I need to go back and research some of the combinations they have.If you are using the 91 mustang engine wiring harness. I have a zip file of information. do's and dont's, how to thin it out etc.
I was givin the file from a Guy on FordMuscle years ago. I used the information to put a Mustang EFI 302 in a Mercury XR4ti.
I also have a 66 F100 with CV IFS 5.0 efi.
jhn9840
Well-known member
Just wondering if you have a link to your YouTube channel?
jhn9840
John
jhn9840
John