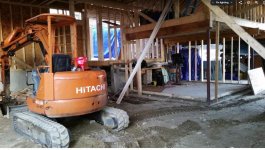
As of today the framing is almost completed. Still have a few interior walls to do along with fire blocking and blocking for trim work. Siding is all stained and should be installed within the next few weeks. Radiant heat is installed in the slab. Roof is shingled but that is a whole story in itself to be told at a later date. In short the shingles were not properly installed and had to be stripped and re-shingled. 32 squares. This delayed me about 9 months. I did hire a framer to do the shell, windows, doors and the roof. With a mutual understanding the work was not completed and we parted ways.


You are using an out of date browser. It may not display this or other websites correctly.
You should upgrade or use an alternative browser.
You should upgrade or use an alternative browser.
69 GP Garage Addition
- Thread starter 69gp
- Start date
CarmelitaYoung
Member
Looks like it will be a nice garage.
orangeblood
Well-known member
regarding that Grand Prix....when you finish your garage build, sure would love to hear the story behind 455 Ram Air IV!
engineer2
Well-known member
A 455 with RAIV heads is gonna need race gas, but would be a blast to drive.
regarding that Grand Prix....when you finish your garage build, sure would love to hear the story behind 455 Ram Air IV!
Well here we go. I had a 69 GP after I got out of HS and loved the car. Bought it for $500 from a friend. Car got totaled not my fault. Fast forward to 1999 and I was looking for a 55 Chevy. Was on ebay and seen the grand prix that I know have. There was only one picture and that was of the rear of the car. After seeing that I was determined to buy it. Original AZ car. The 455 with the ram air 4 heads was not original to the car. I enjoyed the car driving on the street but also went to the track. After a few to many runs the engine blew and came out of the oil pan. Was not a good night. But I did contribute to the night of fire event. The only thing that was saved were the heads, manifold and the carb. Was not sure what I was going to do.. Use to get made fun of at the track for having a big boat. Comments from the tower were you could land and takeoff planes on that hood. So I decided I would make the boat fly. I have since installed a Shafiroff 555 that is now upgraded to 582 CI. Dyno was 982 on the crank. And yes at 4100 lbs I run in the 9s.
As for the Ram air 4 heads they will be put to good use. I bought my wife a 70 GTO and have already got the motor together with the heads to put in her car. And yes she wants a standard transmission.
I was using 110 octane as there were a few stations near me that sold it. And yes real fun to drive. The new setup will be low compression and will run on pump gas. Motor is already done and will be going in my wife's car a 70 GTOA 455 with RAIV heads is gonna need race gas, but would be a blast to drive.
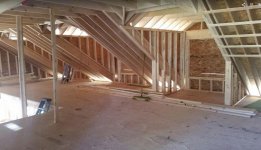
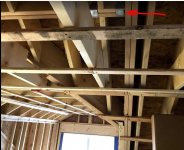
just a few pics of roof and dormer framing.
Attachments
-
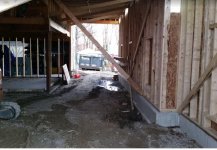
 Roof framing over the new family room connector to the garage.jpg121.7 KB · Views: 21
 -
 2nd fl above garage looking south towards the lower area.jpg110.9 KB · Views: 20
 -
 lower room above garage looking north towards the upper room.jpg133.8 KB · Views: 18
 -
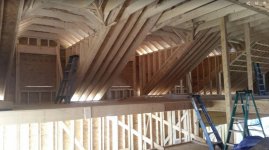 dormer framing.jpg131.6 KB · Views: 26
 -
 dormer framing as seen from the upper room above the garage.jpg145.6 KB · Views: 21
 -
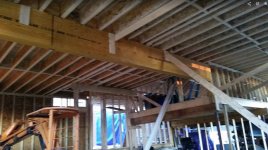 4ply 24 inch high LVL heavyyyyy.jpg148 KB · Views: 20
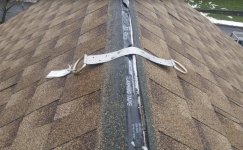
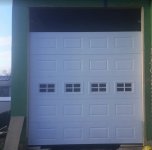
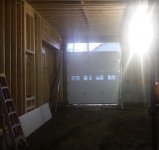
few photos from the inside of the garage, finish nails drive to far into the trim work and of the zip tap not properly installed on the roof.
On the finish nails on the trim boards it looks like they used a machine gun. about 40 lin feet of trim board with nail holes over a 1/4" deep. Looks like ****. As for the Zip Tape everyone just put the tape on and run their hand over the tape to secure it to the decking. This is not to the manufactures requirement of either using their dispensing tool or rolling the tape. If not done properly it voids the warranty. This was the start of the falling out with the contractor.
On the finish nails on the trim boards it looks like they used a machine gun. about 40 lin feet of trim board with nail holes over a 1/4" deep. Looks like ****. As for the Zip Tape everyone just put the tape on and run their hand over the tape to secure it to the decking. This is not to the manufactures requirement of either using their dispensing tool or rolling the tape. If not done properly it voids the warranty. This was the start of the falling out with the contractor.
Attachments


engineer2
Well-known member
Joist hanger should be one over. It isn't holding anything up where it's at.
engineer2
Well-known member
Looks like you cleaned out a lumber yard for your project. Looks nice!

Pressingonward
Well-known member
That's quite a project! Looking good so far
Well these pictures show the start of bad situation dealing with the roof and dealing with the contractor.
To start with I wanted to use my own roofer as he does great work. Told the contractor that I wanted to use him and would pay the difference between what the contactor carried and what my roofer was charging. Contractor stated that in order to warranty the project he had to use his subcontractor. As soon as they started laying shingles i knew we were going to have problems.
First off in this area you need to run ice and water shield up 6', they only wanted to go 3'. Plus on all south facing roofs I wanted full Ice and Water for future solar added to my current system. If I was not involved in construction and was just an average homeowner these guys would have gotten away with screwing me.
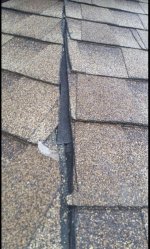
When I first got up on the roof I seen where there was a small angle or hip in the roof that was not properly shingled. Contractor just butted the singles together and left an open seem. Enough to get my blood boiling.
The picture with the red arrow indicates where the main roof of the garage is pitching down toward the peak of the roof over the family room. The peak of the family room is at a right angle to the main garage roof.
The killer for me was I supplied 5 tie offs to be installed under the ridge cap. These were supplied with stainless steel nails and was to be secured to the rafters. These dopes just used 3 nails and only went through the roof decking. If the ridge cap was not installed I would not have have seen this dangerous condition.
Although the contractor had more excuses then leaves on a 70' oak tree in the middle of the summer all items found to be defective at this time were corrected. I did make it clear to the contractor that he needs to be onsite more than what he has been.
I will be bringing up more roofing troubles further in as I am trying to keep the build in order and not jump around.
To start with I wanted to use my own roofer as he does great work. Told the contractor that I wanted to use him and would pay the difference between what the contactor carried and what my roofer was charging. Contractor stated that in order to warranty the project he had to use his subcontractor. As soon as they started laying shingles i knew we were going to have problems.
First off in this area you need to run ice and water shield up 6', they only wanted to go 3'. Plus on all south facing roofs I wanted full Ice and Water for future solar added to my current system. If I was not involved in construction and was just an average homeowner these guys would have gotten away with screwing me.
When I first got up on the roof I seen where there was a small angle or hip in the roof that was not properly shingled. Contractor just butted the singles together and left an open seem. Enough to get my blood boiling.
The picture with the red arrow indicates where the main roof of the garage is pitching down toward the peak of the roof over the family room. The peak of the family room is at a right angle to the main garage roof.
The killer for me was I supplied 5 tie offs to be installed under the ridge cap. These were supplied with stainless steel nails and was to be secured to the rafters. These dopes just used 3 nails and only went through the roof decking. If the ridge cap was not installed I would not have have seen this dangerous condition.
Although the contractor had more excuses then leaves on a 70' oak tree in the middle of the summer all items found to be defective at this time were corrected. I did make it clear to the contractor that he needs to be onsite more than what he has been.
I will be bringing up more roofing troubles further in as I am trying to keep the build in order and not jump around.
Attachments


That's quite a project! Looking good so far
Thanks lots more to come
andyvh1959
Well-known member
Wow, that shoddy shingling work is why I prefer to always do my own work whenever i can. Bad enough too that aside from doing an incorrect ridge, they did that crappy too yet. Either the worker had no idea to apply shingles properly to a ridge, or just didn't care. I'm guessing the second as any roofer can look at any roof and clearly see the cut shingles bent over the ridge and nailed down, often with sealant under the ridge shingles.
Wow, that shoddy shingling work is why I prefer to always do my own work whenever i can. Bad enough too that aside from doing an incorrect ridge, they did that crappy too yet. Either the worker had no idea to apply shingles properly to a ridge, or just didn't care. I'm guessing the second as any roofer can look at any roof and clearly see the cut shingles bent over the ridge and nailed down, often with sealant under the ridge shingles.
The picture with the tie off bracket is missing the ridge cap. Its a good thing that that was not installed as I would have assumed that the bracket was properly installed. There is still zip tape covering the ridge vent opening that has yet to be removed. As for the rest of the work just plain bad.
This was a good size roof 32 squares with 4 dormers and returns on all the rake ends. 7.5 pitch. A little to much for me to do with my work schedule.