To avoid these ads, REGISTER NOW!

7 x 18 utility trailer.

OP
K

koditten

Well-known member
Joined
Apr 10, 2008
Messages
5,528
Location
Midland, Michigan
I had to make a brace to mount my junction box.

I use romex clamps to keep the wires secure. I may not look pretty, but so far it is the best I've found. I like to keep things accessable. We live in Michigan, so the wireing takes a beating. Going this way makis it easy for the next person to wire the trailer if it ever comes to that.

KO
 

Attachments

  • DSCN1031.JPG
    DSCN1031.JPG
    143.2 KB · Views: 268
  • DSCN1034.JPG
    DSCN1034.JPG
    145.9 KB · Views: 232
  • DSCN1035.JPG
    DSCN1035.JPG
    146.3 KB · Views: 266
To avoid these ads, REGISTER NOW!
OP
K

koditten

Well-known member
Joined
Apr 10, 2008
Messages
5,528
Location
Midland, Michigan
I like to solder all my connection. I add a coat of plain old roofing tar then wire nut the connections. I've found nothing better to combat the **** that Mother Nature can dish out here in Michigan. I'm sure there are better options, but I know nothing can come in close to the cheap price I have involved.

The can in the picture hs been in use for over 10 years. It goes a long ways.
 

Attachments

  • DSCN1040.JPG
    DSCN1040.JPG
    144.3 KB · Views: 254
  • DSCN1039.jpg
    DSCN1039.jpg
    105.6 KB · Views: 275
  • DSCN1038.jpg
    DSCN1038.jpg
    109.3 KB · Views: 251
  • DSCN1037.JPG
    DSCN1037.JPG
    145.6 KB · Views: 264
OP
K

koditten

Well-known member
Joined
Apr 10, 2008
Messages
5,528
Location
Midland, Michigan
This is a couple of pics from last night. We just got done coating it. I used Rustolium Truck Bed coating to paint the entire trailer. First time for me, but I am very impressed with the stuff. I did some test scratches this morning and could not scratch this stuff. It is an epoxy after all.

The only drawback was the smell. Pretty bad chemical smell. Even with resperators we had to pen the doors. It got kind of chilly after a bit, but at least the smell wasn't too bad with the overhead doors open.

This is my last pic post. I plan on decking the thing next Tuesday. I'll have some final pics on Wednesday night.

Thanks for following along.

KO
 

Attachments

  • DSCN1041.jpg
    DSCN1041.jpg
    122.3 KB · Views: 273
  • DSCN1042.jpg
    DSCN1042.jpg
    116.3 KB · Views: 255

Outlander

Well-known member
Joined
Jul 30, 2010
Messages
5,154
Location
Quebec, Canada
Once again a thouroughly enjoyable thread. I like the wiring box idea and as we have lots of slop on the roads here in Quebec we rewire our trailers often.

Keep up the good work, and keep up the good posts.
 
OP
K

koditten

Well-known member
Joined
Apr 10, 2008
Messages
5,528
Location
Midland, Michigan
Here we have a few pics of the decking going down. The trailer is starting to take shape.

KO
 

Attachments

  • DSCN1030.jpg
    DSCN1030.jpg
    116.9 KB · Views: 304
  • DSCN0929.JPG
    DSCN0929.JPG
    136.5 KB · Views: 67
  • DSCN0928.JPG
    DSCN0928.JPG
    143.3 KB · Views: 84
OP
K

koditten

Well-known member
Joined
Apr 10, 2008
Messages
5,528
Location
Midland, Michigan
Lets try this again. Hopefully I got my pics in order.

KO
 

Attachments

  • DSCN1028.jpg
    DSCN1028.jpg
    127.5 KB · Views: 318
  • DSCN1029.jpg
    DSCN1029.jpg
    141.7 KB · Views: 318
  • DSCN1030.jpg
    DSCN1030.jpg
    116.9 KB · Views: 249
OP
K

koditten

Well-known member
Joined
Apr 10, 2008
Messages
5,528
Location
Midland, Michigan
This is the final product. I'll try to take some daylight pictures this weekend. I won't be home during daylight hours 'til this weekend.

Thanks for watching along.

KO
 

Attachments

  • DSCN1031.JPG
    DSCN1031.JPG
    142.2 KB · Views: 250
  • DSCN1032.JPG
    DSCN1032.JPG
    146 KB · Views: 239

tomshep

Well-known member
Joined
Sep 24, 2011
Messages
441
Nice build.

Kudos to you for building a fender that can hold some weight. I have had experience with light fenders and people just stand on them thinking they can support the weight. Last trailer I had built they put some heavy steel diamond plate fenders on. Those you could stand on.

The next wiring job I do (thanks to my **** head dogs) is going to be inside plastic pipe. That way it is protected, cheap and easy to work with. I can clamp the pipe to the inside of the frame and drill holes for clamps. I can use j-boxes at the front and axles to split wiring for brakes and rear lights. I know you build on a budget but I am tired of exposed wiring.

Enjoyed the thread.

Tom
 

Motofixxer

Well-known member
Joined
Oct 10, 2009
Messages
681
I also solder my wire connections. You can use that brushable electrical dip stuff to help seal the connections. Some dielectric grease in the bulb sockets and plug keeps the wiring going for a long time.
 

NWOhioChevyGuy

Well-known member
Joined
Feb 20, 2007
Messages
1,924
Location
Buckeye Hill (Morenci, MI)
Another quick question; You have inspired me to build my own trailer, so I'm in the design phase right now. I am looking to make a 7'x14' utility very similar to this one with a single 5200 lb axle. I want to have the side and rear load option for ATV's however don't want the large ramp / gates due to wind resistance. Have you ever done one with a matching rear gate and side gate so that they can be used as loading ramps together?

Thinking 2' high sides so the gates would be 2' x 7' and constructed so they are matching and could be utilized as ramps together.

Thoughts? Idea's
 

akdiesel

Well-known member
Joined
Aug 8, 2008
Messages
2,617
Location
Wasilla, AK
KO

Great looking trailer. You mentioned that the junction box was the best you could find but what about the plastic ABS junction boxes? No prepunched holes and can seal up tight.
 

Motofixxer

Well-known member
Joined
Oct 10, 2009
Messages
681
Another quick question; You have inspired me to build my own trailer, so I'm in the design phase right now. I am looking to make a 7'x14' utility very similar to this one with a single 5200 lb axle. I want to have the side and rear load option for ATV's however don't want the large ramp / gates due to wind resistance. Have you ever done one with a matching rear gate and side gate so that they can be used as loading ramps together?

Thinking 2' high sides so the gates would be 2' x 7' and constructed so they are matching and could be utilized as ramps together.

Thoughts? Idea's


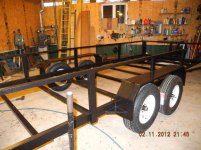
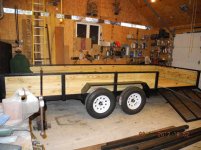
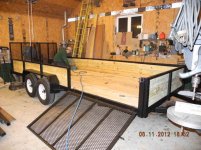
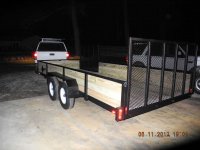
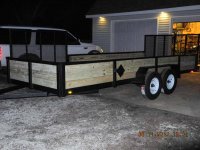
I bought a 7x12 that has that setup, I think it's great. Below is a pic of the sides. One on each side makes for a convenient setup. I hauled it around TN with my ATV in the front and 2 cycles behind. I just unloaded whatever I wanted to ride without extra effort, worked out perfect.

My other option was a trailer with the fold down rear ramp and same sides, or fold down ramps on rear and one side. I opted for this one with no fold downs.

It was built by http://www.terrystrailers.com/

Check out the pics of the motorcycle trailers. There is a rear ramp that is folded in the middle horizontally so the ramp is lower profile, it's a nice setup.

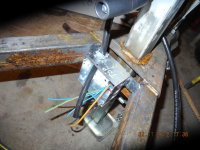
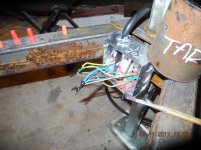
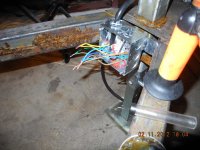
Last year I did have to replace the untreated decking cuz it was rotting through, but it's been outside a few years and the black painted 2x6 hid the damage. I used the opportunity to add some extra angle iron to the frame underneath also giving more support for the decking and keeping it all nice and flat.
 

Attachments

  • 100_4276.jpg
    100_4276.jpg
    156.5 KB · Views: 169
Last edited:
OP
K

koditten

Well-known member
Joined
Apr 10, 2008
Messages
5,528
Location
Midland, Michigan
Another quick question; You have inspired me to build my own trailer, so I'm in the design phase right now. I am looking to make a 7'x14' utility very similar to this one with a single 5200 lb axle. I want to have the side and rear load option for ATV's however don't want the large ramp / gates due to wind resistance. Have you ever done one with a matching rear gate and side gate so that they can be used as loading ramps together?

Thinking 2' high sides so the gates would be 2' x 7' and constructed so they are matching and could be utilized as ramps together.

Thoughts? Idea's

I usually just make the customer a pair of bi-fold gates. The gates are the same height as the sides so wind resistance is reduced and you have the ease of a full length ramp gate when needed.

There is no law that says what you have to do. Nothing as satisfying as designing it and building it yourself and it works. good feeling there.

KO.
 

NWOhioChevyGuy

Well-known member
Joined
Feb 20, 2007
Messages
1,924
Location
Buckeye Hill (Morenci, MI)
I think I will work on the side gate / ramp design and see how it lays out.

How much does the top/side rails add to structure/strength? Would I want to double up the bottom (main frame) tubing in front of the axle if the top rail/sides are not the full side?

I want to build it right from the start to last, spending a couple extra $ up front will not scare me from the upgrades.
 
OP
K

koditten

Well-known member
Joined
Apr 10, 2008
Messages
5,528
Location
Midland, Michigan
The top rail makes the trailers more rigid. You just need to take into account what you will be hauling. Car haulers in general don't have a top rail. You will lose a small amount of rigidity, but the extra trailer gate will make it worth the trade off.

The way I build my side gate allows the gate itself to be part of the side. The only time you lose the rigity is when the gate is down.

What were you planning on using for the frame? I think you would be fine using 2 x 4 1/8" wall tube. 3/16 if you wanted to be sure.

Keep us posted on the build.

Later
Kirk
 

er3456df

Well-known member
Joined
Dec 1, 2009
Messages
230
Nice job! One question- You said earlier "Since this trailer has 5/4 decking, the tongue doesn't touch the rails".

I can't figure out what this means. Can you snap a pic of what you're talking about?
 
OP
K

koditten

Well-known member
Joined
Apr 10, 2008
Messages
5,528
Location
Midland, Michigan
Here is the safety chains welded to the tongue. I don't know what thickness they are, but they are pretty stout. It's cheaper to buy the hooks and chain seperate, so that what I do.

The next is some extra bracing I made for the tongue/frame. Because this trailer will have 5/4" lumber, the tongues do not contact the cross members. I bridged this gap with some scrap pieces of angle. This was the leftover cross member steel I had to cut down. I try not to waste anything.

KO

in the 3rd pic you can see the chuncks of angle iron that I used to connect the tongue to the cross member. Because the deck on this trailer is only 1" or so,the cross members are actually raised up 1/2". This way the frame sides and ends are the same height as the wood deck. When I use 2"lumber the cross members are lowered 1/2" and that makes it so the tongue angles will contact the cross members. It gives you multple points to weld the tongue to the frame. Makes the trailer stronger over all.

Hopefully I was able to explain myself clearly. Thanks for the interest. always a pleasure helping out were I can.

KO
 
To avoid these ads, REGISTER NOW!
OP
K

koditten

Well-known member
Joined
Apr 10, 2008
Messages
5,528
Location
Midland, Michigan
Well, ****! Thie pics didn't get included with my post. Hopefully you can go back to page 2 and see what I was talking about.

Sorry about that. I'm a better welder than thread poster.

KO
 

theoldwizard1

Well-known member
Joined
Feb 22, 2011
Messages
43,109
Location
SE MI
I like to solder all my connection. I add a coat of plain old roofing tar then wire nut the connections. I've found nothing better to combat the **** that Mother Nature can dish out here in Michigan.
Actually that is a pretty good solution ! You could use a generous amount of silicon dielectric grease in the wire nut. Easier to clean off if you do ever have to open that splice.

I doubt you will change your methodology, but here are 2 alternatives.


  • Make your splices with "inline" twists and then cover with "friction" tape, like 3M 1755 or 3407na. Minimum of 2 twists of bare wire. Minimum if 4 wraps of tape. This is what the auto industry has been using for years.
  • Make your splices "inline" twists as above and use "marine" heat shrink tubing.


I don't know how much single conductor wire you use, or it your are using pre-fabbed harnesses, but consider switching to pre-tinned (sometimes called marine) wire. The individual strands of copper are coated with tin before they are twisted into the appropriate number to make of your gauge. Tin will not react with moisture, ever, unlike copper. It is easier to solder also.
 
Last edited:
OP
K

koditten

Well-known member
Joined
Apr 10, 2008
Messages
5,528
Location
Midland, Michigan
Good info on the marine wire. I did not know that. Depending on the price, it sounds like a good alternative.

Thanks

Kirk
 

02RedWS6TA

Member
Joined
Dec 9, 2007
Messages
15
Location
Michigan
Here is the safety chains welded to the tongue. I don't know what thickness they are, but they are pretty stout. It's cheaper to buy the hooks and chain seperate, so that what I do.

The next is some extra bracing I made for the tongue/frame. Because this trailer will have 5/4" lumber, the tongues do not contact the cross members. I bridged this gap with some scrap pieces of angle. This was the leftover cross member steel I had to cut down. I try not to waste anything.

KO

Just an FYI it's illegal and dangerous to attach the safety chains like that. They either need to be bolted (the best way, grade 8 bolts/nuts/washers) or attached to something (cold rolled steel) that is welded to the frame. The chains themselves CAN NOT be welded directly to the frame.
 

kald

Well-known member
Joined
Mar 31, 2012
Messages
671
Location
Central Fl
Nice! Where fo you get your axles and tires at. I was thinking of building a welding trialer but the cost of the axles and tires if crazy nowadays.
 

CNGsaves

Well-known member
Joined
Sep 26, 2012
Messages
13,233
Location
KS and OK
Great trailer build that's much more durable than "store bought" for sure.

I like the picture of you standing on the fender. You won't have to put that ridiculous sticker saying "Not A Step" on either of your fenders!!

Curious what your total cost has totalled up on this build? Was the wood treated lumber and/or did you also finish the wood in any way to prolong it's life? Also, what is the diamond shaped steel attached for on driver's side about halfway back?

Finally, how does it pull . . . anything you would do different?
 
OP
K

koditten

Well-known member
Joined
Apr 10, 2008
Messages
5,528
Location
Midland, Michigan
I get the axles from Johnsons Surples. They are near the boarder of Michigan ande Indiana.. An idler axle cost about 100 bucks and a breaked axle cost 135 bucks. seems to be the best price I can find.

The dimond shaped bracket is for a spare tire. Hope this helped.

Later

KO
 
OP
K

koditten

Well-known member
Joined
Apr 10, 2008
Messages
5,528
Location
Midland, Michigan
I have about 1700 bucks in this trailer. It is hard to keep track of exactly what it cost. I figure I build these things for about 6-7 bucks an hour. I enjoy building them more than needing to turn a profit. This is my hobby, nobody can tell me I take too long to build or that I drink too much beer:)

P.S. don't let it out what I have in materials.

Thanks, again

KO
 
OP
K

koditten

Well-known member
Joined
Apr 10, 2008
Messages
5,528
Location
Midland, Michigan
I can't answer how it pulls. I have built similar trailers and they pull great. These are utility trailers, so how it pulls empty will be totally different then when they are loaded. You just have to position the load to promote the best pull. This is were experience will pay off. I try to build the trailers so that they will pull ok empty, but that is not my main idea. I have to do some sort of compromise to make it workfor both applications.

A trailer that pulls empty does not mean it will pull good loaded. You just need to load iot properly.

Later

KO
 

bowanna03

Well-known member
Joined
Mar 2, 2009
Messages
111
Great work man! I wished I had the talent to do something that nice! Great work!!!!
 

KLP28

New member
Joined
Jan 2, 2012
Messages
1
If you notice the spring bolts, you can see they are shoulder bolts. This is to prevent the bolts from being over tightened. I don't like using these, but they do serve a purpose. Years ago I over tightened a bolt on the shackle end. The bolts were so tight, the spring could not flex. It actually ripped the hanger off the bottom of the trailer frame. I was left with a 2" x 4" hole in the frame that had to be repaired.


Tighten up the rest of the bolts and don't forget to loosen the pivolt bolt on the equalizer. 1-2 turns on the nut is fine.

You will notice on one of the pics that there is a gap between bolt head and hanger. Because of these shoulder bolts, this is as tight as you can get them. To me it looks like I forgot to tighten the bolts.

KO

The shoulder bolts are designed to be tightened flush to the shackle. Then you back off the nut a couple of turns. Its supposed to prevent bolt from turning inside the shackle to prevent wallowing out the shackle. This is how I was told to use them from a trailer manufactorer. I use a 1/2 air impact gun on the nut side to pull the bolt all the way. Hold the bolt with a wrench , dont let it spin.

Nice build!!!
 
OP
K

koditten

Well-known member
Joined
Apr 10, 2008
Messages
5,528
Location
Midland, Michigan
I don't agree. The bolt shaft is 9/16", holes in the springs, shackels, links, hangers and equalizers are all 9/16" The nut on the bolt is much smaller.

KO
 

porschedude996TT

Well-known member
Joined
Oct 28, 2007
Messages
2,384
Location
Santa Maria, California
I never built a trailer and your work looks great. Just a point of interest, the camber on the axles is positive, or in an outboard direction from the top. This seems opposite to me and has me scratching my head....Please explain.

I have an old surplused rental single axle aluminum frame box trailer that I am going to convert to a tandem with a dump bed.
 

aka Larry

Well-known member
Joined
May 2, 2012
Messages
8,026
Location
Eastern, NC
Just an FYI it's illegal and dangerous to attach the safety chains like that. They either need to be bolted (the best way, grade 8 bolts/nuts/washers) or attached to something (cold rolled steel) that is welded to the frame. The chains themselves CAN NOT be welded directly to the frame.

Care to share why? Where did you get this information?
 
To avoid these ads, REGISTER NOW!
Top Bottom