To avoid these ads, REGISTER NOW!

72'x60'x16' "Shouse"

OP
T

tmaas21

Well-known member
Joined
Oct 31, 2014
Messages
100
Location
Nebraska
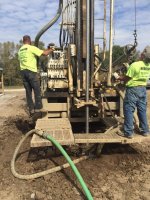
Did the bob cat screw the anchors in the ground?

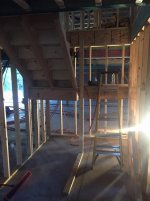
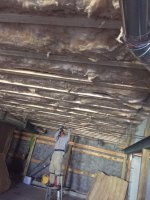
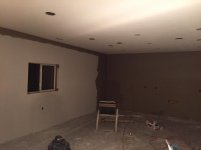
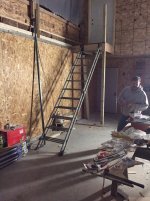
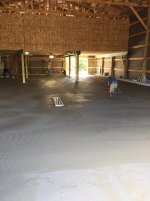
I used the Bobcat to drill holes with a slightly larger diameter than the augers used for the anchors. Once drilled, I placed the anchors in the floor, leveled them to the correct height of the pour, and filled the holes with concrete. The pics don't show it, but I also welded on random angle iron from the square tubing on the anchors, in order to get even more "bite".

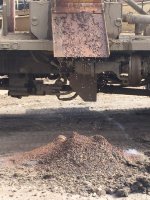
Reason for using the augers at the bottom was to gain surface area to bite to. Had a buddy do the same thing, only with a disc blade at the bottom. Figured this had to be as good, if not better.

Just don't want to pull them out of the ground.

Once set, but before pour, I had a Tulsa welding grad out to QC the anchors and do a little more stick welding on them, just to make me feel better.
 
To avoid these ads, REGISTER NOW!
OP
T

tmaas21

Well-known member
Joined
Oct 31, 2014
Messages
100
Location
Nebraska
For in floor anchors, we took 3" pipe, cut it the thickness of the concrete, and drilled A hole through the center and put a 5' length of 5/8" rebar through it, duct taped the top and placed where we wanted them. Later we had 1/8" steel circles cut then welded 1/2" of 2 1/2" pipe to bottom as a cover. They fit nice and flat and you remove covers with a magnet. A 5/16 transport slip hook will go in easily to hook to rebar

Ya know...I thought about capping off my D Rings at the top. Would have been really nice.

I like your idea. Seems really slick.

In honesty, if I would have had all day to sit there and set the anchors myself, they would be capped. But I had a friend helping while I was at work, and didn't want my concrete crew to mess things up....so I went with this simpler plan.
 
OP
T

tmaas21

Well-known member
Joined
Oct 31, 2014
Messages
100
Location
Nebraska
And.....the day has finally come to pour the floor. Was supposed to do it Monday morning, and they realized that they didn't have any will-calls set up. So they waited until Tuesday morning, after an inch of rain Monday night. Buggied the entire pour. LOL.
 

Attachments

  • IMG_0891.jpg
    IMG_0891.jpg
    146.6 KB · Views: 428
  • IMG_0894.jpg
    IMG_0894.jpg
    130.5 KB · Views: 454
  • IMG_0895.jpg
    IMG_0895.jpg
    127.3 KB · Views: 461
  • IMG_0896.jpg
    IMG_0896.jpg
    126 KB · Views: 428
  • IMG_0898.jpg
    IMG_0898.jpg
    112.8 KB · Views: 436
OP
T

tmaas21

Well-known member
Joined
Oct 31, 2014
Messages
100
Location
Nebraska
Trying to wrap up the framing on the first level. Finally tackled the staircase, now that the floor is poured. Will be nice to not have to use a ladder ;)
 

Attachments

  • IMG_0923.jpg
    IMG_0923.jpg
    141.9 KB · Views: 314
  • IMG_0922.jpg
    IMG_0922.jpg
    139.6 KB · Views: 296
  • IMG_0914.jpg
    IMG_0914.jpg
    133.4 KB · Views: 289
  • IMG_0913.jpg
    IMG_0913.jpg
    129.6 KB · Views: 291
  • IMG_0912.jpg
    IMG_0912.jpg
    113.6 KB · Views: 298

QUIKSVT

Well-known member
Joined
Sep 8, 2007
Messages
88
Location
Hilliard, OH
Getting rolling on the HVAC. Decided to go with Geothermal. With being all electric, I think it was the right move. Don't know if it would be possible to control monthly costs without it.

You'll love the geothermal. We put it in our new build and I'm loving it.
 
OP
T

tmaas21

Well-known member
Joined
Oct 31, 2014
Messages
100
Location
Nebraska
Porch is poured! Garage doors are installed.
 

Attachments

  • IMG_0916.jpg
    IMG_0916.jpg
    134.7 KB · Views: 381
  • IMG_0924.jpg
    IMG_0924.jpg
    140.3 KB · Views: 386
  • IMG_0921.jpg
    IMG_0921.jpg
    127.2 KB · Views: 387
  • IMG_0928.jpg
    IMG_0928.jpg
    118.4 KB · Views: 362
OP
T

tmaas21

Well-known member
Joined
Oct 31, 2014
Messages
100
Location
Nebraska
The drilling rig showed up to drill the holes for the 4 loops of geothermal plumbing. Pretty interesting to watch -- especially the underground boring around the footings and into my geo unit.
 

Attachments

  • IMG_0934.jpg
    IMG_0934.jpg
    142.4 KB · Views: 287
  • IMG_0933.jpg
    IMG_0933.jpg
    149 KB · Views: 289
  • IMG_0932.jpg
    IMG_0932.jpg
    144.9 KB · Views: 293
  • IMG_0931.jpg
    IMG_0931.jpg
    155.6 KB · Views: 297
  • IMG_0930.jpg
    IMG_0930.jpg
    152.6 KB · Views: 289
OP
T

tmaas21

Well-known member
Joined
Oct 31, 2014
Messages
100
Location
Nebraska
Some additional pics....some important items going in! LOL.
 

Attachments

  • IMG_0960.jpg
    IMG_0960.jpg
    130.9 KB · Views: 325
  • IMG_0961.jpg
    IMG_0961.jpg
    141.6 KB · Views: 290
  • IMG_0962.jpg
    IMG_0962.jpg
    99.1 KB · Views: 344
  • IMG_0966.jpg
    IMG_0966.jpg
    95.2 KB · Views: 296
  • IMG_0976.jpg
    IMG_0976.jpg
    108 KB · Views: 310
  • IMG_0959.jpg
    IMG_0959.jpg
    140.2 KB · Views: 294
OP
T

tmaas21

Well-known member
Joined
Oct 31, 2014
Messages
100
Location
Nebraska
Continued work on the interior. Trying to be diligent in installing vapor barriers between the shop portion and the living space.

Also -- continued work on getting the pex manifold finished up.
 

Attachments

  • IMG_0947.jpg
    IMG_0947.jpg
    129.6 KB · Views: 293
  • IMG_0948.jpg
    IMG_0948.jpg
    115.1 KB · Views: 285
  • IMG_0949.jpg
    IMG_0949.jpg
    146.3 KB · Views: 282
  • IMG_0955.jpg
    IMG_0955.jpg
    145 KB · Views: 373
  • IMG_0956.jpg
    IMG_0956.jpg
    132.4 KB · Views: 373
OP
T

tmaas21

Well-known member
Joined
Oct 31, 2014
Messages
100
Location
Nebraska
Been about a month since the last post, but lots has happened....
Insulation guys came out to the do the exterior walls....
 

Attachments

  • IMG_0975.jpg
    IMG_0975.jpg
    143.9 KB · Views: 265
  • IMG_0974.jpg
    IMG_0974.jpg
    130.4 KB · Views: 265
  • IMG_0972.jpg
    IMG_0972.jpg
    111.5 KB · Views: 260
  • IMG_0970.jpg
    IMG_0970.jpg
    93.3 KB · Views: 281
  • IMG_0969.jpg
    IMG_0969.jpg
    129.1 KB · Views: 271
OP
T

tmaas21

Well-known member
Joined
Oct 31, 2014
Messages
100
Location
Nebraska
And the drywallers showed up....
 

Attachments

  • IMG_1030.jpg
    IMG_1030.jpg
    78.1 KB · Views: 254
  • IMG_1024.jpg
    IMG_1024.jpg
    116.1 KB · Views: 291
  • IMG_1025.jpg
    IMG_1025.jpg
    109 KB · Views: 280
  • IMG_1026.jpg
    IMG_1026.jpg
    121 KB · Views: 299
  • IMG_1029.jpg
    IMG_1029.jpg
    101.9 KB · Views: 261
OP
T

tmaas21

Well-known member
Joined
Oct 31, 2014
Messages
100
Location
Nebraska
Another rookie "live and learn" mistake. Forgot to inform the drywall crew that the cement floor was in fact going to be my finished floor. Did not cover it, and it was a complete mess. Nobody's fault other than my own. Been working to clean it.....have at least 20 hours into it so far.

That said...it's coming along nicely. Working to get some paint in on the first level so that cabinets can start to go in.
 

Attachments

  • IMG_1100.jpg
    IMG_1100.jpg
    69.9 KB · Views: 295
  • IMG_1081.jpg
    IMG_1081.jpg
    101.8 KB · Views: 337
  • IMG_1079.jpg
    IMG_1079.jpg
    98.2 KB · Views: 333
  • IMG_1078.jpg
    IMG_1078.jpg
    102.8 KB · Views: 354

CAMMShaft

Well-known member
Joined
Oct 9, 2012
Messages
202
Location
Layton, Utah, USA
That had to be a stomach turning moment when you walked in a saw your floor covered in drywall mud. Glad you were able to get it cleaned up. Great project!

CAMM
 

Jo Diesel

Well-known member
Joined
Aug 26, 2015
Messages
402
Location
St. Johns MI
Did you go rent one of those comercial floor buffers and a squeegee vacuum. Would make fast work of those floors. Can you wax them or is there some polish you use on concrete?
 
OP
T

tmaas21

Well-known member
Joined
Oct 31, 2014
Messages
100
Location
Nebraska
Yes -- it was a stomach turning moment. I had no prior experience with drywall mud, so I wasn't sure what the remedy was. Turns out, if you can get it wet, it'll come off with scrubbing.
Problem is that I couldn't completely soak it with getting my walls wet as well.

I first tried to pour a bucket or two of warm water with Simple Green out on the floor. I bought a Libman 10" wide floor scrubbing broom and went at, one 3' square at a time. Spent hours at it, with a shop vac....worked great, but with a 72' x 18' space to cover, it seemed like an impossible task.

Finally -- got a day off from work and went and rented an orbital floor scrubber from Menards. Had damn near the exact same bristled brush as the one I was running by hand.

Worked like a charm....wish I would have done it from the get-go.

Think the orbital and the attachment where a whopping $30 from Menards for 6 hours of use. A no-brainer.
 
OP
T

tmaas21

Well-known member
Joined
Oct 31, 2014
Messages
100
Location
Nebraska
Did you go rent one of those comercial floor buffers and a squeegee vacuum. Would make fast work of those floors. Can you wax them or is there some polish you use on concrete?

As for finishing the floor....I'm going with a product that I found on here. It's from Garage Flooring, and it's their clear sealer. Just have to have a clean floor and then apply it with a garden sprayer. Pretty slick. Happy with results so far.

Product was $100/gal, including shipping -- at that price I bought 1, to try out in an area that would be hidden.

Black Friday pricing was $75/gal, including shipping --- so I bought 6 or 7 more, enough to finish out the project.
 
To avoid these ads, REGISTER NOW!
OP
T

tmaas21

Well-known member
Joined
Oct 31, 2014
Messages
100
Location
Nebraska
Cabinet installers showed up. Kitchen starting to come together.
 

Attachments

  • IMG_1133.jpg
    IMG_1133.jpg
    94.9 KB · Views: 471
  • IMG_1136.jpg
    IMG_1136.jpg
    146.2 KB · Views: 503
  • IMG_1146.jpg
    IMG_1146.jpg
    109.1 KB · Views: 522
  • IMG_1147.jpg
    IMG_1147.jpg
    131 KB · Views: 587
OP
T

tmaas21

Well-known member
Joined
Oct 31, 2014
Messages
100
Location
Nebraska
Wow i like the cabinets! Are they one off custom?

The cabinets are custom made. I stumbled across them over 14 months ago in a display room of a custom cabinet maker. They were a floor model, so they have all the latest bells and whistles..... Slow close drawers, pull out spice racks on both sides of the oven, commercial range hood, and come complete with faucets, etc...

They were getting ready to rotate their display and wanted to move these. I was lucky in the fact that I had basically a blank slate and could fit basically any cabinet to the space.

Got them for about 45% of what they would cost if you had them built for you.

Gotta thank my mom for this...she's the one that stopped in the cabinet shop and spotted them.

Also have to thank the cabinet company, as they stored them for over a year, free of charge. E-Z Kitchens in Hastings, Nebraska gets a free plug here ;)
 
OP
T

tmaas21

Well-known member
Joined
Oct 31, 2014
Messages
100
Location
Nebraska
Continued work on the "office floor" and the "kitchen floor".

Again....going with colored concrete, cut on 3x3 intervals. Sealing with a product from Garage Flooring. Going for the appearance of 3x3 tile.

Testing things in the office.....then going for real in the kitchen.

So far, so good.

Also --- trying my hand at tiling. Never done it before....but getting by with a good coach and mentor.
 

Attachments

  • IMG_1153.jpg
    IMG_1153.jpg
    91.3 KB · Views: 338
  • IMG_1152.jpg
    IMG_1152.jpg
    73.4 KB · Views: 344
  • IMG_1151.jpg
    IMG_1151.jpg
    105.3 KB · Views: 438
  • IMG_1150.jpg
    IMG_1150.jpg
    89.2 KB · Views: 382
  • IMG_1149.jpg
    IMG_1149.jpg
    85.8 KB · Views: 368

Diesel Dan

Well-known member
Joined
Jul 21, 2013
Messages
2,458
Location
TN
Very good looking build.

I'm planning on doing a pole building on a stem wall as well.
Where did you get the post pockets that anchor to the wall?
 
OP
T

tmaas21

Well-known member
Joined
Oct 31, 2014
Messages
100
Location
Nebraska
Very good looking build.

I'm planning on doing a pole building on a stem wall as well.
Where did you get the post pockets that anchor to the wall?

Anchors come from Menards. They certainly have some mass to them....and not cheap. But I'm told a building on top of a stem wall is the only way to go.
 

Diesel Dan

Well-known member
Joined
Jul 21, 2013
Messages
2,458
Location
TN
Cool!
I'm thinking buying my barn package from Menards during the next 11% of sale.
Closest on is 165 miles away but they will deliver for $350-400 I was told.
 
OP
T

tmaas21

Well-known member
Joined
Oct 31, 2014
Messages
100
Location
Nebraska
Cool!
I'm thinking buying my barn package from Menards during the next 11% of sale.
Closest on is 165 miles away but they will deliver for $350-400 I was told.

It's the only time to buy one if you're set on doing so. It's 100% as advertised.....11% back on every single aspect of the shed.

I got nervous about my rebate getting lost in the mail, so I sent it certified mail...though that was overkill.

I was also worried about them sending it on a postcard like the other rebates....this one was for over $3500, and I didn't want somebody snagging it in the mail...because it works just like cash in the store, no ID necessary.

In the end....I was worried about nothing. It did in fact come in postcard form, but sealed in an envelope.

Wonder what the magic number is for those that come via postcard, and those that come in an envelope??
 
OP
T

tmaas21

Well-known member
Joined
Oct 31, 2014
Messages
100
Location
Nebraska
Spent a little time away from finishing the house portion and got the shop ceiling up so it could be insulated....
 

Attachments

  • IMG_1123.jpg
    IMG_1123.jpg
    144.1 KB · Views: 264
  • IMG_1124.jpg
    IMG_1124.jpg
    144.6 KB · Views: 258
  • IMG_1125.jpg
    IMG_1125.jpg
    144.6 KB · Views: 262

Jo Diesel

Well-known member
Joined
Aug 26, 2015
Messages
402
Location
St. Johns MI
My brother is a contractor and he has remodeled his house with rebates. Bills the jobs to customers then gets and 11% tax free bonus in the mail.

White ceiling looks AWESOME !
 
OP
T

tmaas21

Well-known member
Joined
Oct 31, 2014
Messages
100
Location
Nebraska
Spent some time back out in the shop. Got the main part (16' section) completely insulated. Also put up 3/4 OSB for the first 8'. Going with white steel from 8' to 16'.

Also got the stairs installed from the shop to the 2nd floor living space.
 

Attachments

  • IMG_1181.jpg
    IMG_1181.jpg
    145 KB · Views: 252
  • IMG_1180.jpg
    IMG_1180.jpg
    135.3 KB · Views: 237
  • IMG_1179.jpg
    IMG_1179.jpg
    136.1 KB · Views: 259
  • IMG_1169.jpg
    IMG_1169.jpg
    145.2 KB · Views: 285
  • IMG_1168.jpg
    IMG_1168.jpg
    140.9 KB · Views: 255

Dragfluid

ALLIANCE MEMBER
Joined
Sep 15, 2013
Messages
17,506
Location
Pillager, MN
Nice build! It will be great to roll out of the sack and "walk" to work!
One thing that you should add. 24" of 2" extruded foam around the outside of your stem wall. It will help on keeping the floor from getting so cold.
 
OP
T

tmaas21

Well-known member
Joined
Oct 31, 2014
Messages
100
Location
Nebraska
Got some more of the "flooring" done on the main level. Urethane sealer. Amazing how the colors change!
 

Attachments

  • IMG_1126.jpg
    IMG_1126.jpg
    104.3 KB · Views: 209
  • IMG_1150.jpg
    IMG_1150.jpg
    89.2 KB · Views: 209
  • IMG_1151.jpg
    IMG_1151.jpg
    105.3 KB · Views: 220
  • IMG_1154.jpg
    IMG_1154.jpg
    89.7 KB · Views: 208
  • IMG_1175.jpg
    IMG_1175.jpg
    85.7 KB · Views: 221
To avoid these ads, REGISTER NOW!
Top Bottom