To avoid these ads, REGISTER NOW!

Above 1200 Sq/FT 86's 20HP shop

Wokspaces above 1200 squarefeet.
OP
8

86turbodsl

Well-known member
Joined
Jul 1, 2005
Messages
6,556
Location
Michigan
Initial experiments are successful. Oil needs a good bit of preheating though. I think I will run it through a hot tank before it comes to the burner. I was using this for forced air. It worked good once the oil was hot enough. Blast furnaceish.58ddd2ce9f63734a9681b448dec056ff.jpg81a2d00ba14c42fead32da82630ba44d.jpg

Sent from my LG-TP450 using Tapatalk
 

Attachments

  • 81a2d00ba14c42fead32da82630ba44d.jpg
    81a2d00ba14c42fead32da82630ba44d.jpg
    84.6 KB · Views: 0
  • 58ddd2ce9f63734a9681b448dec056ff.jpg
    58ddd2ce9f63734a9681b448dec056ff.jpg
    81 KB · Views: 0
To avoid these ads, REGISTER NOW!
OP
8

86turbodsl

Well-known member
Joined
Jul 1, 2005
Messages
6,556
Location
Michigan
Not UNLESS you really give it a good smack, knocking it clean off the tank or cracking the valve or tank bung.

Not saying it would happen but I've seen weirder stuff occur.

Just my 2¢.
I hear you. Reluctant to give up the space though. Might add a guard of some sort.


Sent from my LG-TP450 using Tapatalk
 

lessersivad

Well-known member
Joined
Aug 28, 2011
Messages
282
Location
Morenci, MI
Initial experiments are successful. Oil needs a good bit of preheating though. I think I will run it through a hot tank before it comes to the burner. I was using this for forced air. It worked good once the oil was hot enough. Blast furnaceish

According to GerrysDiy and 2jeffs1 on u-toob that seems to be the secret. Only they use the container the oil drips into to get the oil to burn (vaporize).

When I was playing around with an old oil furnace I tried preheating the oil method also. It somewhat worked but not as well as I'd hoped for. The Babington burner I made worked pretty decent but adapting it to the furnace wasn't a very easy task.

I ended up abandoning the project, though I still have all the pieces/parts from a few years back.
 
OP
8

86turbodsl

Well-known member
Joined
Jul 1, 2005
Messages
6,556
Location
Michigan
According to GerrysDiy and 2jeffs1 on u-toob that seems to be the secret. Only they use the container the oil drips into to get the oil to burn (vaporize).

When I was playing around with an old oil furnace I tried preheating the oil method also. It somewhat worked but not as well as I'd hoped for. The Babington burner I made worked pretty decent but adapting it to the furnace wasn't a very easy task.

I ended up abandoning the project, though I still have all the pieces/parts from a few years back.
I was originally planning to do a babington, mainly because I don't want to mess around with a lot of filtration, then I saw the drip type burners on YouTube and that makes more sense to me. Clean out the crusties every few weeks and just let er rip.

Sent from my LG-TP450 using Tapatalk
 
OP
8

86turbodsl

Well-known member
Joined
Jul 1, 2005
Messages
6,556
Location
Michigan
Well with the burner test behind me I am going to haul my new shop vac out and clean out the boiler and prep for burner build.

Sent from my LG-TP450 using Tapatalk
 

lessersivad

Well-known member
Joined
Aug 28, 2011
Messages
282
Location
Morenci, MI
I was originally planning to do a babington, mainly because I don't want to mess around with a lot of filtration, then I saw the drip type burners on YouTube and that makes more sense to me. Clean out the crusties every few weeks and just let er rip.

Sent from my LG-TP450 using Tapatalk

Yup. less 'monkey motion' to get the BTU's.
 
OP
8

86turbodsl

Well-known member
Joined
Jul 1, 2005
Messages
6,556
Location
Michigan
I vacuumed out the boiler, put the refractory back in and did a second burner test. It burned quite a bit longer and better with the pan sitting on the refractory. I think if i can get the temps right, it's going to burn great. I really need to get the flue up to the chimney so i don't keep filling the shop with smoke! Also need to come up with a good way of blowing a propane flame on the pot automatically. Thinking a furnace gas valve and oil burner ignition transformer right now. Any thoughts out there?
 
OP
8

86turbodsl

Well-known member
Joined
Jul 1, 2005
Messages
6,556
Location
Michigan
Well lookie what arrived from the UK. Now I can get the floor filled.84fae10a0b150365bb50e6f55c10cf8f.jpg

Sent from my LG-TP450 using Tapatalk
 

Attachments

  • 84fae10a0b150365bb50e6f55c10cf8f.jpg
    84fae10a0b150365bb50e6f55c10cf8f.jpg
    76.2 KB · Views: 0
OP
8

86turbodsl

Well-known member
Joined
Jul 1, 2005
Messages
6,556
Location
Michigan
The water store can't fill my drum of water this weekend so filling the floor will have to wait. In the meantime I moved the tank again. What do you all think of this placement?

It eliminates the trip hazard of the valve, closes up the space a bit and doesn't cover the light switch and outlets and still gives me room to work on the plumbing.

0299048a85cd33aa63fd1637088bdb6e.jpgd1ca94dc42e2eadb8456853a479a94cb.jpge4799d46c5a30cf1a4a890c2b7947f2c.jpg

Sent from my LG-TP450 using Tapatalk
 

Attachments

  • e4799d46c5a30cf1a4a890c2b7947f2c.jpg
    e4799d46c5a30cf1a4a890c2b7947f2c.jpg
    85.7 KB · Views: 0
  • d1ca94dc42e2eadb8456853a479a94cb.jpg
    d1ca94dc42e2eadb8456853a479a94cb.jpg
    88.2 KB · Views: 0
  • 0299048a85cd33aa63fd1637088bdb6e.jpg
    0299048a85cd33aa63fd1637088bdb6e.jpg
    106.1 KB · Views: 0

lessersivad

Well-known member
Joined
Aug 28, 2011
Messages
282
Location
Morenci, MI
IMHO, I like that (as we say at work), "More Better."

Especially (guess i never noticed before) uncovering the outlet and switch.
 

Strouty

Well-known member
Joined
Mar 21, 2010
Messages
38,215
Location
Southern Maine
It depends on how big you are, 24" would be kinda tight for me. I do like the idea much better, the whole thing begs for a mezzanine over it! Looking at the pictures, I think you could bring it out to the same depth as the copper lines and it would act as a kind of barrier, you would intentionally keep away from the tank and it would be a visual cue to stay away from those lines.
 
OP
8

86turbodsl

Well-known member
Joined
Jul 1, 2005
Messages
6,556
Location
Michigan
It depends on how big you are, 24" would be kinda tight for me. I do like the idea much better, the whole thing begs for a mezzanine over it! Looking at the pictures, I think you could bring it out to the same depth as the copper lines and it would act as a kind of barrier, you would intentionally keep away from the tank and it would be a visual cue to stay away from those lines.
I could probably put some pallet racking over it. Plenty left.

Sent from my LG-TP450 using Tapatalk
 

Strouty

Well-known member
Joined
Mar 21, 2010
Messages
38,215
Location
Southern Maine
I would box the thing in and make it the mechanical room, then you don't have any accidental damage, at least not as easy. It is looking really good and next year you will really feel the benefit!
 
OP
8

86turbodsl

Well-known member
Joined
Jul 1, 2005
Messages
6,556
Location
Michigan
I would box the thing in and make it the mechanical room, then you don't have any accidental damage, at least not as easy. It is looking really good and next year you will really feel the benefit!
That's what I just got rid of! I didn't like that space before I probably wouldn't a second time.

Sent from my LG-TP450 using Tapatalk
 

Strouty

Well-known member
Joined
Mar 21, 2010
Messages
38,215
Location
Southern Maine
I thought that was a much larger room? Shelving over it would be good as well, just want to use the upper space efficiently. That way when you buy your forklift, it will be easy to put things away.
 
OP
8

86turbodsl

Well-known member
Joined
Jul 1, 2005
Messages
6,556
Location
Michigan
Installing the water line from the house. Still working it.e3864763b55072d25f2aa473a703f1ba.jpg

Sent from my LG-TP450 using Tapatalk
 

Attachments

  • e3864763b55072d25f2aa473a703f1ba.jpg
    e3864763b55072d25f2aa473a703f1ba.jpg
    89.3 KB · Views: 0
OP
8

86turbodsl

Well-known member
Joined
Jul 1, 2005
Messages
6,556
Location
Michigan
Flew down to Texas to see my brother. We are kicking *** on his project.39dc7cf9bbee13443e34d02dc49178f3.jpg

Sent from my LG-TP450 using Tapatalk
 

Attachments

  • 39dc7cf9bbee13443e34d02dc49178f3.jpg
    39dc7cf9bbee13443e34d02dc49178f3.jpg
    80.7 KB · Views: 0
To avoid these ads, REGISTER NOW!
OP
8

86turbodsl

Well-known member
Joined
Jul 1, 2005
Messages
6,556
Location
Michigan
Well you can't just leave us with that, what are you working on and what are you doing with it?
JB
His project is a early 70s olds convertible. The frame was bad so we got a frame from an el Camino, which is very similar but longer. We chopped 4 in out of the frame and welded it back together. Neither of us had ever done such a thing so we figured it out together.

Sent from my LG-TP450 using Tapatalk
 

jbmatth

Well-known member
Joined
Jun 3, 2013
Messages
5,682
Location
Northern Ok.
Great, feel free to share some other photos if you don't mind. I can't say I've ever cut one to shorten it, but did some pretty extensive rework on my '57 frame when I was adding the C4 suspension. I just took lots of measurements and hopefully it'll work out in the end.

JB
 
OP
8

86turbodsl

Well-known member
Joined
Jul 1, 2005
Messages
6,556
Location
Michigan
I don't have any other photos sadly, perhaps he can send me some to post if he chooses.
We did the standard z cut, and plate reinforcement, along with careful measurement and cutting. My main contribution was guidance and the welding. He did a great job with the setup and cutting. It went pretty well I think. Length side to side ended up dead nuts perfect. Before we plated it you couldn't tell almost where the cut was.

Sent from my LG-TP450 using Tapatalk
 
OP
8

86turbodsl

Well-known member
Joined
Jul 1, 2005
Messages
6,556
Location
Michigan
Ok, I got a couple more photos to share. You can start to see our process.
We used tacked on angle iron to guide and locate the mating frame member. Ratchet straps to pull them together.89bb38847ad9880efe546eaf4c152bbb.jpg8fbcf21c7fc5b9056a497acf6a7d6cc0.jpg

Sent from my LG-TP450 using Tapatalk
4b7f0a1e99a370a5ceda28500da11112.jpg610bc97547e281d9574451871fc66071.jpg
 

Attachments

  • 8fbcf21c7fc5b9056a497acf6a7d6cc0.jpg
    8fbcf21c7fc5b9056a497acf6a7d6cc0.jpg
    72.3 KB · Views: 0
  • 4b7f0a1e99a370a5ceda28500da11112.jpg
    4b7f0a1e99a370a5ceda28500da11112.jpg
    60 KB · Views: 0
  • 610bc97547e281d9574451871fc66071.jpg
    610bc97547e281d9574451871fc66071.jpg
    47.3 KB · Views: 0
  • 89bb38847ad9880efe546eaf4c152bbb.jpg
    89bb38847ad9880efe546eaf4c152bbb.jpg
    87.4 KB · Views: 0
Last edited:
OP
8

86turbodsl

Well-known member
Joined
Jul 1, 2005
Messages
6,556
Location
Michigan
Thank you. It really shaped up once we both put our heads together.

Sent from my LG-TP450 using Tapatalk
 
OP
8

86turbodsl

Well-known member
Joined
Jul 1, 2005
Messages
6,556
Location
Michigan
Finished routing the water feed and solar input. Just need to sweat everything together which I will do tomorrow.
Some shots of the routing and an overhead perspective shot. This will be final until I get a solar panel built and mounted. If that doesn't happen for a while it will still work fine.1f9a9c9d9ee0092fb24edc79e11a9bf5.jpg7296faab5a36c05e0efe319e3ab11f91.jpg3aacf7395847f1295ca664ac37debb41.jpg

Large valve to the left is the main building load supply. Small valve above is the boiler shut off. I may add a solenoid to that line so I can shutoff the feed by plc under some circumstances.
Sent from my LG-TP450 using Tapatalk
 

Attachments

  • 1f9a9c9d9ee0092fb24edc79e11a9bf5.jpg
    1f9a9c9d9ee0092fb24edc79e11a9bf5.jpg
    72.2 KB · Views: 2
  • 7296faab5a36c05e0efe319e3ab11f91.jpg
    7296faab5a36c05e0efe319e3ab11f91.jpg
    64.7 KB · Views: 2
  • 3aacf7395847f1295ca664ac37debb41.jpg
    3aacf7395847f1295ca664ac37debb41.jpg
    83.7 KB · Views: 1
Last edited:
OP
8

86turbodsl

Well-known member
Joined
Jul 1, 2005
Messages
6,556
Location
Michigan
Thanks Old! I got one of the guys at work to help me with the burner tube. I'll show all that work as soon as i get it done. Still need to come up with a propane gas light setup. I don't think there's any other real functional way to light these drip style burners automatically.
 

Strouty

Well-known member
Joined
Mar 21, 2010
Messages
38,215
Location
Southern Maine
I can't wait until it warms up I think productivity for all of us in the colder areas will increase. I will say you have done far more on your shop than I have been able to accomplish at my place. Your updates are motivational, the frame mods look great, your Brother must be thankful for the help!
 
OP
8

86turbodsl

Well-known member
Joined
Jul 1, 2005
Messages
6,556
Location
Michigan
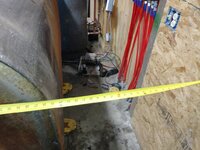
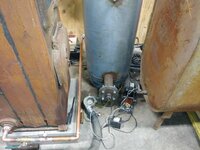
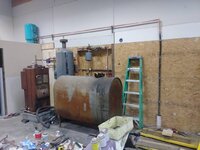
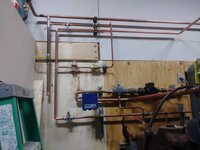
Thank you, and I agree Strouty, it was pretty cold in there last night, and i didn't make it out there until almost 9pm, but i soldiered on and wrapped up the sweating of all the remaining copper. I'm moving on to the burner now, so i'll be detailing that soon and the controls too. I can't imagine what you guys out on the east coast are dealing with lately. It's been merely cold here.

I do believe my brother was quite happy how that frame turned out. We made a date 7 years from then to be driving our convertibles together. I have the fairlane convert i desperately want to finish, among other projects. I've got to get the truck done too, it's supposed to haul me and the missus up to Alaska for our 25th anniversary in a couple of years. And all the stuff i have to run through the woodshop, etc etc. It's a neverending slog...
 
Last edited:
OP
8

86turbodsl

Well-known member
Joined
Jul 1, 2005
Messages
6,556
Location
Michigan
I spent some time discussing my burner design with a friend last night and it's become very clear that burner development will take some time. Due to the automatic lighting i require on this build. I think we have the design workable, but the build will take some time to figure out. It will still be a drip type oil burner, and i will be able to build that portion very easily, but the gas portion is tougher and will take some development, specifically on the ignition and delivery part. So i don't think i can do more than a few manual burns yet this year to be able to get the floor heated, so it will be manual eyes-on burns on weekends probably. With that said, i'll show progress as it happens and start to work on other things as we move into spring. Mainly getting the big door open, and finishing the building insulation.
 
OP
8

86turbodsl

Well-known member
Joined
Jul 1, 2005
Messages
6,556
Location
Michigan
Oh yeah, forgot to mention i pressure tested last night and found no leaks. I think i'm good to fill.
 
OP
8

86turbodsl

Well-known member
Joined
Jul 1, 2005
Messages
6,556
Location
Michigan
Floor has been filled with deionized water for flush and 5 gals of methanol, followed by fernox. It looks like the pump is not functional. I need to yank it out again for testing.33332b3bb74011b7c6a9cb8409030ca9.jpg406f70c284b8f3d6f769825cdb5ba1e3.jpg

Sent from my LG-TP450 using Tapatalk
 

Attachments

  • 33332b3bb74011b7c6a9cb8409030ca9.jpg
    33332b3bb74011b7c6a9cb8409030ca9.jpg
    91.7 KB · Views: 0
  • 406f70c284b8f3d6f769825cdb5ba1e3.jpg
    406f70c284b8f3d6f769825cdb5ba1e3.jpg
    86.6 KB · Views: 0
OP
8

86turbodsl

Well-known member
Joined
Jul 1, 2005
Messages
6,556
Location
Michigan
Pump had a stuck rotor. Back in and functional. Lots of gurgling while it's purging.

I should make a note to anybody wanting to use methanol for antifreeze - it's great for lowering pump energy used, and it's much cheaper than glycol, but it is VERY flammable, and you have to be very very careful to not ingest any or get it on your skin. Something like 15ml is fatal. I wore nitrile gloves and eye shield while handling. No open flames anywhere.

Sent from my LG-TP450 using Tapatalk
 
Last edited:
OP
8

86turbodsl

Well-known member
Joined
Jul 1, 2005
Messages
6,556
Location
Michigan
The last few days I've struggled to make progress. Wife is out of town so chores are ramped up. I did build this last night. Part of my HVAC plan is that my burner will use forced air to enhance the burn, and I don't want that air to come from the heated space. I cut a hole through to the exterior wall in the lean to and installed a 3in PVC pipe. Then built this box to hold a blower fan.
The fan is from my junk box.
The box is made of 2 by 8 and plywood laminated and cut in the shape of the fan.
Backside is sealed with rope gasket.
The fan sits in the box and a cap holds it in.
I have a cap for the bottom that holds a 1.25in hose Barb. Then a hose to the burner will be added.dbfef44fe11f5ab6a60f4b081ddaffff.jpgbab580f58038975c2bb14c26b77cb566.jpg8d8abfc3a4e5b445ca871fa10b5a0d43.jpg230271fb84c5b785b81303ba8efcb061.jpg7ba9bb395a958044bb679c1aa8a84a36.jpgb67ad79f3733b88c3716073f31c06752.jpg98a83d20b7e635e3a6489b609c2c15de.jpg

Sent from my LG-TP450 using Tapatalk
 

Attachments

  • 8d8abfc3a4e5b445ca871fa10b5a0d43.jpg
    8d8abfc3a4e5b445ca871fa10b5a0d43.jpg
    57.4 KB · Views: 0
  • b67ad79f3733b88c3716073f31c06752.jpg
    b67ad79f3733b88c3716073f31c06752.jpg
    76.6 KB · Views: 0
  • 7ba9bb395a958044bb679c1aa8a84a36.jpg
    7ba9bb395a958044bb679c1aa8a84a36.jpg
    51.3 KB · Views: 0
  • 230271fb84c5b785b81303ba8efcb061.jpg
    230271fb84c5b785b81303ba8efcb061.jpg
    70.3 KB · Views: 0
  • dbfef44fe11f5ab6a60f4b081ddaffff.jpg
    dbfef44fe11f5ab6a60f4b081ddaffff.jpg
    53.7 KB · Views: 0
  • bab580f58038975c2bb14c26b77cb566.jpg
    bab580f58038975c2bb14c26b77cb566.jpg
    65.4 KB · Views: 0
  • 98a83d20b7e635e3a6489b609c2c15de.jpg
    98a83d20b7e635e3a6489b609c2c15de.jpg
    54.7 KB · Views: 0

jbmatth

Well-known member
Joined
Jun 3, 2013
Messages
5,682
Location
Northern Ok.
I'm definitely not an expert but wouldn't pulling in the warmer air from inside the shop help combustion more than the cold air from outside? I like the way you mounted the fan, simple and effective.

JB
 
OP
8

86turbodsl

Well-known member
Joined
Jul 1, 2005
Messages
6,556
Location
Michigan
Thank you. The trouble with inside air is I've already paid to heat it and then exhausting it up the flue means it gets replaced from outside thru cracks.

Sent from my LG-TP450 using Tapatalk
 

jbmatth

Well-known member
Joined
Jun 3, 2013
Messages
5,682
Location
Northern Ok.
Makes sense, looking forward to seeing how this all works out in the end. I'm sure you will love having a nice warm shop next winter.
JB
 
OP
8

86turbodsl

Well-known member
Joined
Jul 1, 2005
Messages
6,556
Location
Michigan
Makes sense, looking forward to seeing how this all works out in the end. I'm sure you will love having a nice warm shop next winter.
JB
Thank you. I am just sorry I missed the window this winter. I just don't work very fast in the chaos. I need organization bad.

Sent from my LG-TP450 using Tapatalk
 
To avoid these ads, REGISTER NOW!
Top Bottom