danielzig
Well-known member
No air should be bypassing the coil. Hopefully your issues are solved.

No air should be bypassing the coil. Hopefully your issues are solved.
It happened again. Why does it only happen at night or over night? The whole thing is iced up solid. And because I taped up all the holes there is no air coming out of the vents at all right now.

It happened again. Why does it only happen at night or over night? The whole thing is iced up solid. And because I taped up all the holes there is no air coming out of the vents at all right now.
1. What is the outside temperature at night?
2. What is the thermostat setting at night?
I would start considering a leak as a possibility. Hook your new gauges up and see what your pressures are.
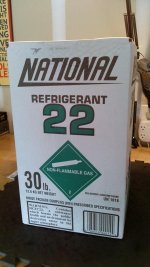
A friend of mine had leaks in his Goodman A coil's. He has three units in his large house. He is going to sell his old outdoor units that are 2.5 ton and 3.0 ton. Should I buy one of them for a spare? He is asking $400. Or will R-22 cost too much to make it worth it.
http://www.alpinehomeair.com/viewproduct.cfm/productID/453054785/p/Goodman_CKL30_1_Condenser
http://www.alpinehomeair.com/viewproduct-453054783.htm
Update: He will let me have all the parts, air handler and outdoor units. His wife wants it gone. I can sell the parts and split the profit. I did a quick search and it is not worth as much as he first thought. Is it worth my time or should I keep one unit for a spare?
As far as hooking up to your current system, just use the access ports on the condenser. Your gauges should have 1/4" standard connections. I would use the ball valve and put it on the end of the high side hose.
After you hook the hoses up, bleed the "air" from the hoses (high and low). Get your readings with an unfrozen coil. When going to disconnect, close the ball valve on the high side. Open the high side to the low side and let the refrigerant that has condensed in the high side hose back into the system. Disconnect both hoses.
Last night got down to 65F and I had it set to 77F in the house.
Good idea, might as well try to learn how with my home A/C system. How do I hook it up? It is slightly different then using it on a mini split right.
You could try this YouTube channel... I remember some good videos on there, not sure if he has one for what you are looking for (I am not home, so I cannot look at them).
[DrZarkloff]
Remember that since you already have some tools, you might want to look at taking an online exam (can't remember the name of the certification now) so you can buy R22. Fairly easy to pass it.
Good luck,
dC
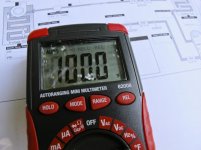
3. When you check your low side pressure it should read 65 to 72 psi with the indoor temp close to 75° to 77°. (after the system has been running awhile and the indoor temperature is close to the setting)
Do you have a way to check the temperature of the suction line?
It should read about 25° to 35° above 32°. If it's close to 32° the coil is very close to icing up.
When it ices up, there's less heat transfer, and with the thermostat set that low with the outdoor temp that low, the coil will continue to ice up
4. During the day, when it's warm check the the low side pressure to make the system is not undercharged.
I hope you don't have a leaky coil.
It didn't freeze up last night but I had it set to 79F and the fan running all the time. So when the compressor shuts off between cycles the fan will melt any ice that may of built up.
Will this not happen anymore when the nights get warmer as summer progresses?

In normal operation the fan should cycle on and off with the compressor.
Also if the unit has the proper charge and air flow there should never be any ice forming on the coil.
Come back with the pressure readings that you got.
Your friend must have more money than he knows what to do with. 3 system replacement because one was leaking? Wow.
dont get a used one.
Mainly the Goodman are newer and are probably 12-13 seer. The condenser you have is probably a 10 seer. So you would have to change the orifice/ metering devise in the air handler. Witch is not a DIY.
You can add a refrigerant die to the refrigerant. The die will show up were the leak is. Theres a patch kit out there that ive used (were there was no way to fix the leak) The customers equipment has been fine for acouple years now.
And theres also a stop leak that you can add to the refrigerant. This maybee your best bet. As its probably a small leak.
As air filters go. Great job cleaning the coil. Get a 5" filter media box. Ive run into the new 3m. 1" filters (they say they stop 100% dirt) cause air flow problems. If not changed very often.
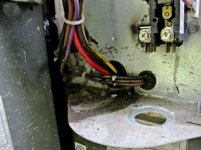
Low side is no problem. Should be no liquid. Dont wear gloves. I was wearing gloves once dismantling a txv which had trapped refrigerant, liquid got to the gloves and gave me frostbite before I could get the glove off.
What about the high side? Do you need gloves for the high side? Also do I need to attach both to figure out if it is low? Or is the low side enough to make an assessment?
You need to know whether you have a TXV or fixed orifice coil to determine what method needs to be used to check the charge. TXV will be subcooling and fixed orifice will be superheat.
Superheat you will be checking the temp and pressure of the low side, subcooling the highside.
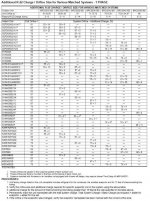
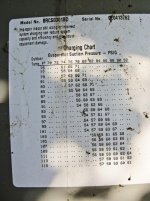
There should be a chart inside the outside units cover that will tell you what superheat or subcooling you are trying to achieve.
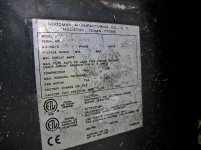
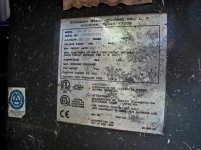
IS the large pipe frosting up,it could either be low on refrigerant,dirty filter or slow running blower motor.I am assuming by the pressures that its an R-22 unit.It looks like an old york or coleman heat pump by the number.The number on the inside is the temperature of the large pipe up close to the guage port.
your numbers are right,its low on refrigerant,normally that style unit leaks at the accumulator,its a tank in the condenser and they are made of steel and rot away.
I would like to add more R22 and monitor the leak rate. I am really hoping to limp it along for a few more years if possible. How much R22 do I add? Do I open the valve on the tank first and then crack open the valve on the low side gauge while the unit is running and monitor the pressure increase? Do I just do a little at a time and recalculate my Super Heat every 5 minutes after adding some?
Open the tank valve then loosen the hose slightly at the gauges to bleed out any air, do the same for the low side hose. Add slowly though the low side, since it's r-22 and you're new at this keep the jug upright and charge vapor, it will take longer but is much safer for your equipment.
Add some, check your superheat, add some, check your superheat.
The chart with the super heat on it needs outdoor temp and indoor wetbulb, if you wrap a wet cloth around your temp probe and place it in the inlet of the airhandler you can get an accurate wet bulb temp. I use a piece of the tubular string from a hooded sweatshirt on my temp probe for this.
Check your temp drop across the indoor coil, with an r-22 system you should have in the neighborhood of 20 degrees when properly charged, this can vary some but if its a 5 degree drop or 35 degree drop you have other problems.
your numbers are right,its low on refrigerant,normally that style unit leaks at the accumulator,its a tank in the condenser and they are made of steel and rot away.
Thank you for all the tips. Tomorrow morning I will charge up the unit.
I just got back in town today and took the EPA test from my hotel room last night. I only missed two questions out of 50 and was able to print out my ID when I got back. The first thing I did was head out to buy some R-22!

How much did that run you? About 300?