
You are using an out of date browser. It may not display this or other websites correctly.
You should upgrade or use an alternative browser.
You should upgrade or use an alternative browser.
A Herringbone Parquet Floor, From Scratch
- Thread starter A_Pmech
- Start date

So did you just carry that on top of the camaro or squeeze it in the passenger seat?
Nah, I put that in the back of my beat up rust bucket 1980 Chevy C-20.
I did just bring home 63' of 1" iron pipe in the Camaro though.

muibubbles
Well-known member
The floor is back underway as of today!

sorry if i missed it but what is the grates with the arrows on the floor for?

jake00
Well-known member
We made about 150 sf of oak herringbone at work today, I cheated though and used the moulder... You might consider used a sled on your table saw. I'd recommend hostile best for adhesive.
jake00
Well-known member
Synteko, I assume you're using the classic? Great finish, but you'll want to wear a mask... Most guys here roll it with a 3/8 purdy white dove.
sorry if i missed it but what is the grates with the arrows on the floor for?
That's my pit, where I rub the Birdcar's belly...
Jake00 said:Synteko, I assume you're using the classic?
Correct! It's all fun and games until you start giggling. Since you've used it, you know what I mean.

Golfer said:Are you next in line for the worlds most interesting man.
I humbly doubt that.

jake00
Well-known member
looks great!
I remember this thread from when it started. It's like alot of other great thread on here, if you don't keep up on them, you'll lose them.
That in-progress photo looks great. Where is your total man-hours count at ?
That in-progress photo looks great. Where is your total man-hours count at ?
v7guy
Well-known member
Really love this thread. Glad it keeps getting updated.
So much of this knowledge is unavailable, thanks for sharing.
So much of this knowledge is unavailable, thanks for sharing.
MOPARINMYCAR
Well-known member
- Joined
- Dec 9, 2010
- Messages
- 63
Fantastic informative post can you tell me how many yard you can lay in a day ?
metalhead212121
Well-known member
- Joined
- Mar 21, 2010
- Messages
- 2,898
That's my pit, where I rub the Birdcar's belly...
That made my day/night right there!

Ive been skimming over both this thread and the other one about your machine shop... I really need to set aside time and read both threads.
critter
Well-known member
For the Aussie Holden fans. Fishermans Bend Plant 3 experimental engineering is layed out throughout with redgum parquetry. Almost 6000 sqm. Beautiful stuff and was layed down in 1946.Did my apprenticeship there in the toolroom. The 48 215 and every other Holden was born in that plant since. The workmanship on the floor alone was inspiring.
Alot of work but the rewards are there for those that appreciate fine craftsmanship verses the current day trend of just do it it now.
Alot of work but the rewards are there for those that appreciate fine craftsmanship verses the current day trend of just do it it now.
camarotoolman
Banned
Sure makes alot of scrap, you will be warm this winter! Maybe buying a higher grade of lumber would be better. just my .02 cents. You certainly have some great machines.
Time for an update!
Here's the floor before sanding:

There are several schools of thought on how to rough in a floor with a drum sander. The most common school is to cut in with a coarse paper and sand ONLY with the grain. Once the floor is cut in, continue sanding ONLY with the grain. This works, but tends to produce a floor with ripples parallel to the axis of rotation of the sanding drum.
As anyone who has used a rolling pin knows, defining a flat plane with a cylinder is not possible if the cylinder traverses the dough in one axis. The result of such an action is a series of ripples, parallel to the axis of rotation of the rolling pin. Further rolling in only one axis will only produce more ripples, although they may be more or less pronounced depending on operator variables.
To truly refine the surface the dough has to be rolled several times, with the rolling pin used at some angle to the previous pass, allowing the face of the cylinder to bridge (and knock down) the ripples in the surface of the dough. After several cycles of surface refinement, the dough is generally flat and without noticeable ripples.
The same applies to floor sanding, clay modeling, and even machine tool manufacturing. To produce a floor that has a uniform gloss the surface must be flat and that means it has to be refined by the sander in more than one axis. To remove the undulations inherent to drum sanding it is helpful to sand in cycles of three directions. 45 degrees left, 45 degrees right (perpendicular to the first pass) and finally with the grain. The result will be a much flatter floor which will show a uniform gloss in glancing light.
Sanding across the grain means starting with a finer paper than one would use for sanding with the grain. This is necessary for a parquet floor in any case, as the grain runs in many directions. Using too coarse a sandpaper will result in tear out which, if severe enough, can require pulling out the chisels and installing new wood. Starting with a finer paper means more passes with the sander, but that's not necessarily a bad thing, as more passes usually means a flatter plane.
Here's an in-progress photo. You can see a few shiny spots, which indicate the floor has not quite been brought flush yet. The direction of the sanding marks shows this was one of the 45-degree passes

I began sanding at 40 grit and made about 4 or 5 cycles before bringing the floor flush and flat. Then, I switched to 60 grit and made one cycle before fairing in the corners with a belt sander.
Here's the floor after sanding to 60 grit in preparation for filling. The products in the photo include Timbermate floor filler from Australia and Synteko Classic 50, a commercial two-part acid-curing floor finish developed in the 50's in Sweden.

Timbermate is a neat product. It is non-toxic, smells like finger paint and has an unlimited shelf life. It works with basically all known floor finishes and can be tinted to fine-tune the color match. It dries to a sandable state in about an hour. I'll show how to use it in the next post.
Here's the floor before sanding:
There are several schools of thought on how to rough in a floor with a drum sander. The most common school is to cut in with a coarse paper and sand ONLY with the grain. Once the floor is cut in, continue sanding ONLY with the grain. This works, but tends to produce a floor with ripples parallel to the axis of rotation of the sanding drum.
As anyone who has used a rolling pin knows, defining a flat plane with a cylinder is not possible if the cylinder traverses the dough in one axis. The result of such an action is a series of ripples, parallel to the axis of rotation of the rolling pin. Further rolling in only one axis will only produce more ripples, although they may be more or less pronounced depending on operator variables.
To truly refine the surface the dough has to be rolled several times, with the rolling pin used at some angle to the previous pass, allowing the face of the cylinder to bridge (and knock down) the ripples in the surface of the dough. After several cycles of surface refinement, the dough is generally flat and without noticeable ripples.
The same applies to floor sanding, clay modeling, and even machine tool manufacturing. To produce a floor that has a uniform gloss the surface must be flat and that means it has to be refined by the sander in more than one axis. To remove the undulations inherent to drum sanding it is helpful to sand in cycles of three directions. 45 degrees left, 45 degrees right (perpendicular to the first pass) and finally with the grain. The result will be a much flatter floor which will show a uniform gloss in glancing light.
Sanding across the grain means starting with a finer paper than one would use for sanding with the grain. This is necessary for a parquet floor in any case, as the grain runs in many directions. Using too coarse a sandpaper will result in tear out which, if severe enough, can require pulling out the chisels and installing new wood. Starting with a finer paper means more passes with the sander, but that's not necessarily a bad thing, as more passes usually means a flatter plane.
Here's an in-progress photo. You can see a few shiny spots, which indicate the floor has not quite been brought flush yet. The direction of the sanding marks shows this was one of the 45-degree passes
I began sanding at 40 grit and made about 4 or 5 cycles before bringing the floor flush and flat. Then, I switched to 60 grit and made one cycle before fairing in the corners with a belt sander.
Here's the floor after sanding to 60 grit in preparation for filling. The products in the photo include Timbermate floor filler from Australia and Synteko Classic 50, a commercial two-part acid-curing floor finish developed in the 50's in Sweden.
Timbermate is a neat product. It is non-toxic, smells like finger paint and has an unlimited shelf life. It works with basically all known floor finishes and can be tinted to fine-tune the color match. It dries to a sandable state in about an hour. I'll show how to use it in the next post.
Floor looks awesome.
mjozefow
Well-known member
Glad to see the stir-sticks are now glued to the floor!
Looking good. Watch the giddiness with that Synteko! You and your dad might have a little TOO much fun applying that stuff.
Looking good. Watch the giddiness with that Synteko! You and your dad might have a little TOO much fun applying that stuff.
Incredible.
Fantastic informative post can you tell me how many yard you can lay in a day ?
Laying the herringbone was a 3-day job. The border took a week.
NUTTSGT said:That in-progress photo looks great. Where is your total man-hours count at ?
I'm not sure, I lost count some time ago. I figure I'll probably have about a thousand hours in it by the time I'm done.
240sxguy
Well-known member
Incredible. I did a floor of brazillian cherry shorts in my dining/kitchen and won't ever do that again. My back hated me. The biggest problem was inconsistencies in board width. Looks killer man, really great.
These photos are for Sandy at the bank.
How to use Timbermate floor filler...
All floors have small cracks of varying sizes when they're laid due to tolerance buildup. Many flooring "installers" and DIY'ers choose not to fill these little cracks and prefer to simply sand and apply a finish. Filling floors is generally something left for higher end work because it nearly doubles the amount of labor required to finish the floor. However, the finish produced with a proper filling job is as close to perfect as can be attained. It will have a uniform gloss with no unsightly cracks or inconsistencies as an unfilled floor will. Here's how to do it:
First, Timbermate must be heated to get it out of the bucket. The best way to do this is to soak it in hot water for about half an hour. Then, scrape it into a larger bucket and thin it approximately 25% by volume with hot water. Use a drill mixer to mix it until it has the consistency of pancake batter:

After mixing, return the mixed material into the hot water bath until you're ready to begin filling. When multiple species of wood make up the floor, use appropriately colored fillers to spot fill any gaps in these species. Then sand off the excess. Vacuum the floor THOROUGHLY to remove all the sanding dust and debris from the cracks.

Once the floor is clean the filler can be brought out of the warm water bath. Pour a line about 3' long on one edge of the floor and start working it firmly left and right towards you with a shop made plexiglass trowel. Plexiglass is necessary because Timbermate is corrosive to all metals when wet. Using it with a metal trowel will result in the filler taking on a dark gray color due to the corrosion products.
Timbermate begins to thicken almost immediately. Do not work with thickened filler, scrape it up and return it to the bucket. Thick filler won't fill the cracks as well as properly thinned filler. Once returned to the bucket it will soften again and you can always add a little more water if needed.
Hold the trowel about 30 degrees from horizontal to help push the filler into the floor. Something I'm not doing in this posed photo:

Here's what the floor should look like after filling:

Now it's back to the drum sander, this time with 100 grit sandpaper. Two criss cross passes remove the majority of the filler:

Taking a close look after sanding, you'll notice the filler hasn't completely filled the hairline cracks. This is normal, Timbermate shrinks slightly when thinned, which makes the cracks open up. A second application is normally necessary:

An advantage to filling is that the filler also works as a sanding tracer. As you can see in this photo, the 100 grit sanding has not completely removed the 60 grit scratches from the last sanding. After the second fill, sanding will continue at 100 grit until these are obliterated:

Almost time for finish sanding...
How to use Timbermate floor filler...
All floors have small cracks of varying sizes when they're laid due to tolerance buildup. Many flooring "installers" and DIY'ers choose not to fill these little cracks and prefer to simply sand and apply a finish. Filling floors is generally something left for higher end work because it nearly doubles the amount of labor required to finish the floor. However, the finish produced with a proper filling job is as close to perfect as can be attained. It will have a uniform gloss with no unsightly cracks or inconsistencies as an unfilled floor will. Here's how to do it:
First, Timbermate must be heated to get it out of the bucket. The best way to do this is to soak it in hot water for about half an hour. Then, scrape it into a larger bucket and thin it approximately 25% by volume with hot water. Use a drill mixer to mix it until it has the consistency of pancake batter:
After mixing, return the mixed material into the hot water bath until you're ready to begin filling. When multiple species of wood make up the floor, use appropriately colored fillers to spot fill any gaps in these species. Then sand off the excess. Vacuum the floor THOROUGHLY to remove all the sanding dust and debris from the cracks.
Once the floor is clean the filler can be brought out of the warm water bath. Pour a line about 3' long on one edge of the floor and start working it firmly left and right towards you with a shop made plexiglass trowel. Plexiglass is necessary because Timbermate is corrosive to all metals when wet. Using it with a metal trowel will result in the filler taking on a dark gray color due to the corrosion products.
Timbermate begins to thicken almost immediately. Do not work with thickened filler, scrape it up and return it to the bucket. Thick filler won't fill the cracks as well as properly thinned filler. Once returned to the bucket it will soften again and you can always add a little more water if needed.
Hold the trowel about 30 degrees from horizontal to help push the filler into the floor. Something I'm not doing in this posed photo:
Here's what the floor should look like after filling:
Now it's back to the drum sander, this time with 100 grit sandpaper. Two criss cross passes remove the majority of the filler:
Taking a close look after sanding, you'll notice the filler hasn't completely filled the hairline cracks. This is normal, Timbermate shrinks slightly when thinned, which makes the cracks open up. A second application is normally necessary:
An advantage to filling is that the filler also works as a sanding tracer. As you can see in this photo, the 100 grit sanding has not completely removed the 60 grit scratches from the last sanding. After the second fill, sanding will continue at 100 grit until these are obliterated:
Almost time for finish sanding...
Omphaloskeptic
Well-known member
Did you have to use a number of belt's (of each grit) to do the floor? Did the Timbermate floor filler cause the belts to load-up/gum-up with use?
I guessing that with your attention to detail, that floor is going to have a 'piano finish' to it by the time you call it good enough. lol
I guessing that with your attention to detail, that floor is going to have a 'piano finish' to it by the time you call it good enough. lol
Did you have to use a number of belt's (of each grit) to do the floor? Did the Timbermate floor filler cause the belts to load-up/gum-up with use?
I guessing that with your attention to detail, that floor is going to have a 'piano finish' to it by the time you call it good enough. lol
Yes, it takes about 4 grades of paper on the drum sander, from 40 to 100, then two grades of paper on the floor buffer which is yet to come.
Timbermate doesn't load up the sandpaper, but it does wear it rather rapidly.
I'll settle for being able to see a clear reflection of the built-in cabinets in the floor when it's done.
Wow! You do fine work A Pmech! I originally joined this site after viewing a linked thread of your bandsaw resto. I like the way you chase perfection. You have more patience than I do for sure. Keep up the good work and remember...PICS,PICS and more PICS. LOL, this is coming from a guy who has yet to upload a single photo. Your work reminds me to take my time on projects and do more documentation. This stuff will be pure gold when you are an old guy like...some folks I know who recommend more pics and patience for posterity. Someday I hope to show my grandchildren 200 photos of the toothpick I restored back in '97.

gonefirefighting
Well-known member
Awesome work!
tinbender 66
Well-known member
It looks fantastic already but should be absolutely stunning when finished. I'm guessing the voids around the edge are where the cabinets go. Can't wait to see those babies .
.
.You have way way way more patience than I do with a floor like that.
I have thoroughly enjoyed this thread. I have a range of friends who are expert knife-makers, fine furniture builders and cabinet makers. Thie level of skill is always impressive and if I had my time again I would have chosen employment in wood or metal work. There is a sense od satisfaction that comes from standing back and looking at something that has taken shape and you know it's of high quality because you built it yourself!
paul.
paul.
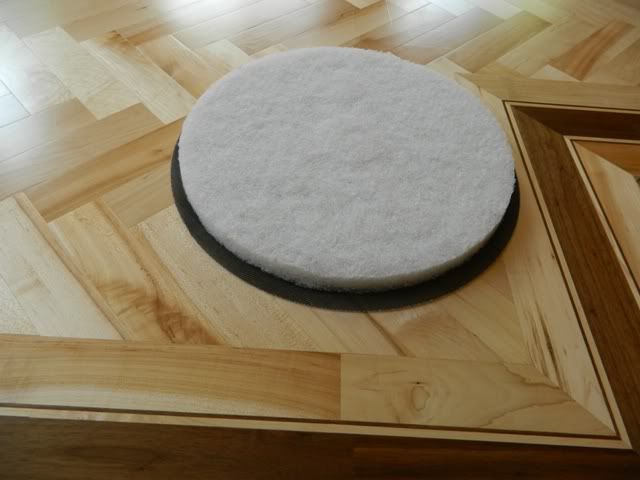
Last night I made the hard plate for the floor scrubber. Nothing fancy, just some scrap 1/2" and 3/4" cabinet plywood and some F-3 felt. This will be used to drive double-sided sand paper discs to remove scratches left by the drum sander:

Long overdue for an update here...
The next step involves sanding with the floor scrubber and floor plate at 100 grit. This removes the remainder of the scratches left by the drum sander. The sandpaper discs are double-sided, so that they may be driven by the felt pad of the hard plate:

The purpose of hard plating is twofold. One, to finish refine the floor flatness and two, to remove the ripples left by the drum sander:

Hard plating at 100 grit leaves a swirl which is smoother than the sanding marks left by the higher pressure drum sander. As the scrubber only cuts at about the 3 O'clock position, as viewed from the handle looking down at the buffer head, the swirl looks like a crescent moon.
Proper technique really helps tame the floor scrubber and hard plate. To sand, place the handle against your hips, hold it with both hands and push into the machine as it pushes back at you. Keep the handle down somewhat to keep the machine cutting and pushing at you while working in a counter-clockwise circular motion or work left to right. As you work across the floor remain relaxed and act as a deadman for the machine. Make the machine do the work.

At this point I've finished with 100 grit and moved to 120. All the marks left by the drum sander have been removed:

Maple starts to take on a sheen about 120 or so, but some scratches from 100 still remain. Another thin spot coat of filler is also needed in some areas:

I noticed I had a couple loose pieces of parquet in one corner. I had difficulty when installing the floor in this area due to a small valley in the underlayment. No worries.
The solution is to drill a hole though the loose piece and inject Gorilla Glue though the hole with a cattle innoculator and a blunted 14ga. needle. The Gorilla Glue is a polyurethane foaming adhesive, just like Bostik's Best. Thus, it expands to fill the volume under the loose section of flooring.
After filling the holes with Gorilla Glue and allowing them to cure overnight, I came back to plug them. This is an easy process. Simply take a scrap of wood the exact same color as the area surrounding the hole. Sand it round and to a slight taper on the belt sander turned upside-down. Then wet it with wood glue, gently drive it into the hole and cut it off. The result is an invisible repair.
Sanding commenced again with 120 to remove the spot filled locations and fair in the couple minor repairs I made. Final preparations were made by screening the floor at 150 grit.
Vacuuming was done with a felt-lined nozzle to avoid scratches. It's important to vacuum all the maple dust out of the grain of the walnut. Otherwise the walnut will have a washed out look:

One last look after screening at 150:

At this point I spent an hour or so vacuuming everything. Then, while the finish was de-airing after mixing I thoroughly tacked the floor twice.
Here's the finish going down. Synteko really makes the colors pop:

The result of the first coat:


The next step is to sand down the seal coat. Rather than using the hard plate, which would burn though the finish, I've gone back to the bristle pad driver on the floor scrubber. The 150 grit screen will be driven by a white floor scrubbing pad. This will gently knock down the high spots and dust without cutting though the finish which is only about .004" thick:
Here's the result of screening the finish for the first time. The dull areas have been abraded slightly, the shiny areas are only few thousandths below the dull areas and were not touched by the sanding. That's OK, the second coat will fix that:

Here's the result of the second coat. The floor is starting to produce a good reflection of the walls, but it's still a little uneven and the walnut grain isn't quite filled yet:

The next step involves sanding with the floor scrubber and floor plate at 100 grit. This removes the remainder of the scratches left by the drum sander. The sandpaper discs are double-sided, so that they may be driven by the felt pad of the hard plate:
The purpose of hard plating is twofold. One, to finish refine the floor flatness and two, to remove the ripples left by the drum sander:
Hard plating at 100 grit leaves a swirl which is smoother than the sanding marks left by the higher pressure drum sander. As the scrubber only cuts at about the 3 O'clock position, as viewed from the handle looking down at the buffer head, the swirl looks like a crescent moon.
Proper technique really helps tame the floor scrubber and hard plate. To sand, place the handle against your hips, hold it with both hands and push into the machine as it pushes back at you. Keep the handle down somewhat to keep the machine cutting and pushing at you while working in a counter-clockwise circular motion or work left to right. As you work across the floor remain relaxed and act as a deadman for the machine. Make the machine do the work.
At this point I've finished with 100 grit and moved to 120. All the marks left by the drum sander have been removed:
Maple starts to take on a sheen about 120 or so, but some scratches from 100 still remain. Another thin spot coat of filler is also needed in some areas:
I noticed I had a couple loose pieces of parquet in one corner. I had difficulty when installing the floor in this area due to a small valley in the underlayment. No worries.
The solution is to drill a hole though the loose piece and inject Gorilla Glue though the hole with a cattle innoculator and a blunted 14ga. needle. The Gorilla Glue is a polyurethane foaming adhesive, just like Bostik's Best. Thus, it expands to fill the volume under the loose section of flooring.
After filling the holes with Gorilla Glue and allowing them to cure overnight, I came back to plug them. This is an easy process. Simply take a scrap of wood the exact same color as the area surrounding the hole. Sand it round and to a slight taper on the belt sander turned upside-down. Then wet it with wood glue, gently drive it into the hole and cut it off. The result is an invisible repair.
Sanding commenced again with 120 to remove the spot filled locations and fair in the couple minor repairs I made. Final preparations were made by screening the floor at 150 grit.
Vacuuming was done with a felt-lined nozzle to avoid scratches. It's important to vacuum all the maple dust out of the grain of the walnut. Otherwise the walnut will have a washed out look:
One last look after screening at 150:
At this point I spent an hour or so vacuuming everything. Then, while the finish was de-airing after mixing I thoroughly tacked the floor twice.
Here's the finish going down. Synteko really makes the colors pop:
The result of the first coat:
The next step is to sand down the seal coat. Rather than using the hard plate, which would burn though the finish, I've gone back to the bristle pad driver on the floor scrubber. The 150 grit screen will be driven by a white floor scrubbing pad. This will gently knock down the high spots and dust without cutting though the finish which is only about .004" thick:
Here's the result of screening the finish for the first time. The dull areas have been abraded slightly, the shiny areas are only few thousandths below the dull areas and were not touched by the sanding. That's OK, the second coat will fix that:
Here's the result of the second coat. The floor is starting to produce a good reflection of the walls, but it's still a little uneven and the walnut grain isn't quite filled yet:
AussieDan
Well-known member
The floor is looking great! Any idea how many hours you have into it at this point? Every time I read one of your posts I marvel at how you find the time.
That floor is so damn cool.
Griff93
Well-known member
Man that's really nice looking. I'd have to get a keep off floor sign if I had that much time and work in it.
Omphaloskeptic
Well-known member
Wow, you must have the patience of Job not to rush that installation! Kudos to you.
They say that preparation is 90% of any good execution; what did you have to do to the sub-floor prior to the underlayment? For a parquet floor, does the underlayment have to be near cabinet quality plywood, and how was it fastened?
Thanks for the very interesting documentation.
They say that preparation is 90% of any good execution; what did you have to do to the sub-floor prior to the underlayment? For a parquet floor, does the underlayment have to be near cabinet quality plywood, and how was it fastened?
Thanks for the very interesting documentation.