To avoid these ads, REGISTER NOW!

About to install wood floors. Looking for pointers and help

NewShockerGuy

Well-known member
Joined
Oct 12, 2010
Messages
2,481
Location
Northern Virginia / DC
About to install wood floors. Looking for pointers and help (UPDATED)

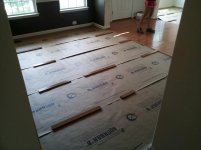
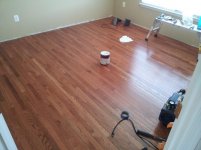
I have 55 boxes of hardwood sitting in the house now since Saturday.

When we moved into the house two years ago and we had the same guy install the wood floors in the main area that did my wife's townhouse. I think we got it for around $6.90 installed per sq ft.

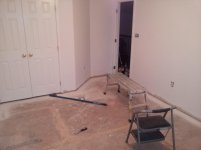
Welp, called him back to get a quote and it was too high this time so I said why don't I do it. The plus is that it's for our 4 bedrooms upstairs so there is NO rush in terms of it has to get done since we really are using just the master bed room. Like most installers he installed shoe trim molding. I hate how this looks, so for the first bedroom I've completely taken off all baseboards.

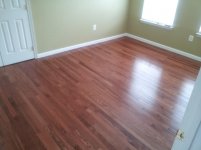
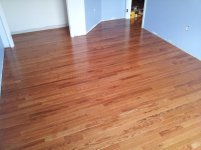
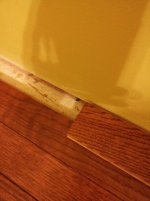
So there is previous wood in the hallway that was installed and since each bedroom has/had carpet there is a small piece of wood via a transition piece. I'd like to keep this transition piece instead of ripping it up and the 14-15 boards in order to extend the wood in the bed room for a single look. I like the separated look honestly.

My first question which may sound super dumb is how exactly do I do my first line and make sure it's plum. I know I will need to nail the first 2-3 rows by hand which is fine but I want to make sure it's straight.

Such as | | | |

Rather than ||| \ \ \

Hope that makes sense. IE: I don't want to think I'm starting straight then come to find out that by time I get to the other side of the room it's going to be all slanted or I have to cut the board and have some weird angle..etc

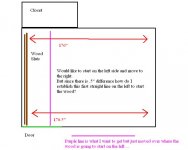
I would like to position the wood so that it is pretty inline with the boards already there minus the transition piece.

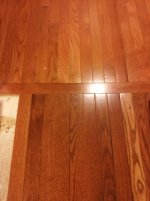
I have attached images on what I mean. If I put it up against the wall by the door then the pieces are some what staggered instead of pretty straight. But if I do it coming off the pieces then the wall side would only be about a 2" piece of wood? I would manually nail that down obviously but is that recommended? Would I nail that FIRST then the 2-3 more rows then start using the staplier or would I start with those pieces coming from the door then move towards the walls?

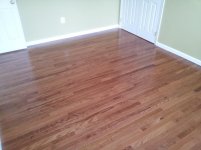
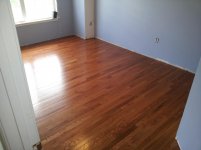
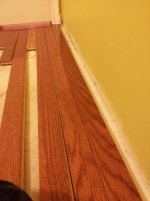
The next point I want to ask about is the spacing. Am I correct in assuming that there has to be a gap all the way around the room. Not just north and south if installing the wood. 1/4" or a little less all the way around. I took two photos. One is oof the wood right up against the wall, the other is pulled back some, the baseboard WILL cover the gap but I just want to make sure how the gap needs to be applied via all 4 walls or just front and back?

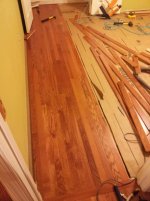
I have taken some pictures and just playing with the wood. In no way am I going to have the wood like that, it's going to be staggered obviously and the wood mixed in. What's in the picture is darker than most of the other wood in the boxes so I'm not going to transition the darker wood right off the original wood since it looks odd to me.

I think that's all the questions I have, it's really mainly the getting the plumb line and how to even get that going first since I know no walls are going to be 100% true, I just don't want to do an initial measurement by going off the wall only to find out I've f'ed myself. I did that mistake with wallpaper once and had to completely take down and redo because instead of doing a plumb line in the middle of the wall (which was easier because I could use a level and then draw a straight line) I went off a wall that by time I got to the middle wall everything was off...arg! lol

Any tips or tricks and advice would be great. I watched a ton of youtube videos but some things obviously aren't that clear.

Thanks,
-Nigel
 

Attachments

  • woodboxes.jpg
    woodboxes.jpg
    82.8 KB · Views: 53
  • roombaseboards.jpg
    roombaseboards.jpg
    70.5 KB · Views: 49
  • wood1.jpg
    wood1.jpg
    84.3 KB · Views: 63
  • wood2correct.jpg
    wood2correct.jpg
    96.8 KB · Views: 61
  • wood3.jpg
    wood3.jpg
    78.9 KB · Views: 48
  • wood4door.jpg
    wood4door.jpg
    69 KB · Views: 46
  • wood5doorcut.jpg
    wood5doorcut.jpg
    62.5 KB · Views: 44
Last edited:
To avoid these ads, REGISTER NOW!

kd3pc

Well-known member
Joined
Aug 10, 2013
Messages
3,630
Location
Northern Neck
First is the room/space square? Make sure it is, or you need to have a strategy with how to handle that.

I always find the longest run, and spend a while with string and level and tape measure right down the middle of the space.....making sure it is straight and square to the most obvious walls/corners/etc. The rest of the floor will align with this master "board". Then I sleep on it. This will be the most noticeable line people see. This is what most floor layers do. You can run the wood across the shorter lengths, that is up to you. Once I have looked at it more than once and slept on it, then you lay that master board, (assuming you have let the new wood acclimate at least 72 hours) and at least two more rows, all the time keeping them square/straight to the chalk line, string line --I am old fashioned, you can use one of the lasers, but I end up blotting it out. I spend a fair amount of time on this phase, as it sets the line for the rest of the floor. The longer the run, the worse a mistake will look.

You may not be able to save the transitions, as they may not be square to the new wood. Again, some people lay the transition out to align with the door jamb, but that often makes the wood look "crooked". You will need a good saw, and a really sharp hardwood blade....you want that line with the transition, even though it is made up of 12-15 narrow boards, to look like one straight line.

Once you lay out your center line, then you work to one wall or the other...what ever you have left when you get to the two walls, you have left and will have to decide how best to "hide" any issues. I Leave at least 3/8" on all walls, there is an art of more or less depending on the season you lay the floor. This why a lot of floor people use shoe moulding, to cover the gap.

I use roofing felt on the subfloor, stapled well as any staples sticking up will aggravate the new floor. I also REQUIRE that the homeowner keep HVAC on at all times while doing the floor, as changing the conditions or allowing the house to have the same temp/humidity as the outside world is not good for the wood.

Best of luck, there is quite a bit involved with this, to get a lasting install. Don't be too quick to dismiss your guy's price...good tools, saws and the skill he brings to the job may be worth it, in the long run.
 
OP
N

NewShockerGuy

Well-known member
Joined
Oct 12, 2010
Messages
2,481
Location
Northern Virginia / DC
Appreciate the info! What is the best way to make sure I get a true plumb line?

When you say a center line that doesn't necessarily mean directly in the center of the room right? I guess I got lost when you say that and then say I will work off the center line from one side or the other. Just want to make sure I'm not misunderstanding.

When you say make sure the room is square is that simply measuring from one corner to the other on both sides making sure the measurement is the same?

Good point on the transition pieces, I will have to factor this in as well.

So far the wood has been acclimated for almost a week now being inside the house which is climate controlled.

I made sure to go over the floor to remove ANY and ALL staples from the previous carpet/matting and made sure the floor was free of dust or debris... anything of that nature. So you use roofing felt instead of rosin paper? I bought rosin paper because I have seen everyone and the previous installer used it as well.

I definitely am not saying what he is charging isn't bad, but when I look at some of the areas NOW, knowing what I have read and seen online I am displeased with some nails that are "bent" into the wood in unseen areas or corners, or just in general the lack of detail which I would have addressed had I known what to do. Plus I'm not the dumbest dude out there nor the smartest but I've seen people with far worse skill than me put down wood flooring and it looked fine. (my friend, though I love him to death is a donk and if HE can do it I surely can...hahaha)

Thanks so far!

-Nigel
 

kd3pc

Well-known member
Joined
Aug 10, 2013
Messages
3,630
Location
Northern Neck
Center line...yes I use the center of the longest room or hallway....after you square the room (as you describe, corner to corner, should be the same). That long board should go from one end to the other and LOOK perfectly straight, regardless of what walls are on either side of it. No bend, no sweep, no bumps, kicks or those kinds of things. I then work one side of that board, towards the "most" floor to be laid. Then come back and finish the "less" side. I have used a string, chalk line and the like, but sometimes those can "sweep" if it is a large room. I then talc the edge of the wood, so you can "see" anything that is out of line, better. The joints should be invisible.

Rosin paper is fine, I just have used the felt so long and found that not much slides on it. Either serves the purpose.

For me the layout of the storyboard is critical, once that is over, just lay and nail and cut and finish.

You're golden, then.
 
Joined
Apr 10, 2013
Messages
21
Location
NJ
I was in your shoes a few years ago and I too took to the internet to learn as much as I could. I tackled the installation of 2400 sq ft of pre-finished hardwood in addition to retro fitting my stairs with treads.

The first thing you need to do if you haven't already done so is open up both ends of the boxes of the hardwood floor for air to circulate so the wood becomes acclimated to the inside conditions. You should also test the RH (relative humidity) of your sub floor and the wood floor and makes sure it falls within a few percent. 0-2% is ideal. You don't want your sub floor at 15% RH and your wood at 8% RH. If memory serves me correct oak should be somewhere in the neighborhood of 6-8%. (I could be off but that should be close)

Second, make sure your sub floor is free from protruding nails, etc. You also want to make sure it is flat within manufacturer recommendations. Again, I'm a bit fuzzy but it was something like a 1/4" over 10'. You want to fill in any low spots with tar paper. High spots can be sanded down with a belt sander.

Do not skimp on prep. Just like anything else, the more time you spend prepping the better the end result will be.

Now to answer your questions. Rosin paper is useless in terms of a moisture barrier. What it does provide is a smooth surface so the wood planks slide better while installing. That is the main reason why you see it being used. Luckily oak is relatively stable so if your sub floor and wood are at the same RH, you shouldn't need an underlayment like tar paper, however its good practice to use it. (I'd use it, its cheap and it's likely you will need i to fill low spots.)

The rule of thumb for wall spacing, if you are using 3/4" wood leave a 3/4" gap between the walls. This should be followed for the tongue and groove ends, the sides you can get away with less. Obviously since you are butting the wood up against the transition in the hallway there will be no spacing there, so I'd leave close to the recommended spacing. (I actually cut the bottom of my sheet rock in order to make sure my expansion gap was covered by the wall molding. I wasn't doing quarter round.)

As the previous poster mentioned above you need to make sure the transition strip is installed 90 degrees to the inside walls. Take a laser guide or a right angle and mark a 90 degree line from the transition strip all the way across the floor. You then want to measure from both walls to this line at multiple points on each side. If the measurement are the same at both ends your square. If they aren't you aren't square. Now, one thing to mention. Your bottom plate of the wall may not be straight. I laid my 8' level against the bottom of the wall to try and provide a straight measuring point for both sides.

Here's my recommendation for beginning each room off the transition strip. Once you determine each strip is square run your starting line across the room. At the mid point of each door where your starting line is face nail, or better, screw an entire row of boards across the room. You want to make sure you pick as straight of boards as possible since this is your starting row. (You are essentially sacrificing these boards to begin and keep a straight line.) Toss any boards that are warped or cut them down and use them as starter boards if a portion of it is straight.

Now, the other thing you need to be aware of. Hopefully the tongue side of the board is facing the inside of the room. This way you can install the groove part to the transition. (I doubt the tongue part is facing the room, if it is I wold think it was cut off) If the tongue part is facing the room and the tongue was removed your screwed....well, somewhat. What this means is that you will have no tongue and groove connection at the transitions and you may hear some squeaking when stepping there if the boards rub against each other.

So, lets say the groove is facing the short wall in the room and you're done installing the wood to the long wall. You obviously cant install wood backwards so you will need floor splines. These will get glued into the groove portion so you can install the wood in the other direction.

http://www.chicagohardwoodflooring.com/hardwood-floor-spline

Your going to need:

table saw
chop saw
jamb saw - I wasn't cutting door jambs by hand
set of wood chisels
8' level
belt sander?


Good luck. Show us pictures when you are done.
 
Last edited:

draglink

Well-known member
Joined
Jul 2, 2006
Messages
2,614
Location
Hayes, Va
I cannot add anything that hasn't been said. BUT AGAIN AS ABOVE --

Do not use rosin paper. Your installer probably used Aqua Bar underlayment paper. It looks JUST LIKE rosin paper but has Aqua Bar printed on it. It is a ply paper and keeps 98% of moisture out. We switched from felt to Aqua Bar on a jobsite and went from cupping wood to ZERO issues overnight with the change(builder issue, crawls were moist). You should be able to buy Aqua Bar at box stores or any wood floor supplier
 
Last edited:

volleyball

Well-known member
Joined
Aug 29, 2011
Messages
4,127
Location
NY, not NYC
Maybe you want the pro to do the hallway and set you up. Pay an extra consulting fee and go to town in the bedrooms where it may not show as much.
 
OP
N

NewShockerGuy

Well-known member
Joined
Oct 12, 2010
Messages
2,481
Location
Northern Virginia / DC
All excellent info! The installer already did the top hallway, that's the way he did the transition pieces on the doors... I'm almost 100% positive there is no groove or tongue on the pieces in the downstairs area as well since the kitchen already had wood with the transition piece, he just matched it up. So I am guessing there is no groove on that transition piece. That's fine I will just make sure to nail it down on the end pieces and staple it and hope that it doesn't squeak there, if it does, it does. I know it won't be perfect but after looking at the "pro" neither is that, and I'm more pissed that I paid a pro to do a perfect job and my OCD doesn't see past the "flaws"...

I will look and post a picture of the pictures that I took when they did the downstairs area. There are certain areas where I scratch my head and say why did they do it that way, but overall it wasn't bad. We needed to get the floor down first before we moved in and with my job and school at the time there was no way I could have done it in the short amount of time.

I will take the rosin paper back to Lowes tomorrow and pick up the Aqua Bar. I know rosin paper wasn't used for a vapor barrier but everything I saw said to use it. Anything specific about the Tar paper? Is there a thickness. Does one put the tar paper FIRST on the sub floor to bring it up THEN put the Aqua Bar paper on top or Aqua bar paper first THEN tar paper on low spot? I know right off the door there IS a high spot of about 5mm so I will sand that down. I checked the level of the room with a 72" level and for the most part it's pretty good minus that high spot. I will keep checking for sure. Does one staple the Aqua Bar to the sub floor or just simply lay it on top and overlap? How much overlap should there be from piece to piece. And does it go WITH the direction of the wood or in the opposite direction?

Aqua Bar: This is what I want right?
http://www.homedepot.com/p/Fortifiber-500-sq-ft-AQUABAR-B-Tile-Underlayment-Roll-70-195/202592567


Since I'm not in a rush at all for these bedrooms I wanted to be able to tackle this. I've done everything so far to the house, epoxy floors, maxjax install, built a shed..etc. So I don't mind learning honestly, I want to learn. I want to be able to do it properly and say look... MIC DROP..lol Just certain things are unclear to me and I'd rather ask all questions and figure it out than to be that guy that assumes and then have it come out like ***. I have no shame in asking anything I don't know.

As far as tool I think I have everything,

Got the miter saw, table saw, drill/bits, pneumatic nailer and stapler. Punches to drive the nails by hand down. 72" level, angle gauge for making cuts so I'm not free balling it by guessing. Belt sander, palm sander, oscillating tool to cut the door jams or small trim pieces.

I will measure the transition piece and hope it's square, I can do that tonight and find out. That's what I was going to do as far as possibly starting from that point but just wanted to make sure it would be ok. Luckily I'm starting with the smallest room in the house and it's pretty much a square minus the closet, which I'll also be doing a transition piece and then making the wood go the other direction I think, just for looks really) My theory is that out of all 1540sq ft that I'm doing, I should get progressively better as I do the master bedroom which would be the 4th and final one upstairs..hahah My wife eager to get the master bedroom done first, said start with that, I had to tell her why I wasn't going to start on the biggest room. NO WAY!

I'm honestly excited to do this... :)

-Nigel
 
Last edited:
Joined
Apr 10, 2013
Messages
21
Location
NJ
The exact reason I do things myself is because I know they will get done to my standards.

Buy the thinner tar paper since you say your floors look flat. Underlayments get stapled down. Wood gets installed opposite direction of the floor joists. This may be the same direction which the hallway is running. You also want to snap lines on the subfloor at the joist locations. Nail/staple to them where possible.
 
Last edited:

Beaumont67

Well-known member
Joined
Apr 10, 2011
Messages
526
Location
St. Thomas, Ontario
BTW - great thread & fantastic input by all.

Several years ago, I bought 3/4 x 3-1/4" finished oak.
Instead of calling a hardwood floor installer, and could of got a "wam-bam-thank-you-man" quick install job, I instead hired a finish carpenter friend to work along side me.
- any bend nail cleats, we cut off with a dremel tool with a tiny cut off wheel

A few years ago, we installed 3/4 x 6" unfinished Hickory plank flooring.
As Hickory is 41% more dense than oak, a cleat nailer would crack all the tongue & groove off.
- all extra hard floor boards had to be directly PL400 glued (to the 3/8" plywood subfloor, that was earlier glued & screwed, without tar paper) and T & G nailed with a finish nail gun

After doing the hallway, had two bedrooms to the right and one bedroom going to the left.
To eliminate any transition strips and make all bedroom floors seamless, we used our table saw to make up a few thin fir strip (inserting in the groove to make a tongue on some boards, starting the room). Thereby, changing the floor boards by a 180 degree direction of the T & G, entering the final bedroom.
- made the proper size tongue and glued it in the exposed groove, to reverse the plank flow
 
Last edited:

kwfloors

Well-known member
Joined
Apr 23, 2014
Messages
140
Location
In the great NW
Another thing is make sure the floor is flat. I hate the joints in the subflooring and I flatten them with an edger w/24 grit disc. On your starter rows, you can glue them with like PL adhesive and less nails if you wait like overnight for the glue to set. We have Koolglide seaming irons and have a utility tape that would do that also and set in 10 minutes. It activates the tape by sound waves so the iron itself is never hot.
 

volleyball

Well-known member
Joined
Aug 29, 2011
Messages
4,127
Location
NY, not NYC
With real wood floors, expect not perfect. Think character. It helps with the OCD and dealing with damage. I feel wood floors are loved because they are beautiful because of their flaws.
And don't think pro means perfect. I know this guy that paid a pro to do his upstairs. Talk about a hack job. Even though all the joists run the same direction, the flooring doesn't. Notched around the metal balusters. Drove me crazy looking at it, so I offered to fix it and he didn't want to spend the money so now it doesn't bother me.
 
Joined
Apr 10, 2013
Messages
21
Location
NJ
I installed walnut stained hickory in my house. Fit what we were looking for and the budget at the time. I used a stapler but didn't experience any broken tongues.

From what I understand you need to glue and nail/staple all wide plank flooring (can't remember if it is 4" or 5" and over). I would have loved the look of wide plank vs the 3 1/4" I put down but I wasn't about to add the extra work. I also used a sound dampening underlayment that wouldn't allow for gluing anyhow.

I'd be curious to see pics of the 6" floor you installed. Stained or just poly'd?


BTW - great thread & fantastic input by all.

Several years ago, I bought 3/4 x 3-1/4" finished oak.
Instead of calling a hardwood floor installer, and could of got a "wam-bam-thank-you-man" quick install job, I instead hired a finish carpenter friend to work along side me.
- any bend nail cleats, we cut off with a dremel tool with a tiny cut off wheel

A few years ago, we installed 3/4 x 6" unfinished Hickory plank flooring.
As Hickory is 41% more dense than oak, a cleat nailer would crack all the tongue & groove off.
- all extra hard floor boards had to be directly PL400 glued (to the 3/8" plywood subfloor, that was earlier glued & screwed, without tar paper) and T & G nailed with a finish nail gun

After doing the hallway, had two bedrooms to the right and one bedroom going to the left.
To eliminate any transition strips and make all bedroom floors seamless, we used our table saw to make up a few thin fir strip (inserting in the groove to make a tongue on some boards, starting the room). Thereby, changing the floor boards by a 180 degree direction of the T & G, entering the final bedroom.
- made the proper size tongue and glued it in the exposed groove, to reverse the plank flow
 

draglink

Well-known member
Joined
Jul 2, 2006
Messages
2,614
Location
Hayes, Va
After doing the hallway, had two bedrooms to the right and one bedroom going to the left.
To eliminate any transition strips and make all bedroom floors seamless, we used our table saw to make up a few thin fir strip (inserting in the groove to make a tongue on some boards, starting the room). Thereby, changing the floor boards by a 180 degree direction of the T & G, entering the final bedroom.
- made the proper size tongue and glued it in the exposed groove, to reverse the plank flow

You can buy these already made up at flooring stores. They are called 'slip-tongues'
 
OP
N

NewShockerGuy

Well-known member
Joined
Oct 12, 2010
Messages
2,481
Location
Northern Virginia / DC
Welp I just got back from getting the correct stuff!

You are correct that they did infact use Aqua Bar!!! So glad I asked honestly becuase I feel like an idiot if I used something else!

Couple pics from two years ago when they did it


And so now we begin.... here we go!

:)

-Nigel
 

Attachments

  • aquabar1.jpg
    aquabar1.jpg
    133 KB · Views: 55
  • aquabar2.jpg
    aquabar2.jpg
    137.8 KB · Views: 53
  • aquabar3.jpg
    aquabar3.jpg
    133.4 KB · Views: 48
OP
N

NewShockerGuy

Well-known member
Joined
Oct 12, 2010
Messages
2,481
Location
Northern Virginia / DC
I'm finally starting this today. Weekend was way too busy with things.

I found out that my room is off by 1/2" on the one side... so now I am confused on how to get a straight line? If I measure out the same distance from the left wall with then by the time I get to the other wal it will be off by 1/2"

I've looked at this for at least an hour and not understanding how to get a straight line on the side wall now...

Maybe I'm just frustrated but this is where I am at:

I hope the drawing is helping. I know when I installed my maxjax I had to make sure they were even with each other but this seems different to me since I'm trying to get a vertical line I guess that would equal the 90 degree mark not the 91 degrees or 89 degrees, if that makes sense.. Where it would show on the finishing wall on the right as I'm doing the last couple strips of wood...

Thanks,
-Nigel
 

Attachments

  • room.JPG
    room.JPG
    43.1 KB · Views: 40
To avoid these ads, REGISTER NOW!
Joined
Apr 10, 2013
Messages
21
Location
NJ
Your pink line, is that exactly 90 degrees off the hallway and does it measure the same off the short wall? If it measures good on 3 out of 4 walls then the one wall is 1/2" off and there's nothing you can do about it. Are you measuring off the bottom plate? Existing moulding?
 

southalabama

Well-known member
Joined
Jan 10, 2011
Messages
5,538
Location
Brewton AL
As stated above find the center line.

I've never worked on a perfectly square room. Check for square and develop a plan for that. They were close enough to be hid under the base and shoe mouldings .
 

Beaumont67

Well-known member
Joined
Apr 10, 2011
Messages
526
Location
St. Thomas, Ontario
You can buy these already made up at flooring stores. They are called 'slip-tongues'

^^^^ Thanks, good to know.
Only took 15 minutes to make our own (on the table saw) & install, without driving to next city & delaying the job, a few hours.

I installed walnut stained hickory in my house. Fit what we were looking for and the budget at the time. I used a stapler but didn't experience any broken tongues.

From what I understand you need to glue and nail/staple all wide plank flooring (can't remember if it is 4" or 5" and over). I would have loved the look of wide plank vs the 3 1/4" I put down but I wasn't about to add the extra work. I also used a sound dampening underlayment that wouldn't allow for gluing anyhow.

I'd be curious to see pics of the 6" floor you installed. Stained or just poly'd?

^^^^ We had to air nail the 6" wide Hickory plank tongue, plus PL deck glue the underside...needed to minimize the shrinking & expansion of the wide and long T&G wide wood planks.
The floor is finished now, and turned out amazing...sorry only have the construction phase photo right now.

We rented a floor sander and used my $59 HF 6" D/A variable speed polisher/sander as the free edger (saved $40 x 3 days rental).
Refinishing Material, oil base:
- First 2 coats Interior Stain - Bio Poly NT http://www.earthpaint.net/product_bioPoly_NT.php
- Next 3 coat Wear/Protection Layer - Mountain
Uses A Super Tough Cashew Resin http://www.earthpaint.net/product_mountain.php
- slightly thinned down with Pure Citrus Solvent http://www.earthpaint.net/product_pureCitrusSolvent.php
^^^^ Applied finishes with a sheep skin floor mop head.

General flooring tips:
- Hickory is 41% more dense (harder) than oak flooring...more large dog friendly re toenails & dropped bones.
Relative humidity is best to keep around 40-50%, to avoid board cupping, and combination of nailing & a good amount of glue, really helps.
- Doing the flooring reno job on our retirement home, last year - basically gutted all the floors through the main level.
Brick bungalow built in 1960 only had 1/2" thick plywood nailed to floor joist's...and squeaked bad....zero screws in ply subfloor.
- Where the 3/4" thick hickory plank flooring went, 3/8" exterior grade spruce plywood was glued with deck adhesive (like PL400) and screwed down beforehand.
Where the porcelain tile went down, 3/4" thick plywood was glued and screwed first.
^^^^ This kept all the floors flush without a transition strip...went through lots of screws & PL glue tubes.
- also took out the kitchen, to keep the dishwasher from being trapped, from raising the floor with new subfloor & porcelain tile install

Why wood moisture content matters. http://woodgears.ca/lumber/moisture.html

And a photo of the 6" wide hickory wide plank flooring, that went in earlier.
- at our retirement country home reno...and dobe Amy (old girl) supervising the floor install...LOL

Uploaded with ImageShack.us[/QUOTE]
 
Last edited:

Ewolffram

New member
Joined
May 26, 2014
Messages
4
Take a finish nail onto existing floor 6' or more onto the existing. Put the nail in the crack and put a string on it. Extend the string into your room. While someone watches your string move the other end until you stay on the same line. Pound the second nail in. Measure to your room for square (1/2" isn't enough to matter honestly) measure a multiple of the width to run the first row off the string. If you need to adjust it for square put a nail at the end of the existing floor to keep that string there while you move the other end. If the floors aren't square it won't show but you do want them to match across the threshold.

Hopefully this helps.
 
OP
N

NewShockerGuy

Well-known member
Joined
Oct 12, 2010
Messages
2,481
Location
Northern Virginia / DC
I think I was over-reacting, but damn I don't know why I couldn't figure it out.

I got it resolved and SLOWLY moving foward... So far it looks good :)

I don't know why my mind was making it this hard being on the floor... For some reason if it's a wall I have no problem figuring it out, but as soon as it's on the "ground" it's like my mind gets confused and then just get completely frustrated... lol


Thanks,
-Nigel
 

Attachments

  • flooring.jpg
    flooring.jpg
    87.3 KB · Views: 38
OP
N

NewShockerGuy

Well-known member
Joined
Oct 12, 2010
Messages
2,481
Location
Northern Virginia / DC
Welp, figured I'd update. FINALLY finished the room. It's been too busy and my "one" day install I know now isn't realistic at all...... oh well. It looks really good to me, someone on here might say it looks bad or isn't professional. But I think I did a much better job that who I paid years ago or even the builder who put wood in the house in the beginning of the hallway.

I painted the baseboards super bright white and I am amazed at how much better and cleaner they look from what the builder/previous owner had them as far as off white flat paint. I'm sure it will make the room complete once I put them on tonight.

Overall it was a good experience and I feel like the next 3 rooms will go faster and that this being my first time ever doing this it turned out quite well.

w00t w00t!

Thanks for all the help! I'm sure I will have more questions later on...like always!

*Added baseboard pics. Now it's finished. :)

-Nigel
 

Attachments

  • 3.jpg
    3.jpg
    78.8 KB · Views: 39
  • 2.jpg
    2.jpg
    63.9 KB · Views: 35
  • 1.jpg
    1.jpg
    70.3 KB · Views: 43
  • finished3.jpg
    finished3.jpg
    59.1 KB · Views: 31
  • finished2.jpg
    finished2.jpg
    76.6 KB · Views: 17
  • Finished1.jpg
    Finished1.jpg
    77.2 KB · Views: 20
Last edited:
OP
N

NewShockerGuy

Well-known member
Joined
Oct 12, 2010
Messages
2,481
Location
Northern Virginia / DC
Appreciate the link!

Welp, I've already started on the 2nd room.

It's going MUCH faster than the first one and looks even better so far..hahaha

I give it one more day to install the flooring and this will be done minus the painting of two other walls and patching/sanding/painting baseboards, then installing them. Don't mind all the wood in the last picture. I had pieces in the hallway and my wife got tired of them sitting there so she put them there...lol

I also got tongue and grove inserts so that I can switch the direction of the wood going into the closet rather than face nailing 9 rows... it will be much better!

I'm quite pleased so far! Seems to be getting better as I go and things that I was worrying about in the first room I breezed right by thus far as far as trimming door moldings, closets..etc.

Attached before, and current progression. Hopefully I can finish one day this week so that the weekend comes by and I can do the baseboards!


I actually find most of my time not in cutting the wood but simply racking it and laying it out. My wife thinks I'm almost obsessive about it, but I find myself sometimes spending 10 minutes racking two rows..lol It's ok though, I'd rather it look nice and be done once than just slopping it together like the builder did in the kitchen and then always be frustrated when looking at it. So far I have a huge grin when looking at it! Will post updated pictures once I get further down the line.

-Nigel
 

Attachments

  • before5.jpg
    before5.jpg
    84.3 KB · Views: 31
  • before4.jpg
    before4.jpg
    76.9 KB · Views: 21
  • before3.jpg
    before3.jpg
    48.3 KB · Views: 20
  • before2.jpg
    before2.jpg
    73.2 KB · Views: 20
  • before1.jpg
    before1.jpg
    85.1 KB · Views: 19
Last edited:

NorDel Garage

Well-known member
Joined
Oct 13, 2011
Messages
219
Location
Newark,Delaware
Before I put down the wood I put deck screws into the subfloor and into the joists about every foot. The only room with squeak issues is the entrance hallway. It was done when the house was built. to handle a out of square room , I had to rip the final board on the wall side . The gap was covered buy the baseboard and quarter round. Speaking of bases boards, this gave me chance to upgrade to wider board. Good luck, looks great so far!
 

Kevin54

MEMBER EMERITUS
Joined
Jan 12, 2005
Messages
29,341
Location
Urbana, Ohio
Nigel.....All I have to say is that if you were doing it for someone else.....I'd hire you in a minute. :thumbup::thumbup:

It looks fantastic, and don't let anyone try to tell you different. You are doing an outstanding job.

I don't know what your day job is, but is should have the title of Primo Remodeler. From fretting about the wallpaper last year or so, to doing an outstanding job on that, to now laying hardwood....... Fantastic!!!! :thumbup:
 

Wuaname

Well-known member
Joined
Jan 28, 2014
Messages
601
Location
Florida
Subscribed. I am entertaining installing laminate flooring in the bedroom of our hopefully new place in the next few months.

I'm guessing is the same as that described in this thread for wood floors?
 

Kevin54

MEMBER EMERITUS
Joined
Jan 12, 2005
Messages
29,341
Location
Urbana, Ohio
Subscribed. I am entertaining installing laminate flooring in the bedroom of our hopefully new place in the next few months.

I'm guessing is the same as that described in this thread for wood floors?

Laminate is a little bit different and a little more forgiving. Instead of laminate having to be nailed down, all you have to do is space out the first row. After that, it's just a matter of locking the other pieces in. Way easier than laying hardwood.

Also with laminate, just like hardwood, you need an underlayment. Some laminate comes with it already glued on to the backside. If it does, then all you need to add is a vapor barrier. Most of the time, this will be 15# or 30# felt paper that is used under roofing.

A good set of knee pads, and buy a "laminate flooring installation kit". The kit consist of plastic spacers for against the wall. It also consist of a deadblow rubber mallet, and it also will have a steel bar that is bent up on one end and down on the other. This is used to hook the flooring, then tap with a hammer to set into place.

Laminate flooring is an easy install, but will kill your knees. It really takes someone to be on their feet, and to cut and hand the boards, while you are enduring the agony of being on your knees absorbing the pain. If you are the only person that is going to be doing it......:( You have my sincere sympathy!!!!! :lol:
 
OP
N

NewShockerGuy

Well-known member
Joined
Oct 12, 2010
Messages
2,481
Location
Northern Virginia / DC
Kevin,

I appreciate that! I think I get myself worked up over some things more than others, then once I figure it out I'm ok, but up to point it sometimes is just so damn frustrating..hahah

Here are three pictures of the finished floor.

I still have to put the baseboards back up and I ended up painting the closet wall and smaller white wall a greenish color. Looks decent.

This room went much smoother than the last room that's for sure. WAY less face nailing, I've got it down to about the last 2 rows instead of the previous 6 that I did because I couldn't get the stapler in there because of the wall.

I find that racking the wood is honestly the most time consuming parts. I try and do a completely random yet nice look, and it took me about 30 minutes to rack 2-3 rows before I was happy with how it looked...lol

ONTO the 3rd room!

-Nigel
 

Attachments

  • after3.jpg
    after3.jpg
    59.9 KB · Views: 9
  • after2.jpg
    after2.jpg
    78.6 KB · Views: 10
  • after1.jpg
    after1.jpg
    91.6 KB · Views: 15
OP
N

NewShockerGuy

Well-known member
Joined
Oct 12, 2010
Messages
2,481
Location
Northern Virginia / DC
Third bedroom done.

forgot to snap pics after the doors and baseboards were put back on but you get the idea....


LAST bed room has already been started... hope to get it done in 2 weeks! SOOO much to do..arg!

-Nigel
 

Attachments

  • 1.jpg
    1.jpg
    79.9 KB · Views: 6
  • 2.jpg
    2.jpg
    79.7 KB · Views: 5
OP
N

NewShockerGuy

Well-known member
Joined
Oct 12, 2010
Messages
2,481
Location
Northern Virginia / DC
Welp figured I'd share the final...lol

Master bedroom and closets done. This was the most wood out of all the rooms, and took the longest. The part I didn't like was by the windows because it was at an angle on both sides. Other than that this room went by pretty smooth.

Overall I would say anyone that is looking to do hardwood flooring to give it a go. It wasn't nearly as hard as what I thought it was going to be but it was extremely labor intensive as far as back and forth cutting and making sure it looked good. I can say without a doubt racking the wood took me the absoulute longest. At times it took me 30 minutes to rack two rows of wood because I wasn't happy with how it looked or the pieces or the wood seams... Mind you I am a bit OCD on certain things but I know without a doubt that my racking looks 20x better than the dude we paid two years ago to do the downstairs and it looks 100x better than what the damn builder did in the kitchen.. I can see WHY though, most people here want to do a good job so they take pride in what they do for the final look.. obviously if you pay someone to do it, you want it done fast and they want to make money. If it takes them 2 months to lay 1200sq ft of wood they aren't making money.

My wife was saint in this matter cause if it was up to her she would have just paid someone the 10k and they would have installed it and been done in 3-4 days. It took me just shy of 2 1/2 months. Mind you I was really only working on the weekends. And with the above mentioned of racking the wood sometimes it got the best of me as far as time is concerned. It's done though and I'm extremely pleased with the results. It did however seem like after each room I got better, faster, and more efficient on how to handle the room.

I had to go off the transition pieces that the previous dude had in the hallway so I couldn't always just start from the one side of the room. I was often 1/4 of the way in the room because of the doorway.

Anywho, last pics. Again before the baseboards and doors attached...lol

Can't wait for next year, so many more projects! Downstairs title with heated floor, outside sprinkler system and back yard patio with firepit. **** doesn't end....lol

-Nigel
 

Attachments

  • 1.jpg
    1.jpg
    77.9 KB · Views: 5
  • 2.jpg
    2.jpg
    70.2 KB · Views: 4
  • 3.jpg
    3.jpg
    69.5 KB · Views: 6

volleyball

Well-known member
Joined
Aug 29, 2011
Messages
4,127
Location
NY, not NYC
Looks great and that you are happy with it is most important. What is the problem with it taking so long? It doesn't look like you use the rooms.
Suggest to the wife that 3 months of slow progress is way better than years and years of bitchin how wrong the job was done.
 
To avoid these ads, REGISTER NOW!
Top Bottom