To avoid these ads, REGISTER NOW!

Ad-hoc internal structure

Grimly

Well-known member
Joined
Feb 5, 2014
Messages
181
Location
Ireland
I have this old industrial building I bought 15 years ago, I have been slowly (oh, so slowly) turning it into a house, and always meant to use the large part as a workshop, but winters in it were brutal and as I was getting older it became less of a pleasure and more of a chore to do any work in the unheated two-storey-high space.
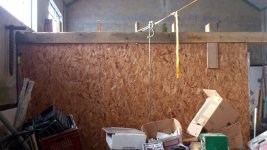
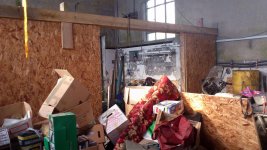
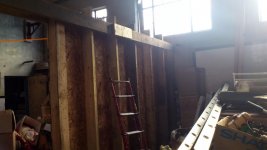
So, last summer I started building a dividing wall, making two workshop spaces in one, and by doing that, also creating an upper floor for storage of all the ****... err... useful stuff that was too good to throw away or burn. :D
The inner workshop is insulated and draughtproofed - will have a stove for next winter, too. :flamethro
Work started in the last week of April 2013, with the first screws securing the footplate and wallplate into place. Right then I'd made a mistake I paid for over the coming months.
I got a bit of a head-start by already having the vertical timbers from a previous project - they'd been lying under cover outside, so were well-seasoned (for a decade!), so brushed them down and treated them with copper sulphate/diesel as a fungicide. Wrapped them with polythene on the faces that go against the concrete.
Apart from that initial bump of materials, all the rest were bought on a weekly or fortnightly basis as I needed them. Just 30/40/50 euros-worth at a time, as I could afford it, delivered by the local hardware store, when it suited them.
Construction went in fits and starts - when funds allowed, when I could be arsed, when the weather allowed (sometimes, as the winter came in, just too ****** cold to venture down there) and of course, when not being diverted by other stuff.


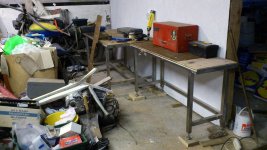
First part; the erection of the wall and shifting of the assorted ****. I hardly had to move any of it, but it was a bit of a pain in the ***, working around it all the time.
 

Attachments

  • DSC_0265.jpg
    DSC_0265.jpg
    146.5 KB · Views: 242
  • DSC_0269.jpg
    DSC_0269.jpg
    148 KB · Views: 210
  • DSC_0270.jpg
    DSC_0270.jpg
    152.4 KB · Views: 209
  • DSC_0271.jpg
    DSC_0271.jpg
    110 KB · Views: 193
  • DSC_0272.jpg
    DSC_0272.jpg
    145.2 KB · Views: 200
  • DSC_0273.jpg
    DSC_0273.jpg
    131 KB · Views: 158
Last edited:
To avoid these ads, REGISTER NOW!
OP
G

Grimly

Well-known member
Joined
Feb 5, 2014
Messages
181
Location
Ireland
Part 2
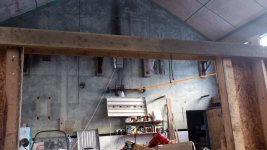
The wall is finished and the ceiling beams in place. I decided to space the beams 24" apart to allow me to slot in the ex-office ceiling light fittings, but doh! Didn't take into account the fact they were slightly wider than the allowed space - what a **** of an architect, eh? That meant trimming the lights, but oh well, it worked out ok in the end.
Going by online calcs, the locally available timbers were a bit borderline for the span, so to give them more rigidity, I inverse-T-beamed them, by glueing and screwing 2x2 timbers to the lower sides, and when the upper floor is firmly screwed down in its totality, it should all meld together as one solid unit.
Even now, with only a third of the flooring in place (enough to carry some of the **** from downstairs) it's re-assuringly bounce-free and pretty damned rigid as it stands. I'm quite happy with the way this has worked out.
 

Attachments

  • K20D0735.jpg
    K20D0735.jpg
    141 KB · Views: 122
  • K20D0734.jpg
    K20D0734.jpg
    151.2 KB · Views: 121
  • K20D0726.jpg
    K20D0726.jpg
    136.7 KB · Views: 123
  • K20D0719.jpg
    K20D0719.jpg
    133.5 KB · Views: 124
  • K20D0716.jpg
    K20D0716.jpg
    149.9 KB · Views: 136
  • IMGP2632.jpg
    IMGP2632.jpg
    146.3 KB · Views: 148
Last edited:
OP
G

Grimly

Well-known member
Joined
Feb 5, 2014
Messages
181
Location
Ireland
Part 3
All the wiring done and the lights working. The camera doesn't do it justice - I could carry out an appendectomy in there. From an online source I found the necessary / recommended lighting for a workshop space and made allowances for ageing tubes and dirty fittings to keep the lumens high enough. Turned out I needed five fittings. These fittings are 4ft x 4tubes, each of ~36W (originally 40W, but modern ones are lower power).
The ceiling lights are sitting on the side timbers of the inverted T-beams and can be removed from upstairs when and if necessary.
 

Attachments

  • DSC_0002.jpg
    DSC_0002.jpg
    117.1 KB · Views: 122
  • DSC_0009.jpg
    DSC_0009.jpg
    137.7 KB · Views: 114
  • DSC_0010.jpg
    DSC_0010.jpg
    106.1 KB · Views: 108
  • DSC_0012.jpg
    DSC_0012.jpg
    149.6 KB · Views: 133
Last edited:
OP
G

Grimly

Well-known member
Joined
Feb 5, 2014
Messages
181
Location
Ireland
Part 4
First coat of paint slapped up in parts and temporary benches laid in - eventually I'll build a solid timber bench there, but that will have to wait until I insulate the front and rear walls during the summer. It'll do for now.
I spent the last couple of days just shifting **** around and cleaning tools... so that's where I'm up to now.
More paint on the other side of the 'shop made a difference to the light being bounced around - the more, the better; you can't have too much light in a 'shop. :D

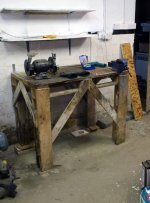
11th February - third bench in place. This is an old thrown-together totally scrap materials pallet bench I knocked up 20 years ago when I was renting a cottage with a lockup garage but no bench in it. It's somehow survived all these years and still holding together quite well, but will eventually get the chop. Not yet though; it's still got a job to do.
 

Attachments

  • DSC_0003.jpg
    DSC_0003.jpg
    122.2 KB · Views: 80
  • DSC_0004 crop.jpg
    DSC_0004 crop.jpg
    91.6 KB · Views: 74
Last edited:
OP
G

Grimly

Well-known member
Joined
Feb 5, 2014
Messages
181
Location
Ireland
Part 5
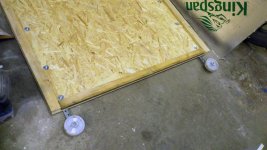
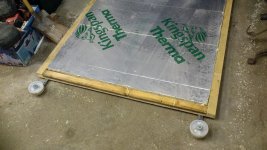
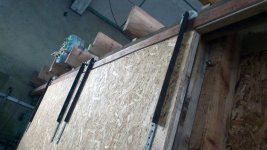
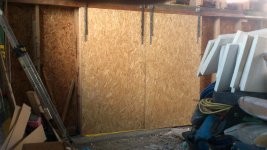
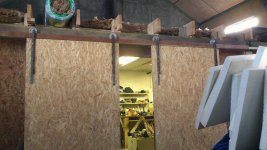
Got the timber for the sliding doors - the door track up top is simply 2 x 2 with an edging strip and the rollers had previously done duty on a truck-type thing.
Mounted them on spaced axles, bolted them to 8x4 sheets of 3/4? OSB and edged the sheets with 2 x 1" timber.
Applied spray-foam PU glue, weighted them down to set, then applied a top sheet of hardboard foam-glued and nailed all around.
That's the score for today - will do another one tomorrow.
 

Attachments

  • DSC_0001.jpg
    DSC_0001.jpg
    114.7 KB · Views: 62
  • DSC_0003.jpg
    DSC_0003.jpg
    126.2 KB · Views: 64
  • DSC_0005.jpg
    DSC_0005.jpg
    130.7 KB · Views: 64
  • DSC_0008.jpg
    DSC_0008.jpg
    118.8 KB · Views: 97
OP
G

Grimly

Well-known member
Joined
Feb 5, 2014
Messages
181
Location
Ireland
Thanks Dale;
Hah, I noticed the door-roller hangers were showing a slight bend so took them down for a welding session of a bracing angle along the sides. Nearly wrecked myself doing it, but it's sitting better. I'll do the second one tomorrow.
 
OP
G

Grimly

Well-known member
Joined
Feb 5, 2014
Messages
181
Location
Ireland
Part 6:
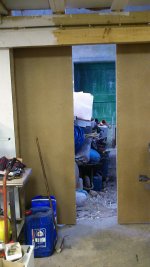
Finally, after a bit of putting up and taking down again, got the doors in place for the last time. They're not coming down any more (unless they fall down). I still have to arrange recessed handles and locking devices, but that's easy. Draught-proofing them will be easy too; strips of folded-over carpet tacked to the ends of the door and overlapping similar strips tacked to the jamb, so they meet when closed. The bottom gaps can be sealed with a wooden rubbing strip that hangs off a short curtain of carpet and rubs along the floor as the door travels. This is just a diy version of something I've seen industrially.
 

Attachments

  • doors7.jpg
    doors7.jpg
    110.5 KB · Views: 55
  • doors4.jpg
    doors4.jpg
    109.8 KB · Views: 60
  • doors2.jpg
    doors2.jpg
    110 KB · Views: 66
  • doors1.jpg
    doors1.jpg
    140.2 KB · Views: 52
OP
G

Grimly

Well-known member
Joined
Feb 5, 2014
Messages
181
Location
Ireland
Part 7.
Not directly part of the workshop, but after the last rural power cut, when I discovered my previous, scattered power-failure kit wasn't all right at all, I decided to formalise it a bit better.

The blue plugs on the right are normally hooked into mains power, but during blackouts can be transferred to the sockets on the box on the left, which is fed from an inverter, fed in turn by the car, which is pulled up to the door and a pair of HD leads connected across the battery.
Essential loads can be fed clean power from the UPS that way and while the inverter produces fairly dirty power, it's enough to run the oil burner and lighting. I wouldn't risk running the TV from the inverter (done that, it killed it later) but the PC is happy enough on the UPS and it has a satellite card in it, so normal broadcast reception is assured.
 

Attachments

  • DSC_0002.jpg
    DSC_0002.jpg
    146.4 KB · Views: 74
To avoid these ads, REGISTER NOW!
OP
G

Grimly

Well-known member
Joined
Feb 5, 2014
Messages
181
Location
Ireland
Things progress slowly, and this past summer and autumn were spent doing some useful tasks in the workshop space, mostly related to rebuilding or keeping the bikes running (as well as general maint and construction of various things). Come the winter, it became obvious I'd really better finish off the ceiling insulation and make a start on the wall insulation too, so got on with that and my, what a difference that made.
If I know it's going to be a cold day, I have a 2kW oil-filled heater on a timer, which comes on at 7am and by the time I get in there the temperature is a comfortable enough 10degC or so, which isn't toasty, but is tolerable, and when I start being active, it's warm enough. This is effectively a 3-car garage space, and all the metal work within it, tools, cabs, kit, is much more pleasant to handle when it's not too cold to be using. Draughtproofing was another thing I paid detailed attention to - that was the second most important thing.
Anyway, I recently picked up a couple of small 6-drawer filing cabinets to augment my toolbox, as it was becoming crammed with too many spanner sets. These small cabs are very handy and I only actually need one of them for spanners and other hand tools, the other cab being useful for workshop manuals, measuring instruments, etc.
Of course, I will always need more space, and I'm keeping an eye out for more Freecycle stuff like these.
ASJ4kZE.jpg
 
OP
G

Grimly

Well-known member
Joined
Feb 5, 2014
Messages
181
Location
Ireland
Finally got some air in the workshop, with a cooler built in. I re-purposed some old heating coils I'd made years ago, and they'd been abandoned outside for a while. I intend to do some blasting and spraying, so cool dry air is nice to have.

The cooler is about 36ft of 1/2" pipe, a bit of a mixture, but it holds air at 150psi ok.
The water collection pipe is 6ft of 3/4", which will hold 1/2Litre, so I'll see if that's enough capacity. No problem to add more pipe, or a bigger pipe, later.
The drops by the door, and one across the ceiling to the tyre bay complete the setup for now. I intend to have an air main around the shop, but might not need that.
Plugging in the rattle gun, I'm pleased to find it wazzes around with no loss of oomph. I'm sure a better gun would be even better :)
 

Attachments

  • Air_system_00001.jpg
    Air_system_00001.jpg
    83.4 KB · Views: 46
  • Air_system_00003.jpg
    Air_system_00003.jpg
    110.1 KB · Views: 40
  • Air_system_00004.jpg
    Air_system_00004.jpg
    108.9 KB · Views: 43
  • Air_system_00005.jpg
    Air_system_00005.jpg
    110.8 KB · Views: 36
  • Air_system_00006.jpg
    Air_system_00006.jpg
    62.7 KB · Views: 30
  • Air_system_00009.jpg
    Air_system_00009.jpg
    43.4 KB · Views: 10
Last edited:
apollo11

Banned
Joined
Aug 19, 2017
Messages
1,226
Location
State Of Reality
No wife or girlfriend?
I don't know any woman that would live in that
If I was single, I'd live in that in a heartbeat
I asked because you said you were turning it into a house.
 
OP
G

Grimly

Well-known member
Joined
Feb 5, 2014
Messages
181
Location
Ireland
Have you had any problems with the pulleys/rollers?

No, they're still working fine. I treat them with a bit of care though, as they're not tough enough for industrial mishandling. Eventually the guides will wear and perhaps the roller centres, as the bolt just goes through a nylon/plastic bore. No matter if they do, as they're going to last a while yet and it will be easy to upgrade them.
 
To avoid these ads, REGISTER NOW!
Top Bottom