I'm almost ready to insulate the (now) vaulted ceiling in my garage project (ref. https://www.garagejournal.com/forum/threads/raising-garage-ceiling-questions.500414/). The existing rafters are only 2 x 6 and while they do the job, I want to add more than R19 insulation without spending the $$$ on foam. I also plan to install a ridge vent and eave vents, so must account 1.5 - 2" for that. I'm looking for options to extend the rafter depth to allow more insulation. Rafter are ~13' long and I considered adding a 2 x 4 edge-wise to the existing 2 x 6. I did a test fit up and am not sure this is the way to go. It will be very difficult to get the fit close enough to make a good glue joint along the length, so I don't think I'll get much out of it structurally speaking. I can use Timberlok 6" screws to hold them in place, but would rather do something that would be easier to install and if not stiffening the rafter, at least not adding much dead weight to them. I plan to use metal sheet to cover insulation to minimize extra mass. One approach that I read about suggested using plywood or OSB gussets to attach 2 x 2 at whatever extension I choose. Gussets would certainly be easier to attach to existing rafters and might even add a little stiffness. Anyone have experience doing this?


You are using an out of date browser. It may not display this or other websites correctly.
You should upgrade or use an alternative browser.
You should upgrade or use an alternative browser.
Adding depth to rafters for insulation
- Thread starter MikeC55
- Start date
whateg01
Well-known member
If you aren't needing to add strength, why glue it? I dunno if this is the right answer, but a few screws and liquid nails seems like it would do the job.
firebirdparts
Well-known member
I've done that. I mean, it's hard to find a space-filler that's going to do the job that's cheaper than a 2x4.
billconner
Well-known member
I'm with the gussets. Whether you use 2x2, 2x3, or 2x4, it will be simpler. Plus you loose conductivity of the framing.
Did you consider running 2x4 perpendicular to rafters? 2 layers of batts in opposite directions with metal up and down slope?
You really should run the baffles or similar full length so the fibrous insulation isn't wind washed.
Did you consider running 2x4 perpendicular to rafters? 2 layers of batts in opposite directions with metal up and down slope?
You really should run the baffles or similar full length so the fibrous insulation isn't wind washed.
67King
Well-known member
Have you considered getting rigid sheet insulation? You could put the fiberglass in between the rafters, then put the sheet on top of that. This stuff is about $1/SF, and has an R-value the same as closed cell foam (R-6.0 for 1" thick). https://www.homedepot.com/p/RMAX-Pr...-Rigid-Foam-Board-Insulation-637900/313501508
OccupantRJ
Well-known member
I like this reply because it provides cross connection from rafter to rafter and gives a place to land the metal in a vertical orientation If that is what is desired.I'm with the gussets. Whether you use 2x2, 2x3, or 2x4, it will be simpler. Plus you loose conductivity of the framing.
Did you consider running 2x4 perpendicular to rafters? 2 layers of batts in opposite directions with metal up and down slope?
You really should run the baffles or similar full length so the fibrous insulation isn't wind washed.
strutaeng
Well-known member
Plywood strips nailed on the face of the rafters and can even have perpendicular strips on the bottom (similar to TJI joists) to help with soffit nailing.
For venting the roof, I saw one vid where the guy used 2 x cut-offs glued to rafter faces as a spacer and then installed a poly panel on them, sealed the edges, so the poly panel becomes the divider for vent. This kills 2 birds, as the poly adds insulation and will keep additional fiberglass bats from being wind washed. I could do the whole thing with multiple layers of poly, but it would cost quite a bit more than fiberglass bats to get to R-30 that way (I'm thinking put in R-21 bats after the poly layer, for a total of around R-30).
I have looked at adding 2 x 4 perpendicular, but venting becomes more problematic, since I'm starting with only a 2 x 6. Taking 1.5" depth for vent and a 2" layer of poly only leaves around 1.5" for bat before it runs into perpendicular furring, assuming furring is placed directly of bottom of existing rafters.
I have looked at adding 2 x 4 perpendicular, but venting becomes more problematic, since I'm starting with only a 2 x 6. Taking 1.5" depth for vent and a 2" layer of poly only leaves around 1.5" for bat before it runs into perpendicular furring, assuming furring is placed directly of bottom of existing rafters.
billconner
Well-known member
I was thinking something along these lines. Spacers, like a 1x2, which could be cut from foam, to space a 1/ 2 or 3/4 inch foam panel from roof sheathing and allow a 3 1/2" batt within the 2x6 cavity.For venting the roof, I saw one vid where the guy used 2 x cut-offs glued to rafter faces as a spacer and then installed a poly panel on them, sealed the edges, so the poly panel becomes the divider for vent. This kills 2 birds, as the poly adds insulation and will keep additional fiberglass bats from being wind washed. I could do the whole thing with multiple layers of poly, but it would cost quite a bit more than fiberglass bats to get to R-30 that way (I'm thinking put in R-21 bats after the poly layer, for a total of around R-30).
I have looked at adding 2 x 4 perpendicular, but venting becomes more problematic, since I'm starting with only a 2 x 6. Taking 1.5" depth for vent and a 2" layer of poly only leaves around 1.5" for bat before it runs into perpendicular furring, assuming furring is placed directly of bottom of existing rafters.
Thanks, Bill. I think it's a sound idea. But I don't think there's any way around making the rafters deeper to get the R values up. I'm thinking 1/2" plywood or OSB gussets and 2 x 3s. Another thing I'm thinking is maybe the gussets don't need to be continuous. That is, I don't think they would need to run the entire length of the rafter. Maybe 12" wide sections every 36" or so? Since I'm not counting on them for any structural support of the roof (and insulation/sheet metal cover will be light). I'll sketch something up.
billconner
Well-known member
Understood. I was thinking I combination with extending rafters. I don't know least expensive means to assure vent space and prevent the wind washing of fibrous insulation but probably not my suggestion. And extending rafters with gusset plates and two by makes sense. I think 8" squares of 1/2" ply every 3 or 4 feet would be fine, alternating sides. The extension will allow a single thick batt, which should be less expensive than 2 thinner batts. I'd probably put a gap - even a 1/2" - to break conductivity.Thanks, Bill. I think it's a sound idea. But I don't think there's any way around making the rafters deeper to get the R values up. I'm thinking 1/2" plywood or OSB gussets and 2 x 3s. Another thing I'm thinking is maybe the gussets don't need to be continuous. That is, I don't think they would need to run the entire length of the rafter. Maybe 12" wide sections every 36" or so? Since I'm not counting on them for any structural support of the roof (and insulation/sheet metal cover will be light). I'll sketch something up.
racecougar
Well-known member
Is R-30 going to be enough? Isn't code R-60 in CT?
racecougar
Well-known member
Isn't this a vaulted ceiling following the rafters?Are you planning on making an attic out of it, with a floor you will need to walk on and store stuff on? That might change what you choose to do.
Isn't the OP using liner panel?Make it flimsy enough and you’ll have cracking drywall forever.
danfromsyr
Well-known member
I used a combination of foam baffles like these and then rockwool (I'm not fond of fiberglass insul)
then I overlayed the rafters with another 1in foam..
seal gaps with a foam gun and taped seams on the flat panels.

then I overlayed the rafters with another 1in foam..
seal gaps with a foam gun and taped seams on the flat panels.
bluedog225
Well-known member
I used a combination of foam baffles like these and then rockwool (I'm not fond of fiberglass insul)
then I overlayed the rafters with another 1in foam..
seal gaps with a foam gun and taped seams on the flat panels.
Looks good. how did you attach the green foam?
Are you planning on making an attic out of it, with a floor you will need to walk on and store stuff on? That might change what you choose to do.
Great question, I was going to ask the same.
Not sure if OP has posted anything but sketches, but they also make references to adding strength to the rafters...hope he doesn't have trusses.
There's a few ways to skin this (that may be one actually!) but it's all conjecture based on what I can see.
R-60 would be nice, but this is only a garage, not living quarters, no plumbing, etc. and so will not be continuously heated (and it's being done in stealth mode). No attic, I'm doing this to get overhead clearance for a full size 2 post lift. I suppose strengthening the rafters (no trusses) would be nice, but they have done the job for over 50 years as-is, so I'm not going to spend the money to sister bigger lumber to them. Planning to use tin on the ceiling and not sure what on the walls yet. I have added 2x6 collar ties to every rafter pair, which may improve roof overall strength a little (there were none before).
danfromsyr
Well-known member
Nails,staples,glue,caulk,Looks good. how did you attach the green foam?
Can cut them snug and use friction.
You can cut the panel 2in wider than the bay.
Then score a line down each side 1in halfway thru and flip/fold the cuts to for the risers yet still attached to the panel.
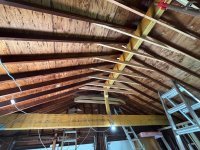
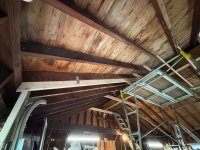
Here's a couple photos. The 2nd photo shows a test fit of a 13' long 2 x 4 edge to edge with original rafter. The rafters do have some sag, so getting the new wood to conform isn't easy and no one carries 14 footers in stock (this was a 16 footer). I'm afraid of ordering 14 footers and ending up with a bunch of warped/twisted **** (since I can't pick them myself). This is why I think the gusset method will be easier. The ridge beam (3 ply 14" LVL) was installed from back wall 20' long and is supported on forward end by 4 ply 14" LVL across width of garage. This allowed me to remove the rafter ties in this 20' section.
Attachments


willymakeit
Well-known member
OSB or plywood applied to sides with whatever depth you are using.
Im adding 5 1/2'' to mine so a 11'' gusset on side full lenght. I stagger my joints. Some gusset both sides.
Im adding 5 1/2'' to mine so a 11'' gusset on side full lenght. I stagger my joints. Some gusset both sides.
nicks78camaro
Well-known member
Deleted: Disregard, I'm dumb.
Last edited:
racecougar
Well-known member
The OP doesn't have a flat ceiling.Could you blow in cellulose or something instead and go right over the existing rafters or am I misunderstanding something?
Could you blow in cellulose or something instead and go right over the existing rafters or am I misunderstanding something?
Blown in cellulose would go over ceiling joists, not in the rafter bay.
See post #22 for what OP is doing
nicks78camaro
Well-known member
The OP doesn't have a flat ceiling.
Blown in cellulose would go over ceiling joists, not in the rafter bay.
See post #22 for what OP is doing
Definitely misunderstood and blew right past that post. Sorry.
PCustoms, I did have a PE double check my beam selections (who does this kind of stuff day in/day out), and he agreed. He did add the separate footings for the lally columns, which I made larger and deeper than he specified. The rear wall sits on a concrete block foundation about 3' tall, that was hollow, but is now reinforced with rebar and concrete poured into hollows. 3.5 x 5.25 PSL column carries ridge beam load to foundation on back wall and to 4 Ply 14" LVL on forward end. It's a 22 foot span between lally columns with point load of ridge beam at mid-span (PSL). I stopped short of the gable because I wanted to do this myself and didn't think I could handle sliding a 24 footer through hole in the gable. This gives me plenty of overhead space for the car lift and the remaining non-vaulted portion will have rafter ties 16" OC and plywood on top for light storage. I didn't need the whole length to be vaulted.
The original structure was built in late 60's with 2x8 rafter ties 48" OC. No measurable bowing of side walls. So I'm removing 5 rafter ties from the vaulted portion and adding ties to forward portion (16" OC, attached to existing 16" OC rafters).
The original structure was built in late 60's with 2x8 rafter ties 48" OC. No measurable bowing of side walls. So I'm removing 5 rafter ties from the vaulted portion and adding ties to forward portion (16" OC, attached to existing 16" OC rafters).
I put R19 in between the truss bottom chords of my addition, the screwed 3/4" foil faced poly iso to the bottom of the trusses. I taped the joints and screw heads with foil tape. Then put metal liner panels over it using the appropriate length screws.
Not so why you couldn't make the same approach. I bought "seconds" when it came to the polyiso and saved me some cash. ... maybe 40-50 cents on the dollar.
Not so why you couldn't make the same approach. I bought "seconds" when it came to the polyiso and saved me some cash. ... maybe 40-50 cents on the dollar.
racecougar
Well-known member
That wouldn't allow for ventilation from the soffit to the ridge with the OP's construction.I put R19 in between the truss bottom chords of my addition, the screwed 3/4" foil faced poly iso to the bottom of the trusses. I taped the joints and screw heads with foil tape. Then put metal liner panels over it using the appropriate length screws.
Not so why you couldn't make the same approach. I bought "seconds" when it came to the polyiso and saved me some cash. ... maybe 40-50 cents on the dollar.
If he puts in the baffles like mentioned it would.That wouldn't allow for ventilation from the soffit to the ridge with the OP's construction.
racecougar
Well-known member
He'd either compress the baffles or the insulation in that case. It may work better with R-13, but we're getting awfully light on insulative value at this point.If he puts in the baffles like mentioned it would.
Yes, probably have to use R13 or whatever appropriate size insulation. L was only talking about what I used as a reference, OP has to use materials sized to his application.He'd either compress the baffles or the insulation in that case. It may work better with R-13, but we're getting awfully light on insulative value at this point.
I now see this is the 3rd or so thread on the same roof the OP has made.
Innovate1
Well-known member
That's a lot of added lumber/beams while saying it has been fine for many years... Guessing things were sagging. If you use short gussets (really just straps) to put a 2x4 below the existing rafters there really is no need to make them full length. The strength of the 2 x 4 vs the existing 2 x 6 doesn't add much strength. And you are adding some extra weight although using tin for ceiling helps keep the weight down. Could gain some strength by adding full length gussets and stagger the joints on each side but that's a lot of material - it that case a full length for the added 2x would be better.
Innovate1
Well-known member
Do you have room for venting from soffit above the wall? I may have missed some information on that and it looks like not a lot of room there.
At present, the roof has no eaves/venting. There is enough room above the top plate of walls and I do plan to add eave extensions and soffit vents (and will install a ridge vent). Racecougar, where were you able to buy polyiso "seconds" ? This is the same roof as in the other 2 threads. I figured the subject of insulating a vaulted ceiling warranted a new thread.
racecougar
Well-known member
I did batts in the walls and blown fiberglass in the attic; I haven't touched any polyiso.Racecougar, where were you able to buy polyiso "seconds" ?
I'm planning to do something like Dan (post #17), where the foam board will create the vent channel. I'm thinking of using this foam board https://www.homedepot.com/p/RMAX-Pr...R-13-1-Foam-Insulation-Board-637898/313501510 , and then add R-19 fiberglass on top (bottom) of that, then tin ceiling (to give me a total R-32). What I'm not sure about is should the foam board be faced, and if it is, should I then use unfaced fiberglass? The description of the foam board says "with a durable white-matte (non-glare) reinforced aluminum facer on one side and a reflective reinforced aluminum facer on the reverse." I want to be careful not to trap moisture.