To avoid these ads, REGISTER NOW!

altersaddle's 12x24 workshop

altersaddle

Well-known member
Joined
Jan 31, 2015
Messages
349
Location
Victoria, BC
This is my workshop thread!

DSC05550.jpg

My shop is a 12x24 stick framed building on a foundation. Our lot is only 50x100 so space was pretty tight.

Inside I have all sorts of stuff, including my Triumph TR4 and a hobby-level wood and metal shop. No dedicated power, insulation, or walls yet - I run everything on an extension cord and have to be super careful.

DSC05551.jpg DSC05556.jpg

I set up a welding blanket like a curtain to put a bit of separation in the room and protect the car from grinding spatter.

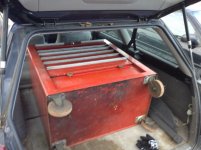
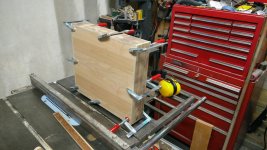
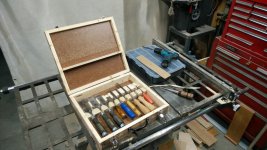
The latest project was a small hand carry toolbox for my brother-in-law. We'll fill it full of tools for a Christmas gift.

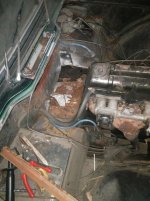
The current Triumph job is to patch up a nasty rust hole in the firewall, and get the carbs re-attached.

DSC05555.jpg DSC05554.jpg

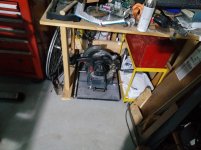
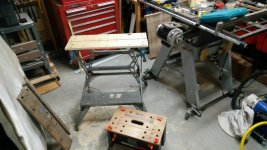
Current shop project is to build a pair of carts to go under the metal lathe bench. One will hold bicycle supplies and tools, the other will hold the bench grinder / chop saw / skilsaw and will do double duty as the work surface for whatever's going on top of it.
 
Last edited:
To avoid these ads, REGISTER NOW!
OP
A

altersaddle

Well-known member
Joined
Jan 31, 2015
Messages
349
Location
Victoria, BC
Finished off the carry box tonight. I'll post a photo once I have the last ingredient (utility knife).

Also purged my screwdriver drawer, and got rid of a bunch of crappy screwdrivers that I never used. Was hoping to get enough room for the nut drivers, but the drivers I kept filled up the drawer.

This weekend I am going to check out a storage locker auction. I've been trying to upgrade my tool chest - the Craftsman combo I have now is OK, but I'm pushing its capacity without even getting all my sockets in.

After missing a few used boxes that came up locally, I made the decision to buy a brand new one from Beach (GH Metals) in Ontario! I felt pretty smug about supporting Canadian business, until I found out this week that they have closed.

Fortunately, the timing works in my favor - I haven't given them any money yet. Unfortunately, I still do not have a new toolbox.
 
OP
A

altersaddle

Well-known member
Joined
Jan 31, 2015
Messages
349
Location
Victoria, BC
This is the full kit for the in-law gift:
DSC05564.jpg

The storage locker auction was interesting, nothing I wanted came up though. The only tools were the remains of a tiling business (tile cutter, drill press, lots of grout). Everything else was forgotten bric-a-brac of little value, although some of the lockers went for a few hundred bucks.

Tonight I started work on the bike tool roller cart. It'll be a 10"x22"x18" steel box, made of welded angle (bed frames and shelving!)
 
Last edited:
OP
A

altersaddle

Well-known member
Joined
Jan 31, 2015
Messages
349
Location
Victoria, BC
Didn't get to spend any time in the shop tonight, was out all evening driving... to get this!

49581775_934.jpg

More photos next week - I still need to pick up a new-to-me roller cab to go under it. It's massive.
 
OP
A

altersaddle

Well-known member
Joined
Jan 31, 2015
Messages
349
Location
Victoria, BC
Got the roll cab. It needs more cleanup and a bit of work on the slides (and a drawer pull) but it should last another lifetime.

It is a Vulcan (Williams' truck brand) badged MB-355 made by the Metal Box & Cab't Corp of Chicago. 7 drawers and about 150 pounds. Wheels are made in Indiana!
 

Attachments

  • IMG_0298.jpg
    IMG_0298.jpg
    137.8 KB · Views: 85
  • IMG_0299.jpg
    IMG_0299.jpg
    137.5 KB · Views: 69
Last edited:
OP
A

altersaddle

Well-known member
Joined
Jan 31, 2015
Messages
349
Location
Victoria, BC
Thanks! Someday it will be a really nice driveable car, and not just a potentially nice car!

I got home today. The slides on the bottom box were just sticky, nothing wrong (so far) but I think the lock bar is messed up. The drawers only open when the top drawer is open, so I'm going to pop the drawers off the slides (and clean behind them...) and see what's up.

Might be that is just the way it works.

It makes the 27x18 Proto top box look small too.

I would like to find a replacement badge (ha ha) and a new drawer pull (ha ha). I figure my chances are pretty slim at getting actual MBC parts so this might require some ingenuity.

In case someone has a bin full of mysterious extruded aluminum - the drawer pull I need is 27" long. I can measure the holes if necessary. There is a slot for a paper label on the MBC drawer pulls.

Update: I got the drawers out - spring release slides like similar vintage Snap-On and found a bunch of goodies in the bottom. Mostly cold chisels and punches, but also a baggie with earplugs labeled "Rest In Peace". Apparently Arnie could get pretty loud.

Also, it looks like the top drawer must be open slightly to unlock the rest of the drawers. Does this sound right?
 

Attachments

  • IMG_0302.jpg
    IMG_0302.jpg
    146.4 KB · Views: 99
  • IMG_0303.jpg
    IMG_0303.jpg
    144 KB · Views: 84
  • IMG_0304.jpg
    IMG_0304.jpg
    147.5 KB · Views: 88
  • IMG_0305.jpg
    IMG_0305.jpg
    147.2 KB · Views: 69
  • DSC05566.jpg
    DSC05566.jpg
    139.9 KB · Views: 78
Last edited:
OP
A

altersaddle

Well-known member
Joined
Jan 31, 2015
Messages
349
Location
Victoria, BC
Last night I moved all my tools from the Craftsman box into the new Proto-Vulcan stack.

It sounds like a comic book villian.

I'm left with a pile of stuff to sort, and have discovered a few of the drawers in the Vulcan are in rough shape. It has led a working life and some bent drawer slides have worn away the metal in the cabinet.

I think I'll try to repair the channel for now, but I'm considering upgrading to ball bearing slides if I have to remove the friction slides to fix them.
 
OP
A

altersaddle

Well-known member
Joined
Jan 31, 2015
Messages
349
Location
Victoria, BC
Been working on the cart for the bike tools.

The bottom shelf is done and I'm working on the top shelf now. Picked up some small square tubing to use for the legs.

It's good to get some practice welding thin metal, most of this project is crappy bed frame steel, some is thin angle that was a cheap Mastercraft workbench in a previous life.
 

Attachments

  • IMG_20151129_211220.jpg
    IMG_20151129_211220.jpg
    141.7 KB · Views: 109
OP
A

altersaddle

Well-known member
Joined
Jan 31, 2015
Messages
349
Location
Victoria, BC
Got the bike tool cart all welded up. I'll give it a coat of paint and a shelf for the bottom, and it will be a good home for all my bicycle tools.
 

Attachments

  • IMG_20151206_180748.jpg
    IMG_20151206_180748.jpg
    135.4 KB · Views: 69
  • IMG_20151206_180810.jpg
    IMG_20151206_180810.jpg
    134.4 KB · Views: 74

Denwood

Well-known member
Joined
Sep 22, 2014
Messages
4,184
Location
Thunder Bay, Ontario, Canada
I was wondering why there was no insulation, and then noticed your location in Victoria. In my travels I have seen few places as nice :)

The shop looks great..and the car is just about the right size for it.
 
OP
A

altersaddle

Well-known member
Joined
Jan 31, 2015
Messages
349
Location
Victoria, BC
Thanks Dennis! Your build thread was one of the things that hooked me on Garage Journal.

I do plan on insulating / drywalling (eventually) but first, electricity. I'm also having a mental battle with the skylight and ceiling setup - I would like to keep some attic storage but would also like to avoid condensation problems, and I don't want to block off the nice natural light I get now.

Today it was a comfy 11 degrees C, we had some sun between rain showers, so it was nice to be out in the shop.
 
OP
A

altersaddle

Well-known member
Joined
Jan 31, 2015
Messages
349
Location
Victoria, BC
Here's a tour of my top chest, a Proto J542719-12RD-D (presumed, based on measurements and drawer count)

Up top we have safety equipment. The lid usually stays open, so I want this to be easy to grab.
DSC05605.jpg

Top level drawers contain files, punches, and drill bits.
DSC05606.jpg

Nut Drivers, screwdrivers/pry-bars, and driver bits.
DSC05607.jpg

Box wrenches, Speciality wrenches, and small-med wrenches.
DSC05608.jpg

Into the full width drawers. Pliers and snips.
DSC05609.jpg

Ratchets, extensions, adapters, and some socket sets.
DSC05610.jpg

Sockets.
DSC05611.jpg
 
OP
A

altersaddle

Well-known member
Joined
Jan 31, 2015
Messages
349
Location
Victoria, BC
Been a while since I've had some time in the shop.

Today I put a coat of rust paint on the cart for my bike tools.

DSC05645.jpg

While that was drying I patched a hole in the firewall of the Triumph. It is halfway done here, still need to finish welding it up.

DSC05646.jpg

Got to play with my newest tool, a CP angle die grinder. Very nice, plenty of power. Picked it up at KMS and was pretty intrigued by the tiny "Master" brand of air tools.

Also fixed up the drain on the compressor which was leaking, just needed to be removed and retightened with teflon tape.
 

HSpencer

ALLIANCE MEMBER
Joined
Nov 28, 2010
Messages
2,854
Location
South Central US
I totally love your shop. It looks like a great place to call your own and get it the way you like it. You have a lot going on there and I really like the find on your Proto box. I was able to find a great Proto top box myself last year. Looking good and I think your place is great!! Looking forward to more and I will visit you at each time you post!!

Best Regards
Herb Spencer
 
OP
A

altersaddle

Well-known member
Joined
Jan 31, 2015
Messages
349
Location
Victoria, BC
Thanks! It is a very limited space and I often find myself at odds with ambitions. One such ambition is the ability to spray paint - I got a great deal on a pressure pot with an Accuspray HVLP gun.

Turns out it was a great deal because the gun was plugged with dried paint. Last owner wasn't a big fan of maintenance.

Luckily, Accuspray guns can be dismantled and rebuilt - that's my current side project. Going to have to soak the guts in acetone to get all of the paint out.

Also, The little yellow cart is all painted and will have to cure this week. Then I can park the bike tools under the lathe bench and figure out where to store my power tools.

IMG_20160327_195854.jpg
 
OP
A

altersaddle

Well-known member
Joined
Jan 31, 2015
Messages
349
Location
Victoria, BC
This weekend I got keen and cleaned up my hoard of wood ends. Anything smaller than my thumb or too nasty to use got tossed.

The spray gun will need an O-ring kit, so it's gone back into a project bin until that arrives.

Behind all the lumber, I found the reset button which had flown off while I was tinkering with a 1/2HP utility motor that wouldn't start! I got the motor all back together but messed something up, it's got a ground fault and immediately blows the breaker. I'll have to tear it apart again and sort it out, I think the slow speed clutch is in backwards so it's running the high speed circuit when stopped.
 

Attachments

  • IMG_20160410_125142.jpg
    IMG_20160410_125142.jpg
    90.4 KB · Views: 37
OP
A

altersaddle

Well-known member
Joined
Jan 31, 2015
Messages
349
Location
Victoria, BC
Yesterday I replaced the bearings in my block grinder. After much research I determined it would take 6203 bearings.

Princess auto sells those:

http://www.princessauto.com/en/detail/bearing-6203-2rs/A-p3850658e

Princess auto ALSO sells 6203-625 bearings:

http://www.princessauto.com/en/detail/bearing-6203-5-8-2rs/A-p3850666e

...which is what I bought first by mistake.

I used my forstner bit collection on some scrap 2x4's to make jigs to remove and install the bearings. I don't have a press, but I do have a bunch of hammers.

Runs a bit smoother now, doesn't take as long to spin down - I still need to balance or replace one wheel though as it does still vibrate at speed.
 
To avoid these ads, REGISTER NOW!
OP
A

altersaddle

Well-known member
Joined
Jan 31, 2015
Messages
349
Location
Victoria, BC
Today I swapped a noisy bearing on the 1/2hp utility motor, which was tricky because I needed a 4" puller and only have a 3".

Made these Z-bend straps and managed to get the noisy bearing out. I was going to replace the other one too but it wouldn't budge, so I left it.

DSC05652.jpg

Got it all back together again and it's just buzzing. I think I messed up the start circuit somehow, or the breaker points for the run circuit are contacting when it's not running. Going to pull it all apart again when I stop being grouchy.

Also picked up a few new-to-me air tools this weekend:

DSC05653.jpg DSC05655.jpg

I overpaid on them, $70 for the lot. There was an single-action air sander in there too which had a busted throttle (stuck on). Die grinder's nothing special and the DA sander is missing the throttle lever/rubber. The old IR 231 looks like it should be good for as long as I'll ever need it though.
 
OP
A

altersaddle

Well-known member
Joined
Jan 31, 2015
Messages
349
Location
Victoria, BC
Fixed the utility motor. I'd ended up with the start/run/throwout/centrifugal breaker all backwards somehow. Got the runners for the breaker "fork" on the right side with some fiddling, got the breaker points to close when it's stopped and the motor runs fine now.
 
OP
A

altersaddle

Well-known member
Joined
Jan 31, 2015
Messages
349
Location
Victoria, BC
Yesterday evening I rebuilt the IR 231. It wasn't in dire need of a rebuild, but I tore it apart anyway and saw that most of the vanes were worn or chipped. It also needed a new socket retainer and the little detent ball for the torque adjuster.

Of great value was this thread http://www.garagejournal.com/forum/showthread.php?t=30112& - I had a ridiculous time getting the air motor out and should have read that first! I did finally get it out, and cleaned up the casing, and got it all back together. Seems fine now.
 
OP
A

altersaddle

Well-known member
Joined
Jan 31, 2015
Messages
349
Location
Victoria, BC
Had a long hiatus due to work, holidays, etc. Yesterday got out of that by making a floor transition for the house out of fir.

Also picked up some new tools:

IMGP0003.jpg

Three Indestro DBEs, a tiny Billings 0000 (5/16"?) machinists' wrench, and a box of tool bits for the metal lathe. Quality Unexcelled!

The next big shop project is to make a home for the bench grinder / skilsaw / chopsaw (rollaway) and to put wheels on the stand for the bandsaw.
 
OP
A

altersaddle

Well-known member
Joined
Jan 31, 2015
Messages
349
Location
Victoria, BC
Work continues on the chop saw / grinder cart. I don't think there will be enough room for the skilsaw, but maybe it can get tucked in somewhere.

Got casters on the base, which was a cheap tablesaw table that I had been saving for some reason. This is a good reason!

Spent this evening welding up legs. A plywood shelf and top will go on these legs, which will ride on the base, and then I can wheel out the whole works and put either tool on top to use it, then put it all away again.
 

Attachments

  • IMG_20160606_205031.jpg
    IMG_20160606_205031.jpg
    137.1 KB · Views: 32
  • IMG_20160606_214303.jpg
    IMG_20160606_214303.jpg
    143.6 KB · Views: 27
OP
A

altersaddle

Well-known member
Joined
Jan 31, 2015
Messages
349
Location
Victoria, BC
Finished the cart for the chop saw and grinder. It ended up being a tight squeeze to get everything in, I needed to bungee the handle on the chop saw down to get an extra 1/2".

The plywood I used for the top and shelf is pretty crummy. I might replace the shelf with click flooring, which is thinner and slippery and would make it easier to slide out the grinder, and swap out the top for some thicker birch ply. That's a later project now though, I need to get busy on the bandsaw stand so I can use the bandsaw!
 

Attachments

  • DSC05683.jpg
    DSC05683.jpg
    143.1 KB · Views: 29
  • DSC05682.jpg
    DSC05682.jpg
    138 KB · Views: 34
  • DSC05681.jpg
    DSC05681.jpg
    141.2 KB · Views: 30

HSpencer

ALLIANCE MEMBER
Joined
Nov 28, 2010
Messages
2,854
Location
South Central US
Good to see your posts and the tool cart is a great project. I also use these carts mostly made from mid century typewritter stands. I like the Typing stands as they already have the dynamics worked out on the casters and they raise and lower with one lever. I have three of these in use. If you can find the old ones, they are heavy and work well for woodworking tools.
Your shop continues to develop and I enjoy your work and postings!!

Best Regards
Herb
 
OP
A

altersaddle

Well-known member
Joined
Jan 31, 2015
Messages
349
Location
Victoria, BC
Thanks Herb!

My parents had an ancient Underwood typewriter desk, with some crazy counter-sprung mechanics to let you stow away a heavy typewriter. I think it was solid oak. Not sure if they still have it.

Today I got the motor mounted on the bandsaw stand, which was very encouraging! Had to do a mercy run out to Lee Valley to pick up a replacement tire for the lower wheel, the old rubber tire was really loose.

Tomorrow I should be able to button up the whole works and use the bandsaw.
 

Attachments

  • IMG_20160618_202019.jpg
    IMG_20160618_202019.jpg
    107.5 KB · Views: 34

BiTurbo228

Well-known member
Joined
Jun 13, 2016
Messages
252
Location
South of England
Nice little workshop you have there, and I love the car :)

I've got a similar sized workshop, but a lot taller so I'm lucky that I can store loads of things on the walls! I've also got a Triumph Spitfire project, although yours is a lot more complete than mine!

I like the little carts to trolley around power tools. I'm planning on making something similar for my cheapo TIG welder so I'll see if I can pinch some design features!
 

ADSR

Well-known member
Joined
Jan 12, 2013
Messages
10,713
Thanks Herb!

My parents had an ancient Underwood typewriter desk, with some crazy counter-sprung mechanics to let you stow away a heavy typewriter. I think it was solid oak. Not sure if they still have it.

Today I got the motor mounted on the bandsaw stand, which was very encouraging! Had to do a mercy run out to Lee Valley to pick up a replacement tire for the lower wheel, the old rubber tire was really loose.

Tomorrow I should be able to button up the whole works and use the bandsaw.

looks good

When I start working on my saw project, I'll have some questions for you:beer:
 
OP
A

altersaddle

Well-known member
Joined
Jan 31, 2015
Messages
349
Location
Victoria, BC
Well, as soon as I got the bottom wheel replaced the saw threw the top wheel. I had to mail order the second one and that really slowed things down.

But it's done! I made a blade guard out of sheet metal and now I have a band saw.
DSC05777.jpg

I also picked up a D-handle for my router, which will make it easier to use.
DSC05776.jpg

This afternoon I patched up a bit more of the firewall on the Triumph. It is slow going because the metal is very, very rusty. When I'm old and impossibly rich I will have a huge multi-car workshop and then the car will get a full extreme restoration, with the body coming off and being rebuilt properly.
DSC05775.jpg
 

BiTurbo228

Well-known member
Joined
Jun 13, 2016
Messages
252
Location
South of England
Nice little patch job :) I know the pain of having to weld to less-than-perfect metal to try and avoid a full-scale restoration.

Jealous of the band saw as well. Is it metal or wood or both?
 
OP
A

altersaddle

Well-known member
Joined
Jan 31, 2015
Messages
349
Location
Victoria, BC
Jealous of the band saw as well. Is it metal or wood or both?

It's just for wood, if I wanted to do metal I'd have to rig up a jack shaft or something to get it to slow down.

My plan is to get a porta-band and then make a stand for it, but I've promised myself to sort out my handheld power tools before buying anything new.
 
OP
A

altersaddle

Well-known member
Joined
Jan 31, 2015
Messages
349
Location
Victoria, BC
Not much happening in the shop lately; been working on replacing the deck in the back yard.

I did pull out my fiberglass patch job on the Triumph battery box and am replacing it with steel.
 

Attachments

  • IMG_20160718_201603.jpg
    IMG_20160718_201603.jpg
    143.9 KB · Views: 17
OP
A

altersaddle

Well-known member
Joined
Jan 31, 2015
Messages
349
Location
Victoria, BC
It's been a long time and I haven't made any progress on the Triumph, which is a bummer.

I did replace the jaws on the Workmate, though. Finally got to use a bunch of the tools I've been hoarding. Used tee nuts instead of trying to rescue the original ones, which I think were epoxied in? It's hard to tell. Went with plywood like the old ones.

Band saw works pretty good now, I put a nice big blade on it for resawing and rescued some of the lumber from the old deck to make a crate for the skilsaw. I'm considering getting rid of the chop saw in favor of using just the skilsaw (or handsaws), to get back that shelf / storage space.
 

Attachments

  • IMG_20170604_220640.jpg
    IMG_20170604_220640.jpg
    148.7 KB · Views: 15
  • img_20170518_205349.jpg
    img_20170518_205349.jpg
    142.5 KB · Views: 16
OP
A

altersaddle

Well-known member
Joined
Jan 31, 2015
Messages
349
Location
Victoria, BC
Today I got the wood lathe running again, it's been serving duty as a wire wheel for too long.

Last trip to Lee Valley I got some chisels. What with having extra lumber from dismantling the deck, I figure I should make a proper home for them.

But before doing that I wanted to sort out a few project chisels I had picked up from who-knows-where. I had two socketed wood chisels, one just missing a handle but the other was severely abused. Last night I chucked the pounded one in the metal lathe and cleaned up the socket. Today I used up some hickory (shovel handle!) that I had been saving to make new handles for the chisels.

The chisel case is going to be 16"x14" and will be similar to my existing plane box.

I'm going to keep my eyes open for a few more nice old long shank chisels so I can put all the short ones in a separate set.
 

Attachments

  • IMG_20170611_133534.jpg
    IMG_20170611_133534.jpg
    149.1 KB · Views: 18
  • IMG_20170611_145256.jpg
    IMG_20170611_145256.jpg
    151.2 KB · Views: 18
  • IMG_20170611_163622.jpg
    IMG_20170611_163622.jpg
    148.4 KB · Views: 19
OP
A

altersaddle

Well-known member
Joined
Jan 31, 2015
Messages
349
Location
Victoria, BC
Tonight I discovered that many of my router bits are too big around for the standard porter-cable baseplate. So I made a ghetto plate out of scrap click flooring with a bigger hole for the bit.

Did the job, I carved out a 3/8" rabbet in the lumber to build the box and glued it up.

I also spent the extra time to carefully fit all the pieces and square them up, I've a bad habit of just slapping it together willy-nilly and then finding out the next day that there's a twist or a bow or something's out of square.
 

Attachments

  • DSC05943.jpg
    DSC05943.jpg
    138.9 KB · Views: 16
  • DSC05942.jpg
    DSC05942.jpg
    144.2 KB · Views: 14
OP
A

altersaddle

Well-known member
Joined
Jan 31, 2015
Messages
349
Location
Victoria, BC
Yesterday I put the top and bottom on the box, today I opened it up and put some hardware on. I used more leftover click flooring for the panels. It's OK to work with, the melamine finish doesn't take glue well so I cut into it a bit to expose the particle board core.

Coming together! Tomorrow I'll fit some sort of blocking to hold the actual chisels and put something on the lid to keep them steady.

Box is a bit big so I'll use just screws without glue to hold whatever goes in there, so it can be changed out later.

Was also thinking of doing some kind of pop-up mechanism to present the tools when you open the lid, but that would add way too much time onto this project!
 

Attachments

  • IMG_20170613_211514.jpg
    IMG_20170613_211514.jpg
    151.1 KB · Views: 19
  • IMG_20170614_195518.jpg
    IMG_20170614_195518.jpg
    150.4 KB · Views: 21
  • IMG_20170614_201247.jpg
    IMG_20170614_201247.jpg
    146.9 KB · Views: 20
Last edited:
OP
A

altersaddle

Well-known member
Joined
Jan 31, 2015
Messages
349
Location
Victoria, BC
More work on the chisel box this week/weekend. Got a handle, and finished off the woodwork on the inside.

Just need to get or make some rubber feet and a bit of foam or felt to stop them from rattling around, then it's done.
 

Attachments

  • IMG_20170618_162831.jpg
    IMG_20170618_162831.jpg
    141.8 KB · Views: 13
  • IMG_20170618_200311.jpg
    IMG_20170618_200311.jpg
    151.8 KB · Views: 16
To avoid these ads, REGISTER NOW!
Top Bottom