To avoid these ads, REGISTER NOW!

Another Craftsman Drill Press Restoration

Scimonetti

Well-known member
Joined
Aug 25, 2014
Messages
431
Location
VT
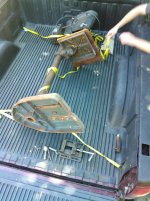
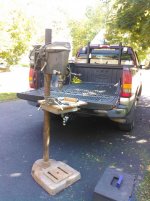
After lurking around Garage Journal for the past year or so and learning a ton, I finally decided to sign up. I just picked up this drill press I've been looking for for the past year or so, and I think its time to try and make a thread on this project!
 
To avoid these ads, REGISTER NOW!
OP
S

Scimonetti

Well-known member
Joined
Aug 25, 2014
Messages
431
Location
VT
Here are some pictures right now, bought it for 75 bucks.
 

Attachments

  • IMG_20140927_122435.jpg
    IMG_20140927_122435.jpg
    145.6 KB · Views: 198
  • KIMG0011.jpg
    KIMG0011.jpg
    136.7 KB · Views: 162
  • KIMG0012.jpg
    KIMG0012.jpg
    147.7 KB · Views: 205
  • KIMG0014.jpg
    KIMG0014.jpg
    141.2 KB · Views: 140
OP
S

Scimonetti

Well-known member
Joined
Aug 25, 2014
Messages
431
Location
VT
Thanks! I'm starting to really set up a shop, and im trying to do it with old Craftsmans like Red leader
 

PWRstroke_smoke

Well-known member
Joined
Aug 30, 2014
Messages
309
Location
NorCal
Awesome looking press!! I am trying to do the same thing just bought my first house and setting it up with old craftsman. got a 150 and a block grinder so far. I just finished the restoration on the 150 press, let me know if you need any help or pictures.
 
OP
S

Scimonetti

Well-known member
Joined
Aug 25, 2014
Messages
431
Location
VT
Thanks! Yours came out great, Nice job on the gray paint job. I'll paint it either that or the original blue (which is cobalt cannon in valspar I think). So far I've restored a table saw I bought for $50, and bought a belt sander for $50 with a junk motor.


Last edited:

bluebolt

Well-known member
Joined
Dec 28, 2008
Messages
5,441
Location
Benton LA
Nice restorations so far! I like the idea of using the saw motor to power the sander and the sander wood base that goes in the saw miter gauge grooves.
 
OP
S

Scimonetti

Well-known member
Joined
Aug 25, 2014
Messages
431
Location
VT
Did some badge removal and disassembled the whole head unit, and found out what the real color was!
Everything came apart okay, and I managed to get the table unstuck, but not the head unit still.
Speaking of the table, it's a tilting one with a pristine angle gauge underneath, but is missing the tilt lock down knob (no problem), and has a small hole.

 
OP
S

Scimonetti

Well-known member
Joined
Aug 25, 2014
Messages
431
Location
VT
I'm a bit stuck on the last part of dissassembly. The column is stuck in the base. It's not necessary to get off but would allow me to sand and polish it in my homemade long bed larhe. I would love any input. I will throw the base in an electrolysis tank to clear off the crud, so maybe if I do that with the column onitit will come off? I've gone through half a can if pb blaster and nothing had soaked through to the bottom. Thanks!
 

pendragon1998

Well-known member
Joined
Mar 24, 2012
Messages
3,733
Location
NE Georgia
If you put the column halfway into a tank for electrolysis you may end up with a dark line around it at the water surface level.
 
OP
S

Scimonetti

Well-known member
Joined
Aug 25, 2014
Messages
431
Location
VT
Went out and got a wire wheel for my dad's bench grinder(still trying to find a block grinder) and did all of the hardware. The fine wheel I got won't take off the flaking chrome, so Haven't gotten to the knobs yet. Still trying to get the column off the base.
 
OP
S

Scimonetti

Well-known member
Joined
Aug 25, 2014
Messages
431
Location
VT
A pleasant surprise, the chuck is in amazing shape and goes through it's whole travel silky smooth. I chucked up the pulleys in my homemade lathe and did a not perfect but the best I could do without altering the pitch job of cleaning them up. The castings are pretty misaligned. This is the better of the 2

 
OP
S

Scimonetti

Well-known member
Joined
Aug 25, 2014
Messages
431
Location
VT
I also made an investment in my restorations and finally bought WD40 by the gallon. Those spray cans never make it down past 1/3 empty...
 
Last edited:
OP
S

Scimonetti

Well-known member
Joined
Aug 25, 2014
Messages
431
Location
VT
Are you going to try and match the original color that you found under the badge ?

Yes, I believe it is Valspar Cobalt Cannon. It matched my table saw and almost this. It looks a bit closer, but this was off my crappy phone.
 
OP
S

Scimonetti

Well-known member
Joined
Aug 25, 2014
Messages
431
Location
VT
With the exception of the base, I have everything that needs to be stripped in a pile. I'm looking into electrolysis because I can't wire wheel these parts and I don't have a sandblaster.
 
OP
S

Scimonetti

Well-known member
Joined
Aug 25, 2014
Messages
431
Location
VT
Got the motor apart, and broke the silicon wafer the centrifugal switch is on pulling wires... Need to check ebay for a replacement...

I also will need to rewire it to some extent. Wether I splice in new wires right before the insulation strips/wire breaks, or untie the originals from the windings and start over is up for debate, any input would be appreciated.
 

ckadams00

Well-known member
Joined
Sep 12, 2011
Messages
1,273
Location
Seattle, WA
Awesome, I've rebuilt three of these - keep us posted!

I have never had to mess with the wire windings - just splice new wire in and heatshrink - I have always had good luck in cleaning up the motors and replacing the bearings with no other issues.
 
OP
S

Scimonetti

Well-known member
Joined
Aug 25, 2014
Messages
431
Location
VT
The motor bearings appeared to be good, so I flushed them with mineral spirits and repacked them with some old trailer hub grease.

 
To avoid these ads, REGISTER NOW!
OP
S

Scimonetti

Well-known member
Joined
Aug 25, 2014
Messages
431
Location
VT
Awesome, I've rebuilt three of these - keep us posted!

I have never had to mess with the wire windings - just splice new wire in and heatshrink - I have always had good luck in cleaning up the motors and replacing the bearings with no other issues.
Thanks! I would much rather do that
 
OP
S

Scimonetti

Well-known member
Joined
Aug 25, 2014
Messages
431
Location
VT
Ok, so I really need one of these

and one of these(just the knob) The top one was missing and I just took a big chunk out of the the other knob when I tried to wire wheel off some chrome with an angle grinder. I might be able to reshape it on the lathe, I'll keep you posted.
 

tedsters

Well-known member
Joined
Oct 29, 2012
Messages
1,443
Location
Michigan
your doing a good job on every thing I am putting a craftsman garage together also and i have such a mess in my garage i will be lucky to get started on everything by january, I have actually picked up a lot of things in the last few months with the cast iron pedestal stands
 
OP
S

Scimonetti

Well-known member
Joined
Aug 25, 2014
Messages
431
Location
VT
One other thing I forgot to mention, as we loaded it up, my brother checked it for any parts/trim that might fly out or rattle free. Wedged at the base of the motor was this


My first one in person!
 

gilbo

Well-known member
Joined
Feb 1, 2010
Messages
716
Scimonetti if you could scan and post it up to vintage machinery.org
 
OP
S

Scimonetti

Well-known member
Joined
Aug 25, 2014
Messages
431
Location
VT
I was able to chuck up the round knob in my lathe and take an 1/8" off the top with 40 grit, taking out the hunk the wire wheel left. I'm thinking about starting a thread about chrome plating removal, I couldn't find one searching.
 
OP
S

Scimonetti

Well-known member
Joined
Aug 25, 2014
Messages
431
Location
VT
Set up my electrolysis tank today, and decided to try the motor end caps. It's been sitting for about 7 hours and there is some crud on top but no paint coming off or really noticeable change. I am only using a 12v 6a charger, didn't clean off the contact surfaces, and didn't have enough baking soda to make the proper mix. I guess it is important to do well! I'll try again, but does this setup look good for the most part?
 
Last edited:

gilbo

Well-known member
Joined
Feb 1, 2010
Messages
716
i have always used washing soda, i have never used baking soda,is it still bubbling, but after 7 hours majority of the rust should be gone off that piece.yea you might to add some more soda. the paint will come right off once do the rinse off scrub

i also use a rebar across instead of the wood pieces, and wrap the wire around the rebar then attach the neg clip to that
 
Last edited:

s2kattracks

Well-known member
Joined
May 20, 2014
Messages
230
Location
Nashville, TN
Nice work!

I have a table saw very similar to yours that I am slowing restoring(but using weekly lol)

Today, I just picked up a late 40's early 50's craftsman jointer w/ cast iron stand, to start restoring. Love these old Craftsman tools
 
OP
S

Scimonetti

Well-known member
Joined
Aug 25, 2014
Messages
431
Location
VT
Nice work!

I have a table saw very similar to yours that I am slowing restoring(but using weekly lol)

Today, I just picked up a late 40's early 50's craftsman jointer w/ cast iron stand, to start restoring. Love these old Craftsman tools

That's on my wish list! Glad you found one, I just saw the picture you posted of that, man that is cool. Something tells me these are a slippery slope...
 
To avoid these ads, REGISTER NOW!
Top Bottom