To avoid these ads, REGISTER NOW!

Another garage door header post

md2020drums

Active member
Joined
Jan 21, 2023
Messages
27
Location
Kent WA
Hi everyone! Long time lurker, first time signer upper and post-er!
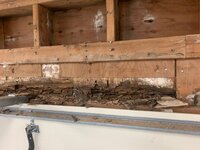
Quick backstory; I Bought this place after selling my first during the real estate boom here in Washington state. After a while here I discovered my “safe space” aka the shop (lol) had been afflicted with what appeared to be termites. Turns out they were carpenter ants. They did a number on the framing.

Which leads me to my question- is jacking up the rafters in front of the header going to be enough to support it while I remove the header? Also will likely need to replace some of the top sill(sp?). Looks like these little pos’s made it through at least one of the 2 2x6’s comprising the top sill. The span of this particular shop bay is approx 10’ 1”. The header is a 4x12 with 2x4s to be flush with the interior wall.
I’ve attached pictures to help paint the picture.

Thank you all in advance
 

Attachments

  • 2B922FBF-A1B0-434E-9605-444029450FBC.jpeg
    2B922FBF-A1B0-434E-9605-444029450FBC.jpeg
    703.9 KB · Views: 201
  • 27DC2BC8-401B-4BBF-A091-4BDE83977D03.jpeg
    27DC2BC8-401B-4BBF-A091-4BDE83977D03.jpeg
    709.5 KB · Views: 198
  • A830703D-E117-4D1C-B8ED-5B5F2CF97568.jpeg
    A830703D-E117-4D1C-B8ED-5B5F2CF97568.jpeg
    583.7 KB · Views: 189
  • 1791C4DB-C8CF-46EF-A73E-84C1FAEC088D.jpeg
    1791C4DB-C8CF-46EF-A73E-84C1FAEC088D.jpeg
    517.8 KB · Views: 187
  • BE2C6A91-C407-47F6-A3C9-69E9635D25E7.jpeg
    BE2C6A91-C407-47F6-A3C9-69E9635D25E7.jpeg
    549.5 KB · Views: 193
To avoid these ads, REGISTER NOW!

ericlar80

Well-known member
Joined
Nov 14, 2014
Messages
362
Location
California
Yes, you can just get some screw jacks or wood jacks under the rafters on the inside and change out what you need to in the framing below. Personally, I’d cut the drywall back, string a 2x6 across the area I was lifting, and place a jack every 4ft, at least. This will keep everything nice and straight.

You don’t need to lift it but 1/16th. Basically just take the weight off and give enough space to sneak everything back in there.

Wood jack:
 
OP
M

md2020drums

Active member
Joined
Jan 21, 2023
Messages
27
Location
Kent WA
Yes, you can just get some screw jacks or wood jacks under the rafters on the inside and change out what you need to in the framing below. Personally, I’d cut the drywall back, string a 2x6 across the area I was lifting, and place a jack every 4ft, at least. This will keep everything nice and straight.

You don’t need to lift it but 1/16th. Basically just take the weight off and give enough space to sneak everything back in there.

Wood jack:
That wood jack thing is some serious ingenuity!
Thank you for getting back with the good information.
I just wanted to be sure so the whole shebang didn’t come tumbling down on me.
The rafters in my shop run parallel to the garage door. (top sill). How would I go about securing the 2x6, would I run the jacked 2x6 perpendicular to the rafters?
 

ericlar80

Well-known member
Joined
Nov 14, 2014
Messages
362
Location
California
Thinking about it some more…

If you are ok with taking a few of the exterior slats off the wall, I would do that above the top plate, including 16+ inches beyond the garage door to each side. Then, scab a 3x8 onto that open area, using 2 ledger screws into each stud, and use 2x4s to support it along its length. I would run a temporary “bottom sill” on the ground to nail the 2x4s into. I’d probably run a few heavy nails from the 2x4 into the asphalt, especially if it is sloped.

The 2x4s would have the wide face against the wall so that they can support the 3x8 from underneath it.

The ledger screws need to stay at least 1” away from the top/bottom edges of the 3x8, and I think 5” away from the end of a stud they are screwed into. So make sure it is up high enough above the top plate.

Once this is setup you will have free and clear access to the whole interior and be able to change whatever you want. Review this option for yourself if you think it is safe, and hire it out to a licensed framer if you are unsure.

Consider whether you want a wider garage door at this point because it’s not much additional work.

Simpson Strong-Tie SDWS22500DB-R50 5" x .220 Timber Screws (Exterior Grade) 50ct https://www.amazon.com/dp/B0084KQUAC/?tag=atomicindus08-20
 
OP
M

md2020drums

Active member
Joined
Jan 21, 2023
Messages
27
Location
Kent WA
Ironically, it’s the bay next to it that I would make bigger…
I don’t mind pulling slats off since all the siding needs to be replaced anyway. I don’t think you can tell from the pictures, but they were the tip-off that started this whole mess.

From what I understand here, you’re saying to remove the siding up to the studs above the sill, and attach the 3x8 across the studs ABOVE the sill and support it with 2x4’s (sideways facing)?
 
OP
M

md2020drums

Active member
Joined
Jan 21, 2023
Messages
27
Location
Kent WA
You’re the man. I’m going to open her up and head to the hardware store. I have lumber, but I’ll need 12+ ft 2x4’s to be able to reach above. That siding will peel right off as it’s definitely compromised. Fiasco. What doesn’t kill us makes us stronger, right? Lol
 
OP
M

md2020drums

Active member
Joined
Jan 21, 2023
Messages
27
Location
Kent WA
I'd be very pissed at the *home inspector and thinking about his oversight and liability.
*(required by many lenders)
Oh man, not sure which part of the states you live in, but here in Washington if you wanted to get a house you pretty much would forgo the inspection :/. I saw red flags when I did my own inspection, but I didn’t know it would be THIS bad. I’ve stayed in touch with the previous owners and they genuinely seem like decent people. When I mentioned this, they claimed to not have known about the carpenter ants and damage. The wall in question had 1/2” plywood instead of drywall, and the ants hadn’t made it through yet. But still, I think I would have noticed the signs if I was the previous owner. But again, I’m pretty hyper focused on maintenance and even the minutia. There’s a lot of work that needs to be done here. A lot
 

JohnX14

Well-known member
Joined
Jun 2, 2014
Messages
548
Location
Boston 'burbs
I'd be removing the overhead door and re-framing the jacks, studs, header, and checking out the rest of the studs and sheathing. Once the door is out, it isn't much more work to replace anything damaged. I'm sure it isn't limited to the header. And there isn't a whole lot of weight on a gable wall
 
OP
M

md2020drums

Active member
Joined
Jan 21, 2023
Messages
27
Location
Kent WA
Yeah, the market was ridiculous. The neighborhood I lived in before would become really weird at night. Random suspicious characters with shopping carts filled with junk walking through the neighborhood, drag races down my street. Even had to chase people off from my backyard on multiple occasions.
When the market was peaking out a year and a half ago, I convinced myself to “upgrade”.
I made way more than expected on the sale.
Had I been smart, I would have held onto that money and waited until things slowed down. Kind of like they are now.
As much as I love this old house, I probably should have stayed put in my first home. My utility bill has tripled -this house was built in 1924 and wasn’t insulated well(I’ve been chipping away at this). I severely underestimated the amount of work this place needs. Again, I am ocd about things being broken/rotted/peeling etc so it may just be my crazy brain.
Oh man, went off on a tangent there. Not sure where I was trying to go with this.
Anyway, probably should have posted this in the introductions sub lol. Either way, I’m definitely glad I finally joined this forum.
 
OP
M

md2020drums

Active member
Joined
Jan 21, 2023
Messages
27
Location
Kent WA
I'd be removing the overhead door and re-framing the jacks, studs, header, and checking out the rest of the studs and sheathing. Once the door is out, it isn't much more work to replace anything damaged. I'm sure it isn't limited to the header. And there isn't a whole lot of weight on a gable wall
I got started on the first bay and replaced the affected jacks and studs. The header sustained some damage, but not bad enough to warrant replacing it.

The one I’m on now is bay #2. As much as it would be easier to remove the door, it’s going to leave a huge hole. I’m hoping that I can do this without removing it. I have a lot of tools and random things in the shop and I’m still in Kent lol.
And you are right- the studs holding it up were mostly chewed through.
 

ericlar80

Well-known member
Joined
Nov 14, 2014
Messages
362
Location
California
Seems like 3x8’s can only be acquired from an actual lumber yard. Can I use like a 6x6 instead to split the difference?
Since you are stripping the exterior, you could use a 2x8. Again, use ledger screws into each of the studs above the top plate to support the weight of the eves.

Notch a 1.5x7.5” section out of the top end of the temporary 2x4 supports, so the 2x8 is supported by these notches. Put a couple GRK style screws through the notched upright of the support stud and into the ledger to lock the supports to the ledger. The temp studs will have the narrow face against the wall in this case. Have a nail plate at the bottom, below the temp support studs.

I’m picturing the support studs every 16-24”.

I’m suggesting an 8x lumber to keep the 2 ledger screws from splitting the existing studs in the wall. It will give them a little distance between each other.

Like someone else said, I’d probably replace anything suspect. King and jack studs, for example.
 
OP
M

md2020drums

Active member
Joined
Jan 21, 2023
Messages
27
Location
Kent WA
Since you are stripping the exterior, you could use a 2x8. Again, use ledger screws into each of the studs above the top plate to support the weight of the eves.

Notch a 1.5x7.5” section out of the top end of the temporary 2x4 supports, so the 2x8 is supported by these notches. Put a couple GRK style screws through the notched upright of the support stud and into the ledger to lock the supports to the ledger. The temp studs will have the narrow face against the wall in this case. Have a nail plate at the bottom, below the temp support studs.

I’m picturing the support studs every 16-24”.

I’m suggesting an 8x lumber to keep the 2 ledger screws from splitting the existing studs in the wall. It will give them a little distance between each other.

Like someone else said, I’d probably replace anything suspect. King and jack studs, for example.
I was going to do double 2x8’s for the top support, or is that overkill?
Also, about the 2x4’s being notched, are you saying I could use 1 2x8? I am about to go to Home Depot to grab the stuff. Been tearing off the siding and doing a whole lot of staring at it. It’s nasty under there
 

Attachments

  • image.jpg
    image.jpg
    799.4 KB · Views: 135

ericlar80

Well-known member
Joined
Nov 14, 2014
Messages
362
Location
California
Yeah, if you put a supporting stud every 16-24”, anchored well, you should be able to just use a single 2x8.

For replacing the actual header, I would make or buy a 4x12, assuming that is a 10’ wide door. Im assuming that’s probably bigger than what was in there before.
 
OP
M

md2020drums

Active member
Joined
Jan 21, 2023
Messages
27
Location
Kent WA
Possibly, the other side is smaller, but it looks like there was a bigger one there before. Yeah I’m probably going to have to go to a lumberyard to get a 4 x 12. And yes I measured 11 at the opening so it likely is a 10’.
The 2 x 8 doesn’t have to be continuous, does it? The longest length I found was 10 feet and there are 14 or so feet to cover..
 

ericlar80

Well-known member
Joined
Nov 14, 2014
Messages
362
Location
California
I’m surprised they don’t have a 16’ length of 2x8 you could cut down, but two sections is probably fine.
 
To avoid these ads, REGISTER NOW!
OP
M

md2020drums

Active member
Joined
Jan 21, 2023
Messages
27
Location
Kent WA
Yeah, if you put a supporting stud every 16-24”, anchored well, you should be able to just use a single 2x8.

For replacing the actual header, I would make or buy a 4x12, assuming that is a 10’ wide door. Im assuming that’s probably bigger than what was in there before.
Just an update. Finally got around to tearing it wide open. The header is basically 100% compromised. I mounted the 2x8 and am carefully removing trim to have the room to put the 2x4’s to support the span. I realized when I started cutting 2x4s that you’d mentioned cutting notches. I then realized I messed up. I confused the earlier post about putting the supports “long way” facing the outside/door.
Should I pull the 2x8 off and remount it with the 2x4’s notched? do you think I’ll be alright?
I was going to go every 16” into a temp bottom sill 40561E92-89B3-4297-B01A-84015499514B.jpegimage.jpg
 

Attachments

  • A08C1BAA-2324-44B5-AFF1-A44031682871.jpeg
    A08C1BAA-2324-44B5-AFF1-A44031682871.jpeg
    590 KB · Views: 101
OP
M

md2020drums

Active member
Joined
Jan 21, 2023
Messages
27
Location
Kent WA
Just to clarify, the 2x4s are supposed to support the 2x8 directly. Not the beam.
Right, I was going to cut them to length and screw them to the 2x8 up top which you can see in the 2nd picture down. I mounted the 2x8 first. Currently rotohammer info where the bottom sill will go
 

K'ledgeBldr

Well-known member
Joined
Aug 22, 2011
Messages
1,925
Location
Johns Creek, GA
Wow! Talk about overkill.
You said the roof is stick built (rafters). So the greatest load point is the ridge support that comes down to the garage door header- which is offset.

I would just temp-support the ridge. Have the new header on-hand and ready to install. Pull out the damaged header, and install new- that opening isn’t going move when the old header comes out.

I also would not use solid dimension lumber for a new header- it’s not as strong as a build-up header of multiple 2X lumber. Or, use a LVL (that’s what I would spec/do). Also, the header should go to the top plate(s), then cripple down. Header down, cripple up- like you have presently- generally lends itself to a wavy top plate.
 
OP
M

md2020drums

Active member
Joined
Jan 21, 2023
Messages
27
Location
Kent WA
Thanks for all the help
Yeah, looks good. It never hurts to have an angled cross brace but you probably don’t need one.
thanks for all the help so far. Feels good to get this moving forward.
I know this is a little carriage-before-the-horse-ish, but I’ve been wondering about putting an apartment up above the shop. I’m out here all the time and I figure I could rent the house out and just set up home base out here.
What do you think. Here’s some photos. I’m 5’10” or so and I took a selfie to giver some scale
It’s HUGE up there. But there are the roof trusses. Have you ever done a conversion like this? I noticed they didn’t even put the sheathing all the way up and I was thinking how easy it’d be to start framing for it this summer.378A91EE-0081-4B9E-9417-2D8169D37C83.jpegF1819354-4BC9-477F-B4FF-B177425BF8CA.jpeg
 
OP
M

md2020drums

Active member
Joined
Jan 21, 2023
Messages
27
Location
Kent WA
Wow! Talk about overkill.
You said the roof is stick built (rafters). So the greatest load point is the ridge support that comes down to the garage door header- which is offset.

I would just temp-support the ridge. Have the new header on-hand and ready to install. Pull out the damaged header, and install new- that opening isn’t going move when the old header comes out.

I also would not use solid dimension lumber for a new header- it’s not as strong as a build-up header of multiple 2X lumber. Or, use a LVL (that’s what I would spec/do). Also, the header should go to the top plate(s), then cripple down. Header down, cripple up- like you have presently- generally lends itself to a wavy top plate.
Thank you! You posted while I was typing up an addendum project to think about since I’ve got this wall opened up.
Yeah, after I was done putting it together I realized it was way more than needed, but as I’m not a builder I appreciate that I can know for sure that she isn’t gonna come on down while I’m dancing a jig under the rotted header. And thank you for the tip. When I get the new header, I will install it “the opposite”. That makes way more sense!
 

ericlar80

Well-known member
Joined
Nov 14, 2014
Messages
362
Location
California
Thanks for all the help

thanks for all the help so far. Feels good to get this moving forward.
I know this is a little carriage-before-the-horse-ish, but I’ve been wondering about putting an apartment up above the shop. I’m out here all the time and I figure I could rent the house out and just set up home base out here.
What do you think. Here’s some photos. I’m 5’10” or so and I took a selfie to giver some scale
It’s HUGE up there. But there are the roof trusses. Have you ever done a conversion like this? I noticed they didn’t even put the sheathing all the way up and I was thinking how easy it’d be to start framing for it this summer.
I doubt there is an easy way to convert that to an apartment. Best case you have an engineer design custom trusses and you find a way to sneak them in there.

You would be better off ripping the everything off and starting over with different trusses or building a second story altogether. It’s a shame because that really is a lot of room. But new trusses could have more vertical lift at the wall, and have floor joists worked into the plan.
 

ericlar80

Well-known member
Joined
Nov 14, 2014
Messages
362
Location
California
Thank you! You posted while I was typing up an addendum project to think about since I’ve got this wall opened up.
Yeah, after I was done putting it together I realized it was way more than needed, but as I’m not a builder I appreciate that I can know for sure that she isn’t gonna come on down while I’m dancing a jig under the rotted header. And thank you for the tip. When I get the new header, I will install it “the opposite”. That makes way more sense!
I tend to over design things. A few extra 2x4s isn’t that much of investment considering the savings of doing the work yourself. You could steal a couple of those for the framing if you’re so inclined.
 

ericlar80

Well-known member
Joined
Nov 14, 2014
Messages
362
Location
California
Wow! Talk about overkill.
You said the roof is stick built (rafters). So the greatest load point is the ridge support that comes down to the garage door header- which is offset.

I would just temp-support the ridge. Have the new header on-hand and ready to install. Pull out the damaged header, and install new- that opening isn’t going move when the old header comes out.

I also would not use solid dimension lumber for a new header- it’s not as strong as a build-up header of multiple 2X lumber. Or, use a LVL (that’s what I would spec/do). Also, the header should go to the top plate(s), then cripple down. Header down, cripple up- like you have presently- generally lends itself to a wavy top plate.
LVL probably would have been a custom order, depending on where he’s at. This is a basic setup so a solid header or built up header are both good options for a weekend repair like this.

Just put the concave side of the beam facing down.
 

K'ledgeBldr

Well-known member
Joined
Aug 22, 2011
Messages
1,925
Location
Johns Creek, GA
Thanks for all the help

thanks for all the help so far. Feels good to get this moving forward.
I know this is a little carriage-before-the-horse-ish, but I’ve been wondering about putting an apartment up above the shop. I’m out here all the time and I figure I could rent the house out and just set up home base out here.
What do you think. Here’s some photos. I’m 5’10” or so and I took a selfie to giver some scale
It’s HUGE up there. But there are the roof trusses. Have you ever done a conversion like this? I noticed they didn’t even put the sheathing all the way up and I was thinking how easy it’d be to start framing for it this summer.378A91EE-0081-4B9E-9417-2D8169D37C83.jpegF1819354-4BC9-477F-B4FF-B177425BF8CA.jpeg
Just so you know- that’s a truss roof system- not rafters. So there’s no ridge. Also, the end trusses are usually a little beefier- and because of the the way that end is built- it’s basically self-supporting. You didn’t really need any temp support at all.
 
OP
M

md2020drums

Active member
Joined
Jan 21, 2023
Messages
27
Location
Kent WA
Just so you know- that’s a truss roof system- not rafters. So there’s no ridge. Also, the end trusses are usually a little beefier- and because of the the way that end is built- it’s basically self-supporting. You didn’t really need any temp support at all.
Ah, I see. The old bones were making noise when my brother and I were opening up the wall. They had 1/2” plywood instead of sheet rock, so it took a while to open it up and I was kind of worried that the walls were helping to hold the whole thing up lol. Looking back now, I can tell there wasn’t much weight there because of the sparsity of the framing on that end-basically just a few 2x4’s. No matter, the temp wall pieces are over 11’ each so they’ll get used eventually.
Yikes - I didn't know ants could do that kind of damage. This says they like wet, decaying wood: https://www.thespruce.com/preventing-carpenter-ant-infestations-2656282; do you think water was getting in under the siding or something like that?
I believe that would be what started this. The siding is, by far, the crappiest I’ve ever seen in my life. There are actual knot holes in some of the pieces. There was absolutely no flashing anywhere. I’m not a pro, but I would imagine there should be around trim/windows etc. right?
The plan is obviously to fix this damage and then rip all this **** off to expose the sheeting to make sure there isn’t any more damage, re wrap with tyvek (existing is some sort of tar paper?) and perhaps do hardie so I don’t have to mess with it for a while
 
OP
M

md2020drums

Active member
Joined
Jan 21, 2023
Messages
27
Location
Kent WA
I doubt there is an easy way to convert that to an apartment. Best case you have an engineer design custom trusses and you find a way to sneak them in there.

You would be better off ripping the everything off and starting over with different trusses or building a second story altogether. It’s a shame because that really is a lot of room. But new trusses could have more vertical lift at the wall, and have floor joists worked into the plan.
The upper part has no sheeting- so if you rip off the siding, which is the plan, you could probably get the new trusses in between the studs.
So you think that that the roof would essentially need to come off and be redone to accommodate an apartment? Doing something like that I’d hire out to do the structural beefing, but then I’d do everything else myself piecemeal.
The county jacked up the taxes which in turn jacked up the mortgage. If I could figure out how to deck out the shop, I’d be golden.
 

Toolfool

Well-known member
Joined
Aug 22, 2011
Messages
4,980
Location
Tallahassee, FL
I built on Whidbey Island for 30 years. I've seen a lot of carpenter ant damage, even in bone-dry framing. After you get the wall re-framed and the exterior sheathing back on and about to insulate (good idea while its open) or cover the interior walls, spray everything with 'Suspend SC' (Amazon) as insurance.
 
OP
M

md2020drums

Active member
Joined
Jan 21, 2023
Messages
27
Location
Kent WA
Quick question- so I picked up a Doug fir 4x12. Eric was right, was going to be a special order for gluelam and time is of the essence, as they say.
Since this huge beast is going to be probably too much for my bro and I to muscle up there, can I use a chain hoist attached to one of the trusses above? Perhaps a 2x6 going across 2 of them to share the load ?
Also, I heard mention of “top and bottom” orientation for headers. There are no such markings that I saw on this 4x12. Is that for gluelam only? I don’t want to EFF this up.
Thanks you guys, much appreciated.

407CA3D7-AEAE-46AB-B545-7FAD9064D537.jpegABBFCABE-4713-45AD-9F40-302F5A755CCA.jpeg
 

ericlar80

Well-known member
Joined
Nov 14, 2014
Messages
362
Location
California
Yes, crown up. Cup your hand a little hand point your palm to the ground - that's how the beam should be installed. :)
 
To avoid these ads, REGISTER NOW!
Top Bottom