Mpower5266
Well-known member
I installed my Armorclad kit this past weekend and I figured I would make a thread about the install and then update it as I use the garage. I am not affiliated with Armorpoxy in anyway but they have been very helpful in the process so I wanted to do a review.
The garage is approximately 560 sq, a 20x24 main parking area and smaller 8x11 area that joins to the basement. Its an addition on my house so its a fresh pour, probably 5 months old and no cars (technically) have been parked on it.
 Untitled by mpower5266, on Flickr
I opened the packages, and noticed I did not receive instructions, but they were easily accessible on Armorpoxy's web site so I printed them off. I started with a good deep clean of the floors and scraped up any drywall mud or mortar left by the workers.
 Untitled by mpower5266, on Flickr
 Untitled by mpower5266, on Flickr
Then hosed it down and applied the acid etch with a push broom. I didnt notice much foaming or really anything happening but the floor was really clean.
 Untitled by mpower5266, on Flickr
After that I pushed all the water I could out of the garage and let it dry out.
 Untitled by mpower5266, on Flickr
This little guy came in very handy blowing the water out and dusting in between coats, I highly recommend some sort of blower if you are doing your floor.
 Untitled by mpower5266, on Flickr
I wanted to make sure it was dry so I ran 2 dehumidifiers for about 30 hours, it was very dry after that.
 Untitled by mpower5266, on Flickr
Then the point of no return, we mixed up the primer and rolled it out. I mixed it in a new 5 gal bucket and dipped the roller in rather than dumping it out on the floor. I didnt trust myself to not spill it everywhere.
 Untitled by mpower5266, on Flickr
It went on smooth and covered well.
 Untitled by mpower5266, on Flickr
I would highly recommend a mask at this stage, maybe I'm a wuss but I had a pretty bad headache that night. Anyway, followed the instructions and let it dry for 24 or so hours and put down the epoxy.
I mixed it in a 2:1 ratio but portioned it out 4:2 and did the garage in stages. My dad poured and rolled while I used the spiked shoes to spread the flakes. I wanted the flakes to have the look of the BMW M Colors and I was not disappointed.
 Untitled by mpower5266, on Flickr
I had a few areas where the flakes were a little heavy but over all it came out awesome.
 Untitled by mpower5266, on Flickr
 Untitled by mpower5266, on Flickr
I even got a really nice tape line and I **** at taping.
 Untitled by mpower5266, on Flickr
Let that dry over night and put down their military top coat with about 3/4 of the supplied can of grit additive. I was very happy with the results but again highly recommend using a mask, this was the worst smelling stuff out of the three.
 Untitled by mpower5266, on Flickr
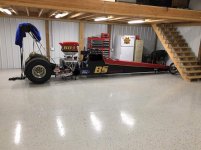
All and all I am happy with the results and impressed with the ease of install.
I will update this in the future if it wears or if I notice anything interesting.
The garage is approximately 560 sq, a 20x24 main parking area and smaller 8x11 area that joins to the basement. Its an addition on my house so its a fresh pour, probably 5 months old and no cars (technically) have been parked on it.
Untitled by mpower5266, on FlickrI opened the packages, and noticed I did not receive instructions, but they were easily accessible on Armorpoxy's web site so I printed them off. I started with a good deep clean of the floors and scraped up any drywall mud or mortar left by the workers.
Untitled by mpower5266, on Flickr
Untitled by mpower5266, on FlickrThen hosed it down and applied the acid etch with a push broom. I didnt notice much foaming or really anything happening but the floor was really clean.
Untitled by mpower5266, on Flickr After that I pushed all the water I could out of the garage and let it dry out.
Untitled by mpower5266, on FlickrThis little guy came in very handy blowing the water out and dusting in between coats, I highly recommend some sort of blower if you are doing your floor.
Untitled by mpower5266, on FlickrI wanted to make sure it was dry so I ran 2 dehumidifiers for about 30 hours, it was very dry after that.
Untitled by mpower5266, on FlickrThen the point of no return, we mixed up the primer and rolled it out. I mixed it in a new 5 gal bucket and dipped the roller in rather than dumping it out on the floor. I didnt trust myself to not spill it everywhere.
Untitled by mpower5266, on FlickrIt went on smooth and covered well.
Untitled by mpower5266, on FlickrI would highly recommend a mask at this stage, maybe I'm a wuss but I had a pretty bad headache that night. Anyway, followed the instructions and let it dry for 24 or so hours and put down the epoxy.
I mixed it in a 2:1 ratio but portioned it out 4:2 and did the garage in stages. My dad poured and rolled while I used the spiked shoes to spread the flakes. I wanted the flakes to have the look of the BMW M Colors and I was not disappointed.
Untitled by mpower5266, on FlickrI had a few areas where the flakes were a little heavy but over all it came out awesome.
Untitled by mpower5266, on Flickr
Untitled by mpower5266, on FlickrI even got a really nice tape line and I **** at taping.
Untitled by mpower5266, on FlickrLet that dry over night and put down their military top coat with about 3/4 of the supplied can of grit additive. I was very happy with the results but again highly recommend using a mask, this was the worst smelling stuff out of the three.
Untitled by mpower5266, on FlickrAll and all I am happy with the results and impressed with the ease of install.
I will update this in the future if it wears or if I notice anything interesting.
Last edited:


 I have only had mine done since oct 18 , but so far it’s been what I was hoping for.