To avoid these ads, REGISTER NOW!

Armorpoxy install - lessons learned

Carnut68

Member
Joined
May 2, 2016
Messages
5
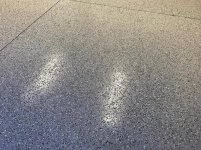
So I finished up the floor on my 28x36 detached garage and I think it came out pretty well. A couple lessons learned and observations to help the next person, some of which echo the other recent post:

1. Use 18" rollers not the standard rollers that come in the AP kit. I didn't figure this out until it came to the topcoat. The larger rollers are faster and are less likely to leave roller marks.

2. If you have a large area, divide it into sections and figure out how much you should be applying per section. Don't wait until you get to the end and realize you have a lot left over and you need to do another coat.

3. Get the spiked shoes. I didn't have them and had to have an exit strategy and roll my way to the door with no ability to go back while still wet.

4. I didn't do flakes because as a working garage I thought it would make it hard to find small parts when I dropped it. In hindsight, I was very careful while rolling and still have some roller marks and areas where thickness or color was slightly inconsistent. The flakes would most likely have masked all of that.

5. Definitely use the anti-slip additive. The epoxy coat was super slippery (in socks anyway) even when dry. The additive is not difficult to work with as long as you remix the material in the bucket every time before you pour more in your tray. Also don't run your tray too low either as the grit will settle in the bottom and you could get clumps. If you do get a concentration just roll it out before it sets.

6. If you own dogs...in my case two black labs...don't let them anywhere near your project. I let them in once when completely dry and I blew the garage afterwards and I was still struggling to pull the occasional hairs out throughout the application of epozy and topcoat. They stand out like a sore thumb and it's no fun getting them out of the floor, then out of your roller and then trying to find a safe place to put them.

7. Two people is definitely easier than one. It was helpful to have my wife mix up the next batch while I rolled and to patrol for the aforementioned stray hairs or bugs that decided to make themselves a permanent part of the project. Just make sure your helper doesn't cover your sleek new Dewalt LiIo drill with clearcoat.

8. This will be obvious but good lighting would be nice. In my case, my garage was recently built and I haven't had a chance to do electric yet. For a few reason I needed to get the floor done asap and move some vehicles and tools in to make way for three tons of pellet in my primary garage. This meant doing the work by daylight and shoplights. Not sure I would do that again. I am still curious how it's going to look under the lights...that is when there are lights.

9. If you tape off the edge of the garage where it crosses under your garage door like I did, don't pull up the tape before you topcoat. For some reason I decided to pull it up before my second application of topcoat. I figured overlapping it slightly would "seal the edge". Whether it did that or not, it definitely discolored the bare concrete on the other side of the line. I will have to see if I can clean that up a bit.

10. I rented a floor grinder and did the acid etch just to be safe. If you haven't used a floor buffer/grinder get ready for some fun. I was seriously ready to take it back to Home Depot and claim it was defective because it launched itself uncontrollably to my left as soon as I pressed the lever. Took me about ten minutes to get the hang of controlling it.

Overall, I think it came out very nice although only time will. I was very nervous about doing it. I tried to epoxy my main garage 15 years ago and it failed miserably after a couple years and I have lived with that ever since. Probably a low end product from Home Depot and the prep was not thorough as this time around. In the spring, I will be going back to AP and see if I can fix that...this time with flecks!
 
To avoid these ads, REGISTER NOW!

Armorpoxy

Well-known member
Joined
Aug 18, 2013
Messages
3,731
Location
NJ
Great feedback!

Yes, the larger rollers are better, but the cost of them and the frames makes the kits pricey so we offer them as options....
 

Eliteconcept

Active member
Joined
Jun 3, 2017
Messages
26
Location
NW Indiana
just curious as I'll be doing my floor with armorpoxy this weekend. How long did you let the floor dry between etching and putting down the primer?
 

Armorpoxy

Well-known member
Joined
Aug 18, 2013
Messages
3,731
Location
NJ
We normally recommend 24 hours minimum to allow the floor to dry. A fan helps as does ventilation/doors open. Higher humidity=longer dry time.
 

thammel

Well-known member
Joined
Oct 3, 2005
Messages
2,236
Location
Maryland
I found I needed much longer than 24 hours. I'd let it sit for up to 2 weeks! I actually waited about 10-11 days. The saw cuts took the longest to dry out...and I don't mean that they were full of water but water must have soaked in at the edges and penetrated the concrete from the side because these areas - along the saw cuts - took the longest to dry.

Tom
 

Eliteconcept

Active member
Joined
Jun 3, 2017
Messages
26
Location
NW Indiana
Right on. I did my final cleaning and rinse last night. got the ceiling fans going and windows open. will open garage doors when i'm home later. Planning on giving it a good 36 hours before primer. my floor is solid no expansion joints so hopefully it dries out in 36 hours
 
Joined
May 19, 2014
Messages
16
I wanted to chime in and say THANK YOU to the OP for this thread. VERY VERY helpful. I just laid down armor clad with flakes in my garage and it's absolutely beautiful! I will have to agree with few key points:

1. 18" rollers!!! Please get them. Made my life so much easier. It was a breeze!

2. Spike shoes!!! a must to do perfect flecks. No spike shoes = your flecks will never be good. My flecks came out professionally perfect. Throwing them up in the air made BIG difference. Even one or two I throw downward = clump city clump! Throw them flecks up in the air like you don't care! LOL

I'll make a full thread later with a diy video. So I don't wanna post pics yet :) . If you have a big garage or slightly overweight, I recommend using some locktite as you tighten the nuts. Extra $3 will give you extra peace of mind.

3. Weigh your Part a and part B. Keep that scale handy. I divided mine in 4 equal parts. After each section, I checked weight and I knew how much I suppose to have. I always had more. I went nice thick coats.

4. Very helpful tip about going criss-cross pattern. I actually went twice - vertical/horizontal/vertical/horizontal again. Epoxy seemed self leveling too. It's perfect.

I'll make a nice thread with a DIY video. Can't wait to primer the walls and do wall/ceiling paint. I am sooo happy with how armorclad came out.
 
Last edited:
Joined
May 19, 2014
Messages
16
ok .. little sneak peek.. I just couldn't NOT share it.. I put enough flakes. I ordered extra but didn't use all. bc I also wanted base coat to see though too..

I DO NOT like the huge amount of blue flecks 6 lbs bag comes with. I didn't not do 2 white, 2 black, 2 blue. Rather, I did 2 lbs of black, 2 lbs of white, 2 lbs of dark gray and 1 lbs of light blue. So blue didn't overwhelm the floor like some other floors I saw.

attachment.php


attachment.php


attachment.php


stupid pic attachment really resizes and degrades the images! :mad: anyhow I can upload them high res here?

this is pre clear coat. Clear coat goes on sunday morning at 74 degree NJ weather!
 

Attachments

  • 22662718_10213964812856117_2028655503_o.jpg
    22662718_10213964812856117_2028655503_o.jpg
    153.3 KB · Views: 1,488
  • 22664250_10213964813056122_1024957159_o.jpg
    22664250_10213964813056122_1024957159_o.jpg
    151.1 KB · Views: 1,456
  • 22690075_10213964820096298_1095588059_o.jpg
    22690075_10213964820096298_1095588059_o.jpg
    152.9 KB · Views: 1,458
Last edited:

Eliteconcept

Active member
Joined
Jun 3, 2017
Messages
26
Location
NW Indiana
looks great. hopefully you didn't get any orange or red flakes in yours like i had in mine. I've found about 5 to 7 orange/red flakes in my floor so far after i put it down last weekend. Quite disappointing.
nice job though!
 

DWAS

New member
Joined
Nov 5, 2017
Messages
2
I just finished putting down my primer coat this morning. Two other hints, some of which have been mentioned in other threads:
1. Wear a respirator (C95) as the fumes are quite strong.
2. Tape off the interior door to the house (on the inside). This will reduce fumes coming into the house, and will help prevent someone from opening the door and walking onto wet epoxy
 

Armorpoxy

Well-known member
Joined
Aug 18, 2013
Messages
3,731
Location
NJ
Hi,
Just a note about fumes, we offer low/no odor systems if requested. They cost more though...
 

tripleJs15

New member
Joined
Mar 17, 2013
Messages
1
Is the primer required if it’s a new (45 days) garage floor ? I plan to go over it with a Clark floor polisher and diamabrush, then sweep and vacuum.

There has never been any oil, paint etc on the floor, if that makes a difference.
 

Armorpoxy

Well-known member
Joined
Aug 18, 2013
Messages
3,731
Location
NJ
LOTS of strings here about using primer. While not required, it is strongly advised, and in your case since you are mechanically prepping, mandatory. Grinding opens up the floor and makes it porous, and not always evenly so if you don't prime, you can get a very uneven finish. Well worth the money.
 

hobie16

New member
Joined
Nov 24, 2013
Messages
4
Location
MN
I installed Armorpoxy on our garage floor a year ago and it's holding up very well. The floor is 19 years old and I've had a couple of areas where the concrete "popped", it had nothing to do with the epoxy, just older concrete that has been abused with MN road salt. I simply patched with a Rustoleum epoxy patch kit and brushed on some left over floor epoxy, added some flakes and top coat, and the repair disappears. I can relate to all the installation points made above. I was a nervous wreck going into the project but this site helped me tremendously as well as Armorpoxy's instructions. I didn't etch the floor, just diamond ground it. So far so good. I also used the Armorpoxy on our wood (plywood) entryway into the house too and it's holing up perfectly. We have a three stall garage and I divided the project into six sections and this worked out pretty well. I did the job by myself. I also put down the primer for extra insurance. The primer smelled but I was expecting that and it didn't last long. Very happy with the performance of Armorpoxy.
 
To avoid these ads, REGISTER NOW!

erikh5014

Member
Joined
Nov 24, 2017
Messages
11
Location
BFE
Guys whats the difference between the armorultra, armorpoxy and armorclad. Would like to get stuff purchased during the current sale but they are closed so not sure what to get or how much to order. Have a 30x40 and little nervous about ordering two 600 sq ft kits as i dont want to be too thin on dft.

Also thanks op for the great tips and everyone else that has chimmed in.
 

Armorpoxy

Well-known member
Joined
Aug 18, 2013
Messages
3,731
Location
NJ
Hi
Kindly email us directly (not pm) for materials list and quote. Thank you.


Sent from my iPhone using Tapatalk
 

65fsbk

Member
Joined
Jan 15, 2018
Messages
11
Thanks for taking the time to write this up Carnut68!

I will be doing my 1200 SQF new build garage floor in the next month or so. I will unfortunately be doing it by myself. The slab was poured 8 months ago.

A few questions:

- What size nap on the 18 inch roller would be good? Is 3/8" nap good enough?

- How many rollers should I buy?

- I plan to do the primer, epoxy and then the 2 part top coat, I should be able to use the roller for all steps, right? Or will the epoxy likely kill the roller?

- I have a paver driveway and do not want to get any of the acid for etching on the driveway. What would be the best tape to use to make sure no acid/water makes it out of the garage and onto the driveway?
 

thammel

Well-known member
Joined
Oct 3, 2005
Messages
2,236
Location
Maryland
Blue painters tape or green frog tape works well. Make sure you have it wide enough.

I used one roller (18") each for the primer, color coat and topcoat. so that was 3 rollers. I used epoxy glide rollers from amazon. I did the same - armorpoxy and the primer, color coat and military grade clear coat were all 2 part mixtures. I did this 3 mornings in a row this past September. If you are using the armorpoxy muriatic acid and pressure washing, be sure and leave plenty of time (as long as 2 weeks) for things to thoroughly dry. And buy lots of 5gallon HD buckets for mixing. My garage was 900ft"2 and it was not a big deal doing it by myself.

The rollers will be hard from the previous coat which is shy you'll need a new roller for each coat. Also be sure you have spikes and be sure to tighten the nuts holding the spikes on....or you may find them falling off.

Be sure you have some long painters poles...this will help too.

Tom
 

65fsbk

Member
Joined
Jan 15, 2018
Messages
11
Blue painters tape or green frog tape works well. Make sure you have it wide enough.

I used one roller (18") each for the primer, color coat and topcoat. so that was 3 rollers. I used epoxy glide rollers from amazon. I did the same - armorpoxy and the primer, color coat and military grade clear coat were all 2 part mixtures. I did this 3 mornings in a row this past September. If you are using the armorpoxy muriatic acid and pressure washing, be sure and leave plenty of time (as long as 2 weeks) for things to thoroughly dry. And buy lots of 5gallon HD buckets for mixing. My garage was 900ft"2 and it was not a big deal doing it by myself.

The rollers will be hard from the previous coat which is shy you'll need a new roller for each coat. Also be sure you have spikes and be sure to tighten the nuts holding the spikes on....or you may find them falling off.

Be sure you have some long painters poles...this will help too.

Tom

Thanks for the info!

How do I know that the concrete is fully dry after acid and washing? I'll be doing this in AZ in March and it should be about 85-90 degree afternoons in a very dry climate so i would think that it may only take a couple days to dry?

I plan to loctite each nut on the spiked shoes.

Good note on extra 5 gallon buckets, need to do this. Is Home Depot the cheapest place for these?
 

Radical540

Well-known member
Joined
Nov 19, 2015
Messages
62
Location
DETROIT! (where the weak are killed and eaten)
I agree with everything you said. I feel that many posts about "only use the concrete grinder" are complete B.S. (unless you live on an oil-rig). I washed a few times with locally purchased muriatic acid (applied using a "low-cost, [disposable] Harbor Freight lawn sprayer) & a hard bristle broom/brush. Worked great!
Let it thoroughly dry a few days (3-4) and then applied: primer, color, military clear w/ grit & then another 3-5 days to thoroughly dry.
I did this all in November, which in Michigan is rainy & gloomy. Hopefully, when I finish up the other side of the garage in the spring, the process will be somewhat expedited! 18" rollers..great suggestion!!
 

Armorpoxy

Well-known member
Joined
Aug 18, 2013
Messages
3,731
Location
NJ
Our instructions which we can send on email request, or are posted on our website give complete instructions on testing for residual moisture.

The easiest way to do this is to tape down a sheet of clear plastic 4' square. Tape all of the edges to the floor securely. Wait overnight. If you dont have any dampening color under the plastic, or any condensation, you should be good to go. If you do have moisture, then contact us directly for tech advice.
 

65fsbk

Member
Joined
Jan 15, 2018
Messages
11
I agree with everything you said. I feel that many posts about "only use the concrete grinder" are complete B.S. (unless you live on an oil-rig). I washed a few times with locally purchased muriatic acid (applied using a "low-cost, [disposable] Harbor Freight lawn sprayer) & a hard bristle broom/brush. Worked great!
Let it thoroughly dry a few days (3-4) and then applied: primer, color, military clear w/ grit & then another 3-5 days to thoroughly dry.
I did this all in November, which in Michigan is rainy & gloomy. Hopefully, when I finish up the other side of the garage in the spring, the process will be somewhat expedited! 18" rollers..great suggestion!!

Awesome, thanks for the feedback!
 

65fsbk

Member
Joined
Jan 15, 2018
Messages
11
Our instructions which we can send on email request, or are posted on our website give complete instructions on testing for residual moisture.

The easiest way to do this is to tape down a sheet of clear plastic 4' square. Tape all of the edges to the floor securely. Wait overnight. If you dont have any dampening color under the plastic, or any condensation, you should be good to go. If you do have moisture, then contact us directly for tech advice.

Great, I will be ordering my kit in the next week or two, thanks!
 

thammel

Well-known member
Joined
Oct 3, 2005
Messages
2,236
Location
Maryland
You can tell it's dry by the color...it'll be obvious. It'll probably dry quickly where you live.

Tom
 

Mpower5266

Well-known member
Joined
Dec 23, 2013
Messages
2,756
Location
Newnan, GA
Great advice in this thread, I may be ordering a kit in the next month and will refer back to this for sure.
 

Armorpoxy

Well-known member
Joined
Aug 18, 2013
Messages
3,731
Location
NJ
Please test the concrete using the plastic sheet method noted on our instructions.

Also, as a reminder to our clients, please, please contact us directly with ANY technical questions regarding installation, product selection, or any other concerns as the GJ is not always monitored!


We are open 9-6 M-F, and email is monitored almost continuously on off hours.
 

Mpower5266

Well-known member
Joined
Dec 23, 2013
Messages
2,756
Location
Newnan, GA
Please test the concrete using the plastic sheet method noted on our instructions.

Also, as a reminder to our clients, please, please contact us directly with ANY technical questions regarding installation, product selection, or any other concerns as the GJ is not always monitored!


We are open 9-6 M-F, and email is monitored almost continuously on off hours.

I will def do the plastic sheet test once they clear all the construction debris out. What else would you recommend when prepping a brand new pour?
 

Armorpoxy

Well-known member
Joined
Aug 18, 2013
Messages
3,731
Location
NJ
Clean well, etch or grind, and of course just follow our instructions carefully!
 
To avoid these ads, REGISTER NOW!
Top Bottom