To avoid these ads, REGISTER NOW!

Atlas 10F Lathe tear down/cleaning, Work In Progress thread

skeer

Well-known member
Joined
Sep 14, 2021
Messages
1,042
Location
Standish, MI Area
i thought it best to create a new thread since the discovery and show-n-tell of the lathe has reached it conclusion basically.

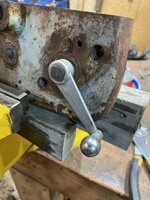
So here's a photo dump to start with.


So, here's the broken/not working things discovered so far:

Tool post base screw handle broken
Tailstock seized (unsure if ram, or screw or lock sleeve)
Set screw underneath ram snapped off
Gear case housing broken (holds the gears to power the lead screw)
Lead screw gear bracket missing outer most 'loop'
Main pulley on countershaft has a broken spoke

Missing parts;
Tool post assembly
Motor mount bracket (not important to me)
Tailstock center
Tailstock lock sleeve handle
Tailstock clamp
No chuck
 
To avoid these ads, REGISTER NOW!

Packard V8

Well-known member
Joined
Mar 16, 2009
Messages
7,380
Location
Spokane, WA
Restoring an abused tool or machine can be its own reward. Enjoy the process and share what you learn along the way.

I have a similar lathe, so been there, done that. Along the way, I learned it's usually more cost-effective to pay more for a completely tooled and operating machine than it is to build one from parts and acquire the tooling.

Lathe parts are heavy to ship, so put out WTB on craigslist/marketplace, et al, watch their Tools For Sale regularly and hope you can find the parts you need locally.

jack vines
 
OP
S

skeer

Well-known member
Joined
Sep 14, 2021
Messages
1,042
Location
Standish, MI Area
I emailed Clausing, waiting on a quote for all the missing and broken parts. Mainly just to see, I’m assuming they will be more expensive than eBay.
 
OP
S

skeer

Well-known member
Joined
Sep 14, 2021
Messages
1,042
Location
Standish, MI Area
Running into a problem, pretty sure I shouldn’t dump potted metal into the electrolysis bucket. Any idea how to get this off? There’s no visible set screws and this square head.. there is t enough poking out to try turning.
 

Attachments

  • 9A0892A7-7B2B-49F4-A835-06ADA06AFD9D.jpeg
    9A0892A7-7B2B-49F4-A835-06ADA06AFD9D.jpeg
    684.7 KB · Views: 52
  • 5AAFC368-1549-4A83-9F9C-C8332BBA7B0A.jpeg
    5AAFC368-1549-4A83-9F9C-C8332BBA7B0A.jpeg
    860.7 KB · Views: 55

subroc

Well-known member
Joined
Apr 22, 2017
Messages
781
Location
Dover, NH
There certainly can be more than one style or type of those. I just checked one I have in the basement. It has a more rounded pivot point with a screw holding it together. I have another in the garage. I will check it tomorrow. Your set up looks like it might be peened.

I just took a look at the 6" I have here. Looks similar. Directly underneath on the bottom of the apron see if there is a hole with a set screw.
 
Last edited:
OP
S

skeer

Well-known member
Joined
Sep 14, 2021
Messages
1,042
Location
Standish, MI Area
There certainly can be more than one style or type of those. I just checked one I have in the basement. It has a more rounded pivot point with a screw holding it together. I have another in the garage. I will check it tomorrow. Your set up looks like it might be peened.

I just took a look at the 6" I have here. Looks similar. Directly underneath on the bottom of the apron see if there is a hole with a set screw.
So my apron has no set screws on the end with this knob and plate. And yeah the square head does looked peened a bit. I might try to drill it out as replacing the bolt will/should be an easy thing.

I've read where putting pot metal into an electrolysis tank can cause it to basically crumble apart.
 

subroc

Well-known member
Joined
Apr 22, 2017
Messages
781
Location
Dover, NH
Well, it isn't pot metal. It is zamac. Some incorrectly call it pot metal. Pot metal is made up of less than known quantities of various metals. Zamac, on the other hand has a specific formula.

I don't know about the electrolysis issue.
 

subroc

Well-known member
Joined
Apr 22, 2017
Messages
781
Location
Dover, NH
Don't drill unless you are sure of what the end result is. I just took a look outside at my 12" Craftsman. It has that set up. Perusal of the manuals all show the set up with the screw holding the lever on. Look for a set screw.
 
OP
S

skeer

Well-known member
Joined
Sep 14, 2021
Messages
1,042
Location
Standish, MI Area
The OG manual shows a bolt going through but yeah.. thinking on it again if there is a bolt it'd be part of the inside disk. So drillings a no go. Ill just be careful with the paint stripper and electro-bucket.

@subroc Is zamac the common name? Tried googling and didnt come up with much.
 
OP
S

skeer

Well-known member
Joined
Sep 14, 2021
Messages
1,042
Location
Standish, MI Area
Update: So the entire assembly has been broken down. Was able to remove the whole drive shaft/pulleys/gears from the headstock yesterday. It's been paint stripped and is socking in the electro-bucket. I did miss one of the two set screws on the larger collar. So there was a slight drag mark on the shaft.. wasn't too bad as it seems the set screw wasn't fully 'set'.
Both bearing are Timkens, and have nice, smooth rotational feels. I have not yet removed the chuck-side bearing or dust shields. I'll have to try to gingerly pop those out once the runst/paint is all gone.
Am I correct in the approach of washing bearings, and gears in hot water and Dawn soap them allowing to fully dry before any wire brushing/towel wiping?

Also question on the bed.. the flat ways have surface rust which wasn't fully removed during electrolysis. I think I know better than to use sand paper even in really fine grits. So the plan is now to go with a dish scouring pad but what sort of fluids can I use to help clean it up safely?

Oh, and the tailstock is on day 2 of oil bucket soak.
 

WisJim

Well-known member
Joined
Dec 20, 2010
Messages
2,274
Location
Menomonie, WI
There's a Facebook group for Atlas/Craftsman lathes, if you do FB, and a discussion group on Groupsio, used to be a Yahoo group. Might be worth checking out. They have been helpful for me.
 
Last edited:

subroc

Well-known member
Joined
Apr 22, 2017
Messages
781
Location
Dover, NH
The OG manual shows a bolt going through but yeah.. thinking on it again if there is a bolt it'd be part of the inside disk. So drillings a no go. Ill just be careful with the paint stripper and electro-bucket.

@subroc Is zamac the common name? Tried googling and didnt come up with much.
My bad. It is zamak.
 

subroc

Well-known member
Joined
Apr 22, 2017
Messages
781
Location
Dover, NH
Here is the process I use for saw tops, band saw tables, drill press tables and would use here.

My process has simplified over time The first change I made was not "dreading" the work. I don't love doing them to be sure but I approach it as just another job and get to work. A good clean top is a satisfying result, so there's that. These days there are just a few things on the bench when I clean something cast. A roll of paper towels or some rags, a razor scraper, WD-40, green (mostly) and red scotch-brite and just occasionally naval jelly and a bit of water if that particular surface has a lot of staining and I think it will help. I just carefully scrape the rust off the thing tryine not to catch the blade and start scrubbing a WD-40 soaked top with the green scotch-brite In the end, it matters what you started with. If the surface has lived out doors under a maple or pine tree for 8 years and is covered in pitch, sap, rust and beer can rings or was it just sitting in an unheated garage or barn with just some surface rust and grime. Elbow grease and a green scotch-brite is more than adequate to clean a razor scraped machined surface. Don't forget to put a little effort into the underside clamping surfaces.
 
OP
S

skeer

Well-known member
Joined
Sep 14, 2021
Messages
1,042
Location
Standish, MI Area
So Zamak is an alloy of aluminum, magnesium and copper using zinc as a base metal. I sent off a question to a Zamak supplier about whether it's safe to put Zamak into an electrolysis tank.

And then 5 seconds later I find this video:

Granted there's no mention of 'zamak' but it does elude to zinc based alloys. Im still gonna wait for some more official response.
 
OP
S

skeer

Well-known member
Joined
Sep 14, 2021
Messages
1,042
Location
Standish, MI Area
So tonight I've laid the first of many primers.. Side gear cover, and both bed feet. I won't mention the paint choices I've made as everyone has their opinions. But it's self-etching so there's that.
And yeah it's cold, I laid a light layer on and let it sit for about 45 minutes in the unheated shop before I brought the three pieces inside for the night. Risky move but.. winter won't go TF away and I need to start re-assembling this unit as I literally can't do anything else in the shop right now.
I tried finding Machine Green but it's all but impossible around here, so I went for a very slightly brighter shade and I hope the dark grey/green primer tones it down a notch.
 
OP
S

skeer

Well-known member
Joined
Sep 14, 2021
Messages
1,042
Location
Standish, MI Area
Ok so I realized that I’m missing the clamp for the tail stock. Luckily I have a couple of front toe hooks off and f250. Cast iron as well, I think I can cut one up into a clamp piece99BD424F-2CF4-463A-9B1E-1CBE58A26A60.jpeg9D1A4BF7-9642-42E8-A4E1-6D65D201B3AE.jpeg
 

RaisedByWolves

Well-known member
Joined
Feb 4, 2023
Messages
3,629
Location
SE PA.
Pulled the main headstock bearings todayB2A4E4D1-4DA0-456A-A04A-D2A3E808AAB5.jpeg37F3F53E-2B07-42D5-8082-4518E2788718.jpeg
Wow, I would have swore that lathe had Babbit bearings based on the look of the bearing caps.

Edit: Looked again, no bolts. I must have had a case of the dumb.

Good news there, but now you have to reset them.

Leave the apron assembled and just work around the half nut lever. Most people get good results painting over the rust anyway.
 
To avoid these ads, REGISTER NOW!
OP
S

skeer

Well-known member
Joined
Sep 14, 2021
Messages
1,042
Location
Standish, MI Area
I spent almost two days on and off scrubbing the bed. Went and picked up a pack of green scotch Brite. Put a pad on the Velcro drill attachment and man did it clean things up!5B555A29-AB3C-4C71-A74C-3FDD99A904D6.jpeg2D553219-51E9-4564-BF54-D0F2DAFD954C.jpeg
 

subroc

Well-known member
Joined
Apr 22, 2017
Messages
781
Location
Dover, NH
Looks good. As a general matter I am reluctant to use powered tools when cleaning machined surfaces like that even something like a saw top that is much larger. I just do handwork. I doubt you need to do anything more to that.
 
OP
S

skeer

Well-known member
Joined
Sep 14, 2021
Messages
1,042
Location
Standish, MI Area
Oh definitely, no so this drill attachment is kinda flexible and is covered in Velcro. Originally it was from a headlight polishing kit. I just used it to hold the green scotch-brite pad. Keeping perpendicular to the surface as much as possible. I’m sure even scotch Brite can remove material but it’d have to be like digging a train tunnel with a spork.
 

RaisedByWolves

Well-known member
Joined
Feb 4, 2023
Messages
3,629
Location
SE PA.
Oh definitely, no so this drill attachment is kinda flexible and is covered in Velcro. Originally it was from a headlight polishing kit. I just used it to hold the green scotch-brite pad. Keeping perpendicular to the surface as much as possible. I’m sure even scotch Brite can remove material but it’d have to be like digging a train tunnel with a spork.
You’re not going to remove material with scotch brite . Least as long as you’re a sane man.

I was actually going to recommend stoning the ways to get them clean.
 
OP
S

skeer

Well-known member
Joined
Sep 14, 2021
Messages
1,042
Location
Standish, MI Area
So the empty headstock is mounted.. just the bolts for now while I use the bracket as a template on the tow hook.

Last night I freed up the tail stock! I did drill a 3/8 access hole on the bottom so I could reach the stuck quill locks to drive them out. I left the parts to soak in the electro bucket over night.
I’ll have to figure out a new set/guide screw underneath since I did drill that one out. And hopefully be able to free up the ram screw without marring it all up.
 

RaisedByWolves

Well-known member
Joined
Feb 4, 2023
Messages
3,629
Location
SE PA.
So the empty headstock is mounted.. just the bolts for now while I use the bracket as a template on the tow hook.

Last night I freed up the tail stock! I did drill a 3/8 access hole on the bottom so I could reach the stuck quill locks to drive them out. I left the parts to soak in the electro bucket over night.
I’ll have to figure out a new set/guide screw underneath since I did drill that one out. And hopefully be able to free up the ram screw without marring it all up.
Tow hooks?

Quill locks? Plural?:unsure:

We’re going to need pics, some of these terms I’m unfamiliar with.
 
OP
S

skeer

Well-known member
Joined
Sep 14, 2021
Messages
1,042
Location
Standish, MI Area
Lol, I posted a pic a few days ago of the headstock bracket laying on an F250 tow hook. I’m missing the tail stock bracket but this cast iron tow hook… pretty sure I can whittle out a second bracket from it.

And the tail stock quill, I’ve seen them referenced as a ram or a quill. But it’s the graduated part that you screw on and out.

It’s still soaking but I’ll post more pics later
 

RaisedByWolves

Well-known member
Joined
Feb 4, 2023
Messages
3,629
Location
SE PA.
Lol, I posted a pic a few days ago of the headstock bracket laying on an F250 tow hook. I’m missing the tail stock bracket but this cast iron tow hook… pretty sure I can whittle out a second bracket from it.

And the tail stock quill, I’ve seen them referenced as a ram or a quill. But it’s the graduated part that you screw on and out.

It’s still soaking but I’ll post more pics later
Gotcha on the tow hook, forgetted about that.

I get you on the quill and yes, that is the correct terminology, in just confused at “locks”.

Every lathe I’ve seen has a single lock for the tail stock to the bed and another single lock to lock the tailstock quill.
 

RoninB4

Well-known member
Joined
Jul 22, 2020
Messages
3,518
Location
Under My House
On those bearings; If you need to clean any bearings do resist the temptation to allow them to rapidly spin, while dry, from compressed air. No lube means steel skidding on steel, not good for new or used bearings. Also, there should be a spec for the quantity and type of grease for bearings like this. New ones should (operative word here) have an info sheet included with the bearings. Too much grease can create excess heat because the grease has nowhere to go. Consult mfg. specs when in doubt or search the internet for cross references when needed. Be careful with abrasives on precision surfaces, even a Scotch-brite pad can remove too much metal in the wrong places when enough pressure is applied. Abrasive stones (India) come in different grades as well. Using a too coarse grade can "plow" deep scratches, create a "dip" in a flat, and/or change the geometry of reference surfaces. Use kerosene, mineral spirits, or some sort of fluid with the stone or they'll clog too quickly. Use light pressure and work evenly. Too much work in one spot increases the chances of creating a "dip" in the surface (unless it doesn't really matter). Hope this helps.
 
OP
S

skeer

Well-known member
Joined
Sep 14, 2021
Messages
1,042
Location
Standish, MI Area
Yeah I made sure to not grind with the scotch-brite in any one spot... kept it moving and kept is wet with PB Blaster and a bit of carb cleaner. Arguably the PB did better at actual cleaning.
I am planning on blowing out the bearings before installation but Im honestly not sure my compressor ha enough *** on it to rotate them, lol. But def noted.
 
OP
S

skeer

Well-known member
Joined
Sep 14, 2021
Messages
1,042
Location
Standish, MI Area
Update: Yesterday I was able to remove the tail stock screw, ram/quill and the 'locking bushing parts'.

I did drill an access hole through the very bottom so I could align a dowel rod to help drive those pieces up and out of the hole. Today is cleanup on the tail stock core as well as the tip of the threads. It turned out to not be threaded in but maybe 3 threads, the rest of them are spotless.

Also gotta clean up the ram bore hole and get it primered and painted.

I also happen to have a handle and a bolt for those locking sleeves.


15CC4536-4A0D-4318-9998-44DE59C7031B.jpegE26636F4-7A29-4292-86CB-9A1C9D258D9D.jpeg
 
OP
S

skeer

Well-known member
Joined
Sep 14, 2021
Messages
1,042
Location
Standish, MI Area
Danke. I do want it known far and wide that the intention was <not> John Deere green. Much to my dismay the very dark primer did not affect the paints gloriously overpriced lawn tractor color.
 
To avoid these ads, REGISTER NOW!
Top Bottom