To avoid these ads, REGISTER NOW!

Australian workshop - big plans in a small space

couchmechanic

Well-known member
Joined
Jul 29, 2011
Messages
104
Location
Bakersfield
Re: My unfinished garage in Vic/Australia

Fantastic ideas. You are a great inspiration. Hope we can see more. Best of luck.
 
To avoid these ads, REGISTER NOW!

flybefree

Well-known member
Joined
May 18, 2008
Messages
1,111
Location
Ohio/Kentucky
Re: My unfinished garage in Vic/Australia

Sir,

Great thread, I like the careful consideration you have shown in your use of space. I must of missed it, what type mill do you have? I am looking at buying a benchtop mill and would benefit from your experience there...

Shaun
 
OP
S

sams

Well-known member
Joined
Apr 7, 2010
Messages
266
Location
S.E Victoria, Australia!
Re: My unfinished garage in Vic/Australia

sweet set up loving the custom drill press stands .i too have a couple drill press which sits on stands ,lol do you have enough bench grinders there jks hows that linisher attatchment go ?

I have 4 grinders in the picture, with these when finished I will have the following available to me, right now I am missing two of this list:

- rough stone
- fine stone
- hard + dead flat stone for sharpening tooling inc tungsten carbide
- linishing
- wire wheel: will be next to polisher, needs custom spacer
- slitting: still need to make the holder and modify the tool rest
- flapper wheel
- polishing

and I will have one side left on the top left mini grinder that I will have a good think about what custom job might be handy for it. No point having a double. So although it looks bizarre and very crowded it's all for a good reason and still friendly to use. It's much nicer to work in this area than the picture suggests.

The lininishing attachment is nice and cheap and this is the 50mm (2") wide version, there is also a 100mm (4"). I specificly bought it so I could use the scotch-brite belts with it as that's the only form that I knew they came in. As I mentioned I now am getting the same thing custom made for my large linisher, this large machine came later.

So I will end up using the attachment with a sanding belt again for finer shaping and the like. Because this is a narrow 50mm version it's prone to move around a bit if you use the edge and the adjustment for the tracking is limited. Other than that it's pretty friendly to use and if are short on room it saves one more piece of electric equipment. Normally it fits all 200mm (8") grinders but I had to go well out of my way to adapt it to the Kincrome. The other good feature is that bench grinders usually have a lot more power than small linishers which makes a big difference.


Fantastic ideas. You are a great inspiration. Hope we can see more. Best of luck.

I appreciate the support, people like yourself and all the others posting on this thread have been nothing but positive and encouraging. This has been motivating me to be as in-depth as possible for anyone who wants to know the specifics.

There is much more to come and I am going to talk and show more about certain things like the flapper wheel and those belts I use for polishing. That's just for what I have now and ontop of that I still only have about a quarter of my workshop where it's meant to be, so I have heaps to show with a few surprises yet. I do however want to give people an insight into my grand plan I had two years ago. I will do a scale drawing of my workshop to show what's in store over the course of the next year.

Thinking more about your comment oeyniman and you're so right, there are some very amazing and huge budget builds in this forum, however as interesting as they are they still are not something most of us can relate to. I have limited energy and space so what you see is me being highly persistant for over two years now.
 
Last edited:
OP
S

sams

Well-known member
Joined
Apr 7, 2010
Messages
266
Location
S.E Victoria, Australia!
Re: My unfinished garage in Vic/Australia

Sir,

Great thread, I like the careful consideration you have shown in your use of space. I must of missed it, what type mill do you have? I am looking at buying a benchtop mill and would benefit from your experience there...

Shaun

Shaun that depends on what you plan to do with the mill, what sort of projects and work did you have in mind?

I have a modified version like this one:

https://www.machineryhouse.com.au/Products?stockCode=K8242

It's far from ideal and along with some stupid design flaws it's not very rigid. It does like to complain a lot when I do cutting. It does however do a great job drilling. The gearbox is excellent and it's nice and compact. I am sure it's available under different names out of the country so I can't tell you what to look for than "HM-45" or "HM-46".
 

flybefree

Well-known member
Joined
May 18, 2008
Messages
1,111
Location
Ohio/Kentucky
Re: My unfinished garage in Vic/Australia

Sams,

I am a learner...started by buying a lathe last year and I have enjoyed making several simple projects with that. For the mill I would use it mostly to learn the basics...drilling for sure, milling out a simple gunsmithing operation such as a AR-15 reciever. I have a farm so there are dozens of little projects each year I can use the lathe on...expect about that many milling projects...every where I look there are good uses for even a basic machine.

Thanks for the link...I can easily cross-reference and find the US equivalent.

I was leaning towards:

http://www.grizzly.com/products/Mill-Drill/G0463

Thanks

Shaun
 
OP
S

sams

Well-known member
Joined
Apr 7, 2010
Messages
266
Location
S.E Victoria, Australia!
Re: My unfinished garage in Vic/Australia

I have a decent bit of information I can give you from my own experience, I will send you a private message on here tomorrow about it.
 
OP
S

sams

Well-known member
Joined
Apr 7, 2010
Messages
266
Location
S.E Victoria, Australia!
Re: My unfinished garage in Vic/Australia

I can't send you a private message, it says disabled. Can you email me here on the address below just remove the spacers on either side of the "@"

sam @ s-86.com
 

flybefree

Well-known member
Joined
May 18, 2008
Messages
1,111
Location
Ohio/Kentucky
Re: My unfinished garage in Vic/Australia

Shoot...for some reason I had the same issue last week.

I will email you straight away.

Shaun
 
OP
S

sams

Well-known member
Joined
Apr 7, 2010
Messages
266
Location
S.E Victoria, Australia!
Re: My unfinished garage in Vic/Australia

With the highly appreciated help of my dad we managed to do something I have been planning for 2 years, I now have this sucker up in the air:

engine-winch3.jpg


It's a 150 x 75mm (6 x 3") medium gauge I-beam/Girder at 6.8M (22') long. As shown it is sitting up on a step which is welded on for two reasons- to lift it to the highest possible position for the most clearence and secondly to have a level surface to sit on. I have a tilted roof so that C channel under it is on a gentle angle. Not shown in the picture is a heavy gauge flat bar to feed the force into the C channel from the screw-bolt support wall plate. My dad brought his Bob-cat in to hold it as high as possible and then we had to use wood, bricks and some brute force to move it around to sit on my pre-prepared mountings.

Also of note only one end is welded to the plate, the other just sits on the step where some plates on either side will sit to let it slide. This will allow the beam to expand and contract as much as it needs in the heat.

Now with that up it's dedicated for the following:

engine-winch1.jpg


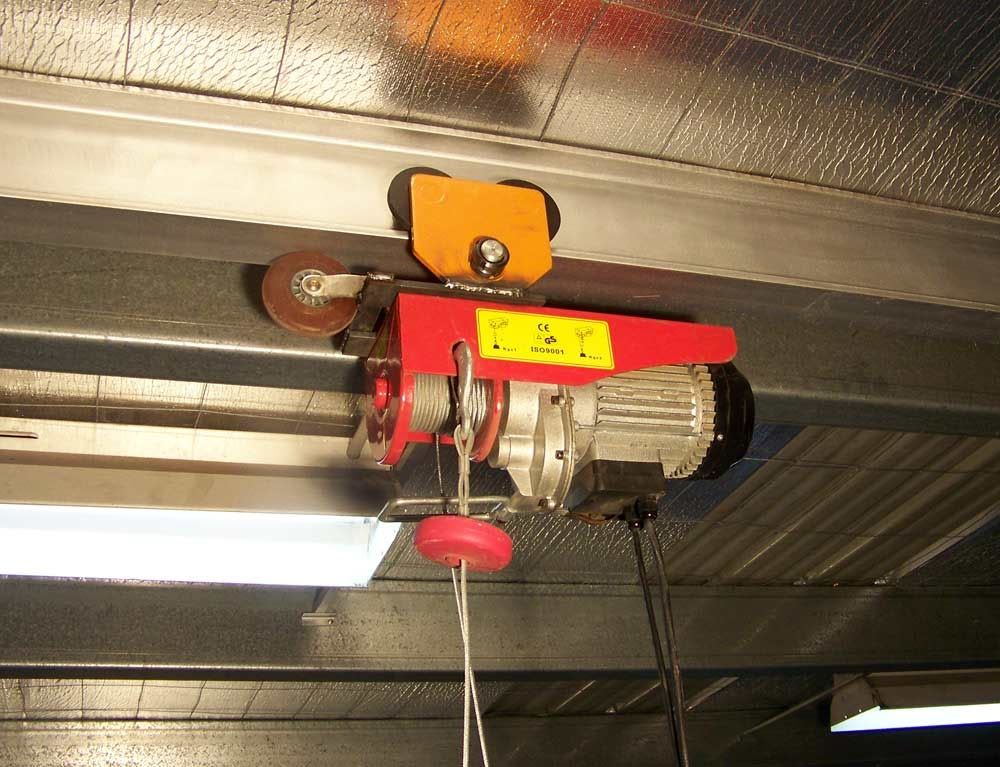
It's rated at 500kg (1100lb) which I very much doubt however the engines and other bits I need to move around are highly unlikely to weigh even a third of that.

I bought a girder trolley which I modified to have two flat bars that bolt to the engine winch. Thinking ahead I had to mount the girder trolley in line with the wire drum, if not the whole unit would tilt under load and no longer be moveable. I moved it as close as possible but couldn't make it dead inline due to bolt clearence.

Before I even put it up I figured I had a contradictory situation- now the trolley wheels where close to inline to the wire drum it wouldn't tilt forward under load but without a load the weight of the motor would tilt it the other way! I could of put a counterweight on it but I thought it was unproffesional and I went for the more comincal looking idea of the small wheel as shown on the left of the unit. Being like this it's flat at all times and it rolls around really nicely.

What's even funnier is where that wheel came from....

engine-winch2.jpg


Missing something? An unknowing thanks to my neighbour up the street for putting this in the roadside garbage about 6 months ago, free is good!


Next on the list is a power feed system fit for a factory. Here are the parts:

engine-winch4.jpg


This is a "semi-flexable" stainless wound rope which I am going to suspend between my walls parallel to my I-beam. On this cable will be some chain links that get to slide up and down the steel rope, then at intervals the power cable will be cable/zip tied to the links. What this will mean is that the cables will start in loops whenat one end and then pull untill almost flat as the crane reaches the other side of the shop. I have had a single dedicated outlet next to the cealing on one side which I put up 2 years ago for the task. The end result will be permenent power without any inconvenience.

The best part of this whole project is the cost, or lack of it, heres the tally inc shipping for each item where applicable:

beam/girder: $200
girder trolley: 100
Engine winch: 120
cable and all accessories: 100
10M lead: 10

total cost: $530

which in comparasin the average engine cranes is about $350. So I think I have done well.

In a twist of fate I might be needing my cars engine out very shortly due to a nasty sound after using it at 8500 revs for a while. Which should of been easily within it's safe rev range long term.

I will post a picture of how things work out with the power feed when I get to it.
 
OP
S

sams

Well-known member
Joined
Apr 7, 2010
Messages
266
Location
S.E Victoria, Australia!
be my guest, we have very simular floor space between out workshops so it could be good for you. Now I am going to have a good look at your thread... oh a kart..
 

Davo J

Well-known member
Joined
Jan 7, 2009
Messages
61
Hi Sam,
I just read this thread and your work shop is looking good.:thumbup:

I made a jib crane a while back and had the could see the same problem going to happen with my hoist. Below in the link you can see how I went about by taking the wheels off the factory trolley and making up a new full length side plates. It looks like you already have the base plate bolted to the top of the hoist, so it would only take adding sides if you wanted to go that way and it would be more stable.
http://www.garagejournal.com/forum/showthread.php?t=56971


Dave
 
OP
S

sams

Well-known member
Joined
Apr 7, 2010
Messages
266
Location
S.E Victoria, Australia!
Thats some really nice work there Dave, much more proffesional than mine. You right I should of just chopped that girder trolley in half and spread the wheels. It will stay an option however for the time being I am going to try it out. Appreciate the suggestion and I am likely to do that later.
 
To avoid these ads, REGISTER NOW!
OP
S

sams

Well-known member
Joined
Apr 7, 2010
Messages
266
Location
S.E Victoria, Australia!
The support I have recieved on here has been nothing short of fantastic, sadly this is going to be the last update for a while. I for the time being need to put my attention to getting my buisness going further. In a few months I hope to have some extra time and money to continue my big plans, I have a few concepts yet that I think will get peoples attention.

Now onto what I promised I would post previously:

linisher2.jpg


Showing what I had custom made for my linisher, well all except that brown belt. From the most course to the finest on the machine itself. What I want to talk about in particular is the one on the far right and on the machine, these go under different names such as Scotchbrite and are like a super heavy duty version of those green pads you use to scrub dishes. These do a fantastic job of polishing aluminium in a very short period of time. I in my buisness get almost everything water cut and for some reason they can have score marks in them. I also add burrs from tapping and my own scratches occasionaly. So I start off with the 600 sheet, then move onto the brown (course) belt and then the blue (med) belt. When doing a batch of parts this works wonders and shines them up nice. With a light rub of lanolin oil to stop fingerprints I mail them off.


pedastal-flapper.jpg


The flapper wheel attachment for one of my wall grinders. This is able to take burrs off metal without taking the shoulders off like a linisher does, very handy. It is meant to be flat but I need to have a polite talk with my part time shop co-worker about the virtues of evenly wearing things out!


Lastly I bought this a little while ago:

vice.jpg


A nice drill vise, or a "vice" as called here in this upside down country. As I mentioned previously I really wish I would of bought this straight away with my drill. Sure it's expensive at about $260 but so worth it. All my workshop life I have been dealing with a vice that would cause the work to tilt up when tightened. I would even go to the trouble to trying to second guess where it would end up by clamping on an angle to compensate for it moving- what a waste of time!!!

This has a built in lock down mechinism that keeps the work piece dead flat no matter how much I tighen it, that combined with it's generous width, handy shoulders near the top and a thrust ball bearing in the handle for super quick n easy tensioning and it's worth every cent.

Also in the background my damaged 20 valve engine, on the bright side my electric winch can be moved with my index finger and thumb alone with that engine hanging off it and also my car is running again with a temporary engine.

Well sadly guys that's it, apart from trivial stuff there's not going to be anything for quite a while. However if you stick around then I will have a whole heap of updates all at once when the two storage areas go up.
 
Last edited:

oeyniman

Well-known member
Joined
Apr 26, 2011
Messages
126
Location
Germany
Dear sams,

thx for the update and I guess, most of us are looking forward to all that stuff you mentioned.

Good luck with your biz
 
OP
S

sams

Well-known member
Joined
Apr 7, 2010
Messages
266
Location
S.E Victoria, Australia!
yes thanks, I look forward to it, even though things are fairly well laid out now I simply have too many things being stored in there. I get highly irritated whenever I trip on something because it's left in the way and I leave it in the way because I am out of room, hmmm.

If anything interesting happens in the meantime I will post a pic, I guess I will show an image of my trailing cable for my engine winch when I put that up
 
OP
S

sams

Well-known member
Joined
Apr 7, 2010
Messages
266
Location
S.E Victoria, Australia!
a small update for you guys-

mill03.jpg


ordered, fitted and aligned a small scale for the quill on my mini milling machine. I have only ever seen people using scales that look like large vernier caliper slides. I have had a bad run with those and I wanted something very accurate which is exactly what I got. I used to have the Z axis set of the head height like everyone else but I found I never used it as it was the quill depth that I needed to know.

Also in the background on the right of the column are the two parallel bars I have on the machine as a guide for my tapping head. I do a large amount of tapping per go at times so the tapping head is fantastic to use. I just slide the guide bar through the bars and then I am all set. Sure beats holding it with my arm pit as I used to.

Also, today I made this up for my bike project:

frame-machining-01.jpg


frame-machining-02.jpg


frame-machining-03.jpg


frame-machining-04.jpg


Crude yet effective


I have also done some digging with a mini loader to lower the ground level for my shed to go up. I need to wait for some more warm weather to stabilise the ground before digging deeper. It's all for a lower concrete level and hence more vertical room in my shed.
 

fastbroshi

Well-known member
Joined
Jul 23, 2010
Messages
111
Location
Dallas, TX
That's pretty neat you figured out how to do that. But what would you build that need tubing done in such a way? Tube roll cages, maybe some motorcycle frames?
 
OP
S

sams

Well-known member
Joined
Apr 7, 2010
Messages
266
Location
S.E Victoria, Australia!
I got the original idea from someone on a bike forum, so I can't take credit for the concept. All I did is work out how to make the holder for my machine. I am going to make sleeves to suit all the smaller pipe sizes that I use. I will also when the need arises make a single much larger version for all the intermediate sizes.

The last picture shows exactly where that pipe will end up being welded. This is a project I have been working on for years that would be met by most people with confusion- 3 wheel drive, 2 wheel steer and just pedals:

http://www.bentrideronline.com/messageboard/showthread.php?t=55613
 

Norcal

Well-known member
Joined
Mar 16, 2008
Messages
13,754
Just saw this thread & thanks for posting it as it's nice to see how things are done in other parts of the world.

If you had to hire the electrical work, how much would it have cost? I ask since OZ frowns on DIY electrical so you were lucky to have the qualifications to be able do yours.
 
OP
S

sams

Well-known member
Joined
Apr 7, 2010
Messages
266
Location
S.E Victoria, Australia!
Beaumont67: you are welcome, if you very patient stay tuned as I have some more big plans in the future.

Norcal: That's a good question, I can both understand people having resevations against doing their own work and the temptation of doing it themself. Here in Australia it's much more dangerous then U.S wiring as when the american have 220/240V it's across two phases, so if they touch one of the cables it's still only 110 to 120 volts. However the australian power supply is a 240 to 250 volt active and a neutral.

As for how much it's amazing, I purchased all my material at better than trade prices and it still must of cost me $1500 or so alone, and that's with free lights. Done to the same standards I just can't see any contractor doing it for less than $10,000 without cutting corners. This is because the way I have laid it out is excessively time consuring and there isn't any way to do it quicker. This is mainly due to the fact there isn't a visable cable in the whole place. If I where to just have exposed cables clipped to the wall then the price would likely be halved though. It took me about 3 to 4 months of saturdays to do all the outlets and then I did the last lighting section at the front and an individual circuit at the back at a later date. This was with some interuptions though.
 
OP
S

sams

Well-known member
Joined
Apr 7, 2010
Messages
266
Location
S.E Victoria, Australia!
It's been quite a while now and I have a few small updates and the prelude of a large one.

My machining corner is not too bad after a cleanup albeit a little crowded.

machine-corner02_zps76e35ba7.jpg


As it can be seen my small lathe has gone to a new home and I used the new space for my linisher. My divider wall is partially up and I have some small additions which I will cover next.


My milling machine set up fully now with my rotating table on it:

mill04_zps54e8103c.jpg


However this is about to be replaced as I bought a full side King Rich Mill. I will likely still keep this for tapping and using this table still.


collett-holder_zps35a8394e.jpg


A nice simple yet highly effective additon is this neat collet holder


Finally here is a good shot of my lathe:

l-lathe1_zpsd5f33dda.jpg


I ended up putting spacers under it as it was hurting my back, now it's great even after extended hours.


l-lathe2_zps7dbf8d95.jpg


This is my upgrade for the lathe: a quick change toolpost, clamped in it right now is a modified boring bar for normal turning use with a agressive CXGX cutting tip in it for aluminium and other soft material use. I had to cut down a boring bar because I couldn't get these special inserts in my usual CNMG style. Works amazingly well and I on the occasion still turn it the other way for some serious boring operations.

Another upgrade was because I was tired of constantly changing bits in my tail-stocks chuck and them slipping in it so I decided to go with a system like the mill:

lathe-tailposts_zps037b44d5.jpg


I generally keep the same bits in them all the time which is as follows:

- 5mm
- 6mm
- 8mm
- 10mm
- 14mm slot-drill: I have a special job for this one
- center drill
- deburring bit

Their MT3 to ER20 adapters, the ER20 collets have up to 13mm grabbing range so I have spare collets available in the other sizes. This whole collection wasn't overly expensive but the time saved is massive. Particularly when I face-off something, center drill it, pilot drill, intermediate and then up to size. For a larger drilling size that would mean changing the bit in the chuck 4 times and trying to do it up real hard. Now I quickly pop them out and grab another one off the wall. The 4 drill bits are Cobolt steel for the ability to drill through some hard metal.
 
OP
S

sams

Well-known member
Joined
Apr 7, 2010
Messages
266
Location
S.E Victoria, Australia!
thanks, I highly suggest the concept.

Once I make my fabrication bench then I will use 650mm deep drawers for things such as all my grinders. If you need help tracking down some slides then let me know, I can even courier some to you.


Now to the second part of my update- as I mentioned previously I have an outside corner that I couldn't directly built on as part of my garage. It is now enclosed and the concrete should be going in tomorrow. Here is how it is right now looking down onto it.

outer-corner1_zps6eb0e38d.jpg


The steel lid is covering the drainage pit, the slab will be 100mm and very well reinforced, this may seem like a complete overkill however I will putting a large amount of load on it. The total space is only 1.6 x 3M or about 5'3" x 9'10" however I think I have a really good layout in mind for it.

I temporarily hung up a flourecent light and I will likely use the same fitting later just with a ballast upgrade and mounted properly.

Against the whole length of the wall on the left (1.6M / 5'3") I plan on making some huge shelves. It makes sense to use as much of the wall as possible to maximise my space, so the drawers will be a huge 1700mm long each and 500mm deep. Working out what I need I am going to end up with 14 drawers in total with differing heights to suit their individual use. The total height of the drawers should be about 2 meters and then I wish to house my air compressor at the very top.

For this compressor I plan on having a fully enclosed wooden cavity with a few baffles to feed the air to it and a cealing fan which turns on when it does to stop it cooking. This I am hoping will drop the noise right down and get it out of my way. I will simply drill a hole through the wall to get the air feed out.
 
OP
S

sams

Well-known member
Joined
Apr 7, 2010
Messages
266
Location
S.E Victoria, Australia!
Concrete is in and the frame is now up in my enclosed area. Here is the wood and slides for the job:

outer-corner2_zps1100fd26.jpg


I have done the maths and I am confident this is correct however it looks like such a massive pile of wood for something that only has 14 drawers. These are full 1.2 x 2.4 (4' x 8') sheets!


Now the frame and floor as it was a few days ago:

outer-corner3_zps4488dfe7.jpg


To completely maximise the space the frame is welded to the structure on one side and welded to the door frame on the other. For the structure side I went as far as to remove the original support and now use my drawers frame for the new outer sheet frame support. I am now going to to have a total 2.1M height.

I have since made progress from this picture and the frame is largely finished with the boards screwed in the sides. Today I will start to put together my first drawer.
 
OP
S

sams

Well-known member
Joined
Apr 7, 2010
Messages
266
Location
S.E Victoria, Australia!
Working every day bar Christmas day itself I now have finished my mega drawers, well all except for some beefy handles which I need to buy and fit.

outer-corner4_zpse5a935db.jpg


outer-corner5_zps523b7f2b.jpg


Shown below are some of my postal supplies, this is one of the first drawers I have put anything into. Of note is the sheer thickness of the sides. I expected to be putting some serious weight into these so I needed it tough.

outer-corner6_zps6c8ee2c1.jpg


The pictures don't convey the sheer size of them very well. The internal usable space is 1800 x 515mm (6 foot long!). The total height of the structure is 2.1M or 7'. With it's 14 drawers this works out to a total of exactly 13 square meters of internal usable space. I am going to put all my stock from my business in it as well as the fixtures/jigs that I have for making parts.

This was quite the tedious job to do, I would say from chopping the metal and wood, making the frame, fitting the insides and making and fitting all the drawers there's about 40 hours in it. I am really releived it's done and now I am going to start putting all my parts in, luckily this shouldn't take more than one work day as I already have worked out where I want everything- hence the different height drawers. I will be chopping up some cardboard slices to go between some of the more sensative parts.


I also put a MDF panel up the top:

outer-corner7_zps5ee9b2ff.jpg


On the far end I want to enclose up my custom assembled compressor and on the other side I am still deciding, one part will have my boxed and bulky items such as my arc welder / router / 3/4" ratchet set and so on.


Next up is the other wall- it was originally going to be completely for my metal shelves, However I now am likely to make room for my four heavy duty jack stands. I was going to also fit 4 shelves for my 20L bulk oil containers however I will alternatively fit them into my future shed.

While the plan is to have 200mm deep shelves every 200mm high I want to make sure it's what I really want. So I am going to make a small test assembly up with some scrap wood and see if I like it. If I can get away with having 250mm deep shelves then I already have a quarter more storage room.

More updates real soon
 

RobSmith

Banned
Joined
Feb 5, 2009
Messages
562
Location
NSW Australia
G'Day, I noticed a VFD on your mill. I'm in NSW and have been looking for a VFD for my lathe...There are so many different types I just need a bit more info for comparison. What brand VFD is it and what do you think of it ?
Thanks,
Rob.
 

HSpencer

ALLIANCE MEMBER
Joined
Nov 28, 2010
Messages
2,854
Location
South Central US
I have commented on this thread once before. I am just amazed to see such a nice home machine operation, and so well done. I am also pleased to see the craftsmanship used in constructing the shop. I am afraid this skill is something we are facing losing in the USA.
You are miles ahead of me in shop practice, and I wish I had those talents and skills. Keep up the photos as you are a real inspiration to the rest of us.
 
To avoid these ads, REGISTER NOW!
Top Bottom