To avoid these ads, REGISTER NOW!

Baldor 8" 8100 restoration thread!

kunkernator

Well-known member
Joined
Sep 27, 2012
Messages
2,438
Location
US of A
I posted a thread in the "General tool discussion" regarding identification of my bench grinder. Now that i dive further in to it, i think it deserves it's own thread to help facilitate answering other's questions with issues I had to figure out.

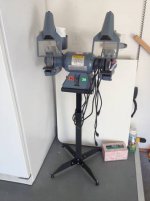
To start; here is the grinder, i saved it from the scrap dumpster at work. It turns on, and spins, but has excessive radial end play. It is also missing components (id tag, tool rest, shields).

6bcc6a7e6d1bd6d6ef3086d58efac400.jpg

79672f3def0ba1c7bd8eab0face73d43.jpg

48523862662d0c38cdece157dcd5a681.jpg

I have determined it is a 1970s era 8100, 8" grinder, based on the dimensions, and the horizontal position of the on/off switch (newer models has a vertical switch).

I tore the unit down, to start.

01c45551d7d9da2f601cffd5e7186d39.jpg

5ce5ae2b7bf8e6b4f153df1ebc284004.jpg

With it all torn apart, i noticed some component that need to be replaced. The bearings, some hardware, and a felt shim. This shim is the cause of the excessive end play, there is supposed to be two (one on either side, between the bearing and inner cover). This shim takes up end play, and acts as a seal to prevent dust and dirt from getting in to the shielded bearing.

7385e4e1a732d3a6332333ab71f26b8a.jpg

c3d47f63e8bc99a2e7f988d25fc4e4fc.jpg

The bearings are easy to source, the hardware i bought from the local Ace Hardware, but the felt is proving hard to find.


Sent from my iPhone using Tapatalk
 
To avoid these ads, REGISTER NOW!

mroneeyedboh

Well-known member
Joined
Dec 30, 2011
Messages
459
I think I read on here that the felt can be substituted using ordinary craft felt. I think it's in the craftsman bench grinder thread
 

drivesitfar

Well-known member
Joined
Oct 23, 2013
Messages
35,988
Location
Pacific Northwest
Kunk: good luck on finding some felt and not sure where to tell you where. i'll be watching and see how your are doing as i'm sure others will. i have to tear down a 1/2 HP Baldor soon myself so i can clean it up and put these Baldor lighted sheilds on mine that i have sitting on a shelf now.

good luck and take plenty of pictures as you have time to.
 

Attachments

  • 3Mc3N23He5Ic5K75Mcd3c0c6286e5221f16b1.jpg
    3Mc3N23He5Ic5K75Mcd3c0c6286e5221f16b1.jpg
    21.7 KB · Views: 137
  • 3Ka3o63Hb5Ne5La5H8d3c4658720b34b11852.jpg
    3Ka3o63Hb5Ne5La5H8d3c4658720b34b11852.jpg
    15.7 KB · Views: 110

zkling

Well-known member
Joined
Jan 23, 2007
Messages
16,939
The washer is called a wool cushioning washer, mcmaster and the like carry them. Unless the wheel wasn't tight, I think you have another issue to the shaft play besides the washer.
 
OP
K

kunkernator

Well-known member
Joined
Sep 27, 2012
Messages
2,438
Location
US of A
The washer is called a wool cushioning washer, mcmaster and the like carry them. Unless the wheel wasn't tight, I think you have another issue to the shaft play besides the washer.


Unfortunately Mcmaster only has 1/2" thick washers in the size i need. I need 1/4" thick, 1" id x 2" od.

As for the end play, it is also due to a bad fit on the current bearings, they spun on the shaft. Fortunately, the shaft mics out correctly for an interference fit, so we will see with the new bearings.

Baldor lists spare parts in their catalog: http://www.baldor.com/mvc/DownloadCenter/Files/11G Interestingly, while I found the felt washer in the parts list for 6" and 7" models, they don't show a felt washer available for 8" models.


I noticed that as well. Unfortunately, the 6/7" models use a 6203 bearing, while mine uses a 6206. Two different sizes.

Last night i did make some progress. It looks like the shaft used to have dowel pins to key the inner retaining collar for the grinding wheel.

75be27ec8841f8bf6dd129bdde1df6c8.jpg

They are sheared off, as you can see. I will file the nub off, and re-drill the hole, then drive a new pin in.

bea8eb58255d0d0fa6a513b32892d597.jpg

I did get new retaining studs made, it was missing 1 and 1 was bent, so i made all 4 new ones.

bd494a087ae78bf43616a7d6b69467e5.jpg

f559024ccb3ebeef56222b902b2ca3a6.jpg

a27d4c67487f2ad30d9ca0b9b96df225.jpg


Sent from my iPhone using Tapatalk
 

JZiggy

Well-known member
Joined
Dec 1, 2014
Messages
990
Location
Atlanta
What's the diameter of the rotor? It's huge! Also, could you share the bearing specs?
 

zkling

Well-known member
Joined
Jan 23, 2007
Messages
16,939
Unfortunately Mcmaster only has 1/2" thick washers in the size i need. I need 1/4" thick, 1" id x 2" od.

As for the end play, it is also due to a bad fit on the current bearings, they spun on the shaft. Fortunately, the shaft mics out correctly for an interference fit, so we will see with the new bearings.

I wouldn't be surprised if they were actually thicker when installed, and the years of compression caused them to give you the 1/4" measurement. May want to check the density rating.

As for the bearings, if it truly spun on the shaft, new bearings will unlikely solve your issue as when a bearing race spins, seldom does the race itself wear but instead the shaft or the bore. If it is just a slip fit you could use one of the low strength loctite bearing retaining compounds to prevent exacerbating the issue.
 

Warrenator

Well-known member
Joined
May 31, 2008
Messages
781
Location
Newberg, OR
I had a wheel bearing that spun on the shaft on a trailer, replacing the axle was going to be problematic so I used blue loctite and it has held for many years now. If I ever disassemble it I will need to use a torch to heat the race up to release the bond. Anyway, the point I wanted to make was that I was advised if a race has spun on the shaft you can use a nail set or a punch to make a series of dents around where the race has spun. When you make the little dents you are also making an area of raised metal that will keep the race from spinning on the shaft yet is loose enough to be removed. Do a few, check the fit, do a few more, etc.
 
OP
K

kunkernator

Well-known member
Joined
Sep 27, 2012
Messages
2,438
Location
US of A
I wouldn't be surprised if they were actually thicker when installed, and the years of compression caused them to give you the 1/4" measurement. May want to check the density rating.


As for the bearings, if it truly spun on the shaft, new bearings will unlikely solve your issue as when a bearing race spins, seldom does the race itself wear but instead the shaft or the bore. If it is just a slip fit you could use one of the low strength loctite bearing retaining compounds to prevent exacerbating the issue.


The felt measures less than 1/4", so i did round up on it. I miss spoke, the bearings are loose in the BORE, not on the shaft. Can anyone confirm if this is the case for Baldor grinders standard? And regardless, i plan on using Loctite green retaining compound. I think it will work fine.


Sent from my iPhone using Tapatalk
 

Shop Dad

Well-known member
Joined
Nov 5, 2014
Messages
160
Location
Princeton, NJ
Great rescue and nice work so far. I have a 10" in the wings like this. It will need similar treatment. Tuning in to see the rest of the story.

Doug
 
OP
K

kunkernator

Well-known member
Joined
Sep 27, 2012
Messages
2,438
Location
US of A
Alright guys, got a bit more work done today. Removed the old roll pin nubs from the shaft, they will be upgraded to hardened steel dowel pins.

794287219c9afa4feca231b88f555b49.jpg

c97cb41ea0f88405355da1b1137e01a9.jpg

I also prepped the shaft for reassembly. Old bearings were pressed off, and the spindles (where the grinding wheel sits) were cleaned up. New bearings have arrived. The parts list calls for single shielded (inside) 6206 bearings. I found double shielded on the cheap, and popped off one shield.

78f23340abbb8710103887c3934a6436.jpg

Had the bell ends sitting in acid overnight, washed them off today and are all prepped along with the stand.

0620e346b7a294a19e9ce39377a25ea6.jpg

The motor housing receives a light sanding to be prepped for paint. The wiring is tucked in, and i put a new cord relief on that i had laying around. I am waiting on the switch and new power cord pigtail from Amazon.

7a73454f7da7f85c5c6a518ad6ce3c1a.jpg


Sent from my iPhone using Tapatalk
 

drivesitfar

Well-known member
Joined
Oct 23, 2013
Messages
35,988
Location
Pacific Northwest
Kunk: I've got a couple questions if you don't mind. did you drill out the old broken pin out of the arbor while it was sitting in the jaws of your vise with a hand drill?

also would there be a downside from using bearings without an open side on your grinder and what is the downside?

nice pictures and since I need to take about my 1/2 HP Baldor some day soon i'll keep watching with more than a little interest.

thanks
 
OP
K

kunkernator

Well-known member
Joined
Sep 27, 2012
Messages
2,438
Location
US of A
Kunk: I've got a couple questions if you don't mind. did you drill out the old broken pin out of the arbor while it was sitting in the jaws of your vise with a hand drill?


also would there be a downside from using bearings without an open side on your grinder and what is the downside?


nice pictures and since I need to take about my 1/2 HP Baldor some day soon i'll keep watching with more than a little interest.


thanks


Kinda. I drilled a pilot hole to open up the center of the roll pin a bit, then took a spiral flute extractor and tapped it in there. Latched on to it with a pair of vise grips and twisted and pulled it out. And it is in my vise, but have no fear, there are soft copper jaws protecting it!

Honestly i have no idea about the bearings. I went with what Baldor called for. I did do a bit of research, which you may find interesting. The shielded bearings that this calls for differ from conventional "sealed" bearings. Shielded bearings have a steel shield that is held stationary on the outside race, it does not touch the inner race, gets close, but doesnt touch. It protects the bearing from MOST foreign debris from entering. Sealed bearings on the other hand, have a rubber-like seal that touches both the inner and outer race, thus COMPLETELY sealing the bearing from debris. The downside to this, is it creates friction, as it is constantly in contact with the spinning inner race. So they have a shorter like expectancy. That is what i learned.

My understanding for the bearings on my grinder, is that the inner face (toward motor) is shielded, but the outer is open.... The purpose of the felt washer is to act as a dust shield on the outer face, as it hugs the shaft tightly. Now, i really dont understand why they didnt just go with double shielded or double sealed bearings, but i went back to original.....

Keep asking questions. To my disbelief, there is not many threads on this forum going in depth on a Baldor rebuild. I want to spread as much knowledge here as i can.


Sent from my iPhone using Tapatalk
 
OP
K

kunkernator

Well-known member
Joined
Sep 27, 2012
Messages
2,438
Location
US of A
Hitting the sack now, but finished up the night by putting the new bearings on. My press will not accommodate putting the bearings on, and i didnt want to wait to go in to work, so i made a bearing driver to improvise.

cf734bafc4e0902373f08b6b8e2d6bdc.jpg

I believe it was 1-1/4" PVC, and a cap. Fit perfect on the inner race around the shaft. Put a little bit of Loctite retaining compound (560 i believe), and tapped the bearings on.

0171cce2e137b72fe7ad3329e1ca6cb6.jpg

Also cut the new dowel pins to the correct height, then deformed one end a bit (for an interference fit), and tapped them in place, once again with retaining compound.

b4d945993d6b78cde69d626588d2d771.jpg

The shaft is all ready for install. Will throw the shaft and two bell ends on tomorrow. Unfortunately can't go too much further, as Amazon has yet to deliver my hollow punch set for making my felt washers (due in Monday).


Sent from my iPhone using Tapatalk
 

drivesitfar

Well-known member
Joined
Oct 23, 2013
Messages
35,988
Location
Pacific Northwest
Kunk: I use copper jaw covers on all my big vises and used to use plastic covers on my old Zyliss that I used for years for homeowner type stuff.

Baldor is shaping up and the pictures and all the words help a lot. also like your pipe tool (aid) for getting the bearings on the shaft.

good luck
 
OP
K

kunkernator

Well-known member
Joined
Sep 27, 2012
Messages
2,438
Location
US of A
Got some more work done today. First off, went out and bought a "donor" grinder. As some had suggested in the previous thread, i can harvest the eye shields and tool rests off a cheap grinder. I ended up grabbing this one from Northern Tool. The eye shields should fit perfect, and then I plan to use the grinder as a buffer afterwards.

a14634059eaf499c64a762cde83c7eea.jpg

2e79b113cada8307cb7ff8dc9e19d218.jpg

I also got the housing all put together. It is a bit of a pain in the ***, but did it.

7d41992d80faf3d88a3da73f898a8753.jpg

After the housing is put together, you have to center the shaft. I did this by lightly tapping the shaft on either end, and check the bearing mounting depth with a caliper.

be5ab0300f467bb11811cfee83374007.jpg

c1e6f0181d2a02b0109d7dedd01e777c.jpg

ab7ab93ce19009e346e1a4f3388352e2.jpg

It may not be the same for all grinders, but i centered the shaft the best I could. I believe the left side had a 0.187" mounting depth, and the right side had a 0.185" mounting depth. I would say "close enough". The difference shouldn't effect motor performance, and wont make the shaft be too far from one side to the other to hit either guard.

I also want to mention, this grinder had one guard with a pores casting. It looks like that had it filled with epoxy or the such from the factory, but the chemical I used to clean the parts also dissolved this filler. I filled it back in with a little bit of JB Weld.

3a99183a3ee7f85de0ce5dfc1e4c19e4.jpg

After all is said and done, i did temporarily wire up a power cord (i am still waiting on my heavy gauge and switch from Amazon), and turned her on. Spun up perfect, and had minimal vibration, just like it should.


Sent from my iPhone using Tapatalk
 
To avoid these ads, REGISTER NOW!

drivesitfar

Well-known member
Joined
Oct 23, 2013
Messages
35,988
Location
Pacific Northwest
Kunk: most of the guys would use a donor USED grinder for spare parts and it looks like you actually bought a new grinder. what brand is it and what did it set you back?

once you set the center shaft in place do you have a way to keep it there with shims and washers before bolting it down to keep if from moving side to side?

nice work and keep posting lots of pictures because I bet your thread will get lots of views in the future and i'm sure i'll check in on it a few times when doing mine.

good luck
 

torqueman2002

Well-known member
Joined
Jun 3, 2009
Messages
6,138
Location
SE Michigan
Kunk: Good thread. :thumbup:

I did a quick read just now, but will be-sure to digest it later and keep up with subscribe notification.

I post mostly about Craftsman Block motor grinders, but have other brands including Baldor. (Don't tell the Block fans, I don't want to get voted off the 'island' :lol:).

I will try your method of removing the pin, I have the same problem on a Baldor, or is it a Delta, maybe a Milwaukee, or .... :D

Keep up the good work and thanks for posting your work.
 
OP
K

kunkernator

Well-known member
Joined
Sep 27, 2012
Messages
2,438
Location
US of A
Kunk: most of the guys would use a donor USED grinder for spare parts and it looks like you actually bought a new grinder. what brand is it and what did it set you back?


once you set the center shaft in place do you have a way to keep it there with shims and washers before bolting it down to keep if from moving side to side?


nice work and keep posting lots of pictures because I bet your thread will get lots of views in the future and i'm sure i'll check in on it a few times when doing mine.


good luck


I did buy it new. Not much on craigslist here, and it was cheap enough, $50 from Northern tool. I will slap some cotton wheels on it afterwards and I have myself a buffer.

As for the center shaft, i used retaining compound in the bore. So once i centered it, i let it sit for a few hours and it doesnt budge. As others have said, the bearing should fit snug, so it shouldnt move. I added the retaining compound as an extra measure.


Sent from my iPhone using Tapatalk
 

drivesitfar

Well-known member
Joined
Oct 23, 2013
Messages
35,988
Location
Pacific Northwest
Kunk: before you close up the Baldor can you take a few more pictures or did you already showing what you did to firm up it's location?

also if you are going to use that grinder for a buffer you might want to buy or make some right and left handed threaded extensions to get the debris from the buffer farther from the motor and also giving you more access when you need to get around the sides of your projects to get at the wheel.

good luck
 
OP
K

kunkernator

Well-known member
Joined
Sep 27, 2012
Messages
2,438
Location
US of A
Kunk: before you close up the Baldor can you take a few more pictures or did you already showing what you did to firm up it's location?


also if you are going to use that grinder for a buffer you might want to buy or make some right and left handed threaded extensions to get the debris from the buffer farther from the motor and also giving you more access when you need to get around the sides of your projects to get at the wheel.


good luck


I will take a few more pictures for you.

And i did start looking at spindle extensions. The interesting thing about this grinder is that it does have sealed bearings, so i am not THAT concerned about debris. I will most likely purchase the spindle extensions in the future, but for now, going to just slap on a couple wheels.


Sent from my iPhone using Tapatalk
 
OP
K

kunkernator

Well-known member
Joined
Sep 27, 2012
Messages
2,438
Location
US of A
Kunk: Good thread. :thumbup:

I did a quick read just now, but will be-sure to digest it later and keep up with subscribe notification.

I post mostly about Craftsman Block motor grinders, but have other brands including Baldor. (Don't tell the Block fans, I don't want to get voted off the 'island' :lol:).

I will try your method of removing the pin, I have the same problem on a Baldor, or is it a Delta, maybe a Milwaukee, or .... :D

Keep up the good work and thanks for posting your work.


Thanks! I am glad you like it and can find it helpful. I have yet to find a block grinder, but would love to! Although this Baldor is pretty badass!


Sent from my iPhone using Tapatalk
 
OP
K

kunkernator

Well-known member
Joined
Sep 27, 2012
Messages
2,438
Location
US of A
Well, still waiting on Amazon to deliver my power switch, power cord, and hole punch.

Drivesitfar: here is a few more pics for you.

The retaining compound is put on the bearing bore and shaft surfaces, where i am pointing.

88de3f088c1c9358768bb58b9d011321.jpg

6fd0efdfa81303c33b4838f206d08b1b.jpg

You can see how the bearing is inset to to the housing. The goal is to get this inset the same on either side.

68bb57c983374a117e686b482a6c78f9.jpg

This is the retaining compound I use. It is just like regular Loctite thread locker, but thicker, more like a syrup.

f33171eb0b0ef941a78c316f21e1c7e1.jpg

I got the wheel retainers all cleaned up on a wire wheel. Before and after:

467e360cb84615c4a305da4ed1596dd4.jpg

And after all 4 are done.

f8d4a4f078f3a60f80edde7a4f44d97f.jpg

The inside bore of them also gets a light sanding by hand. They were a bit rough from spinning on the sheared roll pins.

http://uploads.tapatalk-cdn.com/20160229/68755bc5a003270fd9cd162d1696fe43.jpg[/IMG

Also hit the power switch guard with the wire wheel, and straightened it out a bit.

[ATTACH=full]1242958[/ATTACH]

Just got home from HD with some primer and paint. I dont really care for going back to "original" paint, so i got Rustoleum rusty metal primer, and gray paint.


Sent from my iPhone using Tapatalk
 

Shop Dad

Well-known member
Joined
Nov 5, 2014
Messages
160
Location
Princeton, NJ
The "machine gray" paint is just a bit lighter. Won't make a difference on yours but I had to paint a piece on one of mine and it's noticeable. I like the current Baldor color, but they want a fortune for it. Nice work.

Doug
 
OP
K

kunkernator

Well-known member
Joined
Sep 27, 2012
Messages
2,438
Location
US of A
Alright. Got a lot done last night. The Amazon shipment came in, new power cord, and switch.

fd76dcf4fa5908443a77cb23b5eb26d5.jpg

All wired up and ready to go.

e0e12198c18d9b496ad1e59efa9d35e0.jpg

3ee8c1af7aa041fdce306e6fad0b0de4.jpg

I gave the shafts a little extra sanding again, from the old marks where someone grabbed it with vise grips. This time, i turned the thing on, and held sandpaper to it. Came out wonderfully!

abb3035d2b0c57fb860545f3b5db8057.jpg

New felt washers are cut, and installed with a bit of grease.

f97b473ed5b3f4b2cb56752022c5727e.jpg

The inner housings are installed.

a86a7043ebe3ada5ff73d85d64834de7.jpg

Now a new grinding wheel and wire wheel. As well as the outer housings.

70dcbe0299b08538631f025809261cfe.jpg

Prepped for paint.

49c5bc5343ac135dcab7f5b39917fad1.jpg

Primer on.

a5fa38d24d53f2d82d81f87907b6ceaf.jpg

And painted.

cc5109a74c191fb1265525292af71280.jpg


Sent from my iPhone using Tapatalk
 

DocsMachine

Well-known member
Joined
Sep 16, 2006
Messages
1,844
When those pins on the shaft shear off, a quick trick is to use a bodyman's stud welder. I had that exact problem when rebuilding my big 12" Queen City, so I just welded a stud on there and popped the remnant out with a slide hammer. (Only took a light tap.)

Do NOT use hardened replacements. They're like a key for a shaft- they're designed to shear if a crash occurs, saving the shaft itself from damage. If it's hardened, a crash will try to bend the pin in it's hole, peening the side of the hole and grooving the notch in the washer.

Just use a short section of soft mild steel rod, that's all it needs. Besides, if it does shear off and you don't have a stud welder, the soft iron can be drilled, unlike the hardened pin.

Doc.
 
OP
K

kunkernator

Well-known member
Joined
Sep 27, 2012
Messages
2,438
Location
US of A
When those pins on the shaft shear off, a quick trick is to use a bodyman's stud welder. I had that exact problem when rebuilding my big 12" Queen City, so I just welded a stud on there and popped the remnant out with a slide hammer. (Only took a light tap.)


Do NOT use hardened replacements. They're like a key for a shaft- they're designed to shear if a crash occurs, saving the shaft itself from damage. If it's hardened, a crash will try to bend the pin in it's hole, peening the side of the hole and grooving the notch in the washer.


Just use a short section of soft mild steel rod, that's all it needs. Besides, if it does shear off and you don't have a stud welder, the soft iron can be drilled, unlike the hardened pin.


Doc.


Great advice! I never really thought of it that way. I pulled the outer housings off and replaced the hardened pins with a bit of 1/8" steel rod i cut off.

One other thing I want to mention. The right hand shaft retaining nut had to be replaced. I was at Home Depot, so i grabbed a 3/4" coarse thread nut. I put it on the grinder, and it spun up all wobbly. Long story short, turns out the nut was threaded on an angle, so when you tighten it down, one side contacts the wheel hub, but not the other...... Home Depot has cheap nuts. Went to Ace and grabbed a grade 8 one, works perfect.


Sent from my iPhone using Tapatalk
 

DocsMachine

Well-known member
Joined
Sep 16, 2006
Messages
1,844
One other thing I want to mention. The right hand shaft retaining nut had to be replaced. I was at Home Depot, so i grabbed a 3/4" coarse thread nut. I put it on the grinder, and it spun up all wobbly. Long story short, turns out the nut was threaded on an angle, so when you tighten it down, one side contacts the wheel hub, but not the other...... Home Depot has cheap nuts. Went to Ace and grabbed a grade 8 one, works perfect.

-That's pretty standard. Nuts are mass-produced and not necessarily to any real precision.

I have a writeup of a similar (although less involved) cleanup of an 8" Baldor, the latter part of which shows how I trued up the factory Baldor nuts and washers.

Makes a notable difference, and is worth the trouble.

Doc.
 
OP
K

kunkernator

Well-known member
Joined
Sep 27, 2012
Messages
2,438
Location
US of A
-That's pretty standard. Nuts are mass-produced and not necessarily to any real precision.


I have a writeup of a similar (although less involved) cleanup of an 8" Baldor, the latter part of which shows how I trued up the factory Baldor nuts and washers.


Makes a notable difference, and is worth the trouble.


Doc.


Read the first page real quick, and that is EXACTLY what it was doing. I will read the rest in the morning, but i bet it will prove to be useful.

And i understand the mass production, but this was so far off, it is visibly noticeable on the nut itself. Never had anything this horrible looking.


Sent from my iPhone using Tapatalk
 

DocsMachine

Well-known member
Joined
Sep 16, 2006
Messages
1,844
And i understand the mass production, but this was so far off, it is visibly noticeable on the nut itself. Never had anything this horrible looking.

-Oh sure, that's all too common. :)

The machine shop instructor that taught me the lathe trick for "straightening" those had a fine example; when you screwed a bolt into it, you could see it was crooked from across the room. It was off by something like ten degrees (!)

In my linked writeup, keep in mind those were factory Baldor nuts- so even the stock ones weren't all that great. And those die-cast aluminum flanges aren't trued or machined either, they're just straight out of the mold.

If you can true all of those up- all four flanges and both nuts- you'll find the wheels run a lot smoother. Just keep in mind the flanges need to be trued to the bore- don't just slap 'em in the lathe, gripped by the outer rim, and expect the new face to be good.

If you rebore the center, it'll be too loose on the shaft, so you have to, as I did in my writeup, locate off the bore, and true the faces to it.

It's all a matter of just a few thousandths, but it's worth it. I have both an 8" Baldor and a big 2HP 12" pedestal grinder, and both run so smooth you can damn near balance a nickel on 'em.

Doc.
 

Tylerd

Member
Joined
Apr 5, 2014
Messages
11
Awesome, I have the same Grinder 8107W! I have taken mine apart to clean up, ton of surface rust. Mine has the very same wavy steel, and felt washer on the right side and just the 2 metal flat washers, or whatever they are called on the left side. I have taken the wheel guards off and replaced them with endcaps, that actually go to the 333b buffer, it has the same arbor size and HP. It is a perfect fit on our grinders the part number is RB3010, I got mine from Galco. This is the parts list to the 333b and it has the felt washers and steel wavy washers listed for it https://www.baldorvip.com/servlet/productInfoPacket/333B.pdf. Take a look at it see what you think. My plan is to have a wire wheel on one and a buff on the other side. I am wondering both of ours having just the one felt washer and the 2 steel on the other, that this must be the way they ship from factory. I thought someone had just repaired and did a steel sub for the felt but with both of ours like that, what are the odds. I will post some pics later today of mine with the rb3010 on so you can see what it looks like.
 
OP
K

kunkernator

Well-known member
Joined
Sep 27, 2012
Messages
2,438
Location
US of A
Awesome, I have the same Grinder 8107W! I have taken mine apart to clean up, ton of surface rust. Mine has the very same wavy steel, and felt washer on the right side and just the 2 metal flat washers, or whatever they are called on the left side. I have taken the wheel guards off and replaced them with endcaps, that actually go to the 333b buffer, it has the same arbor size and HP. It is a perfect fit on our grinders the part number is RB3010, I got mine from Galco. This is the parts list to the 333b and it has the felt washers and steel wavy washers listed for it https://www.baldorvip.com/servlet/productInfoPacket/333B.pdf. Take a look at it see what you think. My plan is to have a wire wheel on one and a buff on the other side. I am wondering both of ours having just the one felt washer and the 2 steel on the other, that this must be the way they ship from factory. I thought someone had just repaired and did a steel sub for the felt but with both of ours like that, what are the odds. I will post some pics later today of mine with the rb3010 on so you can see what it looks like.

That is some very good info! I have placed calls to Baldor reps, and none of them know about any felt washers. Yours is the first one that I have found that has the washers. Are the bearings shielded on the inside only? If you are turning yours into a buffer, maybe you are interested in selling the tool rests? And could you take a picture of the nameplate please?

I do think it is weird that the felt washers were only on the one side.....

Thanks for the info!
 
OP
K

kunkernator

Well-known member
Joined
Sep 27, 2012
Messages
2,438
Location
US of A
Some more updates here.

I have decided to send my wheel flanges to another member, along with the shaft nuts, to be machined flat.

I got a new (used) nameplate from a scrap grinder a buddy found, guess i got lucky.

b13d601703983d8e2c4efcb8498e1361.jpg

I have to figure out a way to make the new imprints look good for my grinder.

I also forgot to mention that i have the rest and cup that go along with this. All repainted and ready to go!

fabb4355fd8712d65621cdc7d2110eca.jpg

e08003dead255394059ea4a00044d8a3.jpg

30e39e83c3e0c75ef6300361b532dc1e.jpg

The new wire wheel arrived too.

c119b2170ca1e2080a5f86ab09e1bd4b.jpg

Also, i bought a tachometer to determine the true RPM of the grinder. Turns out it is a 8107, running at about 3600 RPM.

9219fa7f64d6aae5bfdcc2c66d06b308.jpg

And i have decided to re-make the felt washers. I did not use the correct size punch the first time and they fit poorly. I bought some better material from McMaster and the correct size punch, so will be remaking them. Hopefully before the flanges get back.


Sent from my iPhone using Tapatalk
 
OP
K

kunkernator

Well-known member
Joined
Sep 27, 2012
Messages
2,438
Location
US of A
Alright guys, it has been quite a while since i posted an update. Since then, i sent my wheel flanges and nuts to a machinist that is a member here, got them back yesterday, and they look beautiful!

e38ab30c008a80ecce2c137ea9eb4a6f.jpg

Coincidentally, ANOTHER member is making reproduction Baldor badges for his grinder, so i asked if he could make one for me. He just got done producing them today.

f7b3283bf392139416b78522da7973f8.jpg

I will slap the grinder together today, and see how she looks. I am making the new tool rests out of angle iron, but i have not decided what to do about the tool rest supports yet.


Sent from my iPhone using Tapatalk
 

tedsters

Well-known member
Joined
Oct 29, 2012
Messages
1,443
Location
Michigan
Kinda. I drilled a pilot hole to open up the center of the roll pin a bit, then took a spiral flute extractor and tapped it in there. Latched on to it with a pair of vise grips and twisted and pulled it out. And it is in my vise, but have no fear, there are soft copper jaws protecting it!

Honestly i have no idea about the bearings. I went with what Baldor called for. I did do a bit of research, which you may find interesting. The shielded bearings that this calls for differ from conventional "sealed" bearings. Shielded bearings have a steel shield that is held stationary on the outside race, it does not touch the inner race, gets close, but doesnt touch. It protects the bearing from MOST foreign debris from entering. Sealed bearings on the other hand, have a rubber-like seal that touches both the inner and outer race, thus COMPLETELY sealing the bearing from debris. The downside to this, is it creates friction, as it is constantly in contact with the spinning inner race. So they have a shorter like expectancy. That is what i learned.

My understanding for the bearings on my grinder, is that the inner face (toward motor) is shielded, but the outer is open.... The purpose of the felt washer is to act as a dust shield on the outer face, as it hugs the shaft tightly. Now, i really dont understand why they didnt just go with double shielded or double sealed bearings, but i went back to original.....

Keep asking questions. To my disbelief, there is not many threads on this forum going in depth on a Baldor rebuild. I want to spread as much knowledge here as i can.


Sent from my iPhone using Tapatalk

To my understanding with baldor I had some lengthy conversations with them on a couple builds I did, they told me the purpose for the single row bearing with the open front was for less friction with the slow starts and to make the bearing greasable
 
To avoid these ads, REGISTER NOW!
Top Bottom