To avoid these ads, REGISTER NOW!

Ball joint removal tool

To avoid these ads, REGISTER NOW!

cgrutt

Well-known member
Joined
Mar 4, 2016
Messages
8,469
I used the second one to replace front end on wife's Mercedes and son's BMW it worked surprisingly well but might tear boot on old joint. Loosen nut on top of ball joint but leave it attached, hit back of tool to get it into place put pressure on the joint. You still may need to whack side of control arm with it under tension to get it to release. Once it pops remove tool, take the nut off and it should drop right out. Note this just separates the control arm may need a separate tool to replace the ball joint. What car are you working on?
 
OP
A

AC-WC

Well-known member
Joined
Jan 22, 2023
Messages
792
Location
NE, Indiana
2012 Dodge Journey FWD.
Should have explained a little better-did the RH side reasonably easy, beat a couple of times and it dropped right off. The LH is just being a pistol. Not sure how well the seal will do if I put heat on the arm-transferring the heat to the seal. Yes, used liquid wrench on it a few weeks ago and more when working on it. Original arms, 135,000, surface rust, not crusty bad. Surface cracks on the rubber joints so just wanted to do preventive maintenance before anything got bad.
 

Schurkey

Well-known member
Joined
Oct 27, 2011
Messages
2,391
Location
The Seasonally Frozen Wastelands

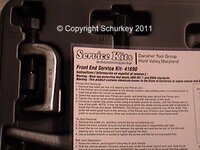
Neither. Both of them are piss-poor knockoffs of the tools provided by Gearwrench, sold under multiple other brand-names such as OTC and NAPA. I got mine as part of a set from NAPA--it was part of their "loaner-tool" program. I liked it so much I told them I was keeping it. The original 2011-ish KD branding and part number (41690) were warrantied about 8 or 10 years after purchase with a NAPA-branded set, same part number. Photos are of the original, KD-branded set.


Lube the pressure screws before use.

Joint_Kit_001.jpg

Joint_Kit_002.jpg
 

tak1313

Well-known member
Joined
Feb 4, 2018
Messages
667
The video shows the "hit the stud" method, but did you try the "two-hammer hit the knuckle where the stud is captured" method?

I know some use the "one hammer and hit the knuckle where the stud is captured" method, but I have found it works much better using two for whatever reason. Hold one heavy hammer on one side, then strike the other side probably has something to do with a stationary mass supporting the knuckle point against a moving mass kinda thing.
 

2ndGearRubber

Well-known member
Joined
Mar 24, 2014
Messages
14,185
Location
Pittsburgh
For a DIY person, without powerful air hammers, a Dodge journey ball joint would absolutely **** to replace. Those saying "just replace" probably haven't looked at the design of the knuckle. That said, if the joint is loose or compromised, safety first.

To pop the ball joint from the taper in the lower control arm, you need to be pulling the arm downward, not pushing the knuckle up. Your only resistance pushing the knuckle up is the bushings in the arm, and the strut. When pulling the arm down, you eventually bottom out the travel of the strut, meaning your knuckle can travel no lower. Place a long prybar or similar in a manor to push down on the arm. Don't need crazy force, just tension. Then whack the control arm taper with your 4lb sledge hammer.

Prying/popper tools typically will just destroy the joint if they're actually used to separate the joint on their own. Used for light tension, like the pry bar, they can be acceptable to use.
 

Hohn

Well-known member
Joined
Aug 25, 2016
Messages
2,856
Location
Diesel Central, Indiana
For a DIY person, without powerful air hammers, a Dodge journey ball joint would absolutely **** to replace. Those saying "just replace" probably haven't looked at the design of the knuckle. That said, if the joint is loose or compromised, safety first.

To pop the ball joint from the taper in the lower control arm, you need to be pulling the arm downward, not pushing the knuckle up. Your only resistance pushing the knuckle up is the bushings in the arm, and the strut. When pulling the arm down, you eventually bottom out the travel of the strut, meaning your knuckle can travel no lower. Place a long prybar or similar in a manor to push down on the arm. Don't need crazy force, just tension. Then whack the control arm taper with your 4lb sledge hammer.

Prying/popper tools typically will just destroy the joint if they're actually used to separate the joint on their own. Used for light tension, like the pry bar, they can be acceptable to use.
BJs are hard to do without a "powerful air hammer" so as a DiY, I own one. The problem is controlling it! It gets extra tricky when the LCA is aluminum and much softer than the hammer's bit.

I've never done a Journey, but I'd suggest a salad bar approach-- a bit of heat, a bit of vibration, some gently prying. Vibration always seems the ultimate solution, but whacking with a hammer tends to get tiring and hurt some parts.
An air hammer applied near the joint with something to distribute the impacts (a flat steel bar) always seems to help. I've had BJs just fall apart after 20-30 seconds of air hammering.
 

tak1313

Well-known member
Joined
Feb 4, 2018
Messages
667
You'll never break it free with one of those, but they are good for downward tension while wracking the knuckle with a hammer.
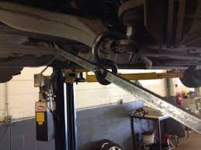
I bought one of these a few years ago to put downward pressure on control arm. It's an OTC 6007, and you use it with a prybar, versus the Draper version. Because it's essentially a giant thick S hook, it stores easily in the tool chest.

The big side goes around the control arm (obviously), and the prybar goes through the small side.

1697554469606.png
1697554540753.png
 

2ndGearRubber

Well-known member
Joined
Mar 24, 2014
Messages
14,185
Location
Pittsburgh
I bought one of these a few years ago to put downward pressure on control arm. It's an OTC 6007, and you use it with a prybar, versus the Draper version. Because it's essentially a giant thick S hook, it stores easily in the tool chest.

The big side goes around the control arm (obviously), and the prybar goes through the small side.

1697554469606.png
1697554540753.png

Those work pretty good. I have the Astro J shaped arm thing that does something similar was well.

Usually that my preference, but I still use my otc hook too.
 

RTM

Well-known member
Joined
May 13, 2019
Messages
13,501
Location
SF Bay Area
I bought one of these a few years ago to put downward pressure on control arm. It's an OTC 6007, and you use it with a prybar, versus the Draper version. Because it's essentially a giant thick S hook, it stores easily in the tool chest.

The big side goes around the control arm (obviously), and the prybar goes through the small side.

1697554469606.png
1697554540753.png
Dang

I tried to create one of those back in the 80s to take apart a ball joint on a Fiat 128. I didn't have anything in house rigid enough to do the job. Ended up buying a tool, took a few days to arrive.

Nice to know someone makes one, now that I don't need it.
 
To avoid these ads, REGISTER NOW!

Hohn

Well-known member
Joined
Aug 25, 2016
Messages
2,856
Location
Diesel Central, Indiana
just noticed that Astro is using a class 12.9 screw on their Goliath BJ tools. I was always told as a younger engineer that 12.9 is no-no for any application where it isn't in a continuous oil bath. Hydrogen embrittlement. I wonder if @Astro_Pneumatic_Tools really feels the 12.9 is needed? A sudden screw fracture could be dangerous. That said, these tools aren't exposed to man fatigue cycles so perhaps the embrittlement potential is a non-issue.

Unsolicited design feedback: drop down to 10.9 and go up to a larger acme thread if needed.
 

Astro_Pneumatic_Tools

Well-known member
Joined
Oct 30, 2013
Messages
2,128
Location
South El Monte
just noticed that Astro is using a class 12.9 screw on their Goliath BJ tools. I was always told as a younger engineer that 12.9 is no-no for any application where it isn't in a continuous oil bath. Hydrogen embrittlement. I wonder if @Astro_Pneumatic_Tools really feels the 12.9 is needed? A sudden screw fracture could be dangerous. That said, these tools aren't exposed to man fatigue cycles so perhaps the embrittlement potential is a non-issue.

Unsolicited design feedback: drop down to 10.9 and go up to a larger acme thread if needed.
Nah. It meets 12.9 for hardness and yield strength, it's not a 12.9 bolt off the rack. It's 100% the right part for the job, we have many years worth of R&D on these. If it were maybe 1/2" or 5/8" thread we'd worry more about fracture, but it's just not seen in 1-1/8" coarse thread.
 

ctandc72

Well-known member
Joined
Sep 19, 2020
Messages
1,087
Location
VA
If your knuckle is loose from the strut (like in that video) and it's flopping around and you just need to separate the ball joint, why not just use a pickle fork?

Me personally, if I'm that deep into a front suspension with a good bit of age / miles on it, I'm putting in ball joints while I'm in there. They are cheap and you can get the installer, if you don't have one, for free (rental) from the local auto parts store.
 

Milton Shaw

Well-known member
Joined
Feb 11, 2011
Messages
4,868
It makes a difference how the ball joint is loaded. Is it in tension or compression. If it is tension then a pickle fork will work. If it is compression you have to support the control arm to unload the joint and then try to get the pickle fork to break it free. I have worked on both kinds and you have to study the suspension to determine how to unload the joint.
 

tak1313

Well-known member
Joined
Feb 4, 2018
Messages
667
Dang

I tried to create one of those back in the 80s to take apart a ball joint on a Fiat 128. I didn't have anything in house rigid enough to do the job. Ended up buying a tool, took a few days to arrive.

Nice to know someone makes one, now that I don't need it.

This is Garage Journal. Need is not a factor in acquiring tools. When I got mine, I didn't need it - just wanted it "in case" so I wouldn't have to wait for it if the need actually arose (since it's not available locally).
 

P0234

Well-known member
Joined
Aug 6, 2012
Messages
3,241
Location
NoVA
You'll never break it free with one of those, but they are good for downward tension while wracking the knuckle with a hammer.
That's what has always worked for me, get something to pull it down with force and hit the knuckle with the hammer. I usually leave the nut on the balljoint too (just enough to catch it when it pops).
 

Steve_P

Well-known member
Joined
Sep 15, 2010
Messages
5,244
just noticed that Astro is using a class 12.9 screw on their Goliath BJ tools. I was always told as a younger engineer that 12.9 is no-no for any application where it isn't in a continuous oil bath. Hydrogen embrittlement. I wonder if @Astro_Pneumatic_Tools really feels the 12.9 is needed? A sudden screw fracture could be dangerous. That said, these tools aren't exposed to man fatigue cycles so perhaps the embrittlement potential is a non-issue.

Unsolicited design feedback: drop down to 10.9 and go up to a larger acme thread if needed.
Huh? Do you have a BSME? Who told you such nonsense? This is nonsensical, especially for a phosphated screw.
 

Hohn

Well-known member
Joined
Aug 25, 2016
Messages
2,856
Location
Diesel Central, Indiana
Huh? Do you have a BSME? Who told you such nonsense? This is nonsensical, especially for a phosphated screw.
I’ve picked up a thing or two working as a professional ME for 15 years. Hydrogen embrittlement is a real thing in class 12.9 screws.

https://steelimage.com/wp-content/uploads/2019/02/Hydrogen-Embrittlement-of-Grade-12.pdf
Here too
Even when used with a zinc phosphate coating, our engineering standards forbid using 12.9 where it isn’t covered by an oil bath.

I raised the question and Astro answered affirmatively so I’m satisfied with that.

But acting like I’m making stuff up and that hydrogen embrittlement of 12.9 threaded screws is “such nonsense” makes you, not me, look ignorant.
 
Last edited:

Steve_P

Well-known member
Joined
Sep 15, 2010
Messages
5,244
We all drive cars for hundreds of thousands of miles with zinc electroplated grade 8 or class 12.9 screws. And we have for 60+ years. And yet I'm betting no one here has ever had an HE fastener failure. Or know anyone that has. You have a better chance of being struck by lightning than having a screw fail from HE.

Modern (30+ years) auto factory assembly equipment in a "metric plant" is held together with almost nothing but blackened class 12.9 SHCS. I never saw one screw fail that wasn't torn out by a robot malfunction.

Consider that aircraft aren't held together with grade 5 screws because they're scared of HE. You use the class or grade of screw required, and not downgrade for fear of HE. You can do a post plate bake if it's a concern.

But suggesting to use a softer screw, in a press, isn't how things work in reality.
 

428PI

Well-known member
Joined
Jul 14, 2018
Messages
1,976
Location
Peabody, KS
Usually just wack the spindle with hammer right at ball joint taper will break it lose. If it doesn't you need bigger hammer or bigger arm.
 
OP
A

AC-WC

Well-known member
Joined
Jan 22, 2023
Messages
792
Location
NE, Indiana
Update-rented a puller set from the parts store. One puller was already broken:( Tried the separator style but couldn't get it underneath the boot:( Last one worked!
3 bolts but took forever to reinstall, ended up breaking my torque wrench, it was only 40 yrs old :cry: , then the ball joint threads somehow got stripped and had to rethread them. I don't use my tap and die set often but when I do it's desperate!
Last pic is the reason I replaced the lower control arms. Cracked rubber and some separation from the rubber/steel.
 

Attachments

  • 20231021_131217[1].jpg
    20231021_131217[1].jpg
    799.3 KB · Views: 36
  • 20231021_092628[1].jpg
    20231021_092628[1].jpg
    504.7 KB · Views: 38
  • 20231021_092316[1].jpg
    20231021_092316[1].jpg
    651.1 KB · Views: 39
  • 20231021_092254[1].jpg
    20231021_092254[1].jpg
    1,016.2 KB · Views: 38
  • 20231021_092238[1].jpg
    20231021_092238[1].jpg
    1 MB · Views: 40
OP
A

AC-WC

Well-known member
Joined
Jan 22, 2023
Messages
792
Location
NE, Indiana
Well, good job. I still don't see the reason for trying to save a ball joint if it doesn't pop easily.

Screenshot_20231021_161334_Chrome.jpg
It's not the cost of the ball joint it's the labor on the Journey. You have to take the entire brake assembly off. For me it would likely be 2-4 hrs each side.
Cgrutt posted the youtube link above.
 

kudakev615

Well-known member
Joined
Jan 10, 2017
Messages
178
then the ball joint threads somehow got stripped and had to rethread them
seeing that you pressed directly against the threads on the stud of the ball joint, theres your answer. if you thread the nut back on the stud so that it sits flush and then press against that, it helps minimize the chance of damaging the threads (y)
 
Last edited:
To avoid these ads, REGISTER NOW!
Top Bottom