jwith68
Well-known member
A couple of weeks ago I started a project that is kind of out of the norm for me. I'm liking the way its turning out, so I thought I'd show it off a bit.
Our son and a friend of his share an apartment in the St. Louis area while they go to school there. They just signed a lease on a new 3 bedroom apartment, and another friend is moving in with them. He tells me their new place will have a decent amount of room, and they need a dining table. He wants something rustic, and he's had his eye on an old door we took out of the interior of a barn when we did this barn overhaul several years ago.
So I got out the door, and looked through the stash of lumber and beams we saved when we took the loft structure out of that barn. I came up with a 5"x5" column, a 3"x5" beam, and a 2"x8" brace, all close-to-full-dimension roughsawn oak. The door and a couple boards that match it closely are pine. All this lumber is just over 90 years old, as the barn was built 1924-25. First order of the day was to powerwash the thick layer of dust (and even some very old dry manure) off it. It turned out looking great, without removing the patina.
The design is a combination of ideas from my wife, a good friend of ours, and myself. We thought a trestle table would work well with the door, which was roughly 32" x 78". Here is the door and a start on the trestle base, after powerwashing.

Here is the base with columns added. Should be beefy enough!

I wanted to do something unique for the actual trestle, incorporate metal, and keep with the rustic theme. So I went out and dug through my scrap metal pile, and came up with a few lengths of old steel "T" post, which usually wind up there when they rust enough at ground level that they break off when you try to pull them. Our last initial is "W", so I thought that might make a good trestle/truss design as well as a nice "monogram". With a little bit of cutting and welding, here is our trestle.

I thought about just taking off the scaly rust and clear coating it, but our son liked the idea of hammertone paint. I thought copper would look good with the rustic wood, so after wire brushing, a coat of rust converter, and two coats of Rustoleum copper hammertone, here is the base.

With the base more or less done, I started on the top. The door was in incredibly nice condition for a 90 year old original barn door, but it still needed a bit of work. I squared it up by trimming both ends and one side slightly. That also got rid of just a little bit of soft wood on what had been the bottom edge. I cut some 2.5" wide strips out of the matching pine boards to edge the door with, to make the table top look a little more "massive", like the base.

I left weathered edges on the top of the edge strip, and used leftover strips from the middle of the boards to straighten and flatten the door across each end. I just clamped a piece of steel tube across the face, with the door upside down, and screwed the strips on as backers at each end. This also made a more secure attachment for the edges at each end. The edges are put on with #4 finishing nails.

We will top the door with a glass top, so we decided to hold the edges "proud" of the door surface and capture the glass, instead of having the glass come all the way to the edge. I used a scrap of 1/4" (actually 5mm) luan as a gauge.

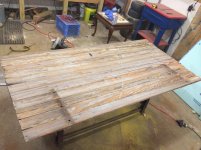
So after the top was finished yesterday, here is what it looked like.

A lot of this lumber was really rough, and would pretty easily give you splinters. So I did a bit of experimentation on smoothing it out without losing "the look". I settled on using the coarse Scotch-Brite scouring pads. They do a great job of smoothing out the splinters, but won't remove the saw marks, color, and character, so long as you don't get carried away. The base was already smoothed out, and I spent 15 minutes or so working on the newly completed top. This is how it looks now.


I still need to do some kind of a finish on it to smooth and protect it, but I want to keep and enrich the look it has now. I'm thinking I will use clear or may be light brown Briwax on it. If any of you have ever done a barnwood project like this, what did you do as a protective finish?
Our son and a friend of his share an apartment in the St. Louis area while they go to school there. They just signed a lease on a new 3 bedroom apartment, and another friend is moving in with them. He tells me their new place will have a decent amount of room, and they need a dining table. He wants something rustic, and he's had his eye on an old door we took out of the interior of a barn when we did this barn overhaul several years ago.
So I got out the door, and looked through the stash of lumber and beams we saved when we took the loft structure out of that barn. I came up with a 5"x5" column, a 3"x5" beam, and a 2"x8" brace, all close-to-full-dimension roughsawn oak. The door and a couple boards that match it closely are pine. All this lumber is just over 90 years old, as the barn was built 1924-25. First order of the day was to powerwash the thick layer of dust (and even some very old dry manure) off it. It turned out looking great, without removing the patina.
The design is a combination of ideas from my wife, a good friend of ours, and myself. We thought a trestle table would work well with the door, which was roughly 32" x 78". Here is the door and a start on the trestle base, after powerwashing.

Here is the base with columns added. Should be beefy enough!

I wanted to do something unique for the actual trestle, incorporate metal, and keep with the rustic theme. So I went out and dug through my scrap metal pile, and came up with a few lengths of old steel "T" post, which usually wind up there when they rust enough at ground level that they break off when you try to pull them. Our last initial is "W", so I thought that might make a good trestle/truss design as well as a nice "monogram". With a little bit of cutting and welding, here is our trestle.

I thought about just taking off the scaly rust and clear coating it, but our son liked the idea of hammertone paint. I thought copper would look good with the rustic wood, so after wire brushing, a coat of rust converter, and two coats of Rustoleum copper hammertone, here is the base.

With the base more or less done, I started on the top. The door was in incredibly nice condition for a 90 year old original barn door, but it still needed a bit of work. I squared it up by trimming both ends and one side slightly. That also got rid of just a little bit of soft wood on what had been the bottom edge. I cut some 2.5" wide strips out of the matching pine boards to edge the door with, to make the table top look a little more "massive", like the base.

I left weathered edges on the top of the edge strip, and used leftover strips from the middle of the boards to straighten and flatten the door across each end. I just clamped a piece of steel tube across the face, with the door upside down, and screwed the strips on as backers at each end. This also made a more secure attachment for the edges at each end. The edges are put on with #4 finishing nails.

We will top the door with a glass top, so we decided to hold the edges "proud" of the door surface and capture the glass, instead of having the glass come all the way to the edge. I used a scrap of 1/4" (actually 5mm) luan as a gauge.

So after the top was finished yesterday, here is what it looked like.

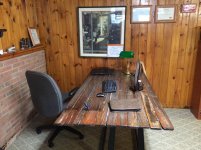
A lot of this lumber was really rough, and would pretty easily give you splinters. So I did a bit of experimentation on smoothing it out without losing "the look". I settled on using the coarse Scotch-Brite scouring pads. They do a great job of smoothing out the splinters, but won't remove the saw marks, color, and character, so long as you don't get carried away. The base was already smoothed out, and I spent 15 minutes or so working on the newly completed top. This is how it looks now.


I still need to do some kind of a finish on it to smooth and protect it, but I want to keep and enrich the look it has now. I'm thinking I will use clear or may be light brown Briwax on it. If any of you have ever done a barnwood project like this, what did you do as a protective finish?
 As above /\ Beautifully executed.