
You are using an out of date browser. It may not display this or other websites correctly.
You should upgrade or use an alternative browser.
You should upgrade or use an alternative browser.
Barrel Stove Kits
- Thread starter imported_banzaitoyota
- Start date


krusty the clown
Member Emeritus
the first thing i noticed is the bottom barrel should have been made so the bung is on the bottom so it could be left open. that way it pulls air in, under the fire grate. i would cut some holes with a 2" hole saw at each end below the grate.
the main thing to remember is the top barrell has got to get hot before it will draft. start your fire with smaller pieces of wood so you get a bed of coals quicker then you should be fine.
i lit a fire in mine this morning at 7:30. by 8:00 i had a bed of coals and then loaded it with wood, by 9:00 the shop was 52 degrees (it was 20 outside).
ok, thanks to you guys I got it figured out. First cut a hole on each end of the bottom barrel to let more air in, then I took the cap off of the botto of the T. I started a fire and all seemed good. I went outside to check the stack and almost all of the smoke was coming out the bottom of the T...bad... I was about to tear the whole thing down and run it through the roof when I remembered the question about the mesh. So I decided to check it just to be sure. Sure enough the mesh was full of creosote. I guess all of the times I tried to get a fire started filled it up with creosote. I removed the mesh....and good to go. Hopefully a birdy doesnt try to nest in the stack...could be trouble for them... ")
clutch47
Well-known member
Yo,
I've been using a single barrel in my old garage for years. Just as every other post said, these barrels start kinda slow....Small fire at first, and work up. Mine drafts like a champ after about 15 minutes. If I feed it too fast without the draft open far enough when it is hot ,she'll start chugging, and trying to draft backwards...It's really kinda cool. I am bothered by the posters saying they built theirs with the bung on the bottom......and leave it open.....
WOW........... No wonder their stoves are getting red hot.
Mine is sealed up tight, lined with firebrick and works great. It never gets red, and I can get about 9 or 10 hours out of it with the right wood. Even longer with locust.
Clutch47
krusty the clown
Member Emeritus
Yo,
I've been using a single barrel in my old garage for years. Just as every other post said, these barrels start kinda slow....Small fire at first, and work up. Mine drafts like a champ after about 15 minutes. If I feed it too fast without the draft open far enough when it is hot ,she'll start chugging, and trying to draft backwards...It's really kinda cool. I am bothered by the posters saying they built theirs with the bung on the bottom......and leave it open.....
WOW........... No wonder their stoves are getting red hot.
Mine is sealed up tight, lined with firebrick and works great. It never gets red, and I can get about 9 or 10 hours out of it with the right wood. Even longer with locust.
Clutch47
double barrells draft even slower.........with a double barrell w/o the bung open it won't draft enough to get upper barrell hot. with a hole in bothe ends open mine has never glowed red hot.
Great thread here. Regarding barrel stoves, I have some additional ideas.
I know this is garage related, but I will have my barrel stove outside.
I will have a double barrel style and a flat plate in the middle of the top barrel for more gas movement and the vent in the back of the top barrel.
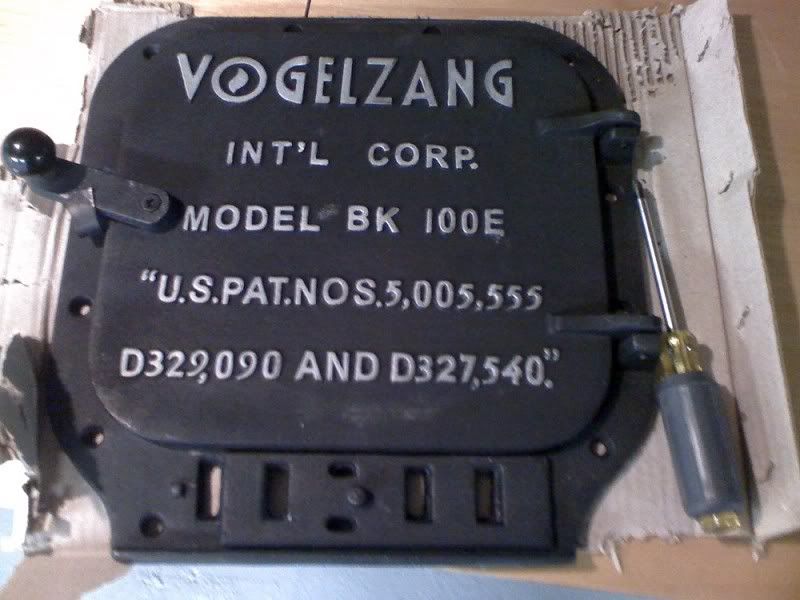
Vogelzang has made a new model recently with dial air intakes on the door, just like the stoves. The door is gasketed also. A little more money too.
I will build a little house for my stove (concrete block maybe) and wrap copper pipe (1/2 inch) around both the barrels. I will fill the area between the barrels and the concrete with sand to absorb the heat and hold it like a heat sink. The copper pipes will stand off then barrels somewhat and will be buried in the sand. The heated water in the copper pipes then is pumped to radiant floor tubes put into the floor before the slab pour. You can put the heatedn water lines to a radiator type HVAC element and putr a fan behind it or plug it into your existing air handler.
You could do this for the whole house and alot cheaper than the outside boiler companies want to sell you one for.
I can put additional openings for air flow into the barrels and through the little house.
I pass this along for your S&Gs and any comments you might feel impelled to relate. Thanx
ICFBOB
I know this is garage related, but I will have my barrel stove outside.
I will have a double barrel style and a flat plate in the middle of the top barrel for more gas movement and the vent in the back of the top barrel.
Vogelzang has made a new model recently with dial air intakes on the door, just like the stoves. The door is gasketed also. A little more money too.
I will build a little house for my stove (concrete block maybe) and wrap copper pipe (1/2 inch) around both the barrels. I will fill the area between the barrels and the concrete with sand to absorb the heat and hold it like a heat sink. The copper pipes will stand off then barrels somewhat and will be buried in the sand. The heated water in the copper pipes then is pumped to radiant floor tubes put into the floor before the slab pour. You can put the heatedn water lines to a radiator type HVAC element and putr a fan behind it or plug it into your existing air handler.
You could do this for the whole house and alot cheaper than the outside boiler companies want to sell you one for.
I can put additional openings for air flow into the barrels and through the little house.
I pass this along for your S&Gs and any comments you might feel impelled to relate. Thanx
ICFBOB
Torque1st
MEMBER EMERITUS
So a person can control the draft properly. My uncles unit had gaskets.Have fun.
I wouuld try it without the sand for a season first.
BTW, Why would you put gaskets around a door that has vents in it?
rinny_tin_tin
Well-known member
Not to be a party-pooper - but...one good fire and all the insurance company investigator needs to see is the remnants of an unlisted wood stove and its all over. They are not real even crazy for UL listed wood stoves, but they accept them - for a higher premium. A barrel stove will bring as much warmth to an the insurance co as a deep-fat turkey fryer.
TheEquineFencer
Well-known member
HI guys, I'm new here but I've used a lot of differant ways to heat a shop. The torpedo heater is whatI used first, one with Kerosene, then a propane one. Both were OK if you're into jet powered vehicles, heat was good, noise sucked. Propane you could not use a regualr thermostat. I used a regular heater wood heater, worked good inside but made me a bit nevous leaving it or working with gas inside the shop. I then got smart and built a heater outside, enclosed in a metal air box, smoke was seperate from the air box, and plumbed a (2) 8 inch pipes through a metal plate in a window. One I forced air into the air box and the other brought the heated air into the shop. This worked OK. It was crude built but worked. My shop I have at home now, the other was a rented one, is 40 X 60 X 16, it has a taylor water heater outside, wood fired. When I poured the floor I put red PEX inside the concrete with Foam/Foil/Foam insulation under the floor before I poured. I heat with radiant heat from the floor in the office/ bathroom and parts where I thought I'd have work benches and such. If I'd know what I know now I'd have done the whole floor. I did not think I could heat the whole shop with the heater I had, it was used and cheap. I also added some heater coils above floor with low speed fans. It's cost me about $1500 for labor to get my wood cut and split, the woods free, for the past five years. I keep the shop around 45-50 in the winter and crank it up a little when I'm in working to 60, above that I start to sweat if I move around much. When I was working out of a freinds "shop", we closed in the one car carport, we built a 30 gallon barrel inside a 55 gallon barrel with 4 inch ducting and heated the shop. It was just big enough to get a full size Buick Electra in and be able to move a round. We used a heater motor/blower to force the air through our heater. Most of the time we had to crack a door to keep the temp down in the winter. We would take Luber-Finer filters from big trucks where I worked, cut them open and take the filter media out, roll it up in tin foil the size of baseballs, starta fire with pine tree "droppings" and put one of the balls into it. It smoked a little to start with but would burn clean and long, but the fire and smoke was outside. I ran into a guy when I was working in Texas, he took his BDL BRL heater, gutted the insidie of a Ford van, put it inside it and use the van as the airbox with it ducted to his shop. The guy in here that wanted to use sand has a good idea, it'll act as a heat sink, just like I use the water tank in my Taylor heater use the water in the tank to hold the heat. I'd put the heater outside in a box and duct it into the building, It's about the cheapest safest way to go for the low buck way. You can get a thermostat from Lowes' that run 120V to run a blower motor or use one that is storebought that plugs into a wall recepticale and what you are powering plugs into it. Well that's my .02 worth.
Last edited:
fireball 440
Well-known member
- Joined
- Jan 9, 2009
- Messages
- 236
Has anybody ever tried a single or double barrel stove with 30 gallon barrels?
willymakeit
Well-known member
We use to build them out of old water heater tanks. Had to burn the galvinize off wkich is toxic.Has anybody ever tried a single or double barrel stove with 30 gallon barrels?
Barrel Stove
Member
- Joined
- Nov 17, 2010
- Messages
- 11
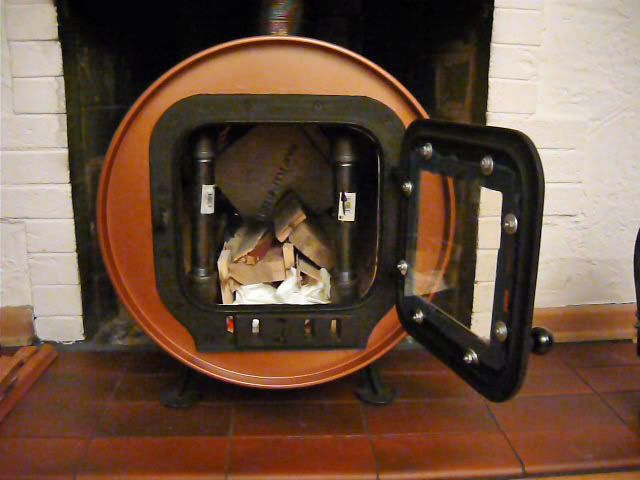
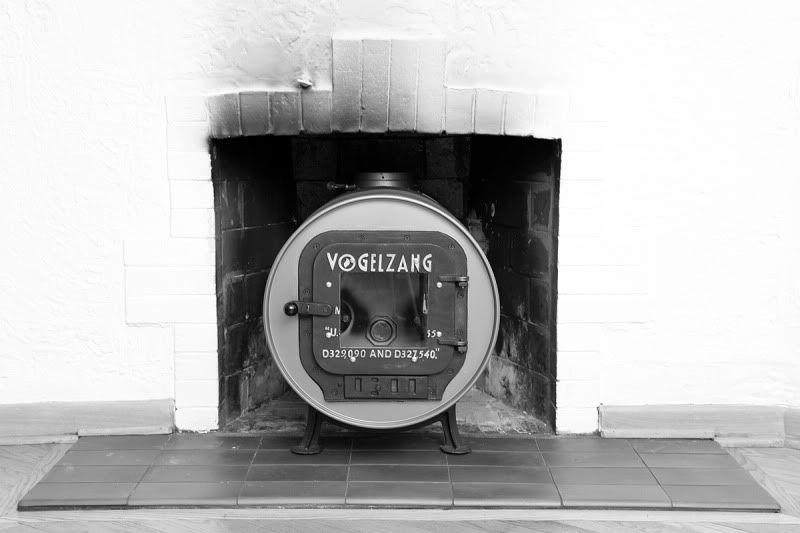
I just put one together with a 30-gallon steel drum. Originally wanted to use a stainless steel drum, but found out they cost $450. The 30-gallon drum was ordered without paint from Skolnik Industries (www.skolnik.com). I modified the cast iron door so that I could see into the barrel. The glass needs to be stove glass to withstand the heat. I also lined the bottom of the barrel with firebrick for both safety and efficiency. Next I lined the old masonry chimney with a stainless steel liner and installed the 30-gallon barrel stove into the existing fireplace. The iron pipe has holes drilled through to feed air for secondary combustion of the smoke. I have yet to aid a fan to force some positive air pressure through the holes. It seems that the natural draft is enough to pull super heated air into the firebox, since I see funky yellow/green/blue flames dancing around. Also, the key to not having a smoky stove is to burn dry wood and have a good draft and open the door slowly.
The stove throws off a lot of heat, many orders of magnitude more than the existing fireplace ever did. I even heat the basement through the old fire place clean-out in the bottom of the fireplace/basement, by adding a 6" flex duct and 250 cfm duct booster.
I went and got some high temperature paint (1200F), but I do not recommend it due to the smell. The true test will be when the temperature outside is -20F. So far it has only gotten down to 35 at night, but the forced air furnace has not turned on yet. Oh, I also added a smoke detector and a CO detector.
tatra
Well-known member
did you use heat treated glass?..............
willymakeit
Well-known member
Just used what I had at the time. Thicker walls than barrels.Williemakit
Do you have any details on benefits to using a water heater? Other than they are free. Is it the same concept? Any tips/tricks?
Thanks
Frank T
Barrel Stove
Member
- Joined
- Nov 17, 2010
- Messages
- 11
did you use heat treated glass?..............
I used a transparent ceramic known as NeoCeram (wood stove glass). According to their web information:
About NeoCeram®
Neoceram® is commonly referred to as glass but it is actually a transparent ceramic. Neoceram is 3/16" or 5mm thick.
Ideal Solution for Woodstoves
Unlike true glass, NeoCeram® withstands continuous exposure to high temperatures without fear of destruction. It is also resistant to failure due to temperature variation. It is the ideal solution for many wood stoves and fireplaces where glass panels are less than 6 inches from the flames. You can get more fireplace and woodstove information at www.fireplacesandwoodstoves.com.
Strength and Durability
NeoCeram® can take the heat. Continuous temperatures up to 1470° F (700° C) can be withstood because this ceramic has an extremely low thermal coefficient of expansion. It doesn't run or swell at high temperatures the way normal glass does.
NeoCeram® can handle change. You wouldn't dare put snow or water on hot glass for fear that it would shatter or crack. Unlike glass, NeoCeram® can handle it.
■Available in 3/16 inch thickness (5 mm)
■Transparent-amber tint
This is the place I ordered it from:
http://www.onedayglass.com/
burleymike
Well-known member
One thing I would do is add a baffle that goes across the top 3rd of the barrel with a 4 or 5" gap at the front to let the smoke exit. You should also line the firebox with insulating firebrick up to the baffle. I would make the baffle out of lightweight insulating firebrick for durability, for even better results you can put 1/2" ceramic fiber blanket on top of the brick.
If you look at how any modern clean burning stove is built they all have the secondary tubes like you already added with a baffle that is insulated. It will make the fire much hotter which will burn more of the smoke. Just be careful as it will be a hot burning SOB. Be sure to have a way to completely shut down the air supply if it starts getting too hot.
If you look at how any modern clean burning stove is built they all have the secondary tubes like you already added with a baffle that is insulated. It will make the fire much hotter which will burn more of the smoke. Just be careful as it will be a hot burning SOB. Be sure to have a way to completely shut down the air supply if it starts getting too hot.
Barrel Stove
Member
- Joined
- Nov 17, 2010
- Messages
- 11
Excellent advise. I added a steel plate to the top of the black steel pipe, but I think I should have made the steel plate wider. Does the baffle extend to the sides of the barrel, so that most (if not all) the heat/exhaust travels to the front of the barrel? I can see the benefit of making a longer passage for the heat to travel, keeping it in contact with the barrel surface for a longer period of time before going up the flue.
Also, should the air that goes into the secondary tubes be pressurized? If so, how hard should the air be blowing through the holes? It seems that the normal draft pulls in the heated air all by itself. However, I did take the turbine and motor out of an old hand held vacuum, and put it into a 4" PVC pipe, then ducted it into a manifold connected to the secondary tubes. The output of the tubine is varied with a 600 watt dimmer switch. Just for kicks, I turned the dimmer to full power for about 10 seconds, and created a swirling tornado of incandescent fire. It was brutal. Do not try this at home!
Thank you for your guidance.
babzog
Well-known member
Does the baffle extend to the sides of the barrel, so that most (if not all) the heat/exhaust travels to the front of the barrel? I can see the benefit of making a longer passage for the heat to travel, keeping it in contact with the barrel surface for a longer period of time before going up the flue.
Also, should the air that goes into the secondary tubes be pressurized? If so, how hard should the air be blowing through the holes? It seems that the normal draft pulls in the heated air all by itself. However, I did take the turbine and motor out of an old hand held vacuum, and put it into a 4" PVC pipe, then ducted it into a manifold connected to the secondary tubes. The output of the tubine is varied with a 600 watt dimmer switch. Just for kicks, I turned the dimmer to full power for about 10 seconds, and created a swirling tornado of incandescent fire. It was brutal. Do not try this at home!
Thank you for your guidance.
Playing with fire is fun.
Yeah, the baffle should completely prevent the smoke and hot gases from leaking around the sides and heading up the flue. You want to direct them forward, leaving a small gap (my Regency stove has only a 2" or so gap - you could probably do with 3-4") at the front to pass the gases. The hot gases then travel all the way back to the flue opening, heating that whole top surface. It also retains a lot more heat in the firebox for more efficient burning.The old stove I put into the shop (few years ago) had a shot steel baffle. I had a guy cut out the old one (which did nothing - barely stopped the smoke from going directly up the stack) and weld in a plate across the back and sides, to act as a baffle akin to the Regency. Works well enough.
The tubes should not be pressurized (though, like I said, it's fun). They're only to permit a pre-determined amount of air into the firebox to burn off the smoke and volatiles. Interesting design you had - to heat them with the fire then re-direct them up and back. I bet that works really well!
Barrel Stove
Member
- Joined
- Nov 17, 2010
- Messages
- 11
BurleyMike/Babzog
Adding the steel across the entire top to increase the exhaust path to the front, made an incredible difference. The residue on the inside of the barrel's top plate and secondary combustion iron pipe is now a tan color. The only downside is that wood consumption has gone up. In the Chicago area, a full cord of seasoned oak is $405.00.
Without a doubt, the double barrel design is the way to go. I wish I had the height in the fireplace box for the 2nd barrel, or even one of those fan forced heat reclaimers . The 2nd generation barrel stove will be more efficient.
Thanks for your help!
burleymike
Well-known member
Glad it made such a difference for you. You may be able to decrease your wood usage by controlling not only the primary air but decreasing the secondary air. With my stove when you damper it down it cuts both the primary and secondary air. That makes the fire burn super hot yet lazy (slow). The slower you can make the fire burn the more heat will be given off to the room. As you damper it down further you want more secondary air than primary that way you are mostly burning the smoke coming from the wood.
You will have to do a lot of playing with your secondary and primary air ratios. If you can take the flue temperature a couple feet up the liner will give you a good idea how well you are burning.
A flue temp of 250-400, 350 is ideal. Burning in that range means you are burning clean and getting a lot of usable heat. If the flue temp is higher when you have it choked down and burning slow that means you are losing too much heat up the chimney.
I could not tell from the photos but did you build a block off plate in the top of your fireplace? If not It is something to consider. Just some 26ga sheet metal will do a lot to keep your heat from being absorbed by all the masonry in the chimney. If you can get your hands on some rockwool you can put some above the block off plate to provide some insulation.
I just ordered a USSC Barrel Stove Kit. I've read reviews that the USSC parts are better made than the Vogelzang parts, but nearly the same price, so I just went with it. It doesn't get too cold here, but my shop is a poorly insulated 1200sq ft metal building and the little propane heater doesn't do well when I'm moving around in the shop, but it has gotten me by for the past few years. I'd like to work in my shop comfortably over the short winter months.
Since my shop is a rental unit, I can't really make anything permanent. I have a panel on the roof of the building that I can remove and run the stack through, but it's location would require a few bends in the stove pipe to make it there. Plus it would have to go through a hanging ceiling and I don't want to risk damaging that.
I'm considering making mine portable with a 2"x2" angle iron frame with steel casters to roll the unit around. I figure I could park it under my 14' garage door, with the door open about a foot higher than the top of the barrel. Then allow the smoke to vent outside. I would then weld some scrap 16ga sheet steel to form a flange on the barrel, then I could wedge in 2 pieces of 16ga sheet to fit the gap under the open door and a couple bolts to keep it somewhat sealed up and enclosed. Now that I think more about it, it would probably cook the metal door, but what other options do I have? The area around the garage door is the only open area that the heat wont really affect anything in the shop. I could easily roll the barrel heater outide when I'm done and put out the fire and leave it outside overnight so prevent any smoke/fire to my shop.
I've considered popping a hole in the corner of the roof, and putting the heater in the corner where I do my fabrication work, stacking bricks or cinderblocks around it, and putting up a few layers of cheap foam-type insulation board and some cheap flashing to help keep the heat off the shop walls in the corner. This would probably be the best method, but it takes up valuable shop space, is not portable, and costs more to setup than the other option.
I need this to be easily portable without costing too much, and provide a larger heated area than the little propane tanks and not as much fumes & noise as the kerosene torpedos. I have an unlimited supply of free pallets for fuel so the wood heater is the cheapest method for me. I can break these pallets up and crack them over my knew for fast fueling. The winters here are short, and not very cold compared to other parts of the country, but to me, it's too cold to work sometimes and I'd rather be productive in the shop than shacked up in the house.
Any ideas on making a barrel heater portable?
Also a few questions for guys who use these types of barrel heaters...
How do you put out the fire when you're done?
How hot does the area around the heater get? (I read there's a recommended 3-foot gap from the walls)
I've heard of sand/firebricks placed at the bottom. Is there a certain type of sand? What the hell are firebricks?
Excuse my ignorance...I never grew up in a cold climate, never had a fireplace in a house, nor a furnace/basement, any of that stuff. Where I'm from, having cool AC 10 months out of the year is a necessity. It was 75-degrees on Thanksgiving day, now it's 27-degrees at night just 2 days later...
Thanks
Last edited:
A few more questions/ideas...
Can the Flue be put on the back of the barrel and run the pipe out horizontally about 6 feet, then upwards? Would I need a fan or something to help draw the smoke out of the flue? Would the fan decrease the heat generated by the stove or increase it by pulling more air across the fire?
Can the Flue be put on the back of the barrel and run the pipe out horizontally about 6 feet, then upwards? Would I need a fan or something to help draw the smoke out of the flue? Would the fan decrease the heat generated by the stove or increase it by pulling more air across the fire?
klogan121
Well-known member
I modified the cast iron door so that I could see into the barrel. The glass needs to be stove glass to withstand the heat.
[/QUOTE]
I love that NeoCeram window you incorporated into that door! I want to be able to see the fire in my barrel stove, and this is a great idea!! A few questions: What are your dimensions of that NeoCeram? Did you use grade 8 bolts to withstand the heat? The nuts/bolts/washers looks like they just sandwich the glass to the door... What type of sealant did you use? Any issues with the glass sooting/blackening up?
I imagine the best way to cut that door was with a plasma cutter!
Thanks!
Kevin
I love that NeoCeram window you incorporated into that door! I want to be able to see the fire in my barrel stove, and this is a great idea!!
A few questions: What are your dimensions of that NeoCeram? Did you use grade 8 bolts to withstand the heat? The nuts/bolts/washers looks like they just sandwich the glass to the door... What type of sealant did you use? Any issues with the glass sooting/blackening up? I imagine the best way to cut that door was with a plasma cutter!
Thanks!
Kevin
burleymike
Well-known member
AAFD, If I were you I would either get permission from the landlord to cut a hole in the roof for a proper chimney. If that is not an option you might consider a barrel stove that will heat water, you could keep the stove outside and circulate the hot water into the shop and run it through a radiator.
Wherever the stove is you will need a properly sized chimney for proper draft. 12' is probably minimum 15 would be better. The less horizontal runs the better every elbow reduces the draft so a straight vertical run is preferable.
Wherever the stove is you will need a properly sized chimney for proper draft. 12' is probably minimum 15 would be better. The less horizontal runs the better every elbow reduces the draft so a straight vertical run is preferable.
I was talking with my dad about this over some leftover turkey. We drew up some napkin plans and talked about the pros/cons to making this an affordable and portable unit that I can stow away in the warm months.
I think the quickie MS Paint Drawing below will be my first attempt at building my barrel heater setup.
I know everyone says not to put extra bends in, but running the exhaust out of my doorway will be the easiest way and the best location in my shop away from anything flammable. My metal fabrication area is near the doorway and there is nothing in that area but metal so nothing can burn there.
I figure the extra bends would help keep more heat in and slow down the burn. I could always add a fan to siphon the air through the pipe if this idea doesn't work.
The only alternative idea I see here is to use a 30-gallon barrel on top of the 55-gallon barrel, and run the exhaust stack out the top rear of the 30-gallon barrel and then through the door.
I figure I would use 6" plumbing pipe ******* & elbows, or just a couple of straight stove pipe sections depending on which way I build it. I would over insulate the pipe where it would run through the opening of the doorway to reduce temps in that area. I have industrial heat wrap for oil refinery applications that I can wrap that section with as well.
I also have some 1" Super Tuff-R Sheet Insulation leftover and can make a section that wedges into the open doorway and has a hole in it to fit snuggly around the insulated exhaust pipe. I have some leftover "Lizard-Skin" that I can apply to the area around the hole in the insulation to also prevent it from crapping out in that area.
Doing it this way I can just open the door, wedge in the Sheet Insulation, roll the barrel near the door and push it through the opening in the sheet inulation, light the fire and work with warmth.
What do you guys think?
Attachments

Last edited:
burleymike
Well-known member
First off safety first, be sure to insulate the section of pipe going through the door with high tempature insulation. Fiberglass will have melted by the time the pipe reaches 1000f, rockwool will work but ceramic fiber is the best option as it can handle over 3000f. If you were to have a chimney fire the rockwool could also melt if the temp gets much over 2000.
You are going to need a draft inducer blower. The smoke will not know whether to go out the door when you open it or the chimney. If you extract enough heat from the chimney before the blower you could use an inducer blower off an old gas furnace. If the flue temps are too hot you will need one for wood stoves $$.
You are going to need a draft inducer blower. The smoke will not know whether to go out the door when you open it or the chimney. If you extract enough heat from the chimney before the blower you could use an inducer blower off an old gas furnace. If the flue temps are too hot you will need one for wood stoves $$.
Barrel Stove
Member
- Joined
- Nov 17, 2010
- Messages
- 11
"I love that NeoCeram window you incorporated into that door! I want to be able to see the fire in my barrel stove, and this is a great idea!! A few questions: What are your dimensions of that NeoCeram? Did you use grade 8 bolts to withstand the heat? The nuts/bolts/washers looks like they just sandwich the glass to the door... What type of sealant did you use? Any issues with the glass sooting/blackening up?
I imagine the best way to cut that door was with a plasma cutter!
Thanks!
Kevin"
Kevin,
Here are the details.....they get you on the shipping cost!
Shape: Square/Rectangle
Glass Type: Ceramic
Glass Thickness: 3/16 Neoceram
Edgework (Step 1): Seamed Edge
Width: 7 1/2"
Height: 8 1/2"
No need for grade 8...just plain old 10-32 screws with large heads...yes, the washers hold the glass in place. I threaded the holes for the screws so that I could get the screws good and tight first. Set the Neoceram onto a thick bead of RTV. Only finger tighten the nuts, so you don't crack the glass and alow for any dissimilar thermo expansion. RTV bleed out some clear goo...then turned a chaulky white..It still provides a good seal....so I am not worried.
I made a 6 1/2" X 7 1/2" opening in the solid cast iron door. First scribe the lines, then drill many holes just inside of the lines...then slowly saw the remaining metal...then clamp in a vise and start filing...It took about an hour..it's only cast iron....you could probably do a quicker job if you are skilled with a saber-saw with a fine tooth metal cutting blade.
The glass can soot if you do not burn the fire hot enough...It is very easy to remove with one of those utility knife scapers (used to remove city window stickers, etc.). Don't bother with the polishing paste they sell, although I used a car finish polishing compound...worked very well, but slowly.
Keep Warm!
SgtRauksauff
Well-known member
We've got a barrel stove in my father's garage, which used to be our home furnace when I was growing up. I don't remember the brand of the kit, I'll have to look into it. We're still using the original barrel from when we built it over 35 years ago. It was built with a "heavy-duty' drum, not the lightweight thin ones that can be had for super cheap. No bricks or lining of any type has ever been used.
He also made an angle-iron cage for the barrel, and then wrapped it in some sheet metal. Big squirrel-cage motor in the back, and two 6" duct pipes out of the front. A few years ago, I was working in the un-insulated 24x24 garage in jeans and a t-shirt, as comfortable as could be, when it was -25 outside, with 40+mph winds. Being that the barrel is as old as it is, it' nearly time to replace it. We also want to install some sort of heat exchanger on the chimney, to pull a little more heat out.
I'll try to get some photos and put them up in the next few days.
--sarge
klogan121
Well-known member
Barrel Stove,
Thanks for the dimensions and info!! I am saving it for when I get my barrel stove going next summer. No funds now. The kerosene salamander heater will have to do this winter.
Again, much appreciated!!!
Kevin
Thanks for the dimensions and info!! I am saving it for when I get my barrel stove going next summer. No funds now
. The kerosene salamander heater will have to do this winter.Again, much appreciated!!!
Kevin
klogan121
Well-known member
Barrel---
What is the dimensions of your door opening? I just bought one today and it measures 9 1/2 x 10 1/2! I think Vogelzang is now making their door kits smaller!! I may take this one back for the US Stove Co.'s barrell kit, as I think the door opening may be bigger!
What a disappointment!!!
What is the dimensions of your door opening? I just bought one today and it measures 9 1/2 x 10 1/2! I think Vogelzang is now making their door kits smaller!! I may take this one back for the US Stove Co.'s barrell kit, as I think the door opening may be bigger!
What a disappointment!!!
Barrel Stove
Member
- Joined
- Nov 17, 2010
- Messages
- 11
10 3/8 wide X 9 3/4 tall. I bought the model BK100E. You may have bought the kit with the clean out door.
Improved700
Well-known member
Barrel,
Could you provide some more information on your baffle and black iron pipe design? Pictures would be a huge help. I am not totally understanding the baffle and metal piece that you have added. I was at the store yesterday, looking at some of the newer wood stove's and can see sorta what they have done, but I am looking at adding a barrel stove to my shop, and am very interested in your design.
Thanks alot,
Kev
Ed ke6bnl
Well-known member
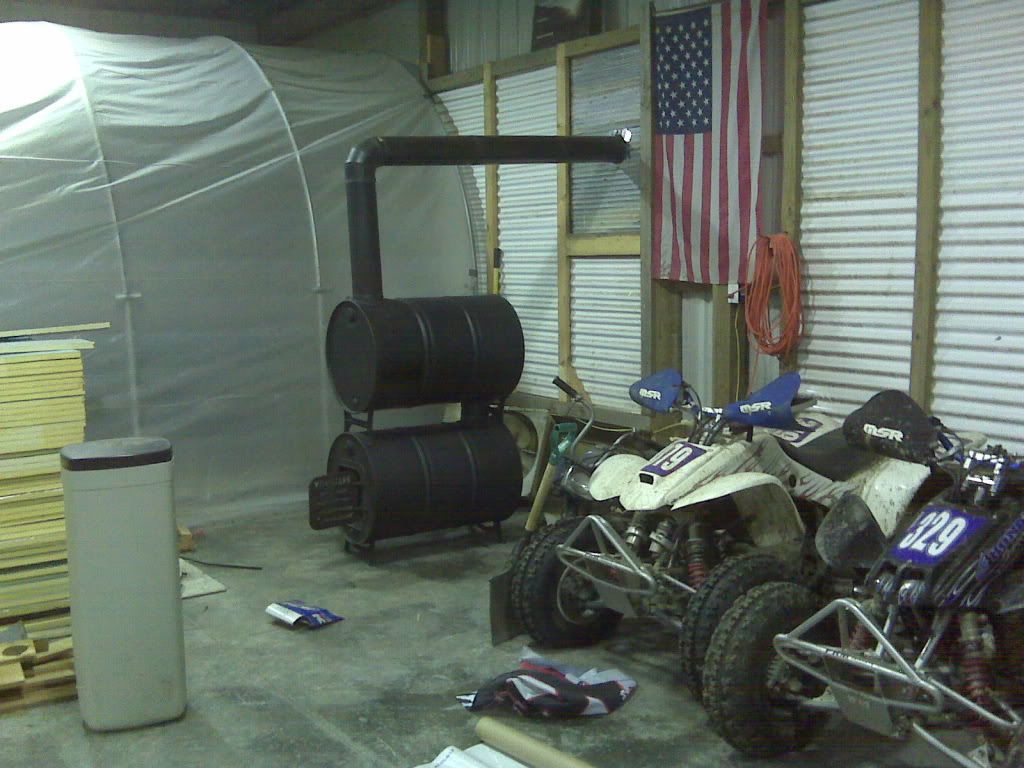
Here is a pic of the first/bottom burner barrel I took last weekend. I test fired it and I am pleased with it so far.
I do not like the attachment method for the top barrel, I will post pics this weekend of how I solved that dillema
thats the brand I put together for the house many years ago. mine was single 30 gallon and worked better then the one I sold it for a store bought $400 stove. I did keeep plenty of ashes in the bottom and some fire brick. That worked great for several years. and will accept plenty large logs. ED
SgtRauksauff
Well-known member
We finally fired up Tortoise (the nickname for the stove, since it's got short stubby legs and looks like a square turtle) yesterday. Bought two boxes of fire bricks at Menards (12 bricks, six per box) and put three rows of four bricks into the bottom of the barrel. With it being about 15°F outside, we got the (still un-insulated) garage to about 50° after about 25-30 minutes. We held it there for a few hours, and played with the front vent until we could maintain a good solid 450 - 500° on the stack. The circulation vents were putting out 140° at one point. We just have a box fan blowing across the stack right now, but we think that one of the Magic Heat or similar "heat extractors" might be a nice addition. I checked the garage temp about 6 hours after the fire was burned out, and it was at 42°. The insulated garage door itself has already proved to be an amazing heat retention device!
--sarge
--sarge
Last edited:
Barrel Stove
Member
- Joined
- Nov 17, 2010
- Messages
- 11
Barrel,
Could you provide some more information on your baffle and black iron pipe design? Pictures would be a huge help. I am not totally understanding the baffle and metal piece that you have added. I was at the store yesterday, looking at some of the newer wood stove's and can see sorta what they have done, but I am looking at adding a barrel stove to my shop, and am very interested in your design.
Thanks alot,
Kev
These videos inspired me to make my wood burning barrel stove.
LennyTheLizard
Well-known member
COOL THREAD.
I've been brainstorming using this type of stove. I already set my shop up for radiant heat in-slab. Now, I just need to decide the heat source. The only source of energy that I have available currently is Electric. Wood is pretty easy to come by where I'm at. I have been contemplating buying a barrel stove kit, but I want to find a heavy duty barrel or maybe an industrial type tank of some sort.
I've been thinking that the heat given off by convection will be great. The real idea though is to roll the barrel with copper tubing and circulate water through it. Then I can run through a manifold system and run the hot water through the floor to distribute the heat more evenly. I think it can be done economically, but I don't imagine my insurance agent would appreciate it too much. Seems this whole system can be done for a fraction of what an outside wood furnace costs.