To avoid these ads, REGISTER NOW!

Basement toilet rough in

joe_pinehill1

Well-known member
Joined
Feb 23, 2013
Messages
537
Location
Northern Virginia
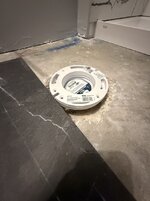
We're finishing a bathroom in our basement that the builder did a three point rough-in. I had the plumber that the builder used do the 5-pt rough-in, setting the toilet flange, set shower pan, shower valve, supply lines. Question on the toilet flange , should I fill the area under the flange with mortar and place screws with nuts in mortar so nuts cure in the concrete? I think the mortar is need to give a smooth surface to tile up to the flange.
 

Attachments

  • IMG_7568.jpg
    IMG_7568.jpg
    254.9 KB · Views: 114
To avoid these ads, REGISTER NOW!

Stuart in MN

Well-known member
Joined
Sep 8, 2005
Messages
23,188
Location
Minneapolis
I don't know what a 3 point or 5 point roughin are, but that flange appears to be sticking up too far from the floor and it does need to be anchored by more than just being glued to the drain pipe. Will you be installing tile or some other finish floor that will take up the gap?
 

larry4406

Well-known member
Joined
Jan 27, 2006
Messages
19,638
Location
Northern Virginia
Basement bath I like to have a 4” stub up for toilet with concrete poured tight to PVC.

Run finish floor tight to stub up perimeter. Flush cut stub up to top of finish floor. Use insert type closet flange which glues to inside diameter of 4”. Then drill and set closet flange bolts (I think at the day job they skip this).
 
OP
J

joe_pinehill1

Well-known member
Joined
Feb 23, 2013
Messages
537
Location
Northern Virginia
I don't know what a 3 point or 5 point roughin are, but that flange appears to be sticking up too far from the floor and it does need to be anchored by more than just being glued to the drain pipe. Will you be installing tile or some other finish floor that will take up the gap?
In my area 3 point is the waist line for Shower, toilet and sink are stubbed out. 5 point includes the water lines.
 
OP
J

joe_pinehill1

Well-known member
Joined
Feb 23, 2013
Messages
537
Location
Northern Virginia
Basement bath I like to have a 4” stub up for toilet with concrete poured tight to PVC.

Run finish floor tight to stub up perimeter. Flush cut stub up to top of finish floor. Use insert type closet flange which glues to inside diameter of 4”. Then drill and set closet flange bolts (I think at the day job they skip this).
the photo may look deceiving. The top of the flange is set for the tile we picked plus thin-set line
 

The Cobbler

Super Moderator
Staff member
Joined
Oct 24, 2013
Messages
25,999
Location
Niagara Region, Ontario, Canada
looks like some long tapcons would bite in to the existing concrete ,then mix up some grout and fill in the voids.
Is that framed wall the back wall for the toilet? if so I would have oriented the flange 90° so the closet flanges are captive
 

Fav Onefour

Well-known member
Joined
Jul 14, 2022
Messages
726
Location
MN cold and hot
Should have waited to glue that in...
It is amazing how often that happens.
The plumber is done so he's happy.
If the trades all got together on the finished product things would be a lot easier.
In the end we want it done right. Why not just do the sequence properly so it's easier.
 

mike93lx

ALLIANCE MEMBER
Joined
Dec 9, 2013
Messages
37,962
Location
Richmond, VA
It is amazing how often that happens.
The plumber is done so he's happy.
If the trades all got together on the finished product things would be a lot easier.
In the end we want it done right. Why not just do the sequence properly so it's easier.
Considering the wrong height was being shot for, I don't think changing the order of operations would have mattered
 

PCustoms

Well-known member
Joined
Jul 23, 2011
Messages
23,580
Location
VT
It is amazing how often that happens.
The plumber is done so he's happy.
If the trades all got together on the finished product things would be a lot easier.
In the end we want it done right. Why not just do the sequence properly so it's easier.

Assuming the plumber isn't coming back to set the toilet, he probably should have communicated with the OP better.

If he is coming back to set the toilet, he should have known better.
 

wssix99

Well-known member
Joined
Mar 2, 2011
Messages
5,165
Location
Chicago, IL
This isn't a big deal. I had the same situation with a cast iron flange, so couldn't come back and glue it after the fact...

1) If the flange isn't glued, just pop it off, add the mortar back, grind as necessary and then glue the flange.

2) If the flange is glued, just put mortar underneath. Then use some sacrificial toilet mounting screws and move them back-and-forth in the flange slots to make sure those areas are clear of mortar. When dry, you can just come back with clean screws and they can slide to adjust like normal. Once the mortar is dry, I'd also add some long Tapcons through the mortar and solid concrete just to make sure everything is solid.
 

larry4406

Well-known member
Joined
Jan 27, 2006
Messages
19,638
Location
Northern Virginia
back in the days when bathroom flooring was 1/4" underlay & sheet vinyl flooring, the flange was set on the sub floor . as floors got thicker that is no longer the case. actually there's a fair bit of wiggle room on where the top of the flange sits.
Yes - double wax rings, spacer flanges, etc.

In a modern world, one sets the flange based on the spec’d floor allowance vs a guess.
 
To avoid these ads, REGISTER NOW!

PCustoms

Well-known member
Joined
Jul 23, 2011
Messages
23,580
Location
VT
Guys, read post 5. The flange height is set to match the chosen tile thickness.

I think we all read post five..

How do you set tile underneath a pre-glued flange and have everything be flush / touching?
 
Last edited:
OP
J

joe_pinehill1

Well-known member
Joined
Feb 23, 2013
Messages
537
Location
Northern Virginia
I lik
This isn't a big deal. I had the same situation with a cast iron flange, so couldn't come back and glue it after the fact...

1) If the flange isn't glued, just pop it off, add the mortar back, grind as necessary and then glue the flange.

2) If the flange is glued, just put mortar underneath. Then use some sacrificial toilet mounting screws and move them back-and-forth in the flange slots to make sure those areas are clear of mortar. When dry, you can just come back with clean screws and they can slide to adjust like normal. Once the mortar is dry, I'd also add some long Tapcons through the mortar and solid concrete just to make sure everything is solid.
I like option 2. I could drop the flush head Tapcons in the flange and pour the mortar around them, and let the mortar set with Tapcons in the flange.
 
Last edited:
OP
J

joe_pinehill1

Well-known member
Joined
Feb 23, 2013
Messages
537
Location
Northern Virginia
If any are tracking this thread, an update. Work travel has gotten in the way of progress. I finished the shower tile last weekend. The floor is next. I was going to use Oatey's PVC spacer rings. Once my wife picks the tile this week, I'll use one or two rings to take the top of the flange about 1/4 inch from the finished surface. Pour concrete under the flange, add Tapcons to secure the flange and install the toilet.

Has anyone glued the flange extenders in place. I see videos people using silicone, maybe with an existing flange that has 10 years of wax on it, silicone is the way to go. But with new flange, I don't see any reason not to glue all together.

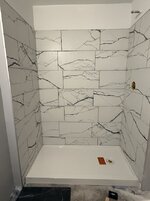
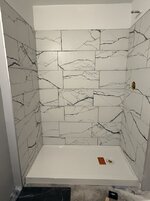
Im happy with the shower tile, still need to grout. I used a 4.5 inch diamond hole saw for the shower valve cut out, along with a plywood template as a jig.
 

Attachments

  • IMG_8031.jpg
    IMG_8031.jpg
    120 KB · Views: 56
  • IMG_8031.jpg
    IMG_8031.jpg
    120 KB · Views: 51
  • IMG_8045.jpg
    IMG_8045.jpg
    125.4 KB · Views: 51
  • IMG_8044.jpg
    IMG_8044.jpg
    65.3 KB · Views: 54
  • IMG_8046.jpg
    IMG_8046.jpg
    129.6 KB · Views: 52
  • IMG_8036.jpg
    IMG_8036.jpg
    172.5 KB · Views: 54

Codyboy

Well-known member
Joined
Jan 31, 2019
Messages
1,727
Location
S.E. TEXAS
Is there any way to cut out the glued in flange , install the tile and do it correctly?
I wouldn't want a stacked up make due solution.

The last time I had to deal with a toilet flange it had lead and bent over the top or something like that. It was a long time ago. Probably went away when lead roof jacks did. Idk.

However I'm interested in this because I'll be installing a toilet flange in the new shop soon.

The floor tile is installed and the 4" sch 40 stub is sticking out. I know I'll have to cut off the stub (i have an inside cutter) and glue in the flange.
I know there are different types of flanges and don't know which one to get or how to install it correctly. Just glue , or glue and concrete screws?
 

mike93lx

ALLIANCE MEMBER
Joined
Dec 9, 2013
Messages
37,962
Location
Richmond, VA
Is there any way to cut out the glued in flange , install the tile and do it correctly?
I wouldn't want a stacked up make due solution.

The last time I had to deal with a toilet flange it had lead and bent over the top or something like that. It was a long time ago. Probably went away when lead roof jacks did. Idk.

However I'm interested in this because I'll be installing a toilet flange in the new shop soon.

The floor tile is installed and the 4" sch 40 stub is sticking out. I know I'll have to cut off the stub (i have an inside cutter) and glue in the flange.
I know there are different types of flanges and don't know which one to get or how to install it correctly. Just glue , or glue and concrete screws?
Glue the fitting and screw down the flange.
 
OP
J

joe_pinehill1

Well-known member
Joined
Feb 23, 2013
Messages
537
Location
Northern Virginia
Final follow up. Tile work is finished. I used GoBoard for the shower alcove, and RedGuard on the concrete floor. All the fixtures are installed. For the toilet, I ended up using a Fernco waxless seal. I like Fernco products. This seal allows you to feel the seal is going into the flange and engaging. It had enough play to take out my out of level flange. Shower doors I sub'ed out to a local installer, $1500 for CR Lawrence Bristol hardware and 3/8 glass.

We passed Final Inspection this morning. My wife just needs to pick the vanity light, and mirror. It was a fun project.


Attachments

  • IMG_8320.jpg
    IMG_8320.jpg
    78 KB · Views: 23
  • IMG_8334.jpg
    IMG_8334.jpg
    130.3 KB · Views: 35

duneslider

Well-known member
Joined
Jan 20, 2013
Messages
2,272
Location
Riverton, Utah
I have been doing tile since 1999 and I can count on 1 hand the number of times a toilet flange had flooring go underneath it. They have always been set so they are touching the floor and are screwed down. Cut the tile around it and be done with it. Most thick wax rings will make up the difference just fine and if the flange is abnormally low because the flooring is extra thick add a spacer and call it a day.
 
OP
J

joe_pinehill1

Well-known member
Joined
Feb 23, 2013
Messages
537
Location
Northern Virginia
I have been doing tile since 1999 and I can count on 1 hand the number of times a toilet flange had flooring go underneath it. They have always been set so they are touching the floor and are screwed down. Cut the tile around it and be done with it. Most thick wax rings will make up the difference just fine and if the flange is abnormally low because the flooring is extra thick add a spacer and call it a day.
thats basically what I did. I did a dry layup of the first three courses. Determines where the tile over the flange would lay. Then made a template out of 1/4 in plywood for a 7.5 inch diamond hole saw. Cut the hole in the tile and the hole lined up perfectly. 1763583108128.png
 

duneslider

Well-known member
Joined
Jan 20, 2013
Messages
2,272
Location
Riverton, Utah
thats basically what I did. I did a dry layup of the first three courses. Determines where the tile over the flange would lay. Then made a template out of 1/4 in plywood for a 7.5 inch diamond hole saw. Cut the hole in the tile and the hole lined up perfectly. 1763583108128.png
Looks nice! That's big money for a diamond holesaw that size!
 
OP
J

joe_pinehill1

Well-known member
Joined
Feb 23, 2013
Messages
537
Location
Northern Virginia
Looks nice! That's big money for a diamond holesaw that size!
it wasn't expensive. I looked on Amazon, and they had an option to buy "used-like new" for $45. For one hole, I thought why not. I drilled while my wife dripped water from the hose. I didn't feel like trying free hand with a grinder and diamond wheel and crack tiles.

Its for sale! I'll probably list it on FB Marketplace for $25, and also the 4.5" I bought for the shower valve.
 
To avoid these ads, REGISTER NOW!
Top Bottom