To avoid these ads, REGISTER NOW!

bathroom plumbimg

muddog899

Member
Joined
Jun 27, 2011
Messages
22
Location
las cruces nm
ok I am going to put a bathroom with a toilet and sink in the shop but not sure on how to run the floor plumbing for the toilet and how do i tie it in with the rest of the plumbing.

I can find floor plans but nothing on the plumbing any help would be great.
 
To avoid these ads, REGISTER NOW!

D.J.

Well-known member
Joined
Sep 16, 2009
Messages
1,116
Location
New Haven IL
Sewer or septic? If sewer contact your local sewer department and ask them for a locate on your system. If on septic look out side your residence for a cleanout, usually about 3" or 4" in diameter. You could remove the plug in the cleanout and have your so flush the toilet in side the residence and see if it is the correct one. Then you will need to make sure you can get enough "fall" for your install.
 
OP
M

muddog899

Member
Joined
Jun 27, 2011
Messages
22
Location
las cruces nm
the system is spetic and I know where that is what i want to find out is how to layout the ruff in plumbing for the toilet and sink drains this will be under the concrete
 

K'ledgeBldr

Well-known member
Joined
Aug 22, 2011
Messages
1,925
Location
Johns Creek, GA
Hopefully, this is what you were looking for-

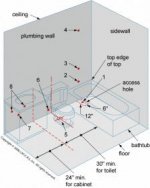
Toilet Measurements:

5. The toilet drain from the center of the drain to the rough framing is 12 1/2" and is centered in 30" minimum of finished space. This applies to a standard toilet installation. There are specialized toilets on the market that require different rough plumbing dimensions. Be sure to check the installation instructions included with your toilet.

6. The water supply is located 6" up from the finish floor and is 6" to the left of the center of the toilet drain as you face the wall. Bring the water supply line out 5" to 6" from the rough framing. It will be cut off later when it is time to install the shutoff valve.

Wash Basin Measurements:

7. The wash basin drain is 18" to 20" above the finish floor, depending upon the height of the cabinet, and is centered in a minimum of 24" of cabinet space.

8. The water supply lines are 4" to the left and right of the drain. Bring the lines out 4" to 6" from the rough framing (they will be cut off later when it is time to install the shutoff valves) and 22" to 24" off the finish floor, depending upon the height of the cabinet.
 

Attachments

  • bathlayout.jpg
    bathlayout.jpg
    10.2 KB · Views: 150
Last edited:

2Big2Ride

Well-known member
Joined
Oct 24, 2010
Messages
258
Location
d/FW, Texas - more FW than D
Re: Bathroom Plumbing, Slab Rough-In

Same situation, ground work will start in a few days for our new workshop and I want to put in a bathroom. It will be a monolithic slab and an insulated metal building. I would really like to do this myself, do it correctly and to code, but have never done any plumbing rough-in on new construction. As all the houses are built on monolithic slabs, I have been looking at some new home construction in the area to get a better idea of how it is done and to get some pictures. I noticed the waste lines are coated or protected where it will be in concrete. What is the coating or wrap, the purpose, and is it a code requirement?

View media item 15331
 

Falcon67

Well-known member
Joined
Jun 11, 2009
Messages
18,371
Location
Merkel, TX
From what I can tell, they don't wrap pipes around here. I would assume it's to protect the PVC from the acid in the concrete. The sand box deal around the pipe is for a bath or shower base, so there is work room for the drain work and/or trap. IIRC - 2" is min code for a bath vent now, with a shower, pot and sink. Remember "air behind water". (Been watching Holmes on Homes, eh) Depends on the location of the facilities. On the diagram provided, you could run the vent stack up behind the pot and tie the sink vent into that - just be sure it come up high enough to meet code before going horizontal into the stack. Sorry - don't have those details in my head. I bought a big book on the subject before I did the bath in the old house. Saved a bundle, but what a jigsaw puzzle with no picture to look at :lol:
 

K'ledgeBldr

Well-known member
Joined
Aug 22, 2011
Messages
1,925
Location
Johns Creek, GA
IRC (International Residential Code) is the 'minimum' code standards for building residential units. However, every state and local authority has the right to amend the code for their specific reason(s)- some are region specific (Miami-Dade County; for example), some are specific because of other weather related phenomena or geological related (such as east TX- because of varying soil conditions). These amendments can only be better than the IRC minimum. And they are usually available through the building department.
In the case of the picture you posted- the wrap is a sleeve to allow movement- and could be to protect the PVC from the lime in the concrete. Generally, the only thing that HAS to be sleeved is copper supply lines (lime will definitely eat away at it). Most slabs in east TX/Metroplex are PTC (post-tension cable) because of the expandable clay soil.

Laying out the plumbing is pretty straight forward- triangulating off of the form boards. Staking it to stay in-place and not over digging the trench for the main waste line is ever important. Wherever the vent will be, you will need a minimum of eight ft./vertical. Cap the end of the main waste line and fill with water- the 8' column will give enough pressure for leak testing and the weight of the water will keep the pipe in place.
 
To avoid these ads, REGISTER NOW!

tyjoja

Well-known member
Joined
Mar 24, 2011
Messages
138
Location
albany ore
1/8" per foot, no more than 1/4" any steeper the water will rush past and the solids can hang up
 

J Persons

Well-known member
Joined
Jul 27, 2010
Messages
640
Location
Louisiana
I just had a plumber in yesterday to repair the bathroom sink drain. The house was built in the mid '60's, the bath sink drain was T'd into the vent pipe using a 90º T, instead of a sanitary T or a Y fitting. The result was a lot of residue building up over the years, and the T was too sharp to allow the plumber's snake to get past the T. He had to remove part of the wall to get to the fitting and replace the T. $600.00 later the job was completed. What pisses me off is the whole thing could have been avoided if the original builder had used the correct parts. .
 

Falcon67

Well-known member
Joined
Jun 11, 2009
Messages
18,371
Location
Merkel, TX
Some layout pics from the old house - rear bath, DIY:
drain4.jpg

3" vent stack.
drain3.jpg


Front bath - $1000 pro plumb
front_drain.jpg


And just for fun from somebody's past DIY effort - Schedule 20 4" (really - schedule 20) joined to 1 1/2" copper, 4" iron pipe and with a "special" vent, secured and bonded together with aluminum foil, concrete and brick.
pipe_crap.jpg


Replaced with my DIY:
drain2.jpg

drain1.jpg
 

6768rogues

Banned
Joined
Nov 28, 2007
Messages
4,524
Location
Western NY
If you are connecting to an existing lateral, a connection above a 45 degree angle can be with a sanitary tee, lower than that requires a "Y". That is the reason for the Y fittings in the pics above.
Recent tests have disproven the old myth about too much slope allowing liquids to leave solids behind.
Be sure to vent the system. There are several ways to effectively vent a system including an air admittance valve. I only use them as a last resort.
 
To avoid these ads, REGISTER NOW!
Top Bottom