To avoid these ads, REGISTER NOW!

BEFORE & AFTER....A Tool Polisher's Haven

JMLangford

Well-known member
Joined
Jun 25, 2014
Messages
1,119
Location
Upstate SC
Hello Folks....My name is Mike and I'm a tool polisher :rocker:

I'm starting this thread so I (and any other tool polishers) can post pics of items I've found in need of some TLC ......

Armed with paint, wire brushes, vinegar, grinders, degreaser, scrapers, etc....whatever it takes to refresh/restore/refinish or simply clean up an item.

I hope other fellow tool polishers will post up some of their polishing projects too.....it's all good ;) maybe share your ideals and techniques,etc.
A TOOL POLISHER's HAVEN.....

Depending on how "involved" I get "polishing" something, I may have several pics with text or I might simply post Before & After.....
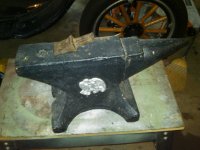
1st one....

BEFORE:

20171122_164412.jpg 20171122_164459.jpg 20171122_164656.jpg 20171124_154602.jpg 20171124_175543.jpg 20171124_190223.jpg 20171203_143327.jpg


.
 
To avoid these ads, REGISTER NOW!

don long

Well-known member
Joined
Mar 31, 2012
Messages
8,841
Location
southern california
I'm a tool polisher restorer.
I've been at it for a couple of years and find it very rewarding

Here is a couple of my tools before and after.
My circular saw


38856905242_868646b0f0_c.jpg1 (3) by don long, on Flickr

38856907912_64c1e7d27b_b.jpg2 by don long, on Flickr

27110799859_9d95e98a64_b.jpg2014-09-19 18.45.12 by don long, on Flickr

38857088152_877dfc54f7_c.jpg2014-09-19 18.47.31 by don long, on Flickr

My tire spreader


38887187341_1337f48884_c.jpg2016-10-15 16.34.40 (2) by don long, on Flickr

24022255017_c2ce914588_c.jpg2017-06-06 16.58.34 by don long, on Flickr

And my gas caddy

38887176081_4841bd6e7b_c.jpg1 (2) by don long, on Flickr

38887180611_1eabb420be_c.jpg56 (2) by don long, on Flickr

My vintage compressor and cart

25015913898_8156c25514_z.jpg2015-10-17 16.23.42 (2) by don long, on Flickr

25015918498_73bd62e423_c.jpg2016-01-14 11.37.53 (2) by don long, on Flickr

I have pictures of the process but too many pic's to share on these projects but I'll do shots as progress on new ones
 

C_F

ALLIANCE MEMBER
Joined
Jan 21, 2005
Messages
9,675
Location
Utah...SNOW BLOWS!
Wow, very impressive you guys!:bowdown:

That old tire spreader is cool, we had a similar one in my HS auto shop. I used it to patch at least a half dozen tires while I had that class. :)
 
To avoid these ads, REGISTER NOW!
OP
J

JMLangford

Well-known member
Joined
Jun 25, 2014
Messages
1,119
Location
Upstate SC
Some of y'all may have remembered this Milwaukee angle drill I got at a yard sale for $5 bucks......
https://www.garagejournal.com/forum/showpost.php?p=4893118&postcount=2932

Case was in real rough shape but he said the drill worked and it also came with 7 rusted ship auger bits and a extension......
IMG_01.jpg IMG_02.jpg IMG_03.jpg

Got busy and removed the front gear housing and then the armature, etc...
IMG_04.jpg IMG_05.jpg IMG_06.jpg IMG_07.jpg

More to come.....


.
 
Last edited:
OP
J

JMLangford

Well-known member
Joined
Jun 25, 2014
Messages
1,119
Location
Upstate SC
I'm not "restoring" this drill, I'm just giving it a real good cleaning to "refresh" it :D

I had my work cut out for me.....this thing need a lot of TLC....
IMG_08.jpg IMG_09.jpg IMG_010.jpg IMG_011.jpg IMG_012.jpg

Refreshed the plastic handles too.....
IMG_013.jpg IMG_014.jpg


More to come.....
 
Last edited:

Lelandwelds

Well-known member
Joined
Sep 6, 2017
Messages
2,443
Location
Central Texas
That work doesnt look like sisal, cotton, or felt wheels. Some looks like wire wheel, some sandpaper rolls, and some looks like flap wheels.

Thats my guess. What are you using? How do you keep from rounding the edges and corners?
 
OP
J

JMLangford

Well-known member
Joined
Jun 25, 2014
Messages
1,119
Location
Upstate SC
So, here's the BEFORE:
IMG_02.jpg

And here's the AFTER:
IMG_022.jpg

Couldn't do anything for the case (I should have stripped it and re-painted)

I advertised it on Craigslist......the ad ran for about a week and an electrician from N.C. came down and paid $130 for it.

Glad he could use it :thumbup:


.
 
Last edited:

don long

Well-known member
Joined
Mar 31, 2012
Messages
8,841
Location
southern california
Mr. Long -- what was your process to polish the cast alu on that Craftsman saw?

I just wet sanded some cast alu. and then hand buffed with metal magic... I now know how much work is involved!


catalytic


When I want to polish an old craftsman tool (which I have several) I start by dismantling it completely. I take my 3" sander with a 150 grit disc on it. I sand down the parts until ALL the scratches are gone. Then I repeat the process with 220 grit then 400 grit return with a 600 grit disc on my pad and with an 800 grit disc I start polishing the piece and my final sand down is with 1200 grit sand paper When the sanding is done the part has a dull shine on it so I take the part to my Baldor polishing machine and with red rouge on the wheel I buff out the part. Then give the piece a thorough cleaning with some wax and grease remover before spraying automotive clear paint on my pieces. I let them sit til cured maybe 3 days before reassembly.
(LOTS OF WORK)
 

don long

Well-known member
Joined
Mar 31, 2012
Messages
8,841
Location
southern california
I love brass tools. And I love to polish brass up to a high shine.
Like this brass pump and fire extinguisher holder

38189577744_2a1e687eff_c.jpgIMG_0046 by don long, on Flickr

38869278472_fdd7570145_c.jpgIMG_0055 by don long, on Flickr

24040583297_6b50fb3f8a_c.jpg1 by don long, on Flickr


25034081978_e3f5148e2b_c.jpg2016-05-10 14.47.34 by don long, on Flickr

27128888119_e6315179af.jpg2016-05-10 14.47.52 by don long, on Flickr

Here is a project that i'm currently working on

this is a blow torch with a rectangle tank (this one is a steel torch)

38905213201_8aaf81d14a_c.jpg1 by don long, on Flickr

I sand blasted the tank. I also polished the brass pieces

37037307654_ca9439caf3_c.jpgIMG_1466 by don long, on Flickr

I took the dents out of the tank, primed and painted it 2tone Blue and yellow and sent it over to a friend to logo and letter it.
Hope to get it back soon.

38869920712_7617a9a6f2_c.jpg2017-10-16 13.03.49 by don long, on Flickr

38018969085_0aeb608685_c.jpg2017-10-24 17.59.34 by don long, on Flickr
 
Last edited:

ndnchf

Well-known member
Joined
Jan 9, 2012
Messages
1,556
Location
Fredericksburg, Virginia
Maybe a little OT, not exactly polished bright. But cleaned up and pretty, showing its well earned wrinkles. This Kellogg air pump (compressor) is well over 100 years old. It came out of an old barn where it had sat for decades before earning its keep in a garage. I took it all apart, cleaned, lubricated and re-assembled it. I added a higher pressure, but original period gauge and a pressure relief valve. It runs like a champ now. I use it occasionally to pump up the tires on my 1924 Ford touring car.
 

Attachments

  • IMG00603-20121225-1004.jpg
    IMG00603-20121225-1004.jpg
    123.7 KB · Views: 1,029
  • Kel.jpg
    Kel.jpg
    130.2 KB · Views: 1,210
  • Like
Reactions: DSS
OP
J

JMLangford

Well-known member
Joined
Jun 25, 2014
Messages
1,119
Location
Upstate SC
Maybe a little OT, not exactly polished bright. But cleaned up and pretty, showing its well earned wrinkles. This Kellogg air pump (compressor) is well over 100 years old. It came out of an old barn where it had sat for decades before earning its keep in a garage. I took it all apart, cleaned, lubricated and re-assembled it. I added a higher pressure, but original period gauge and a pressure relief valve. It runs like a champ now. I use it occasionally to pump up the tires on my 1924 Ford touring car.
ndnchf: You did a great job of cleaning and re-doing your air pump back to service :thumbup: I don't necessarily shine everything to a high shine....most of my cleaning and polishing is not perfect but I enjoy trying.
Most of what I do is on a small scale....cheaper that way ;)
I wish I had the talent and resources to restore stuff like Don (the master) does.....but it's all good!!

How did you get those bits cleaned up so well?
Swingpress: If you are referring to the auger bits.....I simply used a fine wire wheel on my bench grinder.
They actually had just surface rust that came off really easy!
I usually wipe down any bare metal with a very thin coat of gun oil.....


.
 
OP
J

JMLangford

Well-known member
Joined
Jun 25, 2014
Messages
1,119
Location
Upstate SC
Picked up a well neglected Lee Pro 1000 progressive reloader (missing a lot of parts and pieces) and an lightly abused Lee single die press for a crazy stupid low, low, low, low, low, price (more on that later)......
RL1.jpg RL2.jpg RL3.jpg

It came with 40 S&W dies (great cause I've got a couple of 40 cals) and I wired brushed one right away to see how well they'd clean up.....It was the most rusted also.....
RL4.jpg RL5.jpg

The single press was basically complete (other than needing whatever die you'd use and whatever shell holder you'd need) but still needed some TLC.....
RL6.jpg RL7.jpg


.
 
Last edited:
OP
J

JMLangford

Well-known member
Joined
Jun 25, 2014
Messages
1,119
Location
Upstate SC
I started with the easiest one first....the single press :)

Disassembled and scraped and painted and polished and reassembled....then mounted it to a piece of oak to clamp to my bench.....(I installed the decapping die but I don't yet have a proper shell holder).....
RL8.jpg RL9.jpg RL10.jpg RL11.jpg RL12.jpg RL13.jpg RL14.jpg


.
 
Last edited:
OP
J

JMLangford

Well-known member
Joined
Jun 25, 2014
Messages
1,119
Location
Upstate SC
Next, I took apart and cleaned all the dies then started on the body of the progressive press.....
RL15.jpg RL16.jpg RL17.jpg RL18.jpg

I cleaned these three uprights then re-blued them.....(they look brownish but I think it's the reflection of the bench top....they're actually black)
RL19.jpg

Found an oak board to mount it to also :beer: (I've got a lot of stair thread cut-offs from a wood shop years ago)
RL20.jpg RL21.jpg


.
 
Last edited:
OP
J

JMLangford

Well-known member
Joined
Jun 25, 2014
Messages
1,119
Location
Upstate SC
Next, I began taking every piece of the press apart for inspection and cleaning....
RL22.jpg RL23.jpg

Reassembling and timing everything so it comes up at the proper station in the process.....
RL24.jpg RL25.jpg

Got the oak board tung-oiled, then re-mounted the press for reassembly.....
RL26.jpg RL27.jpg RL28.jpg


.
 
Last edited:
OP
J

JMLangford

Well-known member
Joined
Jun 25, 2014
Messages
1,119
Location
Upstate SC
I had to buy a few parts that was missing from the Pro 1000 press....
Auto powder measure and hopper
Priming attachment
Case feeder tubes
and a 9mm shell holder for the single press.....
RL29.jpg RL30.jpg RL31.jpg

I mentioned at the first of these posts, that I got these presses extremely cheap....and it's a good thing :mad: cause at the time I bought the missing components (about a year ago) I could have bought the Lee Pro 1000 with (new) dies for not much more than I'll have in this one.....Now, it and the single press has come down even more since last year......but what the hey :lol_hitti

Dropped in the dies and adjusted them (thanks Youtube) put some cases in the tubes, and did a dry run to make sure everything worked....Got a (imaginary) completed round at every pull of the handle!!......:thumbup:
RL32.jpg RL33.jpg RL34.jpg RL35.jpg


.
 
Last edited:
OP
J

JMLangford

Well-known member
Joined
Jun 25, 2014
Messages
1,119
Location
Upstate SC
I just noticed something :lol:.....Most everything I've posted so far has been RED :lol_hitti


.
 
Last edited:

ndnchf

Well-known member
Joined
Jan 9, 2012
Messages
1,556
Location
Fredericksburg, Virginia

Attachments

  • s-l1600.jpg
    s-l1600.jpg
    48.3 KB · Views: 534
  • Lite 3.jpg
    Lite 3.jpg
    48.7 KB · Views: 666
Last edited:
To avoid these ads, REGISTER NOW!
Top Bottom