To avoid these ads, REGISTER NOW!

BEFORE & AFTER....A Tool Polisher's Haven

To avoid these ads, REGISTER NOW!

fowldarr

Well-known member
Joined
Oct 23, 2009
Messages
1,067
Location
Coastal Oregon
I found this old wrench in a box of stuff I had. 2be6e8e1495a276d51b603be7b772efb.jpg

It was seized up and wouldn’t move much and it wasn’t worthy of a mirror polish, but I cleaned it up and got it working. It’s silky smooth now. 185ed857df5b95b114671a2d4e316c9d.jpg
5898af22723e2a9a82ec6e28834db0de.jpg

Manufacturer was Coes, research online indicates it is a ‘railroad wrench’ and that people on eBay are very proud of them.


Sent from my iPhone using The Garage Journal mobile app
 

Attachments

  • 5898af22723e2a9a82ec6e28834db0de.jpg
    5898af22723e2a9a82ec6e28834db0de.jpg
    763.6 KB · Views: 1
  • 185ed857df5b95b114671a2d4e316c9d.jpg
    185ed857df5b95b114671a2d4e316c9d.jpg
    791.2 KB · Views: 1
  • 2be6e8e1495a276d51b603be7b772efb.jpg
    2be6e8e1495a276d51b603be7b772efb.jpg
    848 KB · Views: 9

gman007

Well-known member
Joined
May 17, 2017
Messages
2,724
Location
West Michigan
Gents
I am sure somewhere on this thread at least once or may be many times someone has already asked for advice on what Buffing Pad / Polishing Wheel and Polishing compound to use for the best final finish (after using progressive grits of sandpaper). But for sake of saving time on scanning through all the pages, I would appreciated if one of the experts here would kindly provide some recommendations.

PS
On second thought a recommendation on the sequence of progressive grits of sandpaper would also be very helpful and appreciated.
 
Last edited:

Finallygotit

ALLIANCE MEMBER
Joined
Jul 6, 2013
Messages
4,078
Location
Tucson, AZ
Gents
I am sure somewhere on this thread at least once or may be many times someone has already asked for advice on what Buffing Pad / Polishing Wheel and Polishing compound to use for the best final finish (after using progressive grits of sandpaper). But for sake of saving time on scanning through all the pages, I would appreciated if one of the experts here would kindly provide some recommendations.

PS
On second thought a recommendation on the sequence of progressive grits of sandpaper would also be very helpful and appreciated.

^^^^ I second the request.

Roy


Look at post #382 in this thread. Don is the man!


HTH


:beer:
 

JHuston

Well-known member
Joined
Feb 21, 2016
Messages
301
Location
Canton, Ohio
Look at post #382 in this thread. Don is the man!


HTH


:beer:

I've been trying out Don's methods to good effect; I would add that, if you're trying to clean up an aluminum casting prior to sanding/buffing, I've found that Eagle one mag wheel cleaner does wonders.

-James Huston
 

fowldarr

Well-known member
Joined
Oct 23, 2009
Messages
1,067
Location
Coastal Oregon
When I polish up my aluminum tools I don't use steel wool I go through a sand paper process. Depending on the original condition of the tools surface. I start with a course paper to remove any deep scratches or imperfections. 80 or 120 grit
If the piece is pretty clean and smooth I will start with 220 dry paper and sand it til the finish is dull. moving up to 400 grit then 600 grit (still dry paper)
next I sand with 800 paper and the piece starts to have a dull shine.
Next I hit the piece with 1200 paper and work out any left over scratches before moving on to the buffer.
My buff wheel is a tight sewed wheel and I use the brown rouge sparingly and when the piece is real shiny I move over to the soft wheel with no polish and buff up the piece to its final shine.
Hope that helps.

Don


It might be worth reposting this every once in awhile.


Sent from my iPhone using The Garage Journal mobile app
 

gman007

Well-known member
Joined
May 17, 2017
Messages
2,724
Location
West Michigan
Finally,James and Fowl
Gents, thank you all for the quick response and the lead. I will check it out. By the way I am planning to polish steel parts.
 
Last edited:

Bob Heine

ALLIANCE MEMBER
Joined
Oct 24, 2009
Messages
10,703
Location
Boca Raton, Florida
I don't think anyone mentioned using files. I find them very handy on rough cast aluminum to keep flat areas flat or keep lettering crisp. Follow filing with Don's sandpaper steps on a hard block.
 
Last edited:

Dogwoodfarms

Active member
Joined
Aug 8, 2018
Messages
28
Location
Canton GA
Mike I like your work. You have found some neat stuff to work on.

This thread really has my intrest. I love showing my tools but I like seeing what others are doing more.

I found the before and after pictures of the fire tools I posted earlier

Those spanner wrenches look better than they do when they show up on the new trucks!
 

Dogwoodfarms

Active member
Joined
Aug 8, 2018
Messages
28
Location
Canton GA
Liking Bessy. I am working towards starting my polishing career soon. I picked up my first vintage aluminum craftsman drill a month or so back and have added more tools than my wife appreciates at the moment. Most of which still don't work and need to be cleaned/repaired. I am currently working on restoring a 9 inch sander back to working order. I'm hoping once I get a few of these up and running she will cool off a bit. I have my eyes on the saw that Don posted on the first page. It's been up for sale for a bit, comes with it's original box and all for a great price. But unfortunately I've used all my points with the wife and I'm praying it won't sell before I get to it. That thing is a beaut restored.

Those of you who have restored these old drills, what kind of grease/packing are you putting back into the gear housings?
 

Dogwoodfarms

Active member
Joined
Aug 8, 2018
Messages
28
Location
Canton GA
I'm sure everyone has their favorite. I use SuperLube synthetic grease.

OK. I picked up some 80w gear oil. I haven't used it yet, but I was thinking it was a little too thin. Maybe not, still new to this. A lot of times the grease I see in these is thick, maybe that's due to it's age and not preferred? I have opened up a large 9inch sander and the oil in it was thick but still running... as one of the three apparently has a slight leak.

Thanks for the info.

Don, you do amazing work and I appreciate you taking the time to share your projects as well as helping us newbies out with tips and tricks. Now that I have read through this whole thread, I am going to see what else Garage Journal has to offer.
 
To avoid these ads, REGISTER NOW!

Mr. Wonderful

Well-known member
Joined
Jan 15, 2018
Messages
1,770
Location
Pacific Northwest
I'm sure everyone has their favorite. I use SuperLube synthetic grease.

I use the Lucas red and tacky. They sell it in the tube at Home Depot works great in the Milwaukee angle drill I posted on here a few pages back. Good Luck and be careful, its an addiction! I cant pass an aluminum boddied tool at a garage sale without seeing in all its glory on the pages of this thread!
 

Dogwoodfarms

Active member
Joined
Aug 8, 2018
Messages
28
Location
Canton GA
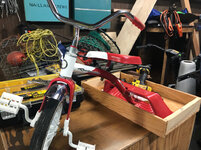
So to stick to the original thread's purpose, this is one of my current projects, I have a few stashed in different places so I can continuously get my fix.

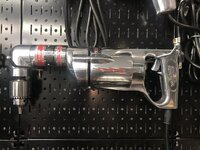
The sander is a Sioux 7" high speed sander. I bought this in a group of three, thinking it was your average sized angle grinder like you find today, I showed up and found these monstrosities, two 7" sanders and a 9". The seller said his dad was a die maker back in the day. He had a garage full of tools for sale and I wanted every one of them. May have walked out with the three sanders and a few other goodies. Definitely kept his info to go visit with again. Hoping to have this fixed up to take with me and show him what I did with it. Still needs some tinkering to get it up and running, the motor just humms at me right now, but I'm getting it there...

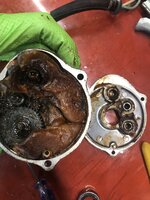
You can see the grease on the sanding wheel that came out, a very thick, black, very sticky substance. Would love to put this back in, if anyone knows a good product to match it.

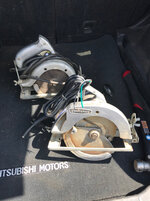
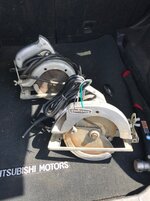
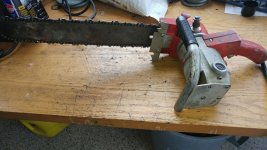
The saw is a Milwaukee 6200 electric saw with a 20" bar. Picked this up from a local and thought it would be great to use in the wood working shop my brother and I are assembling at his place. It runs, but I want to polish her up and make her shine.

These tools have lasted a very long time and I was raised to respect and care for my elders.
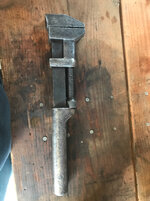
 

Attachments

  • 20180814_152658.jpg
    20180814_152658.jpg
    148.8 KB · Views: 191
  • 20180814_152737.jpg
    20180814_152737.jpg
    149.3 KB · Views: 203
Last edited:

Dogwoodfarms

Active member
Joined
Aug 8, 2018
Messages
28
Location
Canton GA
My next question is the proper/best way to refinish the ID tag(?). The sioux tag seems to be pretty stout and should take a good cleaning, but others I have on other tools seem to be more fragile and I don't want to lose any markings/stamps or deface them in any way.
 

Finallygotit

ALLIANCE MEMBER
Joined
Jul 6, 2013
Messages
4,078
Location
Tucson, AZ
My next question is the proper/best way to refinish the ID tag(?). The sioux tag seems to be pretty stout and should take a good cleaning, but others I have on other tools seem to be more fragile and I don't want to lose any markings/stamps or deface them in any way.


I have taken Simple Green to machine tags with a semi-stiff brush (like a tooth brush) going gently at first. Has worked pretty well for me up till now.


HTH


:beer:
 

Dogwoodfarms

Active member
Joined
Aug 8, 2018
Messages
28
Location
Canton GA
I use the Lucas red and tacky. They sell it in the tube at Home Depot works great in the Milwaukee angle drill I posted on here a few pages back. Good Luck and be careful, its an addiction! I cant pass an aluminum boddied tool at a garage sale without seeing in all its glory on the pages of this thread!

Did you just coat the gears real well with this? It seems pretty thick, but I'm sure once it gets warm enough it will loosen up.

I hear you on the addiction, I am constantly looking at FB and CL for old tools. I have to stop myself because I keep finding deals I can't pass up.

I unfortunately stripped out one of the bolts in the sander. Apparently it's not easy finding a matching bolt that was in a tool from a good 60 years ago... go figure. I found a close match I think that should arrive tomorrow at the bolt store that had to be special ordered. I also am looking at getting some buffing wheels for my "normal" sized HF grinder to work on getting the paint off of this. I figured I'll repaint it as it was the original finish and focus a little more on the electrical inside. Found some frayed wires here and there. I don't see it taking long to get up and running.

May not be "polished" in the end but I am hoping it will look like it came off the shelf.

I have taken Simple Green to machine tags with a semi-stiff brush (like a tooth brush) going gently at first. Has worked pretty well for me up till now.

I will try this. Thanks for the tip. I think this guy would take little "ruffer" approach in maybe hitting it with some blue and then sanding the raised letters. I'll try your method first.
 

Mr. Wonderful

Well-known member
Joined
Jan 15, 2018
Messages
1,770
Location
Pacific Northwest
Did you just coat the gears real well with this? It seems pretty thick, but I'm sure once it gets warm enough it will loosen up.

I hear you on the addiction, I am constantly looking at FB and CL for old tools. I have to stop myself because I keep finding deals I can't pass up.

I unfortunately stripped out one of the bolts in the sander. Apparently it's not easy finding a matching bolt that was in a tool from a good 60 years ago... go figure. I found a close match I think that should arrive tomorrow at the bolt store that had to be special ordered. I also am looking at getting some buffing wheels for my "normal" sized HF grinder to work on getting the paint off of this. I figured I'll repaint it as it was the original finish and focus a little more on the electrical inside. Found some frayed wires here and there. I don't see it taking long to get up and running.

May not be "polished" in the end but I am hoping it will look like it came off the shelf.


I will try this. Thanks for the tip. I think this guy would take little "ruffer" approach in maybe hitting it with some blue and then sanding the raised letters. I'll try your method first.

I packed most of the gear box full with it, making sure to push it into the ball bearings as much as possible. Then I ran it for a minute, opened it up again and put a little more in. You wont believe the noise reduction you will get with new grease!
 

don long

Well-known member
Joined
Mar 31, 2012
Messages
8,841
Location
southern california
I've been working on my corvette the last few weeks Painting and buffing it out
When this funnel caught my attention (it just showed up)
I took some time to examine it and found myself with a hammer and dolly taking dents out of it

IMG_4770 by don long, on Flickr

IMG_4769 by don long, on Flickr

I worked out as many dents as I could find, grabbed my pistol grip grinder and with 150 grit paper smoothed out the body work I had done.
then sanded it smooth with various other grits of paper.
A trip to the big buffer and 45 minutes after spotting the funnel I was back to work sanding on my Corvette again

The funnel needs some clear sprayed on it and into the party garage it goes

IMG_4772 by don long, on Flickr

IMG_4773 by don long, on Flickr
 

fowldarr

Well-known member
Joined
Oct 23, 2009
Messages
1,067
Location
Coastal Oregon
Not a tool, but Moose (my 5 year old) wheeled in a busted up tricycle with a bent rim and oxidized paint. 267585aa62a1278642306722f19bf71f.jpg

Everything was loose bolts were missing and a rim was bent.

Ultimately, I gave him some help, but he did the polishing on this (using meguiars and a drill attachment), also disassembled it and put it back together (lots of help there), and we ordered new back wheels.

5fbcb4b56bf232909cb09314d5312fb3.jpg

I think it came out alright.


Sent from my iPhone using The Garage Journal mobile app
 

Attachments

  • 5fbcb4b56bf232909cb09314d5312fb3.jpg
    5fbcb4b56bf232909cb09314d5312fb3.jpg
    902.5 KB · Views: 9
  • 267585aa62a1278642306722f19bf71f.jpg
    267585aa62a1278642306722f19bf71f.jpg
    847.6 KB · Views: 3

Dogwoodfarms

Active member
Joined
Aug 8, 2018
Messages
28
Location
Canton GA
She's a beauty, the funnel and the tricycle. I picked up one of the old brass torches. It has a few dents but was the better of the batch. Any thoughts on the best way to get in there and get the dents out? I would like to polish her up rather than bondo and paint (not that I've done bondo before either).
 

Attachments

  • unnamed.jpg
    unnamed.jpg
    8.9 KB · Views: 81

fowldarr

Well-known member
Joined
Oct 23, 2009
Messages
1,067
Location
Coastal Oregon
I just saw a bunch of those old brass torches for sale. I can't remember where, but I remember it seemed like a good deal. I just don't have anywhere to start another collection of stuff that I don't use.

And the funnel puts the tricycle to shame. Heck, The dirtiest tool in Don's Party Garage, probably puts my prettiest shiniest tool to shame.
 

Jeff Ivers

Well-known member
Joined
Apr 9, 2010
Messages
2,555
Location
Oklahoma
BT lamp 1.jpg

I've made about a dozen of these over the years. This is one of a pair bought by an individual who said he was going to put them in a museum in Branson, MO. I usually left any minor dent in them for character and polished them up.
 

bonneyman

Well-known member
Joined
Apr 22, 2010
Messages
8,767
Location
Desert SW
BT lamp 1.jpg

I've made about a dozen of these over the years. This is one of a pair bought by an individual who said he was going to put them in a museum in Branson, MO. I usually left any minor dent in them for character and polished them up.

Rock and roll, man! Love the idea.:thumbup:
 

eric.holmslice

Well-known member
Joined
May 28, 2015
Messages
99
After the success with the electric hammer I decided to try something a little more pricey. Vintage Milwaukee tools are a little more expensive. If you shop around you might get lucky. I got this box and angle drill for $100 shipped. This was the first drill I’ve noticed a balanced stator. This thing runs so smooth when it’s turned on.

Enjoy the pics!

Before

4b17bf3c860a5a63dae75d7d2b84ab3b.jpg


942bcf75a6298edade09c491d60989c5.jpg

858ddf3615757cffa5ea67788c3b79bb.jpg

a25cb905276587a1092591ad6d9111e1.jpg

After

237e739caed52d59ec461eb1a277ef77.jpg

6655e8fea320e117e5b2c34cb4f7e4c9.jpg

845f4759e615770dbac64930412e21ba.jpg

7f67adbab211cd4409ae16cd8adc0a42.jpg

df10fb260e37925cc4b3569f7cb690d9.jpg

ada55d7b320c2e5327538c7d1d73d232.jpg

ab4ff870ab96df18190364118cadf5e6.jpg


Planning on clear coating the box over the rust. I will be re-polishing the buckles and handle as well.


Sent from my iPhone using Tapatalk
 

Attachments

  • 237e739caed52d59ec461eb1a277ef77.jpg
    237e739caed52d59ec461eb1a277ef77.jpg
    686.9 KB · Views: 1
  • a25cb905276587a1092591ad6d9111e1.jpg
    a25cb905276587a1092591ad6d9111e1.jpg
    549.3 KB · Views: 1
  • 845f4759e615770dbac64930412e21ba.jpg
    845f4759e615770dbac64930412e21ba.jpg
    628 KB · Views: 1
  • 6655e8fea320e117e5b2c34cb4f7e4c9.jpg
    6655e8fea320e117e5b2c34cb4f7e4c9.jpg
    708.7 KB · Views: 0
  • 7f67adbab211cd4409ae16cd8adc0a42.jpg
    7f67adbab211cd4409ae16cd8adc0a42.jpg
    708.4 KB · Views: 0
  • df10fb260e37925cc4b3569f7cb690d9.jpg
    df10fb260e37925cc4b3569f7cb690d9.jpg
    656 KB · Views: 0
  • ada55d7b320c2e5327538c7d1d73d232.jpg
    ada55d7b320c2e5327538c7d1d73d232.jpg
    416.4 KB · Views: 0
  • ab4ff870ab96df18190364118cadf5e6.jpg
    ab4ff870ab96df18190364118cadf5e6.jpg
    650.8 KB · Views: 0
  • 858ddf3615757cffa5ea67788c3b79bb.jpg
    858ddf3615757cffa5ea67788c3b79bb.jpg
    574.5 KB · Views: 0
  • 942bcf75a6298edade09c491d60989c5.jpg
    942bcf75a6298edade09c491d60989c5.jpg
    667 KB · Views: 0
  • 4b17bf3c860a5a63dae75d7d2b84ab3b.jpg
    4b17bf3c860a5a63dae75d7d2b84ab3b.jpg
    583.9 KB · Views: 0

JHuston

Well-known member
Joined
Feb 21, 2016
Messages
301
Location
Canton, Ohio
The 1100 is a great right angle drill , and definitely deserves the star treatment you've given it. Outstanding?
-James Huston
 

rickhigginshtbr

Well-known member
Joined
Aug 7, 2012
Messages
1,551
Location
Lower Bucks, PA
10d02c5606e84c0f6d64b86deedec2b1.jpg

This thread got me inspired to take a crack at an old aluminum tool. $4.11 yesterday at habitat, give me a week or two ;)


Sent from my iPhone using Tapatalk
 

Attachments

  • 10d02c5606e84c0f6d64b86deedec2b1.jpg
    10d02c5606e84c0f6d64b86deedec2b1.jpg
    810 KB · Views: 1

Loose Ctrl

Well-known member
Joined
Dec 21, 2014
Messages
759
Location
Upstate SC
10d02c5606e84c0f6d64b86deedec2b1.jpg

This thread got me inspired to take a crack at an old aluminum tool. $4.11 yesterday at habitat, give me a week or two ;)


Sent from my iPhone using Tapatalk
Nice saws and great deals. The front saw looks early 70's ish and the back saw looks late 50's to early 60's. Does that seem about right?
 

Attachments

  • 10d02c5606e84c0f6d64b86deedec2b1.jpg
    10d02c5606e84c0f6d64b86deedec2b1.jpg
    130.3 KB · Views: 1

rickhigginshtbr

Well-known member
Joined
Aug 7, 2012
Messages
1,551
Location
Lower Bucks, PA
The one in the back should cone out nice. I like the smooth edges on it.

Me too

Nice saws and great deals. The front saw looks early 70's ish and the back saw looks late 50's to early 60's. Does that seem about right?

I believe so. The B+D in the back is a smaller saw, but weighs more than the craftsman as well lol
 
To avoid these ads, REGISTER NOW!
Top Bottom