
You are using an out of date browser. It may not display this or other websites correctly.
You should upgrade or use an alternative browser.
You should upgrade or use an alternative browser.
BEFORE & AFTER....A Tool Polisher's Haven
- Thread starter JMLangford
- Start date

AngryBeaver
Well-known member
I guess I'm a tool polisher... or just a tool. not sure which...


I have entirely too much time in these tail pipes


I have entirely too much time in these tail pipes
Attachments


Loose Ctrl
Well-known member
I guess I'm a tool polisher... or just a tool. not sure which...
I have entirely too much time in these tail pipes
Great vice. Dig that blue.
When I saw the driveline layout pic, I thought you were working on an MN12 T-Bird, Cougar, or Mark VIII. The Cobra wasn't to much different. Some parts interchange.
AngryBeaver
Well-known member
Great vice. Dig that blue.
When I saw the driveline layout pic, I thought you were working on an MN12 T-Bird, Cougar, or Mark VIII. The Cobra wasn't to much different. Some parts interchange.
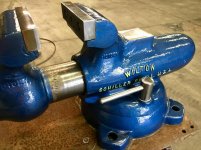
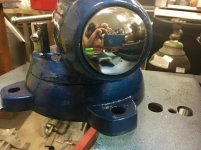
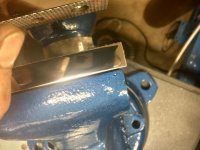
thats an Iron T bird housing... I cracked the aluminum one...
that was a busted up junk wilton I brought back from the dead. look close at the jaw ledge on the red picture...
Loose Ctrl
Well-known member
thats an Iron T bird housing... I cracked the aluminum one...
that was a busted up junk wilton I brought back from the dead. look close at the jaw ledge on the red picture...
Those aluminum third members aren't very strong when puting down some real torque.
I didn't notice that at first. Good job welding that back in.
OCD
Well-known member
Here's a funny one!!
It's a part off our vac truck, that my Dad asked me if I could clean up... Challenge accepted!!
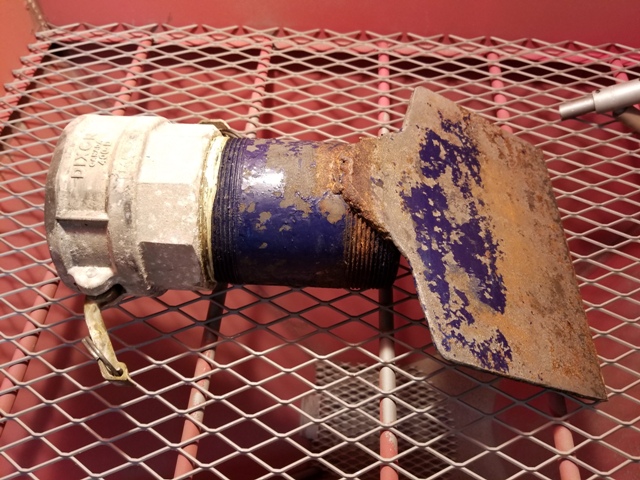
I blasted the steel pipe and diverter plate with aluminum oxide, then painted them with a new Tremclad aluminum color I wanted to try out...
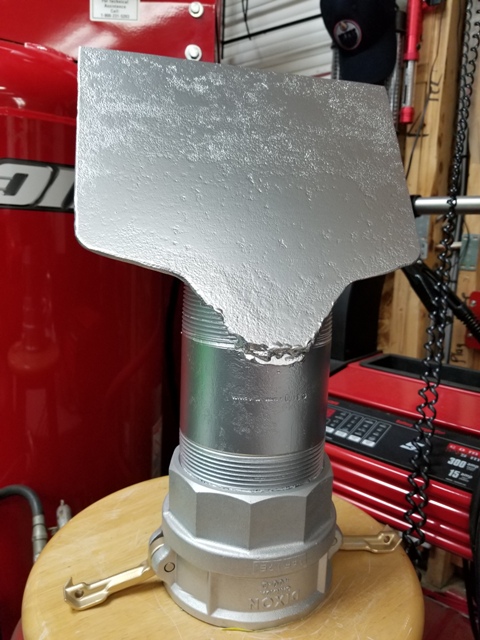
Also glass bead blasted the connector, then clear coated it...
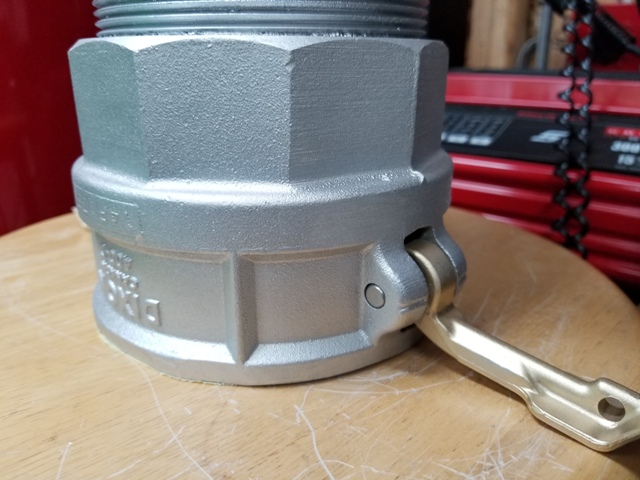
It's a part off our vac truck, that my Dad asked me if I could clean up... Challenge accepted!!
I blasted the steel pipe and diverter plate with aluminum oxide, then painted them with a new Tremclad aluminum color I wanted to try out...
Also glass bead blasted the connector, then clear coated it...
Loose Ctrl
Well-known member
Looks good to me.
bubinga
Well-known member
Fixed it For You.....lolLooks great to me.

Stuart in MN
Well-known member
Here's a funny one!!
It's a part off our vac truck, that my Dad asked me if I could clean up... Challenge accepted!!
If it's off a vac truck it's not going to look that nice for very long.
")
Loose Ctrl
Well-known member
Fixed it For You.....lol

OCD
Well-known member
If it's off a vac truck it's not going to look that nice for very long.
Lol, totally!!
That's my Bro-in law's issue to deal with!! Dad's a clean freak!!
He keeps upping the restore challenges, will be interesting to see what he comes up with next...
bubinga
Well-known member
Lol, totally!!
That's my Bro-in law's issue to deal with!! Dad's a clean freak!!
He keeps upping the restore challenges, will be interesting to see what he comes up with next...


fowldarr
Well-known member


Attachments
fowldarr
Well-known member
View media item 86759View media item 86760
Not really a tool, but a lot of polishing. This is a British Seagull outboard motor circa mid 1950's. It doesn't run, the piston is very stuck, but I used it to practice polishing etc.
I really like this because apparently sometime the gas tank got damaged and the PO, rather ingeniously, replaced it with a fuel tank off a Coleman stove. And the tiller arm must have broke, because it is now a piece of copper pipe. The PO must have really wanted to get it running.
1/2 Cup
Member Emeritus
Decline58 that's sweet.
trijeff
Well-known member
Well here's one I'm pretty sure hasn't been posted before, maybe anywhere on GJ. I bought a stand to make into a sweet adjustable height vise stand (still haven't started almost 3 years later). Came from a machine shop that had bought lots from McLellan air base when decommissioned in 2003, they many years later sold the stuff they didn't use on Craigslist. This dohickey was on top of the stand, it is an optical/metrological instrument rotating lateral slide. Basically to secure precision measuring instruments, then be able to "bump" them to adjust a bit without having to move the 700lb base. Still have some lettering and final cleanup, will take and post better pics once complete.
Sent from my SM-G900T using Tapatalk
Sent from my SM-G900T using Tapatalk
Attachments


Attachments

Thanks! I did my brass zippo too, but since it gets handled so m uch it already looks like **** again. But its nice to pull it out and see the shine on it when I do shine it up
I guess I'm a tool polisher... or just a tool. not sure which...
Did the polisher get a bit close to the top of your head?
Looks good.
lg
no neat sig line
OCD
Well-known member
That boat motor is cool!!
AngryBeaver
Well-known member
Did the polisher get a bit close to the top of your head?
Looks good.
lg
no neat sig line

trijeff
Well-known member
finished up that optical/metrology gizmo


Sent from my SM-G900T using Tapatalk
Sent from my SM-G900T using Tapatalk
Attachments
-
 ca6269ce8eb7c79d4af28c498c4d327a.jpg101.2 KB · Views: 0
 -
 d896066e9a146bc54f3705e4ed8cfa3c.jpg131.5 KB · Views: 0
 -
 c3de8ab944a61044efbb6b54dbc6df9b.jpg130.8 KB · Views: 0
 -
 cb2a3f0fd4f4bd33d201b016d42c74d5.jpg129.7 KB · Views: 0
 -
 01607d58165da2149dca26e35124b186.jpg120.9 KB · Views: 0
 -
 2ed170ca65b7798c1b7a733e325a3390.jpg162.4 KB · Views: 0
 -
 dfddddd609a2140a4a422d9f6a51c178.jpg142.6 KB · Views: 0
 -
 622003cf98ff4a46679b58aa9590b682.jpg141.9 KB · Views: 0
 -
 ac5ec0725052043493b3c152e3bad434.jpg201.2 KB · Views: 13
thundermug
Well-known member
Got this old, hand-made machinist chest a few years ago. There was a layer of orange latex paint over silver spray paint. I left a lot of the dents and scratches. Not exactly polished. I like patina.
Next project is my 1950s Wilton.
Next project is my 1950s Wilton.
Attachments
OP
JMLangford
Well-known member
Hey guys.....I haven't posted to much here lately, but I appreciate how much everyone has kept this thread alive!
I had hoped when I started this, that all the tool polishers would show up and show off what they've refinished/restored/re-done.....I'm amazed at the talent and ability of y'all and the wide range of "tools" being shined up (we've even got a optical/metrology gizmo thingy )
I've still been busy cleaning and polishing items.....I'll post some up soon.
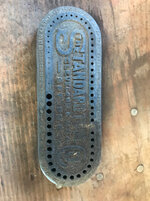
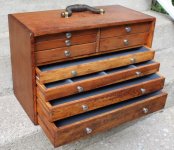
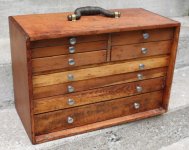
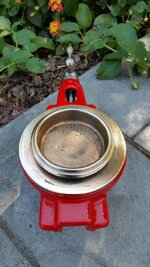
Here is a quick Before & After.....I got this in last weekend from GJ member "bluebolt" (thanks blue) and gave it the TLC spa treatment!
Started by washing the case with Dawn dish detergent and a tooth brush....then wiped it down lightly with Armor-All....
Before & After:


Got it all cleaned up and filled it with bits and my red ratcheting screwdriver (it came with a black driver)


The black driver clean-up coming up......
.
I had hoped when I started this, that all the tool polishers would show up and show off what they've refinished/restored/re-done.....I'm amazed at the talent and ability of y'all and the wide range of "tools" being shined up
(we've even got a optical/metrology gizmo thingy )I've still been busy cleaning and polishing items.....I'll post some up soon.
Here is a quick Before & After.....I got this in last weekend from GJ member "bluebolt" (thanks blue) and gave it the TLC spa treatment!
Started by washing the case with Dawn dish detergent and a tooth brush....then wiped it down lightly with Armor-All....
Before & After:
Got it all cleaned up and filled it with bits and my red ratcheting screwdriver (it came with a black driver)
The black driver clean-up coming up......
.
OP
JMLangford
Well-known member
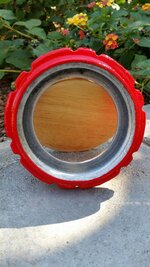
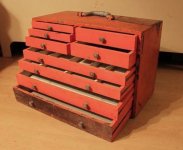
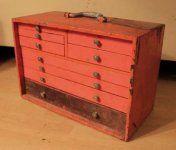
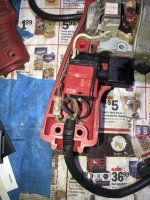
Got started on the black driver and it was pretty dirty....

But it shined up real nice....


I put it in the drawer with the others....(that makes 8 that I have now)....

Here's what it originally looked like....

.
But it shined up real nice....
I put it in the drawer with the others....(that makes 8 that I have now)....
Here's what it originally looked like....
.
bubinga
Well-known member
Got this old, hand-made machinist chest a few years ago. There was a layer of orange latex paint over silver spray paint. I left a lot of the dents and scratches. Not exactly polished. I like patina.
Next project is my 1950s Wilton.
Bellissimo!! (Beautiful of course)

very very Nice. No Not polished, But restoring machinist box's along with my woodworking hobby is one of my interests too!
Thanks for Posting!!
be sure to let us see the Wilton please.
finished up that optical/metrology gizmo
Hey trijeff, that gizmo reminds me of camera tripod heads. The bottom part looks like it would drop into the bowl of a lot of the old tripods. Here's a pic of my old linhof large format tripod. The bottom bowl was 110mm if I recall correctly and it had a stainless steel reducer ring that adapted the top head to fit as well as give you about 15' of up and down tilt. Your unit looks like it would maybe drop into a surveyor's tripod by the way the bottom is shaped. Movie tripods had much bigger bowls, 150mm that were designed for lots of tilt but no pics on this computer for them.
Nice work on the resto!
Attachments

trijeff
Well-known member
Thanks 2ool. I still have the stand it came on, I have dreams of *someday* turning it into a sweet vise stand. This is not mine but is identical. Surveyors Service Co (Servco) Masterstand. Ridiculously over built, the need for which these days probably replaced by an app on your phone.
Sent from my SM-G900T using Tapatalk
Sent from my SM-G900T using Tapatalk
Attachments

Loose Ctrl
Well-known member
That is a surveyors transit base, I believe. My uncle, my father, my cousin, and I were surveyors until my father and uncle passed away. My father when I was 9 and my uncle when I was 19. I worked summers from 14 to 19 as a surveyor. I ran rod full time and transit when we had a man down. I worked a couple years with my cousin who was a surveyor off and on with several companies after the death of my uncle, his father. It was a great learning experience. I do miss being miles deep in the forest chasing property lines. I don't miss being in town and on highways or interstates chasing down right of ways.finished up that optical/metrology gizmo
Sent from my SM-G900T using Tapatalk


Attachments
-
 2ed170ca65b7798c1b7a733e325a3390.jpg155.5 KB · Views: 2
 -
 ac5ec0725052043493b3c152e3bad434.jpg191.2 KB · Views: 0
 -
 d896066e9a146bc54f3705e4ed8cfa3c.jpg125.9 KB · Views: 0
 -
 cb2a3f0fd4f4bd33d201b016d42c74d5.jpg124.9 KB · Views: 0
 -
 c3de8ab944a61044efbb6b54dbc6df9b.jpg125.8 KB · Views: 0
 -
 dfddddd609a2140a4a422d9f6a51c178.jpg136.7 KB · Views: 0
 -
 01607d58165da2149dca26e35124b186.jpg116.5 KB · Views: 2
 -
 ca6269ce8eb7c79d4af28c498c4d327a.jpg97 KB · Views: 5
 -
 622003cf98ff4a46679b58aa9590b682.jpg136.2 KB · Views: 11
thundermug
Well-known member
Thanks Bubinga. I refinished this box a couple months ago. It was handmade from a variety of wood species. A very well-crafted box. I can't find any before pictures of it.
https://scontent-ort2-1.**.fbcdn.net/v/t1.0-9/42966997_978589841772_4126407567846932480_o.jpg?_nc_cat=108&oh=be573d48456d0a9b21acb2e11ac00578&oe=5C52BE00
https://scontent-ort2-1.**.fbcdn.net/v/t1.0-9/42992887_978589806842_5643521490038030336_n.jpg?_nc_cat=111&oh=8486c76137ced506a290885905a7d035&oe=5C56D314
I am planning a project with my son to build him a simple box. I will teach him how to hand-cut finger joints.
When I got this table/stand it was covered in layers of paint, rust, and pine tar. It was made in a local shop. 3/16" riveted steel and 1 1/4" solid wood panels. Weights about 90 pounds. I imagine it was used as a vertical lathe stand, or something similar. The feet are cast steel. Not sure what the panels are made of. Pine tar is not easy to remove.
The top has a 1" lip. I need to make a solid wood top to fit inside. Currently used to hold my beer and chips.
https://scontent-ort2-1.**.fbcdn.net/v/t1.0-9/42982661_978589861732_168572325292146688_o.jpg?_nc_cat=106&oh=646a080f37c8a5fff2a99d99ec97e93f&oe=5C173644
Loose Ctrl
Well-known member
Both of those are cool. I'm a fan of dovetail and the various finger joinery.Thanks Bubinga. I refinished this box a couple months ago. It was handmade from a variety of wood species. A very well-crafted box. I can't find any before pictures of it.
https://scontent-ort2-1.**.fbcdn.net/v/t1.0-9/42966997_978589841772_4126407567846932480_o.jpg?_nc_cat=108&oh=be573d48456d0a9b21acb2e11ac00578&oe=5C52BE00
https://scontent-ort2-1.**.fbcdn.net/v/t1.0-9/42992887_978589806842_5643521490038030336_n.jpg?_nc_cat=111&oh=8486c76137ced506a290885905a7d035&oe=5C56D314
I am planning a project with my son to build him a simple box. I will teach him how to hand-cut finger joints.
When I got this table/stand it was covered in layers of paint, rust, and pine tar. It was made in a local shop. 3/16" riveted steel and 1 1/4" solid wood panels. Weights about 90 pounds. I imagine it was used as a vertical lathe stand, or something similar. The feet are cast steel. Not sure what the panels are made of. Pine tar is not easy to remove.
The top has a 1" lip. I need to make a solid wood top to fit inside. Currently used to hold my beer and chips.
https://scontent-ort2-1.**.fbcdn.net/v/t1.0-9/42982661_978589861732_168572325292146688_o.jpg?_nc_cat=106&oh=646a080f37c8a5fff2a99d99ec97e93f&oe=5C173644
What did you use to remove pine tar? I've been told it can be softened a good deal with Pinesol and the like with actual pine oil in it. A triangle scraper pulls it off, I assume the pine oil makes it easier to remove.
thundermug
Well-known member
Loose Ctrl: For the pine tar I scraped off as much as I could and then started using rubbing alcohol. I alternated between alcohol and sanding for two or three weeks until it stopped weeping out of the wood. Between sessions I used paper towels to draw out as much tar as possible. It was a long process. The surface is incredibly smooth.
Shiftless
Well-known member
Loose Ctrl: For the pine tar I scraped off as much as I could and then started using rubbing alcohol. I alternated between alcohol and sanding for two or three weeks until it stopped weeping out of the wood. Between sessions I used paper towels to draw out as much tar as possible. It was a long process. The surface is incredibly smooth.
Nice work!
I have removed pine tar with turpentine. Try that the next time!
One problem with rubbing alcohol is that it is 30% water unless you get the concentrated stuff which is only 9% water
Last edited:
Loose Ctrl
Well-known member
Loose Ctrl: For the pine tar I scraped off as much as I could and then started using rubbing alcohol. I alternated between alcohol and sanding for two or three weeks until it stopped weeping out of the wood. Between sessions I used paper towels to draw out as much tar as possible. It was a long process. The surface is incredibly smooth.
gman007
Well-known member
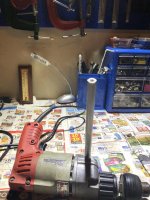
Well I am not sure if Milwaukee 38 Hammer Drill 5392-1 (made in USA) which is only partly metallic (Aluminum) qualifies to be posted on this thread or not but for whatever it is worth here it is.
Recently I bought two US made hand drills (Milwaukee 38 Hammer Drill 5392-1 and Millers Falls Electric Drill Model B 260A aluminum body) for grand total of $10.
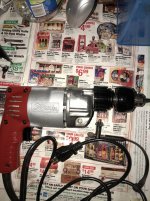
The status of internal wiring insulation as well as cords for both was a bit of concern (as an example see first photo). So I changed the the internal wires as well as the extension cords
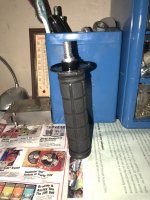
The second photo shows the Milwaukee after rewiring (but before full restoration). Since the side handle for the Milwaukee was missing I made an Aluminium (threaded) rod which I planned to use to build a side handle with (see last three photos).
The 3rd photo shows the Milwaukee after publishing and painting.
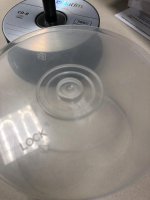
I used the aluminium rod (after cutting it to length) in conjunction with a $2 bicycle handle grip to make the side handle. Since the original side handle had a guard, I used to center of an old blank DVD case to make a similar guard.
Recently I bought two US made hand drills (Milwaukee 38 Hammer Drill 5392-1 and Millers Falls Electric Drill Model B 260A aluminum body) for grand total of $10.
The status of internal wiring insulation as well as cords for both was a bit of concern (as an example see first photo). So I changed the the internal wires as well as the extension cords
The second photo shows the Milwaukee after rewiring (but before full restoration). Since the side handle for the Milwaukee was missing I made an Aluminium (threaded) rod which I planned to use to build a side handle with (see last three photos).
The 3rd photo shows the Milwaukee after publishing and painting.
I used the aluminium rod (after cutting it to length) in conjunction with a $2 bicycle handle grip to make the side handle. Since the original side handle had a guard, I used to center of an old blank DVD case to make a similar guard.
Attachments
-
 Milwaukee 38 Hammer Drill 5392-1 before IMG_3217.jpg146.5 KB · Views: 246
 -
 Milwaukee 38 Hammer Drill 5392-1 before IMG_3227.jpg121.6 KB · Views: 256
 -
 Milwaukee 38 Hammer Drill 5392-1 IMG_3319.jpg149.6 KB · Views: 295
 -
 dvd case cover IMG_3353.jpg50.2 KB · Views: 253
 -
 Milwaukee 38 Hammer Drill side handle IMG_3343.jpg115.9 KB · Views: 289
 -
 Milwaukee 38 Hammer Drill side handleIMG_3350.jpg80.6 KB · Views: 324
Last edited:
bubinga
Well-known member
both very unique !!Thanks Bubinga. I refinished this box a couple months ago. It was handmade from a variety of wood species. A very well-crafted box. I can't find any before pictures of it.
https://scontent-ort2-1.**.fbcdn.net/v/t1.0-9/42966997_978589841772_4126407567846932480_o.jpg?_nc_cat=108&oh=be573d48456d0a9b21acb2e11ac00578&oe=5C52BE00
https://scontent-ort2-1.**.fbcdn.net/v/t1.0-9/42992887_978589806842_5643521490038030336_n.jpg?_nc_cat=111&oh=8486c76137ced506a290885905a7d035&oe=5C56D314
I am planning a project with my son to build him a simple box. I will teach him how to hand-cut finger joints.
When I got this table/stand it was covered in layers of paint, rust, and pine tar. It was made in a local shop. 3/16" riveted steel and 1 1/4" solid wood panels. Weights about 90 pounds. I imagine it was used as a vertical lathe stand, or something similar. The feet are cast steel. Not sure what the panels are made of. Pine tar is not easy to remove.
The top has a 1" lip. I need to make a solid wood top to fit inside. Currently used to hold my beer and chips.
https://scontent-ort2-1.**.fbcdn.net/v/t1.0-9/42982661_978589861732_168572325292146688_o.jpg?_nc_cat=106&oh=646a080f37c8a5fff2a99d99ec97e93f&oe=5C173644
don long
Well-known member
Well I am not sure if Milwaukee 38 Hammer Drill 5392-1 (made in USA) which is only partly metallic (Aluminum) qualifies to be posted on this thread or not but for whatever it is worth here it is.
Recently I bought two US made hand drills (Milwaukee 38 Hammer Drill 5392-1 and Millers Falls Electric Drill Model B 260A aluminum body) for grand total of $10.
The status of internal wiring insulation as well as cords for both was a bit of concern (as an example see first photo). So I changed the the internal wires as well as the extension cords
The second photo shows the Milwaukee after rewiring (but before full restoration). Since the sidle handle for the Milwaukee was missing I made an Aluminium (threaded) rod which I planned to use to build a side handle with (see last three photos).
The 3rd photo shows the Milwaukee after publishing and painting.
I used the aluminium rod (after cutting it to length) in conjunction with a $2 bicycle handle grip to make the side handle. Since the original side handle had a guard, I used to center of an old blank DVD case to make a similar guard.
Very clever building the handle for your new drill it looks great
gman007
Well-known member
Very clever building the handle for your new drill it looks great
Thanks Don.