jamesanderson
Member
- Joined
- Jan 2, 2016
- Messages
- 11
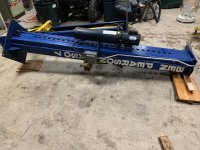
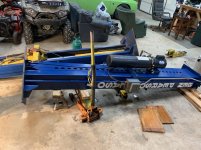
I just finished up installing a Bendpak 2 post asymmetrical lift (XP10 model) and I thought i would post a few things I learned from the exercise for the benefit of anyone else contemplating the same.
Overall I have to say I found it to be a challenging - but quite satisfying project. It’s quite fun to install something quite so big and physical oneself.
I reckon it took me about three full work days to do - but not all in one stretch so hard to estimate.
Tools I strongly recommend getting:
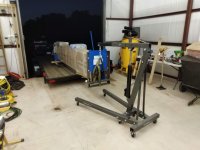
1). An engine lift. I got the 2 tonne item from Harbor Freight that did the trick really well. Unless you have a forklift or a team of four people I dont know how you’d do without the engine lift. It’s useful many times in the project.
2). An SDS Plus hammer drill. I tried drilling the holes with a cheaper hammer drill and it was essentially impossible. I bought a recon Makita unit on CPO tools and a Bosch drill bit and the holes took about a minute each.
3). A sturdy step ladder - ideally two. You spend a lot of time up and down to the gantry level - and you want to feel safe - the sturdiness of the step ladder makes all the difference.
Tips and tricks I figured out:
1). Keeping the equalizer cables in place when you raise the columns is really hard - and reinstalling them when they fall out looks very tricky. I ended up tying the cable to its runner with strong twine - which stopped it falling down into the runner when the “button” inevitably fell out of where it is supposed to sit. This saved a lot of time and frustration.
2). The wiring diagrams in the Bendpak manual are not intuitive at all. The sequence is (a). Install the micro switch and attach the black wire to it. I was doing single phase so only used two wires out of four. Write down which wires you attach to which connectors on the micro switch - you wont remember which you did by the time you get to wire everything up. (B). Once the whole lift is assembled put the black cable down the power side post as per instructions (c). Run the power to the unit. Bring the power supply down the power side post to the power unit. (D). Connect the power unit up to the power supply pigtails and connect in the cable to the micro switch.
The thing that confused me is that the power comes into the main switch - and then essentially loops through the microswitch and comes back down to the power unit. If the m/s is tripped it breaks the circuit. The wiring diagrams are correct - just not very intuitive (to me at least...)
3). The hydraulic “******” that connects into the bottom of the cylinder has to point straight out the back of each post - or else the runner comes down right on it - which does not look good for longevity. I found that these “naturally” installed at right angles to the post so i needed to move them.
4). The Bendpak instructions that came with my unit were materially better than the ones they had online - which I only figured out halfway through the job.
5). There’s a couple of good YouTube videos of people doing full installs. You wont follow exactly what they do - but it gave me confidence to see the process end to end - and put the directions in the manual in better context.
6). You will need a helper at a minimum for raising the columns and installing the gantry. The latter is a 2 person job for sure. Other than that solo worked fine for me.
So - hope this is helpful to someone out there - now I’m just excited as heck to start using my brand new toy...
Overall I have to say I found it to be a challenging - but quite satisfying project. It’s quite fun to install something quite so big and physical oneself.
I reckon it took me about three full work days to do - but not all in one stretch so hard to estimate.
Tools I strongly recommend getting:
1). An engine lift. I got the 2 tonne item from Harbor Freight that did the trick really well. Unless you have a forklift or a team of four people I dont know how you’d do without the engine lift. It’s useful many times in the project.
2). An SDS Plus hammer drill. I tried drilling the holes with a cheaper hammer drill and it was essentially impossible. I bought a recon Makita unit on CPO tools and a Bosch drill bit and the holes took about a minute each.
3). A sturdy step ladder - ideally two. You spend a lot of time up and down to the gantry level - and you want to feel safe - the sturdiness of the step ladder makes all the difference.
Tips and tricks I figured out:
1). Keeping the equalizer cables in place when you raise the columns is really hard - and reinstalling them when they fall out looks very tricky. I ended up tying the cable to its runner with strong twine - which stopped it falling down into the runner when the “button” inevitably fell out of where it is supposed to sit. This saved a lot of time and frustration.
2). The wiring diagrams in the Bendpak manual are not intuitive at all. The sequence is (a). Install the micro switch and attach the black wire to it. I was doing single phase so only used two wires out of four. Write down which wires you attach to which connectors on the micro switch - you wont remember which you did by the time you get to wire everything up. (B). Once the whole lift is assembled put the black cable down the power side post as per instructions (c). Run the power to the unit. Bring the power supply down the power side post to the power unit. (D). Connect the power unit up to the power supply pigtails and connect in the cable to the micro switch.
The thing that confused me is that the power comes into the main switch - and then essentially loops through the microswitch and comes back down to the power unit. If the m/s is tripped it breaks the circuit. The wiring diagrams are correct - just not very intuitive (to me at least...)
3). The hydraulic “******” that connects into the bottom of the cylinder has to point straight out the back of each post - or else the runner comes down right on it - which does not look good for longevity. I found that these “naturally” installed at right angles to the post so i needed to move them.
4). The Bendpak instructions that came with my unit were materially better than the ones they had online - which I only figured out halfway through the job.
5). There’s a couple of good YouTube videos of people doing full installs. You wont follow exactly what they do - but it gave me confidence to see the process end to end - and put the directions in the manual in better context.
6). You will need a helper at a minimum for raising the columns and installing the gantry. The latter is a 2 person job for sure. Other than that solo worked fine for me.
So - hope this is helpful to someone out there - now I’m just excited as heck to start using my brand new toy...