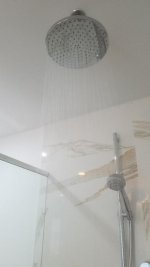
We installed Hans Grohe showerheads and valves in the 4 baths we remodeled/built when we re-did the house for going into retirement.
One of the wide showerheads in an en suite bathroom had started to spray over the glass shower surround. The head is the type which has soft rubber nibs sticking through a chrome metal showerhead, to clean the nibs, you're supposed to just rub the nibs, and any calcification is supposed to be broken-up, and flushed out. Not always! I had noticed that some of the nibs were totally-blocked with accretions of calcium, which did not come-clean and did not become unobstructed by 'rubbing the nibs.'
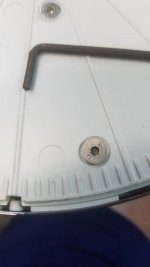
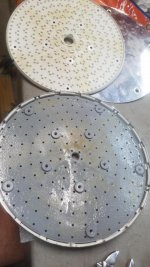
I disassembled the showerhead, removed the hard-plastic disc beneath the chrome sheetmetal top, by prying with small flat bladed screwdrivers on the about 1-1/2" segments that clipped-over the edge of the hard plastic disc (pic #5). The segments get pried outwards to release the hard plastic disc. Then you can clean the round rubber sheet underneath, which is the sheet of nibs. I used a dental pick to poke-through all the holes, starting on the outside ring, and working towards the center. Then I used an air chuck with a rubber tip to blow-out all the nibs (pic #4), and by holding the rubber sheet up to a bright light, I confirmed that the passageways of the nibs were clean and clear. I had to re-do several, to ensure all were clean.
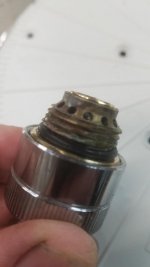
The ****** which has the ball swivel for the showerhead also has a brass threaded fitting (pic#6) in the chrome ring which screws onto the showerhead, to mount to the ceiling water supply pipe. Inside the ****** plumbing piece is a press-fit volume reducer. I removed this for more volume to the shower, there is a 3/4" hot water supply to the bathroom, and we have a Rinnai tankless water heater.
The hard plastic large disc gets re-installed, make sure the 1-1/2" plastic perimeter clips all are clipped-over the edge of the hard plastic large disc. Be sure to line-up the stainless flathead machine screw holes for each piece in succession (pic #7). Once the hard plastic large disc is secured, replace the flat sheet of chrome metal which faces the ceiling, and carefully-tighten the allen screws. The inner circle of allen screws hold the hard plastic large disc, the round rubber sheet of nibs, and the showerhead face you see from below, together. The outer ring of allen screws is used to attach the flat sheet of chrome metal to the assembled showerhead.
The last piece in the showerhead fixture to attach to the ceiling water supply male-threaded pipe, is a small plastic screen, which presses in-place, and is the catch-piece for any debris in the water supply line. I replaced this, because it's easier to remove this and to clean it than it is to go through the showerhead total disassembly like I just did.
The volume of the showerhead is greater because of the removal of the reducer, and the cleaning of all the rubber nibs. The water is coming straight-down now, and I don't have any rogue streams from dirty, calcified nibs, spraying-over the shower glass enclosure.