You are using an out of date browser. It may not display this or other websites correctly.
You should upgrade or use an alternative browser.
You should upgrade or use an alternative browser.
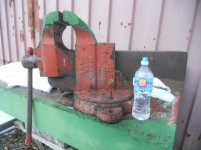
Big vise build
- Thread starter royce
- Start date
mv213
Well-known member
Wow dude. I think your fish stove was the coolest thing that I've seen on this forum and you've just about topped it. Good work, can't wait to see it finished!
I agree, you’ve surpassed even your own great work, and that aint easy! Thanks for sharing and inspiring us weekend “hackers”.
akalian
Well-known member
I don't know if you plan on painting it or not.
But I think it would look just fine with a clear coat of lacquer, celebrating the craftsmanship and your attention to detail, instead of covering it up with paint.
If anybody comments about the lack of paint, just tell them you will be glad to make one for them painted any color they choose, if they are willing to pay for it.
.
Royce, this is one of the best functional pieces of art and craftsmanship I have ever seen! I am curious about the conversation with Kevin Scott about the jaws, was it close to April Fool's day and he just wouldn't believe you needed 13" jaws LOL?
I don't know if you plan on painting it or not.
But I think it would look just fine with a clear coat of lacquer, celebrating the craftsmanship and your attention to detail, instead of covering it up with paint.
If anybody comments about the lack of paint, just tell them you will be glad to make one for them painted any color they choose, if they are willing to pay for it.
.
Yes, I'm planning to paint it Alyeska green.
There is a test sample in the album.
I do like a clear oil finish on steel, but this project with the exposed bronze and brass,I'm thinking will look good with the green paint.
It is aways out, but we"ll see when the time comes.
Royce, this is one of the best functional pieces of art and craftsmanship I have ever seen! I am curious about the conversation with Kevin Scott about the jaws, was it close to April Fool's day and he just wouldn't believe you needed 13" jaws LOL?
Thanks much Bluebolt,
Kevin may have said pardon me once!!!
With his passion of vises and building stuff, I'm having a grand time working with him on this, long distance that is.
Royce
BMR24
Well-known member
Was just at Kevin's this weekend and he showed me some drawings as well as the blanks for your jaws, very impressive
ilovevocs
Well-known member
Nice work Royce!!
I’m told Women love men with big tools.
I’m told Women love men with big tools.
1969
Well-known member
Awesome........
pamike
Well-known member
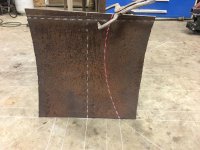
Can you explain what you were doing with the curved piece of steel and the red laser level. Were you using the level to draw a straight line on the curve???
Can you explain what you were doing with the curved piece of steel and the red laser level. Were you using the level to draw a straight line on the curve???
Yes, it was set up to layout the miter cut on the corner of the skirt.
First I laid out the top and bottom rectangles on the floor and 45 degree lines coming off of each corner.
Then set the panel on the bottom lay line and clamped a bar to the panel holding the top vertically over the top lay line.
Then set the laser on the 45 degree line and marked the laser cast line with soapstone.
A pattern for this cut could be developed, but this method is faster and makes up for any out of round in the pipe, making it fit up better and more foolproof
I hope that makes sense.
Here is a pic that may help see it.
Royce
Attachments
Last edited:
jack stand
Well-known member
Can you explain what you were doing with the curved piece of steel and the red laser level. Were you using the level to draw a straight line on the curve???
Are there pics somewhere else? I only see the 2 on post #1.
View media item 82032
View media item 82031
These pictures show me the near unique mind of the builder. To figure out and then layout on the floor the design that rises above in 3D using the laser to see the cut line. Pure genius.
lg
no neat sig line
View media item 82031
These pictures show me the near unique mind of the builder. To figure out and then layout on the floor the design that rises above in 3D using the laser to see the cut line. Pure genius.
lg
no neat sig line
These pictures show me the near unique mind of the builder. To figure out and then layout on the floor the design that rises above in 3D using the laser to see the cut line. Pure genius.
lg
no neat sig line
Those are some mighty kind words Larry, thank you.
One of the neatest gadgets to come out in my career was the laser plumb bob.
I would hate to guess how many man days I've waisted hanging and waiting for a plumb bob to settle.
Another is the laser line level, it opened up some way crazy ways of laying things out, as shown in the pics.
I would not be without one, myself.
Royce
jack stand
Well-known member
These pictures show me the near unique mind of the builder. To figure out and then layout on the floor the design that rises above in 3D using the laser to see the cut line. Pure genius.
lg
no neat sig line
Yes!!! I would have just wasted a bunch of steel, gas & grinding wheels.

jack stand
Well-known member
Here's a link to his album.
https://www.garagejournal.com/forum/album.php?albumid=6243
Check out the base and the column that supports the vise.
A thing of beauty.
https://www.garagejournal.com/forum/album.php?albumid=6243&pictureid=82082
.
Thanks bro!
jack stand
Well-known member
Wow Royce, (just checked out your album) if a picture is worth 1000 words. I'd need quite a few pictures to praise your big vice!
Wow Royce, (just checked out your album) if a picture is worth 1000 words. I'd need quite a few pictures to praise your big vice!
Thank you kindly jack,
I carved a new spindle end mock up today and got the vise body primed.
I'm going to slip out after dinner and get a coat of finish on it.
I added a few pics to the album.
Royce
KMScott
Well-known member
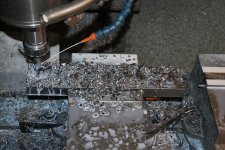
I offered my help to Royce and just so excited to see this project start to come together. Royce is truly a great craftsman and has great vision. He has been sending me material for several weeks and this weekend I had a chance to work on the Jaws and Jaw Support that Royce will weld in place. The jaws are being made from A2 Tool Steel and are 1"x 2-1/2 x 13" with five 1/2:13 socket head cap screws to hold them in place. Royce is not building a show vise here, this vise will handle anything that fits in it's massive jaws with all the strength designed into it. Later this week I will serrate the jaws after I build a fixture for it. My Haas CNC did not have enough power to tap the 1/2:13 threads so I'll hand tap those.
I'll be adding more of my machine work as I go. The 1-3/4 Spindle Thread will show up soon and I plan on building the Meatball and attaching it to the Spindle. Did you catch the large Bronze round in the first pic. That will be fun to carve.
I'll be adding more of my machine work as I go. The 1-3/4 Spindle Thread will show up soon and I plan on building the Meatball and attaching it to the Spindle. Did you catch the large Bronze round in the first pic. That will be fun to carve.
Attachments
-
 13-inch Vise 4-2018 (2).jpg122.8 KB · Views: 492
 -
 13-inch Vise 4-2018 (7).jpg153.1 KB · Views: 422
 -
 13-inch Vise 4-2018 (9).jpg163.3 KB · Views: 418
 -
 13-inch Vise 4-2018 (17).jpg158.6 KB · Views: 389
 -
 13-inch Vise 4-2018 (21).jpg149.1 KB · Views: 384
 -
 13-inch Vise 4-2018 (19).jpg119.7 KB · Views: 391
 -
 13-inch Vise 4-2018 (18).jpg132.4 KB · Views: 404
Kevin.
Seeing these pics is just too cool.
I can't hardly wait to see how you carve the meatball and fit it to the spindle.
Thanks for posting them.
This project would not be happening without Kevin's help.
I don't have the skill or ability to perform the tasks that Kevin is doing.
His advise on this project has been essential, as well.
My hat is off to him.
I started building the spindle nut retainer today and added a few pics to the album.
Royce
KMScott
Well-known member
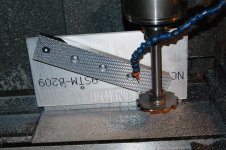
Royce, got your 13" jaws serrated today, used a 4" custom ground carbide cutter. Thought I would share pic's. Going to Heat-Treat tomorrow. The A2 Tool Steel will be treated to 54/56 Rockwell.
I had to build a fixture to hold these 10lb jaws. I was happy how they turned out.
The pic of the jaw lot shows a Wilton 1780 jaw ( 5/8 x 1 x 8") and how it is dwarfed by your jaws.
I had to build a fixture to hold these 10lb jaws. I was happy how they turned out.
The pic of the jaw lot shows a Wilton 1780 jaw ( 5/8 x 1 x 8") and how it is dwarfed by your jaws.
Attachments


pamike
Well-known member
That's awesome! Using resources half way across the country to help each other out.
How many jaws are there? I see a bunch of pieces in that bin.
How many jaws are there? I see a bunch of pieces in that bin.
KMScott
Well-known member
I have 60 pairs that are all different sizes and fit different vises going to Heat Treating.
Royce, got your 13" jaws serrated today, used a 4" custom ground carbide cutter. Thought I would share pic's. Going to Heat-Treat tomorrow. The A2 Tool Steel will be treated to 54/56 Rockwell.
I had to build a fixture to hold these 10lb jaws. I was happy how they turned out.
The pic of the jaw lot shows a Wilton 1780 jaw ( 5/8 x 1 x 8") and how it is dwarfed by your jaws.
The jaws look great and the pic with the other jaws really puts the size in perspective.
Thanks for the pics.
I took delivery on the bronze spindle nut today and can finish the retainer now.
Royce
Miss the Pontiacs
Well-known member
All I can say is WOW! I checked out your albums, should have done that long ago. When a fellow like Larry G makes a comment it is duly noted. I showed my wife some of your pics, she marveled at the Xmas gifts and the Fish Stove. When I showed her the BIG VICE she wondered what you were going to put in it. I told her you crushed Volkswagens.
Again good job
Again good job
pamike
Well-known member
Royce,
What's your background in metal fabrication? U work in the oil fields up there?
What's your background in metal fabrication? U work in the oil fields up there?
Royce,
What's your background in metal fabrication? U work in the oil fields up there?
Started out in the timber industry and moved into the construction and mining industry,then on to pipelining,process piping and utilities.
I did work Prudhoe Bay in The mid 80s to early 90s
Royce
AK,
I’ll let her go for the low low price of $1300.00 per inch!!!!
Royce
Plus "Shipping and Handling" of course.
jack stand
Well-known member
In all seriousness, what are you going to do with this behemoth? To me it's a functional piece of art (and just plain cool) that should be on display, dressed only in a clear coat.
Your vice dwarf's my Parker 978 and I find it to big to be practical in the shop. Now if I repaired locomotive's............
Your vice dwarf's my Parker 978 and I find it to big to be practical in the shop. Now if I repaired locomotive's............