To avoid these ads, REGISTER NOW!

Blacksmithing Projects Journal

bacpacker

Well-known member
Joined
Sep 21, 2011
Messages
520
Location
East Tn
Great thread you have here. I have enjoyed reading thru the processes you use to make your items. I am in the process of gathering a decent set of tools to start my own blacksmith project. I am looking forward to seeing your starter list to give me a good idea of what all I need to be looking for.

I've been looking for an old coal forge, but the prices folks want for them are close to the propane forge you showed. and I think it would fit my needs much better besides.

The knife and tomahawk projects really caught my eye. I'm looking forward to seeing more of your work down the road.
 
To avoid these ads, REGISTER NOW!
OP
D

DoghouseForge

Well-known member
Joined
May 11, 2013
Messages
374
Location
Lakeland, Fl
Ok ,

Heres the tool list I promised:

I layed it out kinda like the Big Home improvement stores stock their products ...

Good.... will get the job done.

Better.... will do the job and last a while with correct care

Best..... if you have the funding$ by this, take care of it, and you will never need another one.

So this post is an opinion. It's based on my experiences with different brands and products. I have in no way used or seen every different version of each product out there so this list is a reference not a definitive brand requirement.

Forges -

I believe that for a person beginning with the forging arts a gas forge is the best way to go. Considering cost, longevity, space, and fuel resource availability you cant beat a gas forge.
Coal is nasty, and Coke forges will set you back $800 to $1500 depending on if you get an electric blower or not. plus, you need a place to burn coal/coke and your garage is not gonna work for that... sorry

NC Tool and Forgemaster make excellent gas forges. Forgemaster's are overpriced and not worth the price difference in my opinion. So for this list the NC tool copany forges have been selected.

Good -

Whisper Deluxe - basic gas forge, sidepass throughs for working longer stock, but no insulated door. This results in heat loss, basicly no forge welding ability, and additional fuel consumption

deluxe link- http://www.shop.nctoolco.com/product.sc?productId=1160&categoryId=121


Better -

Whisper Momma - great forge, insulated door with pass throughs, reaches welding temp, and is very efficient.

Momma link- http://www.shop.nctoolco.com/product.sc?productId=1164&categoryId=121


Best -

Low Boy - This is the best forge for the money! large/deep fire box, pass throughs, reached welding temp and beyond! is prefered by damascus metal workers. efficient and quick !

Low Boy link - http://www.shop.nctoolco.com/product.sc?productId=1165&categoryId=121


Bigger project smiths option -

A taller version of the low boy, so does give added ability for size of projects but sacrifices speed and efficiency...

Daddy link - http://www.shop.nctoolco.com/product.sc?productId=1167&categoryId=121


next is Anvils....
 
Last edited:
OP
D

DoghouseForge

Well-known member
Joined
May 11, 2013
Messages
374
Location
Lakeland, Fl
Anvils

An anvil is kinda like a mans dog. You cant tell someone that you will!!! like "this one dog over the next". Instead we select the dog for what our needs and expectations are for it. You wouldnt herd cattle with a Yorkie and I wouldnt expect a lap dog to herd horses... SO if your planning on making pocket knives then a smaller 70lb anvil might be all you need, but if your planning on making sizeable projects then you will regret not spending the money on a sizable anvil.

My truck swing arm has a 100lb emerson bolted to it, and its the nicest anvil/tool I have ever owned. Its functionaly perfect for my skill level and daily work needs. The horns radious is beautiful and its so solid it feels like an anvil twice its size. On the other hand, my shop anvil is a 275lb 100yr old Peter Wright. Its huge, but course. The horn isnt perfect, the side corners arnt exact, it slopes a little bit etc. etc. etc... but when you need to beat some metal its beautiful. Its the linebacker of anvils, crude but solid as a rock.

My point is that you need to pick an anvil that will suit your style and future project expectations.

There is no Good, better, best for this.. if its the anvil for you , its the anvil for you.

some recommendations -

Emerson 100lb tradition.

Plain and Simple!!! no cheating with this thing! learn to use your horn, and learn to use the face because there are no handicaps built into it. This anvil will make you learn to forge, you dont have a choice...

linked below is the 100lb but they have several sizes.

Emerson link - http://emersonhorseshoe.net/anvils/28-100-lb-traditional.html


Scott Anvil Company -

This is a fairly new company and because of that you can still get their anvils at a very decent price. In 5 years this will be a $900-$1000 anvil. It's a great multi-purpose anvil. The dovetail is excellent for blacksmithing, and its specially designed round horn is exceptional. Instead of having the horn from a 100lb anvil, the Scott company copied the horn off a 250lb Kolswa ($2500 anvil) . Its almost exact in size so you get the big anvil features but in a moveable 100lb package.

scott link - http://www.stockhoffsonline.com/acatalog/Scott_Anvil.html


Going Used -

When buying a used ebay, craigslist, or other sites anvils for sale... be picky!!! and demand lots of pictures. The corners/edges need to be clean and the face and horn need to have minimal to no chipping. When you look on ebay dont choke at the prices...most of those nice anvils are rare 100+year old anvils and are being purchased as collectors items. So be thrifty and diligent so you can find a good deal. NO cracks, NO big chips, and NO freshly painted used anvils. You cant see hirline cracks if the paint fills them in.

Peter Wright shop anvil - 275lb - used value in this condition is $500 - $700


next is hammers and tongs...
 
Last edited:
OP
D

DoghouseForge

Well-known member
Joined
May 11, 2013
Messages
374
Location
Lakeland, Fl
Hammers

Your hammer is your friend so pick it wisely. There are hammers ranging from $30 - $250, and it just depends on what your expectations are. I have both a $60 rounding hammer and a $195 rounding hammer. I used them for different things. The expensive one is balanced perfectly, and its strike force moves twice the steel as the cheap hammer, but the cheap hammer is cheap and I dont cry everytime I miss the steel and chip the face...

If you decide to pursue the hobby you will need to buy a "few" other hammers to do different techniques with. Crosspien, Ball pien, and a small sledge will prove usefull. For this list though Im just focusing on the rounding hammer because its you main hammer %90 of the time.


Good -

Dimond tools 2 lb rounding hammer

Basic design, I own one...it was my starter hammer and I have nothing bad to say about it other than it feels heavy and bulky...

Dimaond tools hammer link - http://www.centaurforge.com/24-oz-Diamond-Rounding-Hammer/productinfo/60HAM/


Better -

NC Tool 2 lb rounding hammer - Good basic hammer with a slightly better balance than the diamond.


NC tools hammer link - http://www.nctoolco.com/cavalry_hammers.html


Best -

Jim Keith Tools -

The Cadillac of hammers. There are a few other guys that make hammers this good but I love Jim so he gets my money. Lives in Tucumcari, NM and is one of the greatest blacksmiths I know.

Jim Keith Tools link - http://jktoolscom.ipage.com/product_info.php?cPath=12_7&products_id=9

 
Last edited:
OP
D

DoghouseForge

Well-known member
Joined
May 11, 2013
Messages
374
Location
Lakeland, Fl
Tongs -

Tongs are an extension of your smart hand... metal moves because of the tongs placement of the steel on the anvil. The hammer hand is just for power. There are as many different types of tongs as there is metal sizes and shapes. For the basics you need flat stock tongs. I recommend 1/8", 1/4", 5/16", 3/8" and 1/2" as your basic set. If thats to many to get at once then get the sizes of the metal you plan to work with on your first few projects.

Tongs wear out...and need to be maintained. The better the tong the better the lifespan. Also, its nice to feel like your holding something with a solid tool and not a weak pair of sticks.

Good -

Diamond brand -

basic as it gets. They dont actually sell multiple sizes. Your just supposed to heat the opening and hammer fit it to the size stock yor working with...It will get the job done but definatly not ideal.

Dimond tongs link - http://www.anvilbrand.com/DIAMOND-FIRETONGS-15--P116.aspx


Better -

Mustad makes a good quality tool. All of there stuff is decent and is a definite indstry satndard for many of us. I learned with mustad tongs so there is no excuses...:lol:
My only complaint with them is the have a very blunt head so its difficult to scoop under things and I find myself constanly knocking things into the heart of the fire box...

Mustad link - http://www.anvilbrand.com/MUSTAD-516-TONGS--P423.aspx


Best -

Jim Keith tools

Sturdy, tough, well made, and my current tong of choice.


Jim Keith tools tong link - http://jktoolscom.ipage.com/product_info.php?cPath=12_8&products_id=14
 
Last edited:
OP
D

DoghouseForge

Well-known member
Joined
May 11, 2013
Messages
374
Location
Lakeland, Fl
Forge Stands, Shop Stands, and Anvil stands

Overlooked but important...

This is kinda what Garage journal is all about right... you can make these from just about anything as long as you think it through and use the right materials.

Forge stands - it needs to be sturdy and somewhat fireproof. I find angle and expanded metal can make a very cheap and nice forge stand. If you look back through the thread (in the tomahawk section) there are several photos of the forge stand in my shop. Be creative! I built mine wih a lower rack for my steel and tongs to rest on...

Shop Stands - a great idea for these is to buy the cheap $10 wood fold out T.V. trays. I get the black ones and paint the tops with Chalkboard paint. This way if I need to write down a measurment or an idea i can scribble it right on the table. Erase when done and start again......

Anvil Stands -

They make alot of different (expensive) metal stands. If your a good welder/fabricator a simple tripod with a good thick steel top will work. Be sure to mont rubber on the feet because its gonna ring super loud and you'll want all the help you can get.

Lots of people like to use tree stumps. This is a great idea if your shop has a dirt floor but if you have a solid surface you will never be able to cut the two sides level and it will wobble around and drive you nuts.

For people who are indoors a great solution is to build an "overlaped weighted base".

Its stagered 2x3"s or 2x4's on a plywood base, screwed together and built to the height needs of your personal preference. For most blacksmiths the correct height is when your arm is straight at your side with the hammer out 90deg from the body. The head should be sitting flat on the anvil face. In my opinion lower isnt a bad thing as it gives you more power but it is harder on your back , but higher is no good as every inch you go up is an inch less stroke to your hammer and that equals more work. This one was built for the 275lb Peter Wright I use as my stationary shop anvil.

Stagger the boards so you rotate the long and short side.
IMG_20130328_185324_zpsc36688ed.jpg


Fill with sand and pack it in tight(some guys water it so it compacts more, but 150lbs of sand is plenty for me wet or dry filled)
IMG_20130328_185330_zps01dc86bf.jpg


Put the cap boards on and make it look cool with some stain or paint or whatever. I did have a buddy build one out of some expensive hardwood and I felt bad because after a week of use it had burn marks all over it...
IMG_20130328_193835_zps859630c0.jpg


Cut some strapping and drill out holes for some lag bolts and cinch her down as tight as you can.
Your on your own for finding cool vintage signs to make it look awesome, sorry... :D
IMG_20130331_013116_zps90db6d0a.jpg


if you look in the background there is one that i built for the 100lb emerson under the forge stand. Its tapered to get narrower at the top for the smaller size of the other anvils base.

Anyway, just a cool, relaltivly cheap solution for hard surface shops. Its also will deaden the ring of the anvil almost all the way out. To take the last bit of edge off I use 3/4'' rubber mats under the forging area. Its handy for when you drop your steel or tools and its a little better on your body.


The only other things i can think of are the quench bucket, some files, and a good vice.

The bigger the bucket the longer your water will stay cool and if you can build one a pedal vice is nice for hot steel because the heat transfers into the vice from the steel and can get a little tricky to looseen with the hot handle...


Here is a list of resources that you can find all of these listed items and tons more. Some of the site offer free shipping on large orders so if your gonna commit on buying 600lbs of stuff, free shipping is a huge savings...

The last listing is for Pieh Tool Company. They specializ in blacksmith related tools and have the largest selection for this forums uses. A huge library or books and about every tong, hammer, and jig you could need...

centaur forge - www.centaurforge.com

stockoffs - http://www.stockhoffsonline.com/

anvil brand - http://www.anvilbrand.com/

nc tool - http://www.nctoolco.com/

pieh tool comp - http://www.piehtoolco.com/


I hope this helps!

I apologize for my spelling and grammer. Im horrible to begin with, but ive been getting worse the later it gets.

Please let me know if I forgot anything or if you have any questions. I will answer them to the best of my knowledge.

Thanks
JP
 
Last edited:

machine_punk

Well-known member
Joined
May 14, 2011
Messages
2,540
Location
Napa Valley, California
WELCOME to GJ! I appreciate you coming here to share your knowledge.

I think you will find this a great place to share what you do. I had a hard time 'finding my place' in several forums, until I came here and GJ welcomed me with open arms.

Like someone said before, "in your own thread, you can do just about anything you want." You have this one titled appropriately to cover just about anything you are working on or want to show us. Several folks have main threads like this, where they show whatever they are working on at the time.

Looking forward to seeing pics of whatever you want to show us! I appreciate you pointing out gas forges as an option. I'd like to get into a little blacksmithing...more for adding interest to some of my other projects, but never thought a coal forge would be easy to work into the garage. I could use a gas forge for hardening and annealing too...along with making and heating steel rivets.

Very cool. Welcome.

Kev
 
OP
D

DoghouseForge

Well-known member
Joined
May 11, 2013
Messages
374
Location
Lakeland, Fl
Finsihed another knife... #4 to be exact. :)

Getting better each time!. On this one I changed the tang/handle to have a higher cut where your finger would push up into the blade, and taperd the handle into the blade as well. It feels alot better, and I think Im gonna keep this change in the design.


The handle on this one is "Bloodwood" , sanded up to 2000grit and sealed with teak oil. I am in love with this wood! to bad the 2' strip in the pictures before cost $23.... the feel is so nice and the wieght on this one is balanced almost exactly where I want it. I used aluminium rod for this one for the pins and the colors just look awesome together!

Gonna make some smaller Paring Knives, and a Cleaver next. Hopefully in the next couple months I can develope a full set of kitchen knives all upcycled from the rasp!

thanks

JP
 
Last edited:

CARS

Well-known member
Joined
Jan 19, 2011
Messages
535
Location
New Ulm, MN
Thanks for all the info JP!

What's nice is you posted options along with real world opinions. Much appreciated.

You also wrote about the reality of this trade... it's going to cost $$$ to get into. Maybe that is why, unlike a car club, there is only a group or two in every state.

And for the record I think it was very well written. Good job and keep adding as you feel the need. If I had a vote, this thread would be a sticky!
 

bacpacker

Well-known member
Joined
Sep 21, 2011
Messages
520
Location
East Tn
Great write up for the starter selections. I appreceiate the options shown. A lot of times better and best is close to the same thing. nice to know the differences in them.
Thanks for the work.
 

BD1

Well-known member
Joined
Mar 18, 2007
Messages
4,602
Location
north side
Awesome presentation. You did really well. I sure hope that you type faster then me. [one finger].That would have taken me weeks ! I think you are now gonna have some followers.
I sent you a PM question, thanks for sharing . :thumbup:
 
OP
D

DoghouseForge

Well-known member
Joined
May 11, 2013
Messages
374
Location
Lakeland, Fl
The Pedal Vice

This is one of the most usefull tools you can have in a shop. Especially if your working with objects that are to hot to hold, you need both hands to weld, or you want to have 360deg mobility when filing or working an object.

Here are some pictures of the Pedal vice, and I will try to be a simple as possible in the description. Its not a a hard project if you can weld and have access to some basic metal working tools/supplies. I apologize for the lower picture quality. My wife took the good camera on her trip and I had to use my phone...


Pedal Vice:


So lets start at the bottom and work our way up... The pedal is pretty straight forward. It bolts in as a lever hinge and attaches to the bottom of the shaft. By depressing the pedal you push the shaft upwards...


On the other side of the base plate an attachment point and turnbuckle hold the bottom of the spring mechanism... the turnbuckle allows you to adjust the tension of the springs to your preferd strength.


About half way up the shaft another attachment point connects the top of the springs. These are garage door springs. This particular one is one spring bent in half to make it extra strong...With the attachment at this point when the pedal is free the shaft is pulled to its lower base ...closing the jaws at the top.


This is the catch assist mounted to the upper portion of the shaft. In this picture the pedal is free and the springs have pulled it to its lowest position...


When the pedal is depressed the lever acts to push up the shaft and your foot overpowers the springs. The catch assit hits the opening of the upper shaft and stops the shaft from opening any further than your preset amount. Its not totaly necessary but its nice to not bottom out the pedal every time you depress it, and it also keeps some tension on the springs which in turn keep it from popping loose if slacked...


The pedal is depressed, the shaft is pushed up overpowering the springs, and the catch has limited the jaws to opening to this amount...


By letting loose the pedal the springs draw the shaft back down to the lower attachment point and the force of the springs tension keeps your object squeezed between the jaws...


This vices jaws were made with the curved shape of a horseshoe in mind, but the size and shape of the jaws could be modified to meet whatever needs you would like.

So thats the pedal vice! Build one for yourself and free up those hands!


Thanks, if there are any questions please ask and I will try to answer them..

JP
 
Last edited:
OP
D

DoghouseForge

Well-known member
Joined
May 11, 2013
Messages
374
Location
Lakeland, Fl
Ok, so I finally have a little time to get this post together. I'm in the middle of one of the busiest three week pushes Ive ever attempted with my business. If I can hold out I'm looking at 19 of 21 days over 12 hours work... needles to say Im tired and having to work the horseshow this weekend didnt help..

Here is the continuance of the previously started post from last week or whenever it was...:dunno:


Paring Knives:

So im working on some smaller paring knives this weekend, a mini cleaver/chopping knife, and a cool cutting board...

Im attempting to establish two different styles of the smaller knives. One with more of a fillet knife blade and the other with a more traditional flat ground wide blade...

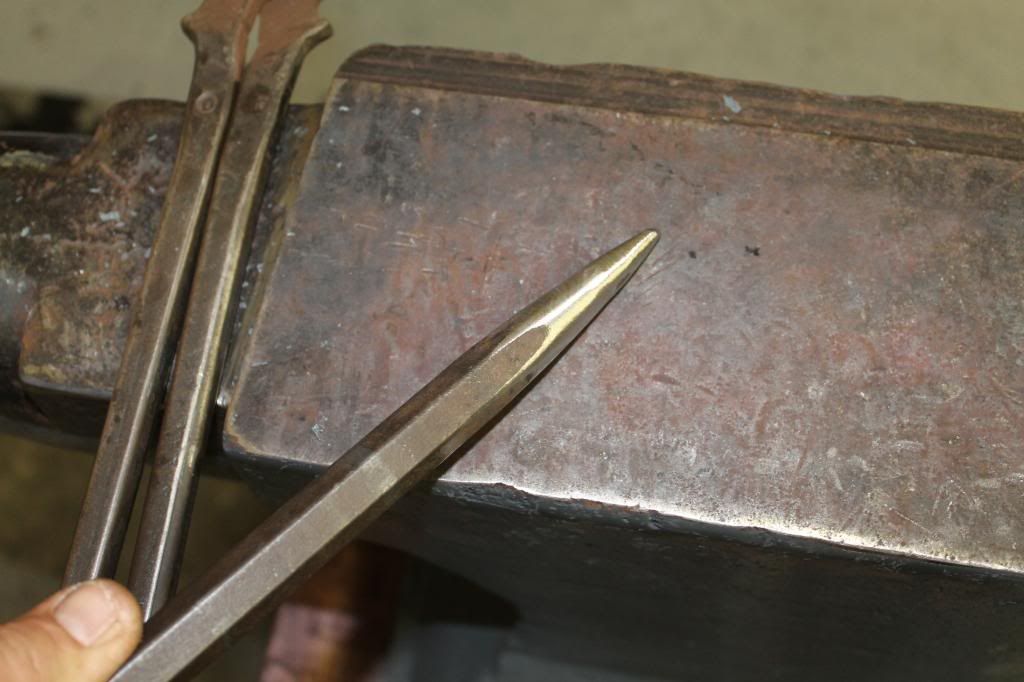
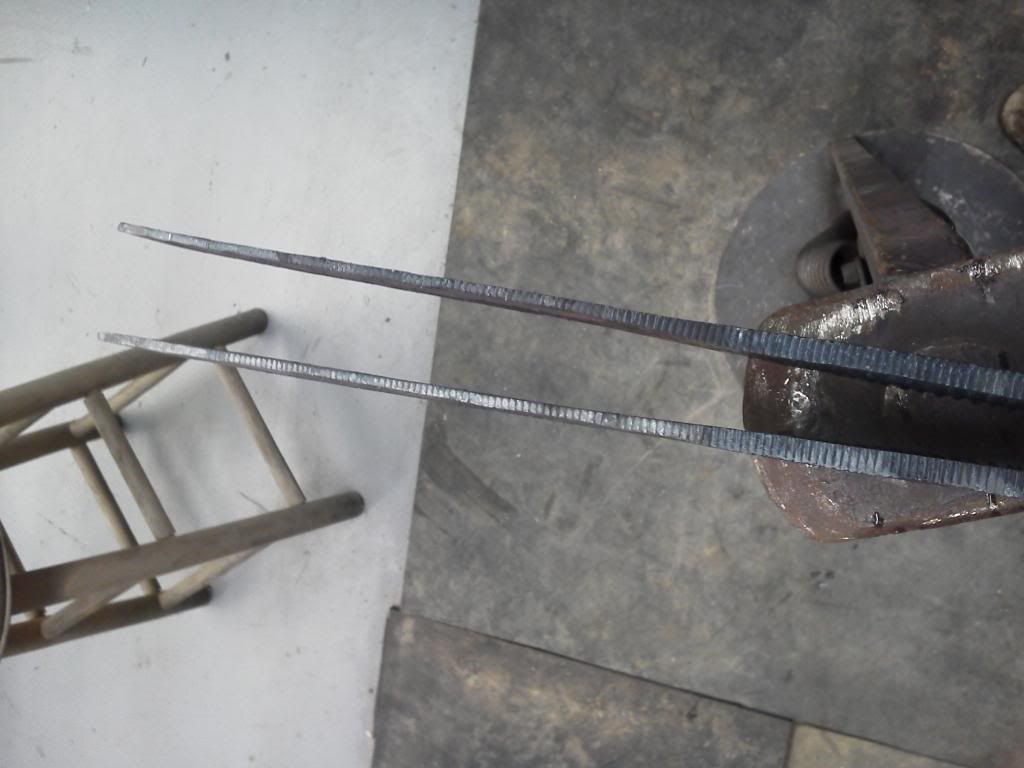
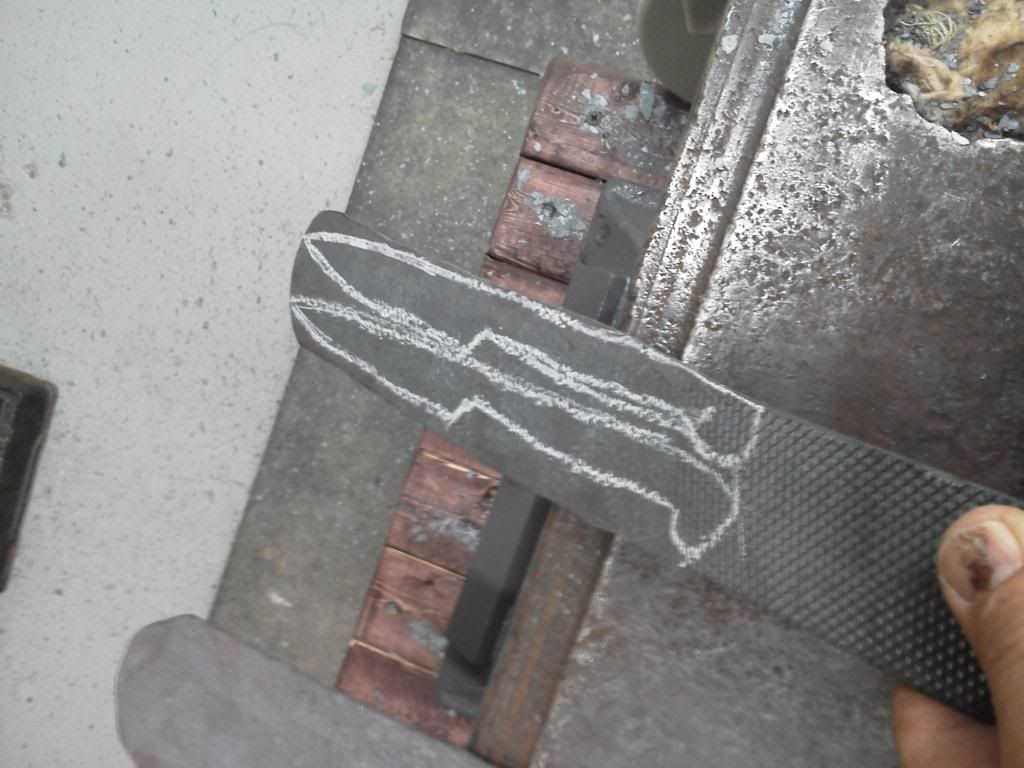
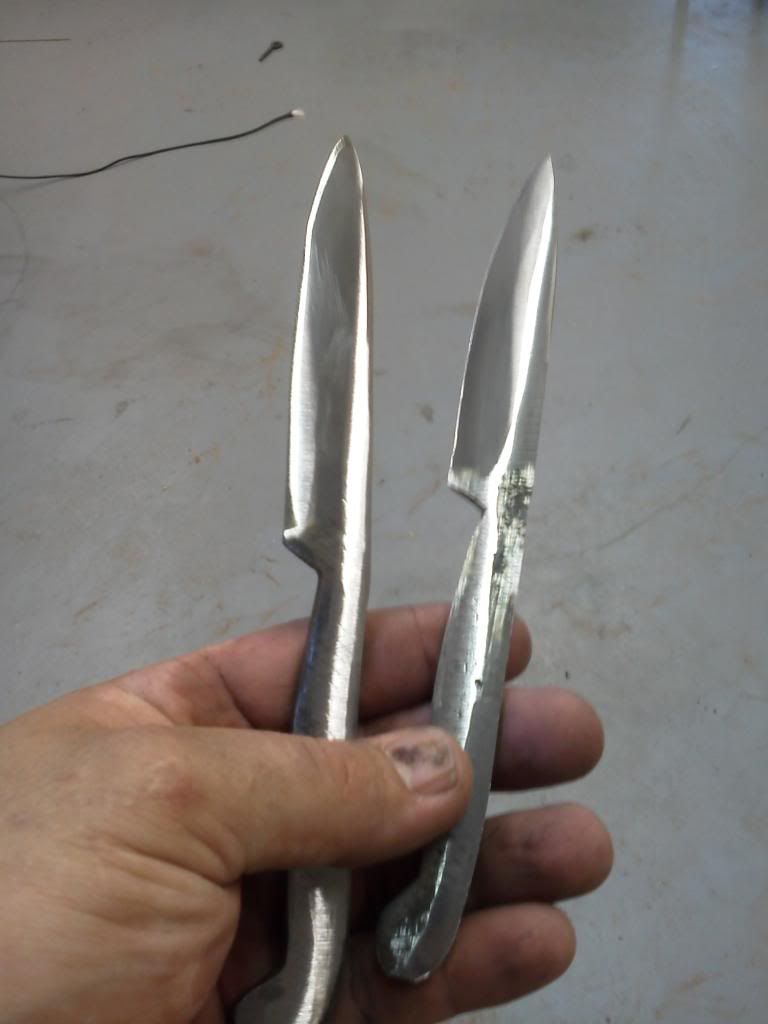
I have forged the rasp down really thin for the paring knive blanks


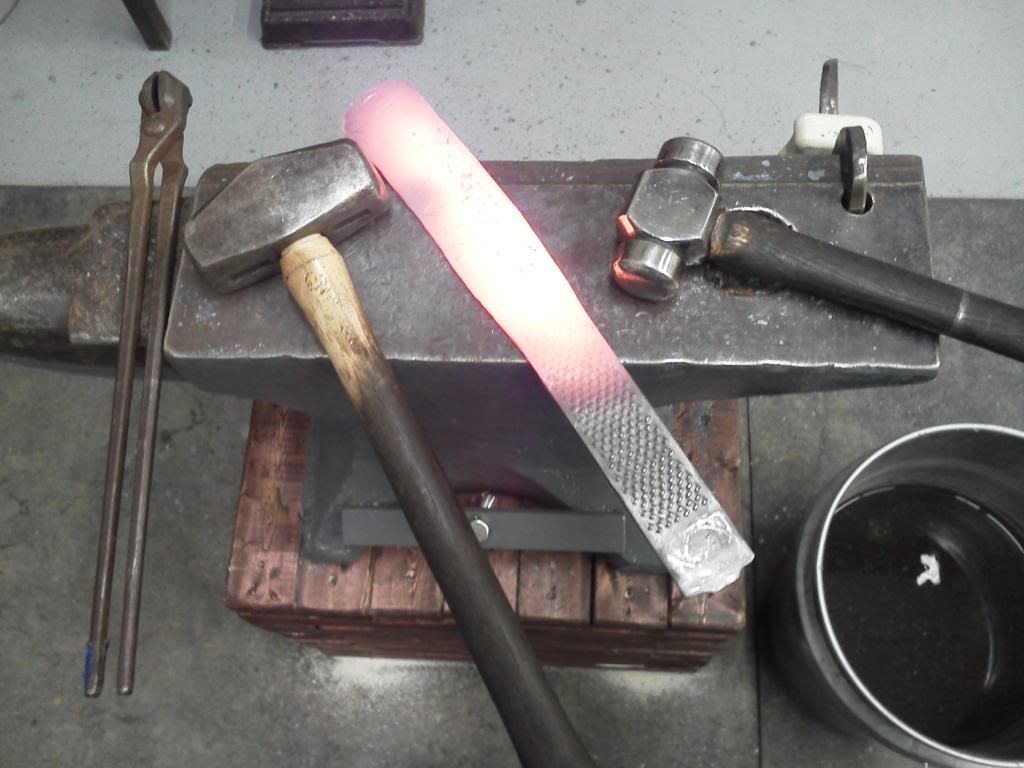
I use the 4lb sledge to flatten everything out. The 2lb is used afterwards to flaten the best I can.


I cant draw! HA! but this is my idea of what a paring knife looks like with a couple cool handle designs...


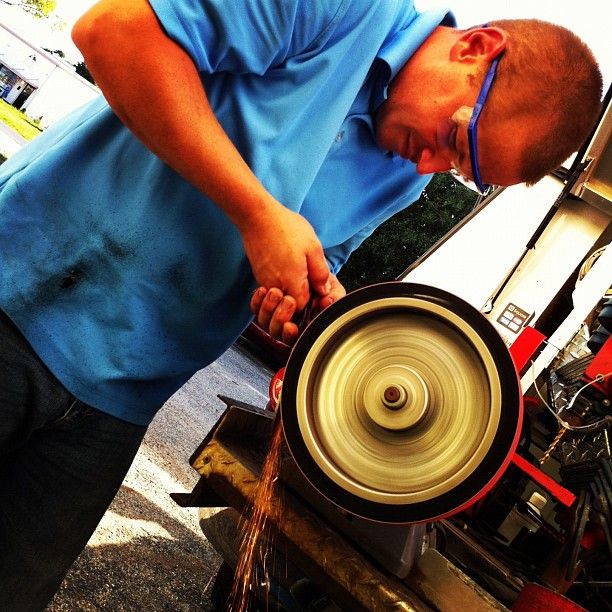
I used the 4.5 inch wheel and my baldor to get the blanks cut out


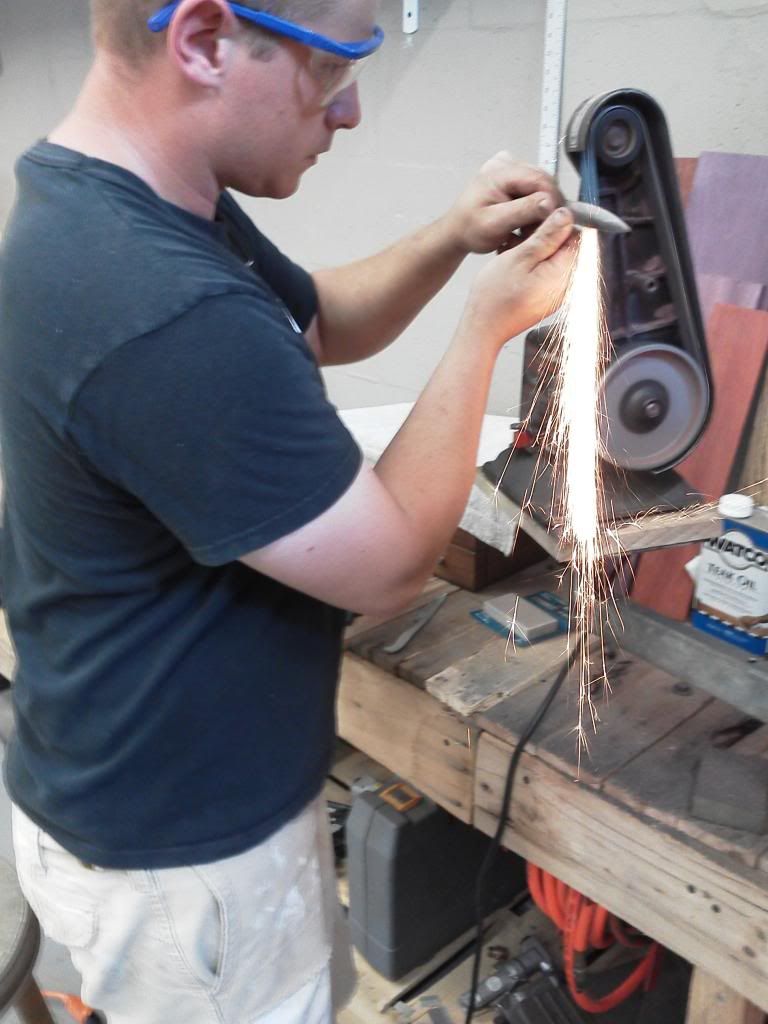
My buddy Jarod shot this pic...Im pretty camera shy so this is a rare moment! Cool Picture though...


So about the last step...

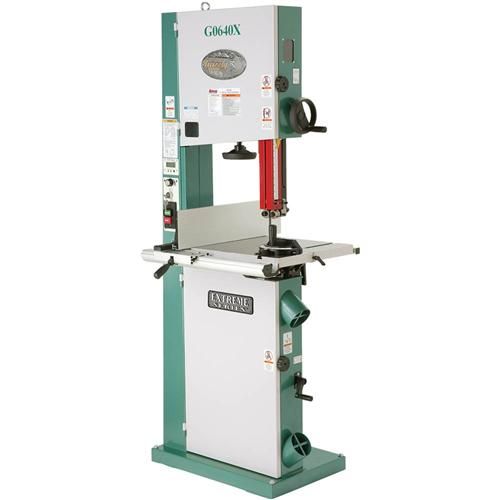
Im really excited to announce that my mentor and good friend has sold me his Variable Speed 17" Meatal Band Saw by Grizzly tools. Its a 131" blade, 3 phase machiene, and will cut out a ton of time and cost from the blank making process.

Ive been breaking an average of 2 cut off wheels and exhausting a $5 ceramic belt on my baldor per knife. So thats about $10 in cost and at least 30 minutes in labor... basicly the waste has cost more than the actual materials...

I honestly couldnt afford this machiene...its way above my hobby shops pay grade, but he made me a stupid deal on the price and is going to let me trade most of the cost out for covering his horses when he is out of town..Truth is, I already cover his horses when he is out of town so this is win win... Im really feeling like this knife making could be a profitable side business, and if Im going to continue to work at it I need to become more efficient..This saw and the larger grinder I hope to get soon will be the key components of that success...


Im going to pick it up next week and cant wait to get it into the shop and ready to work. Its also going to be needed for one of my future projects. My plan is to learn to make forged roses and in order to start that I need to be able to cut out alot of thin sheet metal blanks... So its going to get used way more than it ever did at his shop... He got it for his own knife business but decided way early on to have his blades milled...lame..;) Its basicly not been used for more than the occasional wood project since, and is essentialy brand new...

this is it! unbelievable its actually gonna be at the shop soon!


The Cutting Board:

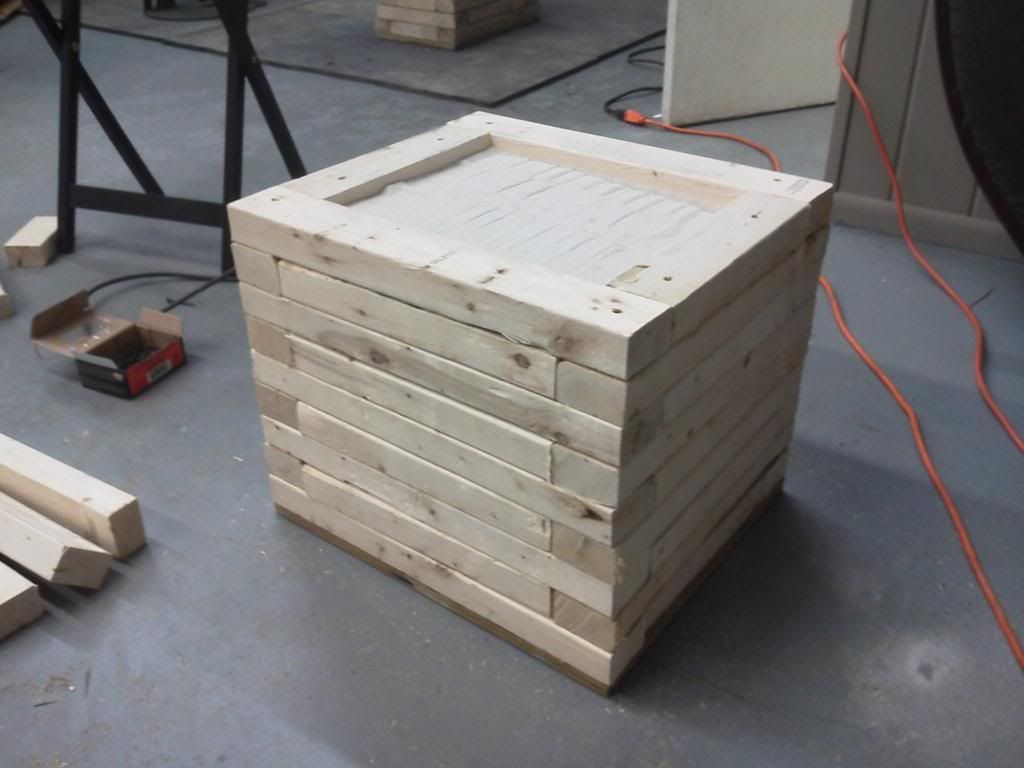
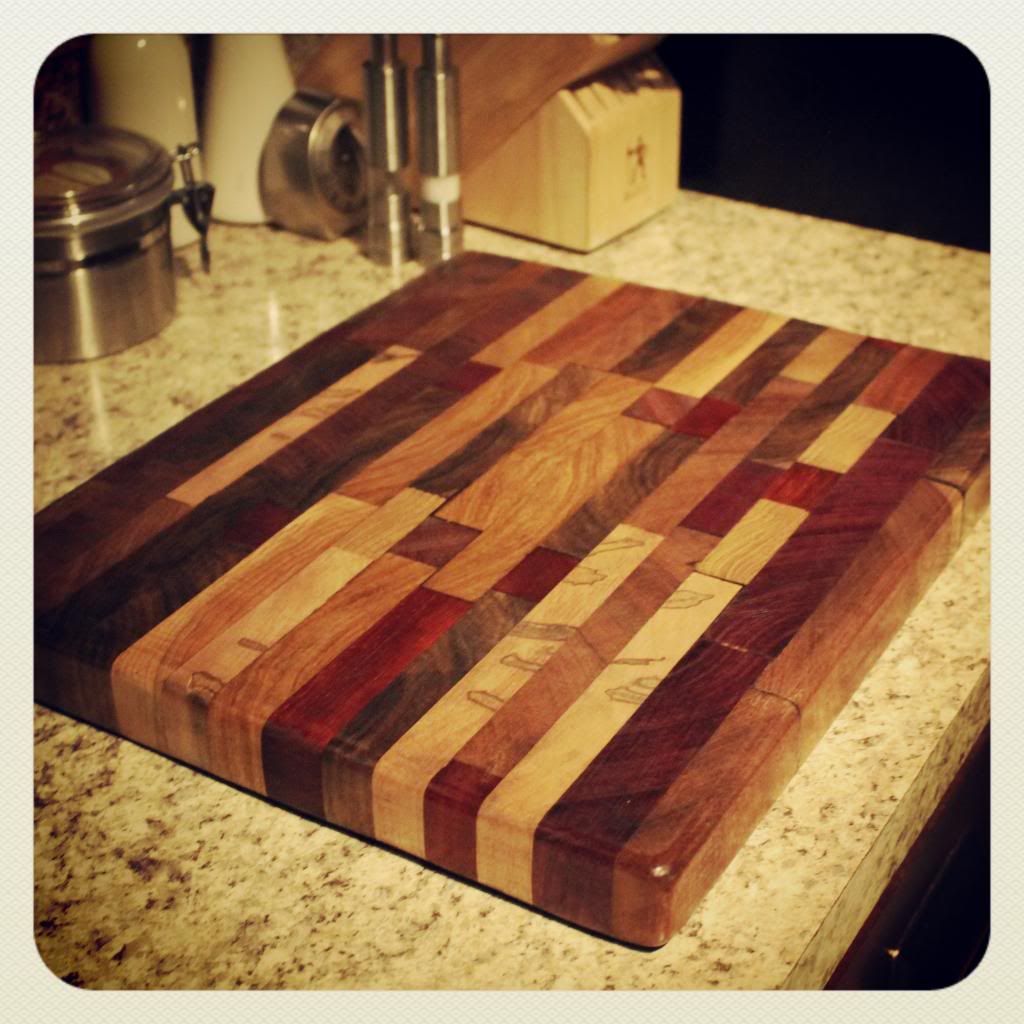
The other project Im working on is making a cutting board. My neighbor is a retired finish carpenter and he makes some amazing stuff. He had a scrap bin full of little 2'' and 3" sections of nice hardwoods. I asked if I could have them instead of him throwing them in the trash so I could make a cutting board..

I cut them all with the table saw and tried my best to get good stright sides... I got a tip from my neighbor ... in order to keep it from getting cut up I needed to use the top/end grain of the wood...

Glued them together after putting the "puzzle" in order...


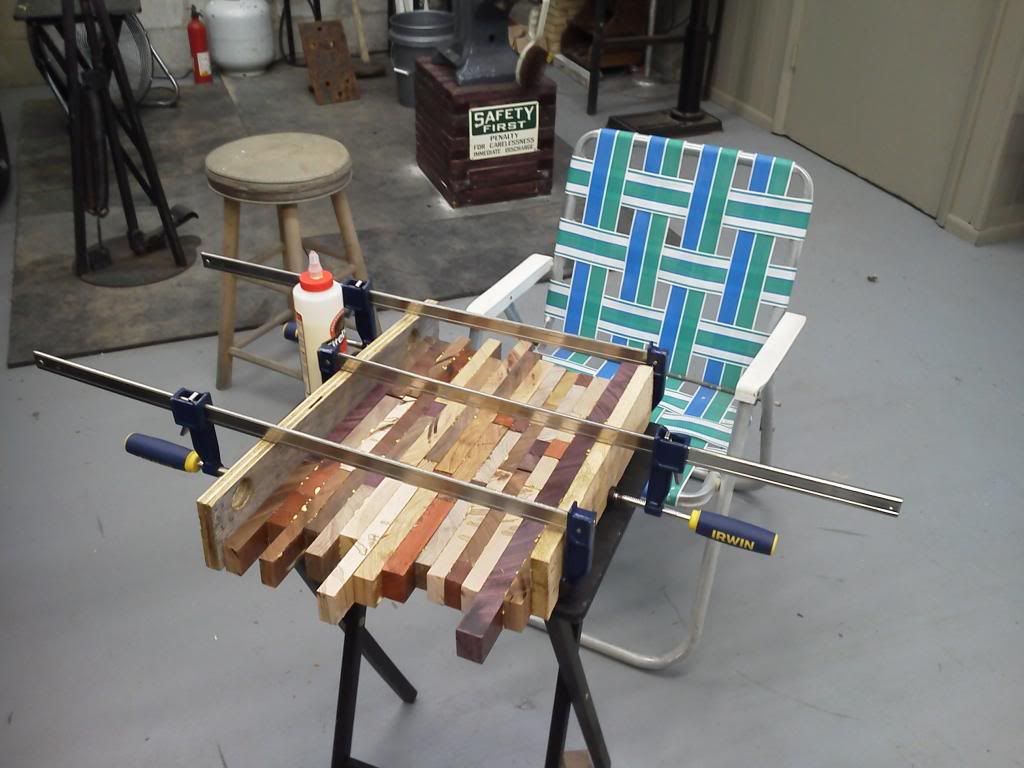
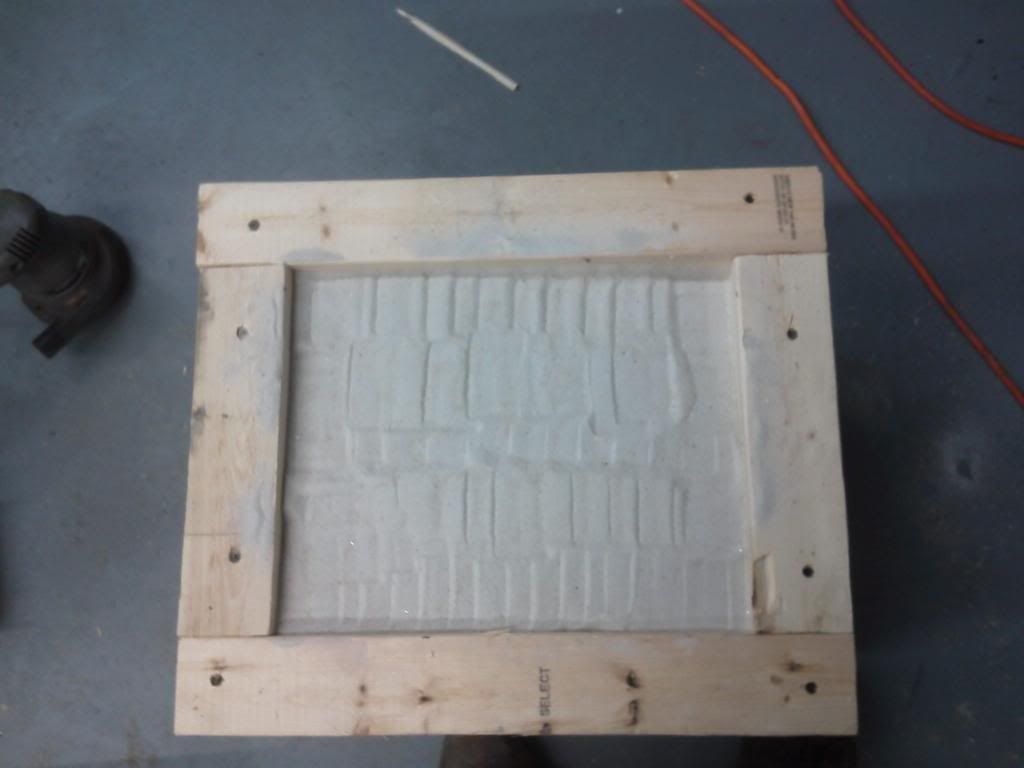
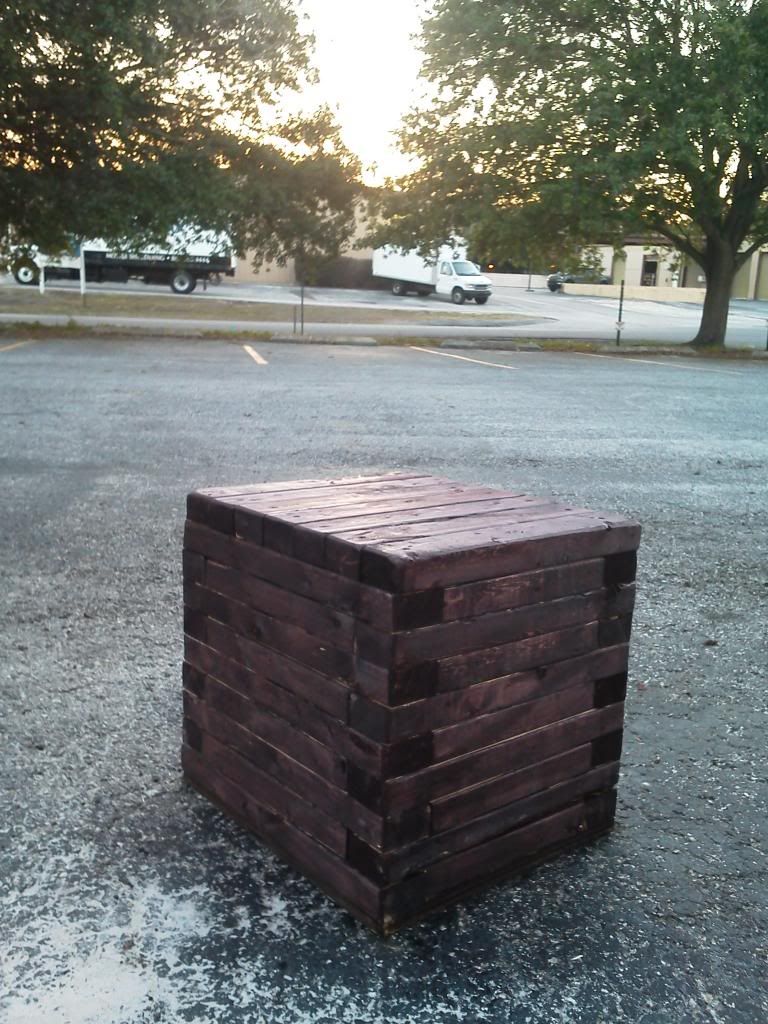
After it dried I cut the extras off and ended up here...


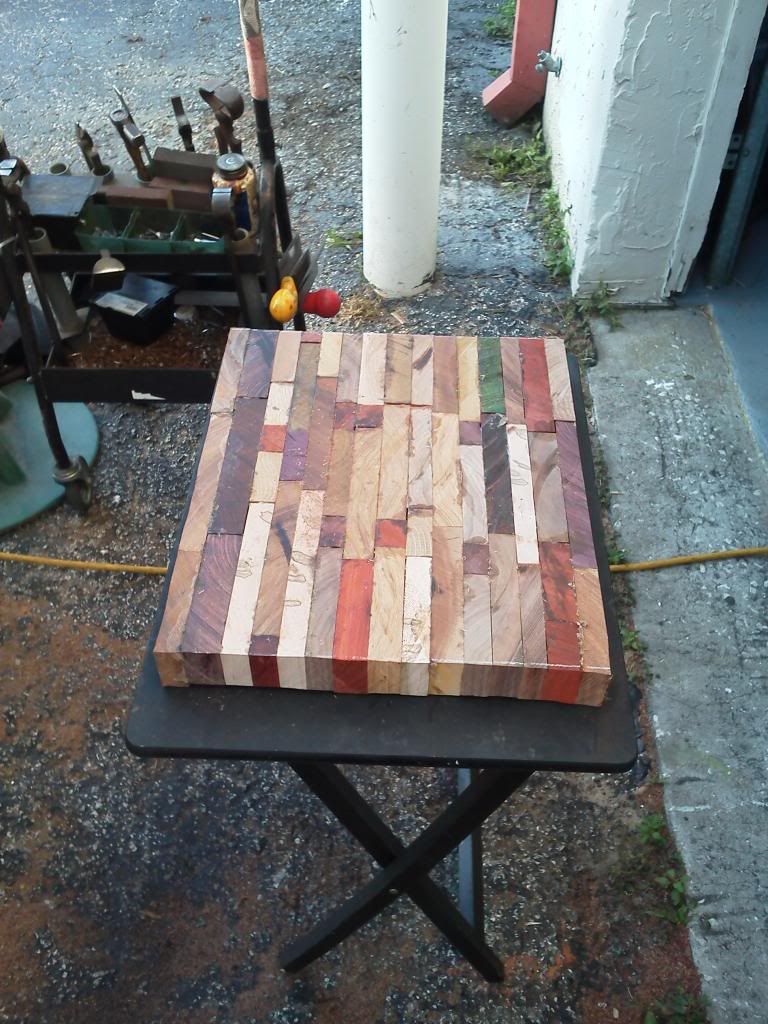
I still need to sand it..(A LOT!!!) to get the surface totally even. I also had a couple small gaps that will need to be filled as well...

If you missed the post on the specific cutting board debacle and recovery please check it out... the link is below:

Cutting board link...
http://www.garagejournal.com/forum/showthread.php?t=202160


Ok so back to the paring knives...

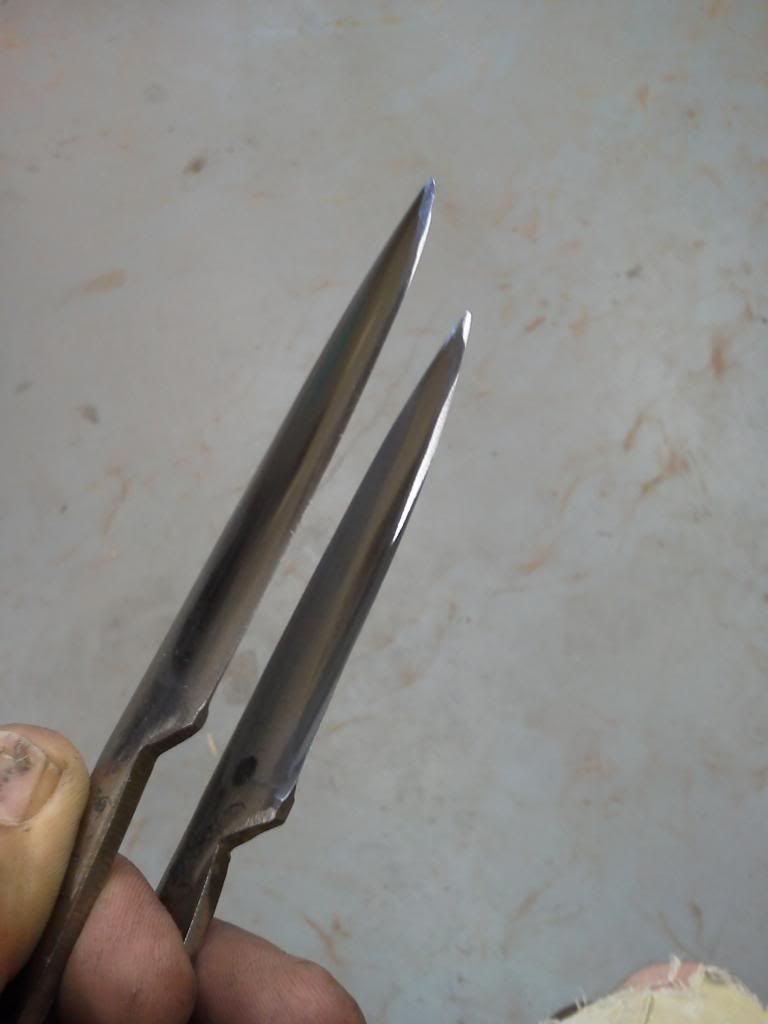
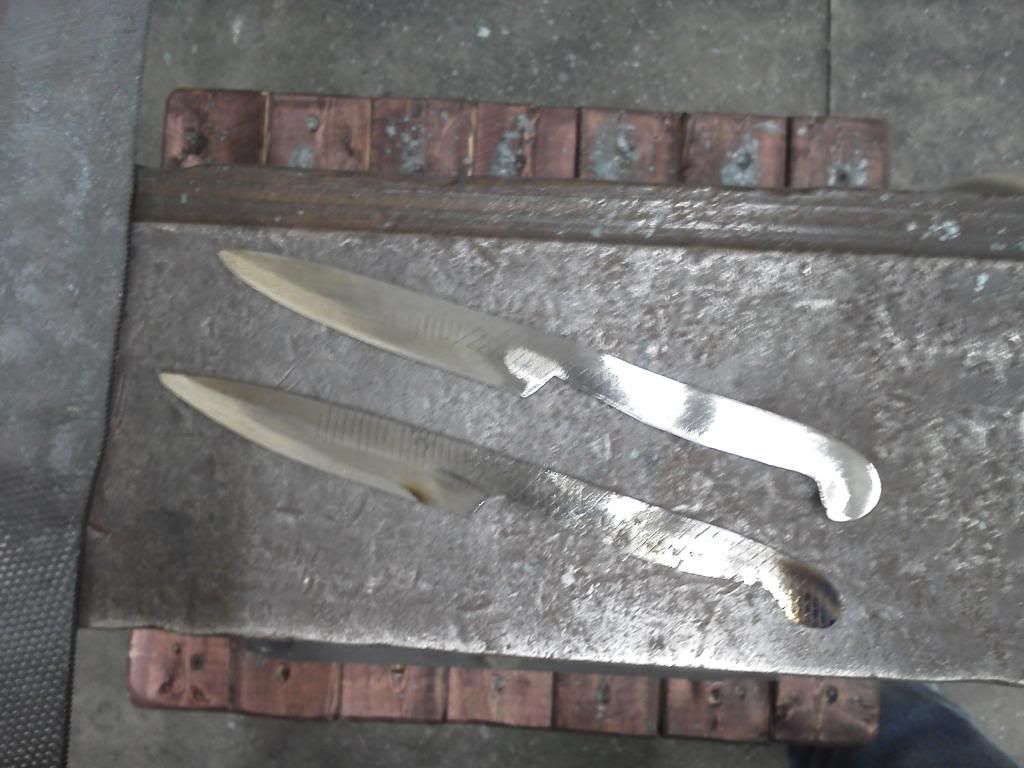
These are the cut and rough ground blanks


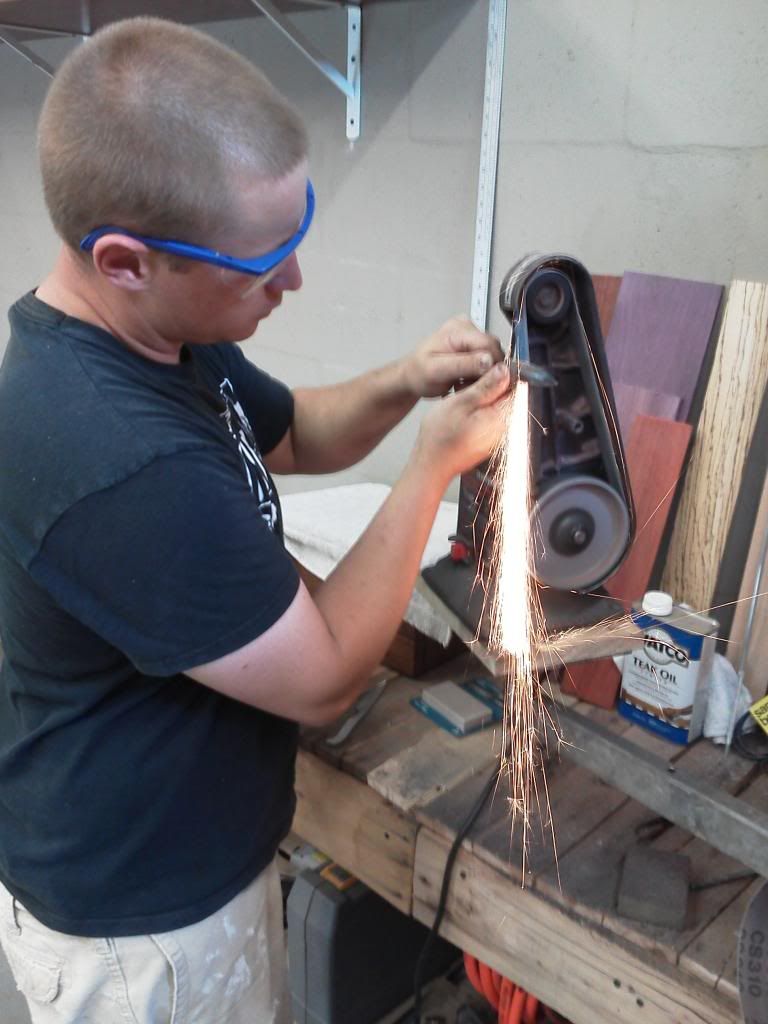
I use the belt sander and work my way from 80 grit up to 320grit...
Its a matter of being patient and observing the shape and flatness of the ground surface. Each pass needs to adapt to the imperfections of the last..


Here they are after completing the 120grit run...


back to it with 220


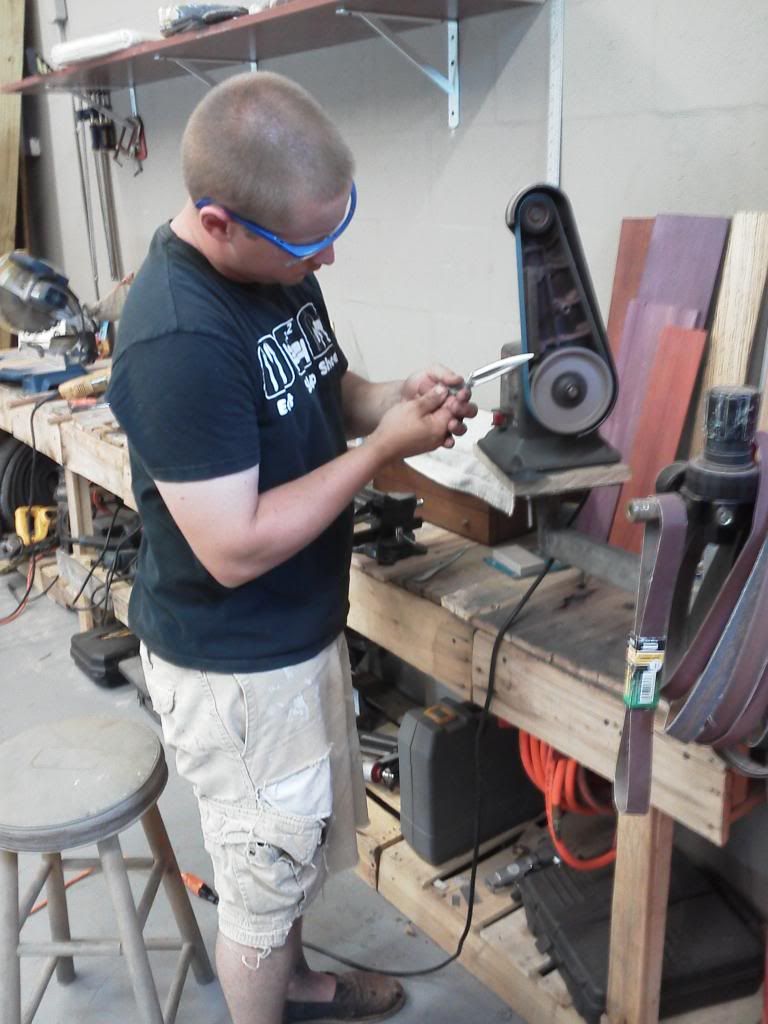
check for the "flow" and "taper" of the blades surface. Any shelfs or ridges will impead the fluidness of the cut so I pay attention to how the belt is actully hitting the blade and work from the thick top of the blade down to the cutting edge.


after the 220 run...


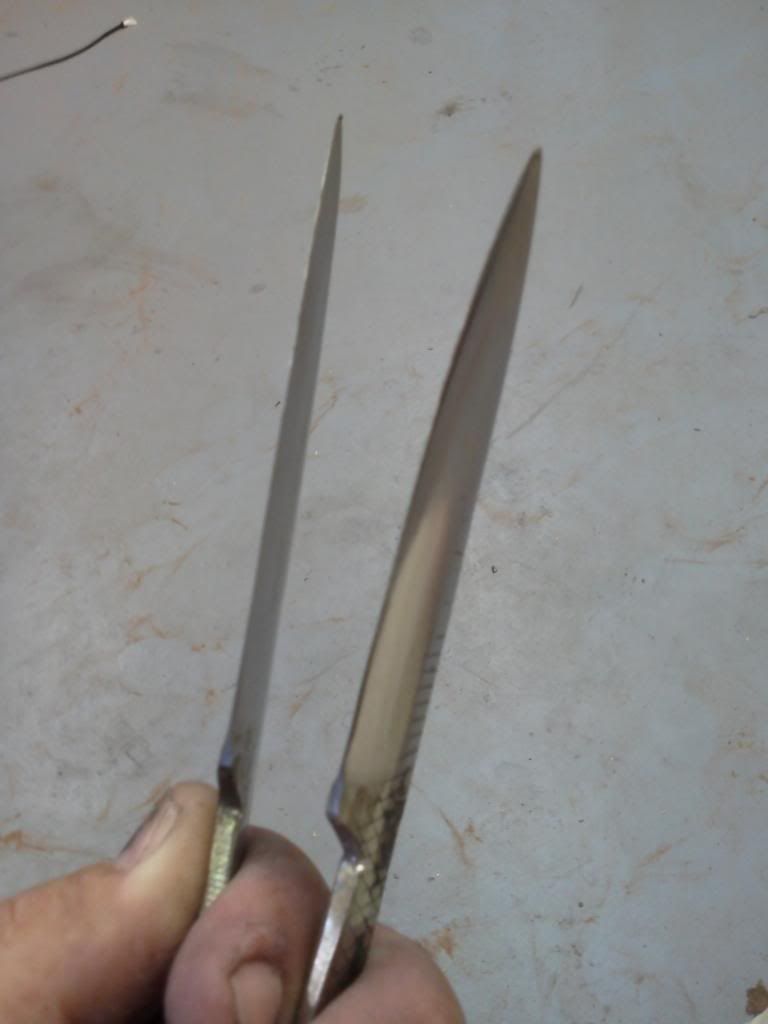
after the 320 run... the cutting edge is really getting fine
 
Last edited:
OP
D

DoghouseForge

Well-known member
Joined
May 11, 2013
Messages
374
Location
Lakeland, Fl
At this point I temper them. Ive found that its best to do it at this stage because instead of after the high grit polishing because removing the surface bluing can be rough on the finish.

So heating the forge with the bar stck shelves i placed inside as racks


The racks caused a problem...They didnt tansfer the heat equally and I didnt get a even temper...


So I decided to try to make a jig to solve this problem
I used two pieces of bar stock and some bailing wire to make a vice for the blanks to sit in. I could then insert the bar stock into the side pass and the blade floated in the middle of the forge box . becasue there was no contact on the blade it heated evenly...


Side note:
I am super excited about the information I learned about tempering and hardening today from my mentor. Basicly what I have been doing is fine as a generic attempt but its not good enough to consistantly produce these knives at a even quality level. The rasp are a blended high carbon steel which is why no one can tell me what specific type they are. Basicly air hardening and low temp tempering will do the trick but I need to chage how i do it.. I will make a post about this specificly later once I have all the details.. Generally though they need to be baked 2-3 times at 450deg after forging and hardening. This is good news because I can use my wifes oven!!!!!!!!!!!!!!!!!!!!!!!!!!!!!!!! yes!


Back to the knives:

So the final sanding and buffing was done and i cut out the handle blanks


epoxy, drill, rivit, sand, oil, etc.etc.etc.
and they turned out very nice. I couldnt be happier with this first run of the smaller knives...


Fillet style blade, thin paduke wood handle with aluminium pins. The idea for this knife was to be "sleek" and have crisp hard edges to it to match the blade...


Traditional paring knife blade. I went with a thick Bloodwood handle with a single copper pin. This thing feels great in your hand. Its beefy enough for guys like myself to use even though its a smaller knife. My hands dont like to bend and grab much once I stop working for the day, and my short fat fingers need some mass to hold on to.


The Mini Cleaver was an attempt to create a heavier chopping knife. Plus I really wanted to drill that big hole that cleavers have in the front tip of the blade. :lol:

Its the same process as before just with a differently shaped blank and the tang has been left fairly thick..

I went with the ZebraWood handle and 1/4"aluminium rod...I thought the beefy knife should have a beefy looking handle and pins... its unfortunatly not the best knife Ive made as far as finish. I wanted it to be a little courser and rough forged looking, but I fell into the cracks of not enough to be rough and to much to be clean... so it just looks weird to me...


So here are the last three completed knives..


So to date these are the four different designs from my Utility/kitchen knife set also including the cutting board...


The plan now is to streamline the process and get an online store built to sell the finished knives and cutting boards as custom orders.

Instead of trying to make a stack of each it will be easier for people to order the knife...select thier wood, pins, and blade stlyles, and then build them to order...The cutting boards are going to be partnerd with my neighbor untill I get the woodworking down though. :lol:

My photos are not quite up to par for the level I want for the store so Im am trading with a local photographer... a couple knives for a full shoot.... seems fair...She has total liberty with the only instruction to "just make them look really good" :thumbup:

Shes making what she is calling "food ****" with them... guess we will see just how **** the knives will be coupled with some nice foody photographs. ;)


So thats where im at currently with Dog House Forge... Once the band saw is up and running I hope to start learning to forge the roses and flowers. That should be a fun skill to learn and I will definatly keep the photo log of the process... The truning jig is still in the works as well but its on hold untill I can get a little more free time...


Also: I have an instagram account now...This is a big deal for me because I am really not into the facebook or other social sites...If you want to see more horseshoe builds and Farrier work please feel free to check it out. Its mostly snapshots from my work day and the horse hooves Im really happy with at the days end...

Instagram id:

@Doghouseforge

Thanks a bunch and if you have any questions or concerns please feel free to ask!

JP

have a lucky week!
 
Last edited:

Zeppe807

Well-known member
Joined
Dec 25, 2009
Messages
372
Location
Sonoma County, Ca.
Blade forging and sourcing the handle hole

The source hole needs to be dead center of stock and needs be widend through different madnrels/punches from thinest to thickest. This packs the metal as it is pushed away from center stock and should keep it from tearing.

I punched a center mark to begin the hole
easter2013063_zps7837e214.jpg


I used an old punch that was damaged beyond tuning and ground it into a "somewhat" round punch
easter2013067_zpsb61a2dee.jpg


Next I took and old tong rein and cut it to make the next size mandrel
easter2013070_zps5eddcade.jpg


This was an awesome moment!
easter2013069_zps8e797959.jpg


I stopped the hole sourcing temporarily so I could rough forge the blade. I didnt want to thin the handle hole area enough that a missed blow while forming the blade would ruin the project.

To forge the blade I heated to a good heat level and worked the hammer with HARD! overlapping blows from the center outward.
easter2013072_zps071cca2d.jpg

easter2013076_zps38d7fe0b.jpg


I used the side of the anvils face to help guide the clean top and bottom ridges.

With the blade roughly formed I cleaned up my center punch so it could be the final mandrel
easter2013074_zps339609c2.jpg


This was a scary moment. I realized at this point that 3" wasnt enough bumping and I probably needed close to 4". It worked and didnt tear but this was definatly my least successfull part of the project. Learn as you go....My mentor always said...among other things...."lifes a nasty teacher because she gives the quiz first and the lesson after" ... case in point.
easter2013079_zps00bae6b4.jpg


I cut the rear section down and put the whole piece in the forge. The next couple heats were to clean up the lines, forge out the "death Spike" ; ) , and set the blades defined starting points.

easter2013082_zps7b9b6fc1.jpg

easter2013088_zpsa5c8776c.jpg

easter2013089_zps7411b058.jpg


Roughly finished
easter2013091_zps44cf49c9.jpg


About 20 min with the files cleaned up the shape enough to call it a "tomahack" lol, NOw I just needed to do the final brush work,

easter2013090_zps5380fb0c.jpg


Heat , brush, cool, brush, repeat....
easter2013095_zpsc8418dfa.jpg

easter2013096_zpsd39dd72f.jpg

easter2013097_zps9d02b5e4.jpg


Thats the end of section #2

Ready to be sharpend, tuned, and handled


Gratuitous shop pic including the Jeep
easter2013027_zps274b0317.jpg


Thanks

JP

Cool Work! Nice Jeep!

Joe Zeppe :beer:
 

bluebolt

Well-known member
Joined
Dec 28, 2008
Messages
5,434
Location
Benton LA
Hey Doghouse nice work! I like your Jeep too and your cutting board.

Emerson Horseshoe supply is about 5 miles from me. About a year back I saw a flatbed truck going down the interstate with a load of their anvils going to the heat treat place in Texas.
 

bullnerd

Well-known member
Joined
Sep 17, 2012
Messages
5,690
Location
Jersey
Is that tall tripod vise/clamp homemade or?

Can you show some pics of it?

I can think of some other uses besides blacksmithing that could be used for.
 
OP
D

DoghouseForge

Well-known member
Joined
May 11, 2013
Messages
374
Location
Lakeland, Fl
Hey Doghouse nice work! I like your Jeep too and your cutting board.

Emerson Horseshoe supply is about 5 miles from me. About a year back I saw a flatbed truck going down the interstate with a load of their anvils going to the heat treat place in Texas.

That sounds like a beautiful dream I've had. Truckloads of anvils! as if I need more than two...

Thanks for the compliments and Im glad your enjoying it.

JP
 
To avoid these ads, REGISTER NOW!
OP
D

DoghouseForge

Well-known member
Joined
May 11, 2013
Messages
374
Location
Lakeland, Fl
Is that tall tripod vise/clamp homemade or?

Can you show some pics of it?

I can think of some other uses besides blacksmithing that could be used for.

The pedal vise is homemade.. Ive actully never seen one like it???
My Uncle built it for me when I first started my Farrier Business. I couldnt afford much so he built me a bunch of stuff to help me look ligit and save money. My first shoeing tool box, a forge houseing, and the stainless workbenches that used to be in my trailer...


As far as pics there should be a bunch in the write up about it just a few post back in the thread...Are the pictures not viewable?

Unfortunalty I dont have any assembly photos...It truly is a very simple design though nothing secret hinding out of sight. Tripod, base, push rod, pedal, springs, and your done. :thumbup:


let me know if you need more info or measurments and I will do what I can.


To everyone that posted about the "start up list" I thank you very much for the excitment and intrest you all have shown... Makes going through the process of laying everything out well worth it!

If anyone has any ideas for projects please let me know what you would like to see...I have the stuff from my head to work on but sometimes I get stuck on stuff...kinda like the knives;)

Thanks again!

JP
 

Guster

Well-known member
Joined
Mar 11, 2012
Messages
1,543
Location
Auckland, New Zealand
Thanks for initiating the inspiration again.

I’ve been meaning to build a small gas forge for years as the concept of a retail one is pretty rare. Was not aware of these farrier forges and definitely didn’t know they could reach welding or critical temp with propane alone. After reading this saw them used for other purposes too and even found a retailer though pricey considering high import duties.

I have since acquired some appropriate refractory tiles by chance and awaiting delivery of a roll of Kaowool and will be building one soon as budget allows for a sheet of steel plate and a good lpg regulator.

Why now…. I would like to bend some 30mm square bar into a 150mm dia. half circle in two concentric sections as a frame for a lathe radius turning tool. Can definitely use the thermal assistance.
 
OP
D

DoghouseForge

Well-known member
Joined
May 11, 2013
Messages
374
Location
Lakeland, Fl
Thanks for initiating the inspiration again.

I’ve been meaning to build a small gas forge for years as the concept of a retail one is pretty rare. Was not aware of these farrier forges and definitely didn’t know they could reach welding or critical temp with propane alone. After reading this saw them used for other purposes too and even found a retailer though pricey considering high import duties.

I have since acquired some appropriate refractory tiles by chance and awaiting delivery of a roll of Kaowool and will be building one soon as budget allows for a sheet of steel plate and a good lpg regulator.

Why now…. I would like to bend some 30mm square bar into a 150mm dia. half circle in two concentric sections as a frame for a lathe radius turning tool. Can definitely use the thermal assistance.


well, now you've done it...Let me look in the photo files and see if I can find the pictures of the forge I built a couple years ago. Cost wise it was about half of the retail ones...only problem was I made it to big and it was stupid wastefull on fuel and heat...

If I find them Ill throw them up here for you to grab ideas from.

JP
 
OP
D

DoghouseForge

Well-known member
Joined
May 11, 2013
Messages
374
Location
Lakeland, Fl
Home Made Forge


This was my first and only attemp a building a forge.

My Uncle built the shell for me out of 18ga steel. I know that probably seems thin for a forge but with the quality of the insulation and fire brick you dont need it much thicker than that.

This was a sucess and I think it would work well in someones shop but at the time all I had was my work trailer and the constant jarring killed this thing in no time flat. However, as a shop forge it would have worked pretty well. My only critique is that my uncle built it twice as tall as my drawing called for....I never really asked him..he did it for free and has helped me more than I can remember so I just took it in stride and worked with it..


The Dog House;) Forge ..forge..


The door was attached by plug welding the hinges.


The handle is cut out of an old rasp (lol, guess I used them alot) and the box itself mesured 12'' X 14'' . It was supposed to be 9"x14"... The extra height was the killer in the end.


Inside used 1" ceramic insulation boarding (double walled) ...so 2 layers for a total of 2" thick. Since any hardware you use to fasten it to the shell will just burn up and away you have to get creative with how you place it. I used the side boards to hold in the rear section under pressure and the ceramic brick to put pressure on the sides. The bricks themselves are heavy enough to stay down s there is no need to secure done but i di make a retaining plate to weld across the front after all the peices of the puxzzle were in place.
The boarding and refractory brick can be purchased from "superior brick and refractory supply of Tampa"...


the retaining plate is along the bottom edge...


The pass through was cut out and used a 1/4 inch plate inset...this was not thick enough and I recommend using cast iron if possible,..


The holes for the venturies were cut out ann I used a series of different plumbing pipe to assemble the venturies. I modled them after the frge i was using at the time, and I have know idea how to measure and asses for lenght and width.. the base of the venturies was welded onto the top of the housing.. (be sure and grind off the zinc if you use galvanized pipe)


Mounted it to a swing arm


worked really nice.. held heat decent, and got shoes hot, was was to inefficent to reach welding temp...If I had a third venture it probably would have been sufficent but teo was just not enough...


So I hope that gives you some ideas for your own build... Just make sure you get the correctly rated cearmic board and bricks..The entire thing cost about $200 to build if you count the steel cost. Most of that is in the Boards, 2 4'x4'x1'' sheets was about $140 and the bricks were $5 a piece.

Ths does not inclue the cost of the regulator and hoses. Plus, I robbed an old forge for the injectors so they would have to be assembled as well.

I would guess that it would cost about $350 to build and alot of time, travel/shipping, and you have to work with protective everything when ou are cuting the boarding...If my opiniion counts on this I would tell you to save up an extra wee/month and but a professionaly made one. Its just to specific of a tool to estimate on and hope its all balanced to run and not just explode. :thumbup:


Thanks

JP
 
Last edited:

Guster

Well-known member
Joined
Mar 11, 2012
Messages
1,543
Location
Auckland, New Zealand
Thanks for the extra info.

Works out to be less than 20% of retail cost of a very basic unit to build me one similar to what you have. I was originally planning to use an old helium tank with castable refractory but I like this design. Only came to be when I happened on the tiles and found an affordable source for kaowool as all the rest is within my means.

I am planning to replicate the internal size of the ones shown(momma or lowboy) adjusting dimensions slightly for best fit of the tiles I acquired(might end up a tad smaller even). Hope to make it so either the base or the lid can be removed to pack the refractory components. Framing the openings with ports made from angle section except around the door where a protruding lip(flat-bar edge) gives an edge to seal on. How does the Kaowool last when used on the door like that? Thought I might capture some tiles in the door similar to your homebuilt and put some glass rope(furnace door seal material) around the door to seal on instead.

I have also made a few burners in the past and the only undecided factor is going with 2 or 3 burners. I’m not doing anything fancy now so reheat time is not so critical though I have made knives in the past(lawnmower blades and trailer leaf spring material) and can see myself looking for an anvil when the itch sets in again. Cost to build the extra burner is not much I guess.
 
OP
D

DoghouseForge

Well-known member
Joined
May 11, 2013
Messages
374
Location
Lakeland, Fl
Thanks for the extra info.

Works out to be less than 20% of retail cost of a very basic unit to build me one similar to what you have. I was originally planning to use an old helium tank with castable refractory but I like this design. Only came to be when I happened on the tiles and found an affordable source for kaowool as all the rest is within my means.

I am planning to replicate the internal size of the ones shown(momma or lowboy) adjusting dimensions slightly for best fit of the tiles I acquired(might end up a tad smaller even). Hope to make it so either the base or the lid can be removed to pack the refractory components. Framing the openings with ports made from angle section except around the door where a protruding lip(flat-bar edge) gives an edge to seal on. How does the Kaowool last when used on the door like that? Thought I might capture some tiles in the door similar to your homebuilt and put some glass rope(furnace door seal material) around the door to seal on instead.

I have also made a few burners in the past and the only undecided factor is going with 2 or 3 burners. I’m not doing anything fancy now so reheat time is not so critical though I have made knives in the past(lawnmower blades and trailer leaf spring material) and can see myself looking for an anvil when the itch sets in again. Cost to build the extra burner is not much I guess.

Some how I missed your response!

So Sorry to leave you hanging!

The kaowool is actually what comes in the doors of the N.C and Forgemaster forges.. I was just trying to limit my material cost so I used the board in the door as well.

It works fine with the board but the drawback is you have to weld in the brackets to retain it...since they are actually covered mostly by the steel wall it takes a lot longer to burn them up than you would expect... The kaowool or similar is easier for the door because you can either tack weld in some brads or punch them through the door to act as snaggs... By that I mean the stringy kaowool batting will work into it and stay there without any needed retaining brackets. Since the kaowool product is almost comletly reflective your brads will never burn up...

Only catch is most places have a minimum order so if you do bricks, board, and batting its pretty costly..definitly still cheaper than ordering one...

If your going to build your injectors and venturies then I would definitly build three... As captain Call says "better to have this and not need it than to need it and not have it"... A good solution is to place a second valve between the 2nd and 3rd venturies. When its closed the third tube will not get fuel and in turn smaller projects can be less wastefull , and if you want to get it HOT! you can open the valve and off you go...

Again im sorry I missed your question and I will be happy to give you any other information I can about the process...Definatly build it smaller than mine.. the width was perfect but the extra height was to much for the 2 burners to overcome in order to reach welding temp... In my opinion you need! to be able to forge weld so building it right the first time is crutial..


Thanks

JP
 
OP
D

DoghouseForge

Well-known member
Joined
May 11, 2013
Messages
374
Location
Lakeland, Fl
Look what came today! AHHHHH!!!! so freaking cool!

Now ... I have no idea what i can do with this thing... :D

I suppose a thorough exam and figur'n session is in order...today i just unloaded it and went back to work...:(

Any tips for set up and blade brands? i need a good multipurpose steel blade for sure.. Its variable speed so Im sure that effects the blade style...

Thanks,

Any info is appreciated

JP


Guster

Well-known member
Joined
Mar 11, 2012
Messages
1,543
Location
Auckland, New Zealand
No rush on the wisdom. :O) I just picked up the refractory tiles last week. Still in the back of my car. The guy I got them from had made his own shoeing forge from an old 12kg LPG tank lined with kaowool. It had a commercial burner assembly that he did not know the origins of. My regulator arrived and still waiting on the kaowool. After that I have my eye on some 3mm steel sheet for the box.

Nice bandsaw.
http://www.grizzly.com/products/Vertical-Wood-Metal-Bandsaw/G0621X the manual on that site should have some setup and tuning info.
I’d suggest a quality 12-14tpi variable pitch bi-metal blade for it when cutting steel and turn the speed right down. I use Starret blades but only because it is all we get over here.
 
OP
D

DoghouseForge

Well-known member
Joined
May 11, 2013
Messages
374
Location
Lakeland, Fl
Thanks.. I just downloaded the manual!

Any guys reading this have brand preference for the type of blade guster listed?

Another question is how long can I realistically expect one of these blades to last....
I'm gonna go read the most recent band saw thread again in the meantime ...

Thanks

JP


Edit- looks like grizzly and Lennox both make multipurpose /multimetal blades for the 108 1/8" machine ... grizzly is a little more expensive but I recognize the Lennox name.... thoughts?
 
Last edited:
OP
D

DoghouseForge

Well-known member
Joined
May 11, 2013
Messages
374
Location
Lakeland, Fl
No rush on the wisdom. :O) I just picked up the refractory tiles last week. Still in the back of my car. The guy I got them from had made his own shoeing forge from an old 12kg LPG tank lined with kaowool. It had a commercial burner assembly that he did not know the origins of. My regulator arrived and still waiting on the kaowool. After that I have my eye on some 3mm steel sheet for the box.

Nice bandsaw.
http://www.grizzly.com/products/Vertical-Wood-Metal-Bandsaw/G0621X the manual on that site should have some setup and tuning info.
I’d suggest a quality 12-14tpi variable pitch bi-metal blade for it when cutting steel and turn the speed right down. I use Starret blades but only because it is all we get over here.

Not sure if you found this section....shipping forges is expensive but these parts should be manageable and take alot of the guess work out of the fuel delivery system ... I couldn't find it listed on their site but I know for sure you can call them and order replacement venturies and fuel injector rails.. makes it possible to uses the push button starter ...

Essentially you could run their tried and tested injection system on your housing. As long as your internal box size is close to theirs you get good results.

HERES THE LINKs:
Miscellaneous parts - http://www.shop.nctoolco.com/category.sc?categoryId=118
Fire brick and hearths - http://www.shop.nctoolco.com/category.sc?categoryId=280
Replacement (batting/loose spun/kaowool) type door inserts - http://www.shop.nctoolco.com/category.sc?categoryId=279
JP
 
Last edited:

54FordPanel

Well-known member
Joined
Aug 7, 2009
Messages
5,711
Location
Fort 54, Littleton, Co
Look what came today! AHHHHH!!!! so freaking cool!

Now ... I have no idea what i can do with this thing... :D

I suppose a thorough exam and figur'n session is in order...today i just unloaded it and went back to work...:(

Any tips for set up and blade brands? i need a good multipurpose steel blade for sure.. Its variable speed so Im sure that effects the blade style...

Thanks,

Any info is appreciated

JP


You **** you *******
 

54FordPanel

Well-known member
Joined
Aug 7, 2009
Messages
5,711
Location
Fort 54, Littleton, Co
Despite your negativity I'm still willing to make the following statement.

"Your welcome to drive over and use it or any other tools in the shop anytime you want. Ill even make you a key"

Lol

;)

JP

That'd be good. I should pop in from time to time and make sure you haven't locked yourself into your Cherokee somehow, and you're just waiting for somebody to show up and let you out. I've heard that happens to some people.
 

Guster

Well-known member
Joined
Mar 11, 2012
Messages
1,543
Location
Auckland, New Zealand
From recollection Lenox has come up as a good brand for band-saw blades. Might be worth considering and keeping an eye out for a blade welder which is considerably more useful for metal work as it allows you to remove material that would otherwise require milling or drilling and lots of filing in some instances. In that case you can buy blade stock on the roll and make up your own blades. Hence why machines like DoALL is so sought after as it has a blade welder built in. The fence on that machine is also more for woodwork than metalwork. Not that it cannot be used to guide long cuts though I find it mostly gets in the way. A sturdier mitre guide tends to be a lot more useful in general metal work.

I am leaning towards including the third burner into the design as "it’s better to have it and not use it than need it and not have it".

I’ll investigate further on burners seeing as I’ve found some suppliers for products like Kaowool that I did not know existed before recently. However I’m not too concerned about burner design as there are some very well performing and well documented designs online and I have built various burners in the past. That was even before I had a lathe, milling machines and a TIG welder. Never mind all the other machinery.
 
Last edited:
OP
D

DoghouseForge

Well-known member
Joined
May 11, 2013
Messages
374
Location
Lakeland, Fl
That'd be good. I should pop in from time to time and make sure you haven't locked yourself into your Cherokee somehow, and you're just waiting for somebody to show up and let you out. I've heard that happens to some people.

Grumble grumble... yah, it happens .... ;)

JP
 

Flathead Johnny

Well-known member
Joined
Nov 27, 2011
Messages
185
Location
MA
hey guys this is pasted from a jalopy journal thread I started, its was suggested to post over here.

http://www.jalopyjournal.com/forum/showthread.php?t=810045

I went to a yard sale today put on by an old timer who was doing a final yard sale before he closed on his home he was selling. I didn't see anything worth while but decided to see if he had any vises. He said he had a vise on his bench and if I liked it I could have it for $5. He said to walk into the back yard where I would find his garage.

I really didnt have high hopes for the vise but it turned out to be a 50s 4 inch craftsman, the end of one of the jaws had cracked off and it needs a retaining clip on the screw so when you back it off the jaw follows it but it was well worth the $5.

Anyways I nearly tripped over an anvil with no horn when I backed away from the work bench with the vise in hand. I've been looking for a anvil and did want one with a horn but decided to ask if he was willing to sell it. I asked and he said yes he would sell it, told me he had no need for it, needed it gone and if I could pick it up and haul it away I could have it for $5, he also included a really nice body dolly with the $5 anvil and two vise grips for a $1 each...... Yup, you could be stupid and realize it was the deal of the century.

Now I know little about anvils, The corner has been damaged and I looked to see if the horn had been knocked off. Nope it never had a horn, I dont have a head on picture but trust me it never had one, which I find strange. I see no maker marks and the guy said it was really really old.

I'm completely guessing and I do know my own strength, I'm ******* this anvil at 125+ lbs

Any info on the anvil would be helpful, have you seen old anvils without horns before?
 

Attachments

  • anvil 1 .jpg
    anvil 1 .jpg
    145.3 KB · Views: 47
  • anvil 2 .jpg
    anvil 2 .jpg
    145.7 KB · Views: 45
To avoid these ads, REGISTER NOW!
Top Bottom